Configuring LexisNexis
LexisNexis Fenergo SaaS Settings
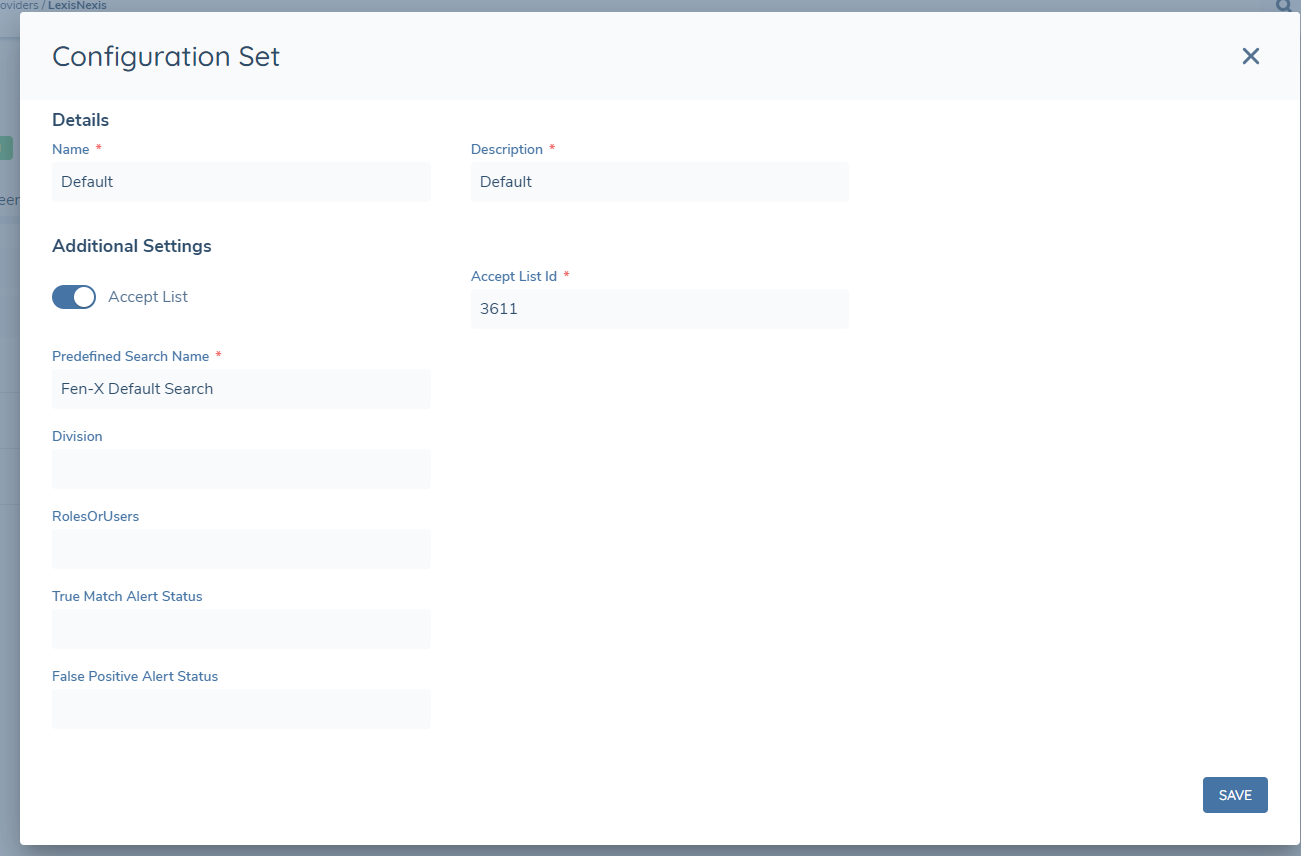
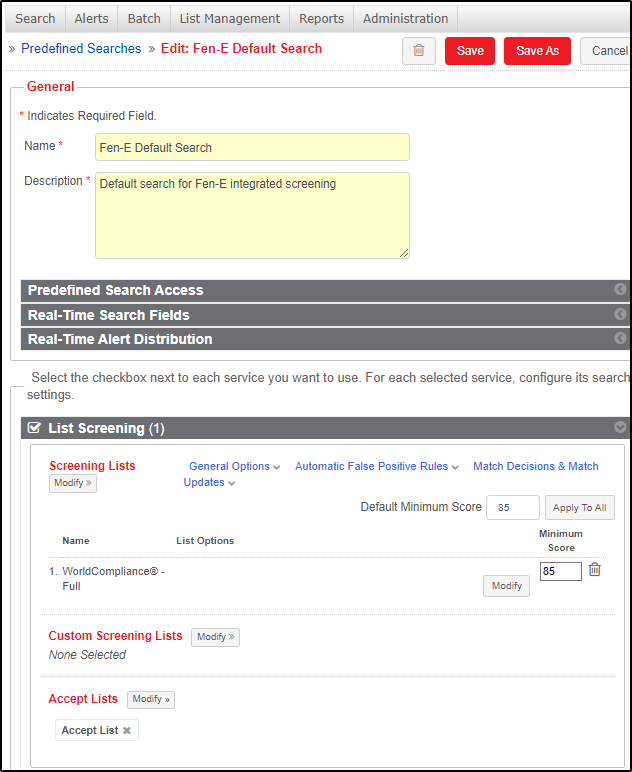
The following settings can be configured for LexisNexis:
- Accept List: Enable/disable the adding of resolved results to a pre-defined Accept List in LexisNexis.
- Accept List ID: Where Accept List is enabled, the LexisNexis List ID of the Accept List that results should be added to the Configured Set required. The Accept List ID must be provided by LexisNexis. Note that when setting up an Accept List for the first time, it must have at least one record added to it before it can be subsequently added to a Predefined Search.
- Predefined Search (PDS): The LexisNexis PDS that should be used for screening searches. This is used to call the appropriate configuration from LexisNexis.
For further information on any of the specific settings mentioned above, please consult your LexisNexis documentation or contact your LexisNexis administrator.
LexisNexis Vessel Screening
To enable vessel screening using LexisNexis in Fenergo SaaS, the following field configuration must be applied for Company entities.
Subtype
- The "Subtype" field is used to identify vessels as a distinct entity type.
- Ensure the Datakey is an exact match with "subtype".
- Set the value to "vessel".
- This field should be configured in the Basic Details section for Company (and/or Other) entity types.
- When Subtype is set to "vessel", the IMO Number field will be displayed automatically.
UniqueId (IMO Number)
- The "UniqueId" field is intended to capture the vessel's IMO Number.
- Ensure the Datakey is exactly "uniqueId". (Refer to the Secondary Identifiers section for further context.)
- Place this field in the Basic Details section for Company (and/or Other) entity types.
- If the IMO Number is populated, it will be included in the Search Criteria during screening.
- In the Screening Results, the IMO Number appears as the "Unique ID".
- Hits from LexisNexis vessel screening are displayed in the same format as other Company entity hits.
LexisNexis Configurable fields via API
The Screening API allows configuration of specific fields, similar to the PDS, within Screening Configuration. These configurable fields are as follows:
- Division
- RolesOrUsers
- True Match Alert Status
- False Positive Alert Status
If no custom values are configured, the system will default to the following values:
- Division: Default Division
- RolesOrUsers: Administrator
- True Match Alert Status: True Match
- False Positive Alert Status: False Positive
To incorporate these fields into the configuration sets, users should utilize the following API endpoint to update the settings schema:
PUT /screeningcommand/api/v2/configuration/provider/{providerId}/settings-schema HTTP/1.1
With the following request body:
{
  "data": {
    "additionalSettingsSchema": [
        {
            "fieldId": "AcceptListActive",
            "name": "Accept List",
            "type": "Toggle",
            "enabledBy": "",
            "mandatory": false
        },
        {
            "fieldId": "AcceptListId",
            "name": "Accept List Id",
            "type": "TextInput",
            "enabledBy": "AcceptListActive",
            "mandatory": true
        },
        {
            "fieldId": "PredefinedSearchName",
            "name": "Predefined Search Name",
            "type": "TextInput",
            "enabledBy": "",
            "mandatory": true
        },
        {
            "fieldId": "Division",
            "name": "Division",
            "type": "TextInput",
            "enabledBy": "",
            "mandatory": false
        },
        {
            "fieldId": "RolesOrUsers",
            "name": "RolesOrUsers",
            "type": "TextInput",
            "enabledBy": "",
            "mandatory": false
        },
        {
            "fieldId": "TrueMatchAlertStatus",
            "name": "True Match Alert Status",
            "type": "TextInput",
            "enabledBy": "",
            "mandatory": false
        },
        {
            "fieldId": "FalsePositiveAlertStatus",
            "name": "False Positive Alert Status",
            "type": "TextInput",
            "enabledBy": "",
            "mandatory": false
        }
    ]
  }
}
After applying the configuration, the new fields will be visible in the configuration set.
LexisNexis Configuration Pre-Requisites
In instances where specific fields have not been configured, as detailed in the preceding section, there are a number of settings that must be configured in a pre-defined manner in LexisNexis for the integration to work as expected. Most of these should already be in place with a baseline LexisNexis configuration.
Please ensure that the following configuration has been properly set up in LexisNexis before proceeding with the configuration in Fenergo SaaS.
-
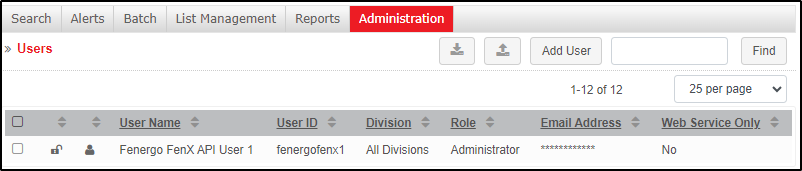
A Role called Administrator must exist in the Roles configuration.

-
A Division called Default division must exist in the Division configuration.

-
The LexisNexis UserID that is being used must have the Administrator role and the Default division assigned to it.
-
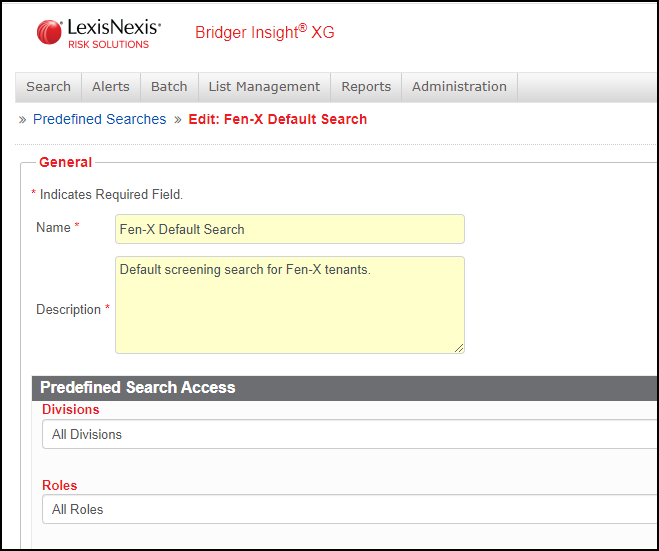
The Predefined Search being used must have the Administrator role and the Default division assigned to it.
-
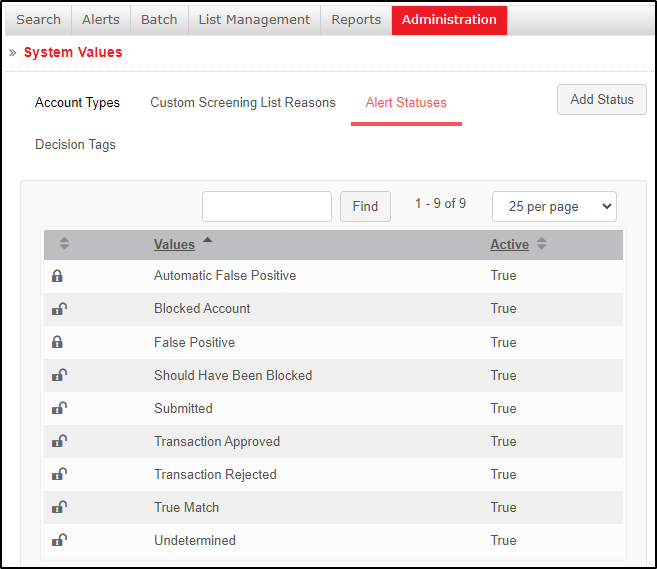
Alert Statuses called True Match and False Positive must exist in the Alert Status configuration.
-
If an Accept List is being used, this must be created in the List Management configuration and must be added to the Predefined Search being used. The Accept List ID will have to be provided by your LexisNexis Administrator.
LexisNexis Address Types
For screening purposes, all addresses must be captured in the Addresses Data Group.
Individual Entities
- Residential and Business address types are supported for Individual entities in LexisNexis screening.
- Up to two addresses can be included in a single screening request.
- The two addresses may be any combination of Residential and/or Business (e.g., Residential + Business, Business + Business, or Residential + Residential).
If multiple addresses are captured:
- If both address types are sent (e.g. two Residential and two Business), the system will send one Residential and one Business address.
- If only one address type is captured (e.g., three Residential or three Business), the system will send the first two of that type.
Company Entities
- Only one address is supported.
- The address must be of type Registered.
On-Demand Screening – Address Handling
For ODS, address types are mapped using a deterministic, system-defined approach (not configurable).
Individuals
Up to two addresses are deterministically mapped from Fenergo Address Types → LexisNexis Address Types as follows:
Scenario 1: Residential + Business
- Residential (Fenergo) → Current (LexisNexis)
- Business (Fenergo) → Mailing (LexisNexis)
Scenario 2: Single Residential Address
- Residential (Fenergo) → Current (LexisNexis)
Scenario 3: Two Residential Addresses
- Residential 1 (Fenergo) → Current (LexisNexis)
- Residential 2 (Fenergo) → Mailing (LexisNexis)
Scenario 4: Single Business Address
- Business (Fenergo) → Current (LexisNexis)
Scenario 5: Two Business Addresses
- Business 1 (Fenergo) → Current (LexisNexis)
- Business 2 (Fenergo) → Mailing (LexisNexis)
Companies
For Company entities, the following mapping applies:
- Registered (Fenergo) → Current (LexisNexis)
Additional Addresses (API Behaviour)
While the Fenergo UI supports a maximum of two addresses, the Screening API may accept more than two addresses.
In these cases:
-
Only the first two addresses (based on request order) will be mapped:
- Address 1 (Fenergo) → Current (LexisNexis)
- Address 2 (Fenergo) → Mailing (LexisNexis)
-
Any additional addresses (3+) (Fenergo):
- Will not be mapped to a supported LexisNexis address type
- Will default to "Unknown" in LexisNexis
Configuration Required — LexisNexis (Ongoing Screening)
- To ensure a second address is sent to LexisNexis as part of OGS, update the Individual LexisNexis Batch Format to include a second address type.
Refer to the Batch Formats section below for instructions on this. - The LexisNexis address types should be configured to match the ODS mapping:
- Residential: Current Address
- Business: Mailing Address
- Ensure that the Automatic Batch is updated with the revised Batch Format (as described in the Automatic Batch section below).
Configuration Required — Fenergo
- Add Business to the Address Type Reference Data List to enable this address type.
Alias Screening
The Alias Screening feature allows you to screen entities using multiple names, such as aliases (AKA) or former names (FKA), within a single inquiry. This enables a multi-name screening capability that streamlines compliance operations and improves traceability and transparency. The section below outlines LexisNexis specific limits regarding alias screening, with more detailed guidance on alias screening available in the Configuring Screening Functionality User Guide: Configuring Screening Functionality.
- For optimal performance, it is recommended to screen no more than 1,000 entities in a single LexisNexis screening submission, for example up to approximately 200 entities, each containing up to 5 aliases. Performance may vary based on the number of aliases and the volume of results returned, and larger submissions may result in timeout errors.
LexisNexis Ongoing Screening Configuration
Ongoing Screening is supported in LexisNexis using the Automatic Batch process and the Accept List. The Automatic Batch process must first be configured in the LexisNexis Bridger portal. If the Batch Format is not configured as described below, OGS will not function.
For further information on any of these subjects please consult your LexisNexis documentation or contact your LexisNexis administrator.
Batch Formats
In Bridger, configure a Batch Format by navigating to Batch > Batch Formats.
A separate Batch Format should be configured for Individual and Company entity types.
Within each Batch Format, set the Field Delimiter to "Pipe".
Individual
-
Upload the file BatchFormatIndFull or BatchFormatIndFirstLast depending on whether you want to use the Full Name or First Name and Last Name for screening.
-
Choose a name for the Batch Format and select the values as per the following image:

-
For Full Name Screening set the field mappings as follows:
Fenergo SaaS Field LexisNexis Field Legal Entity ID ID Numbers: AccountID: Number Full Name Name: Full Name Date of Birth Date of Birth Gender Gender Address Line 1 Address: Current Address: Address Line 1 Address Line 2 Address: Current Address: Address Line 2 City Address: Current Address: City Postal Code Address: Current Address: Postal Code Country Address: Current Address: Country State Province Address: Current Address: State Address2 Line 1 Address: Mailing Address: Address Line 1 Address2 Line 2 Address: Mailing Address: Address Line 2 City Address: Mailing Address: City Postal Code Address: Mailing Address: Postal Code Country Address: Mailing Address: Country State Province Address: Mailing Address: State Nationality Additional Information: Nationality Place Of Birth Additional information: Place of Birth Citizenship Citizenship Other Information Other Information Passport Number ID Numbers: Passport: Number SSN ID Numbers: SSN Driver's License ID Numbers: Driver's License infoNote that two LexisNexis fields,
ID NumberandPhone Numberdo not have a corresponding Fenergo field, and can be set to(none)in Bridger.If using First and Last Name Screening theses additional fields must also be mapped:
Fenergo SaaS Field LexisNexis Field First Name Name: First Name Middle Name Name: Middle Name Last Name Name: Last Name
Company
-
Upload the file BatchFormatComp
-
Choose a name for the Batch Format and select the values as per the following image:

-
Set the field mappings as follows:
Fenergo SaaS Field LexisNexis Field Legal Entity ID ID Numbers: AccountID: Number Legal Entity Name Name: Full Name Address Line 1 Address: Current Address: Address Line 1 Address Line 2 Address: Current Address: Address Line 2 City Address: Current Address: City Postal Code Address: Current Address: Postal Code Country Address: Current Address: Country State Province Address: Current Address: State Other Information Other Information EIN ID Numbers: EIN infoNote that two LexisNexis fields,
ID NumberandPhone Numberdo not have a corresponding Fenergo field, and can be set to(none)in Bridger.
Automatic Batch
In Bridger, configure an Automatic Batch batch using Batch > Automatic Batch.
This specifies:
-
The name of the template e.g. "Clients (Individuals)"
-
The batch format created earlier
-
The Division, if appropriate, that will have access to this Automatic Batch
-
The Predefined Search that is to be used
- Ensure that the Predefined Search being used has an Accept List enabled
-
How any Alerts are to be distributed
-
How the screening process is to be activated
- Select "File Transfer"
-
How selected users, or users of the selected role, will be alerted to Alert assignments
-
Whether the batch results are to be output to a file
- Select the values as per the following image
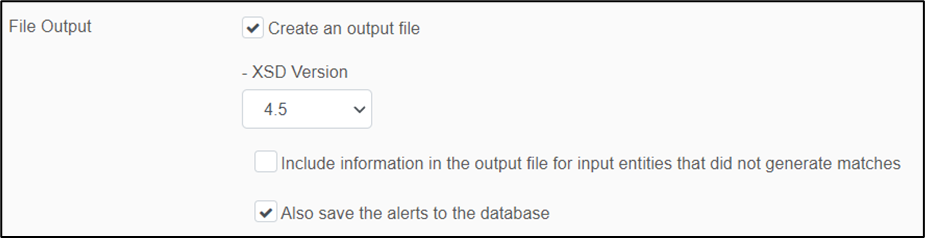
- Select the values as per the following image
-
Upload the PGP Public Encryption Key as provided by your Fenergo SaaS administrator.
Batch runs will be created in LexisNexis with the following format: Fenergo_Ogs_<tenantName>_<Individual/Company>_<YYYYMMDD>_<unique_identifier>
Configuring Fenergo SaaS For LexisNexis Ongoing Screening
This section explains how to enable Ongoing Screening and configure SFTP and encryption settings for LexisNexis.
The provider configuration can be accessed by:
- Navigate to Screening > Provider Configuration
- Select the LexisNexis provider
- On the Provider Configuration page, ensure the Ongoing Screening toggle is set to On
- Open the Ongoing Screening tab to configure the settings described below
Upload (Fenergo → LexisNexis)
- SFTP Upload Domain, Username and Password
- These values are provided by your LexisNexis administrator.
warningThe LexisNexis password expires every 90 days
- SFTP Upload Folder
- These can be obtained by connecting to the SFTP server.
- They must contain the full file path, and folder names must not contain spaces.
Download (LexisNexis → Fenergo)
- SFTP Download Domain, Username and Password
- These values are provided by your LexisNexis administrator.
- SFTP Download Folder
- These can be obtained by connecting to the SFTP server.
- They must contain the full file path, and folder names must not contain spaces.
Other (Encryption Configuration)
- Lexis Nexis Public Key
- Provided by your LexisNexis administrator and used to encrypt upload files.
- PGP Decryption Key and PGP Decryption Password
- Provided securely by Fenergo and used by Fenergo SaaS to decrypt downloaded files.

Understanding PGP Keys used in the OGS Process
To support secure file exchange in LexisNexis ongoing screening, two sets of PGP keys are used.
These keys serve different purposes and are managed by different parties:
- Upload Keys – used when Fenergo sends data to LexisNexis
- Download Keys – used when LexisNexis returns screening results to Fenergo
PGP Upload Keys – Managed by LexisNexis (Updated Annually)
Used for:
Encrypting entity files sent from Fenergo to LexisNexis for Ongoing Screening.
Ownership and lifecycle:
- The public encryption key is provided and managed by LexisNexis.
- A unique key is issued per LexisNexis client account.
- The key is updated annually.
- LexisNexis notifies clients when a new key must be applied.
Client action required:
-
Obtain the Upload Key using the instructions provided by LexisNexis.
-
Format the key by replacing all line breaks with
\nso that it is stored as a single line.Critical requirementThe LexisNexis public key must be formatted as a single line with all line breaks replaced by
\n.If the key is pasted with line breaks intact, encryption will fail and the LexisNexis Ongoing Screening integration will not function.
-
Update the key in Screening > Provider Configuration > LexisNexis > Ongoing Screening in Fenergo SaaS.
-
Refer to the video below for guidance on formatting the PGP key.
Encryption flow (for reference):
- Fenergo encrypts files using the LexisNexis public key.
- LexisNexis decrypts the files using their private key and password.
PGP Download Keys – Managed by Fenergo (Updated Every 2 Years)
Used for:
Decrypting screening results sent from LexisNexis to Fenergo.
Ownership and lifecycle:
- The encryption and decryption keys are provided and managed by Fenergo.
- Keys are rotated every two years.
- Clients receive updated key material directly from Fenergo as part of the rotation.
Client action required:
On the same day, complete the following steps in LexisNexis Bridger:
- Log in and go to Batch > Automatic Batch.
- Open each active batch.
- In the File Output section, upload the PGP Public Encryption Key file provided by Fenergo.
- Click Save.
Then, in Fenergo SaaS:
- Go to Screening > Provider Configuration > LexisNexis > Ongoing Screening.
- Paste in the:
- PGP Decryption Key
- PGP Decryption Password
- Click Save & Test.
Encryption flow (for reference):
- LexisNexis encrypts screening results using the public key provided by Fenergo.
- Fenergo decrypts the results using the corresponding private key and password.
Rotation frequency: Every two years
Last key rotation: 2025-04-30 (30 April 2025)
Multiple Configuration Sets and Ongoing Screening Pre-Requisites
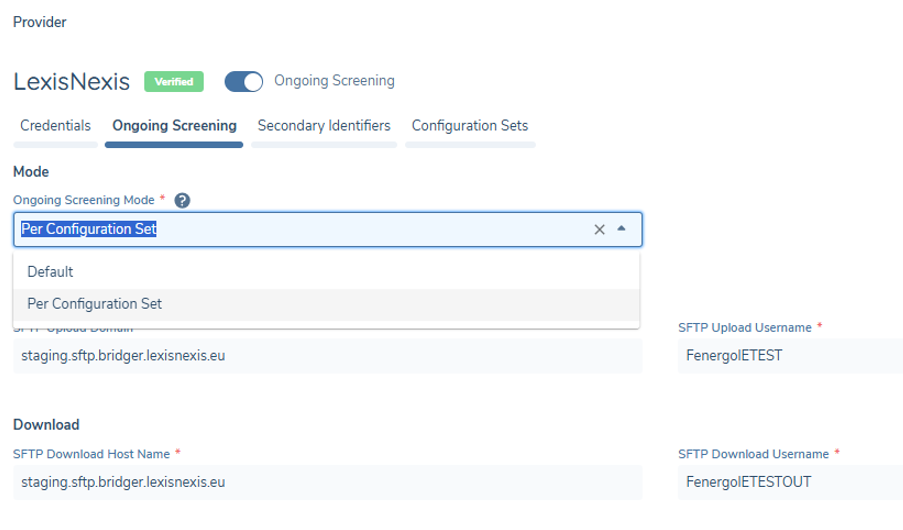
It is possible to set up multiple Configuration Sets for OGS, each mapped to its own Predefined Search (PDS) in LexisNexis. This is controlled by the OGS Mode toggle on the Screening Provider Configuration page, which provides two operational models:
- Default — Entities are not subscribed to OGS using specific Configuration Sets; OGS results are processed for each Configuration Set with OGS enabled. All Configuration Sets share a single Accept List.
- Typical use case: segregating OGS hits by category (e.g. PEP, Sanctions, Adverse Media) so different journey types and SLAs can be triggered.
- Per Configuration Set — Entities are subscribed to OGS using specific Configuration Set(s); OGS results are processed per those enabled sets. Each Configuration Set has its own dedicated Accept List (1:1 with its PDS).
- Typical use case: segregating OGS hits by jurisdiction (e.g. US hits not surfacing in EMEA).
Configuration Sets: UI
SFTP folder fields
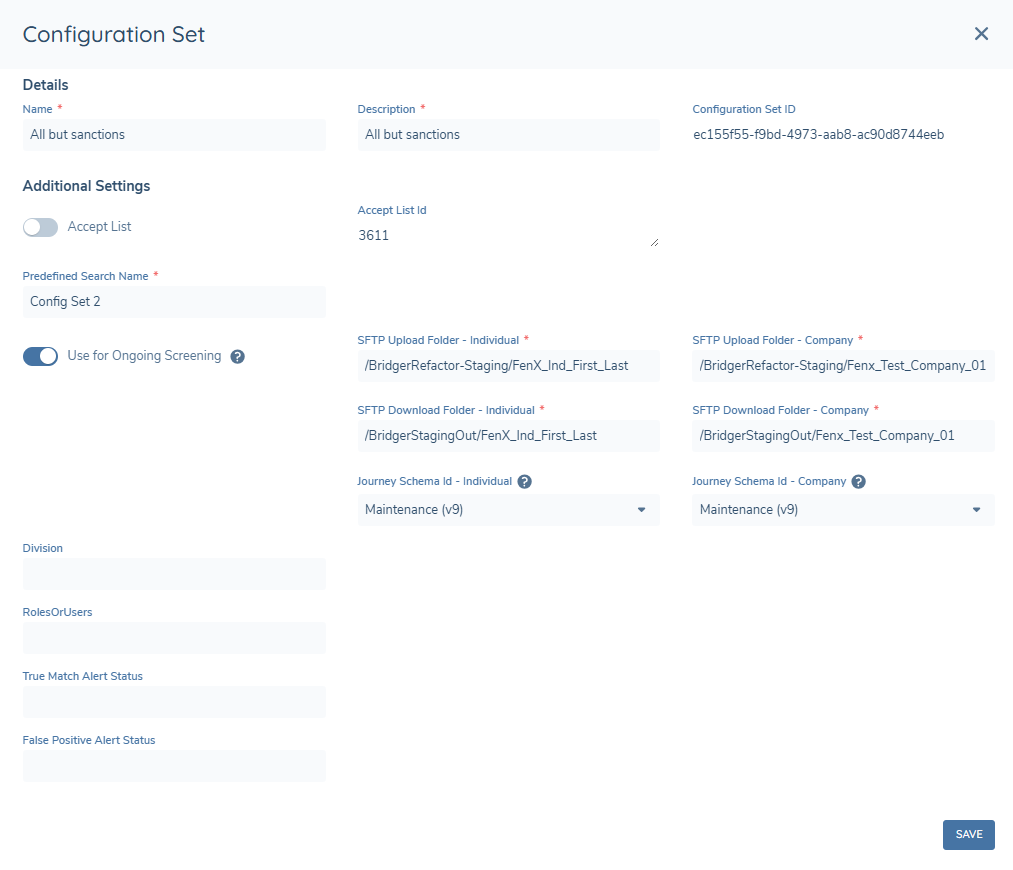
The four OGS folder fields can be configured on each Configuration Set in the Configuration Sets tab:
- SFTP Upload Folder – Individual
- SFTP Upload Folder – Company
- SFTP Download Folder – Individual
- SFTP Download Folder – Company
The same Configuration Set panel is also where the Use for Ongoing Screening toggle and the Journey Schema ID fields (Individual and Company) are configured.
Direct alerts to specific Journey Schema
- Each Configuration Set includes Journey Schema ID fields (Individual and Company) which allow the user to select the relevant Journey Schema the OGS alerts should be triggered in.
- SLAs, team assignment, and routing are set on the Journey Schema, so each Configuration Set can map to a category-specific or jurisdiction-specific journey.
Mapping entities to Configuration Sets
Entity subscription behaviour depends on the OGS Mode selected:
In Default mode:
- No per-entity mapping is required. All OGS-enrolled entities will be uploaded to every OGS-enabled Configuration Set's folder during the nightly process.
- Segregation of hits happens at the LexisNexis Automatic Batch level via the lists scoped to each batch.
In Per Configuration Set mode:
- Entities are subscribed to specific Configuration Set(s). For existing entities already enabled for OGS, these must be mapped to the appropriate Configuration Set(s) via the Screening Command API before the feature is turned on; otherwise they will have no Configuration Set assigned and will not be screened during the nightly process.
- For new entities, when an On-Demand screening journey completes, the Configuration Set used in the screening is added to the entity's OGS subscription list.
- If an entity is later screened with an additional Configuration Set, the additional set is added to the subscription list, and the entity will run OGS for both sets going forward.
Screening & alert processing
- Every enabled Configuration Set generates its own daily Individuals/Companies files for batch processing.
- In Default mode, every OGS-enrolled entity is included in every OGS-enabled Configuration Set's files.
- In Per Configuration Set mode, each Configuration Set's files include only the entities subscribed to that set; entities not subscribed do not appear in that set's files.
- If multiple sets return hits for the same entity, separate Screening journeys are created; one per set.
- On journey completion, the decision is sent with the set/PDS context; LN applies the decision to the Accept List mapped to that PDS (in Default mode the Accept List is shared across all Configuration Sets; in Per Configuration Set mode each Configuration Set has its own dedicated Accept List, 1:1 with its PDS).
Deletion behaviour
- If a Configuration Set is deleted (even if recreated later with the same name), in Per Configuration Set mode, entities previously subscribed to that set will not be sent to OGS for that set.
- If those entities were enabled only for the deleted set, they will not be sent for OGS until resubscribed.
- In Default mode, if a Configuration Set is deleted, entities will remain enrolled in OGS and will continue to be screened by every other OGS-enabled Configuration Set.
Important notes
- This feature applies to LexisNexis integrations only.
- PDS and Accept List mapping is managed in LexisNexis.
- On-Demand Screening (ODS) is not affected by the OGS Mode toggle — clients continue to use whichever Configuration Set is appropriate for the screening at hand.