Configuring the Fenergo Portal Outreach Functionality
Portal Outreach Journey Configuration
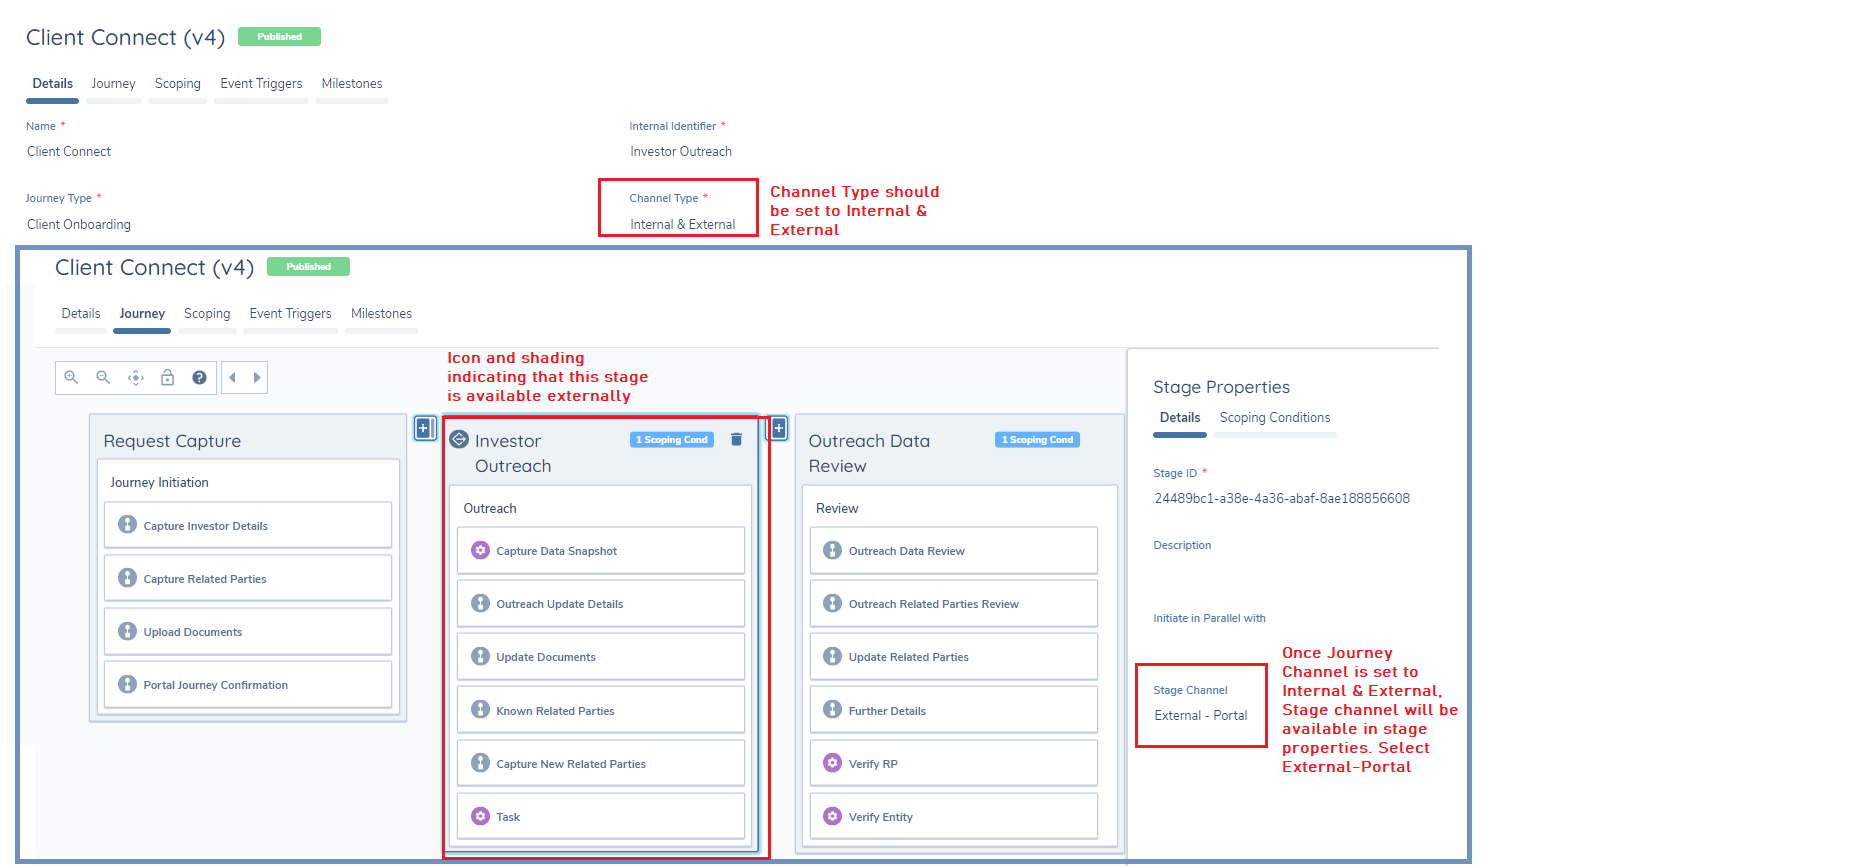
Configuring outreach journeys can be done via the Journey Builder. To allow the portal user to see an entire journey, simply set the channel type in journey details to External. Steps to create an outreach stage in a journey:
- In Journey Details, set the channel type to “Internal & External”
- Within each stage of a journey, there will be an option to set the "Stage Channel"
- Add QuickLink stage to an "Internal" stage to review and update Portal users with access to this entity.
- Set the stage that should be available in Portal to “External – Portal”
- The outreach icon will be visible on the stage to indicate that it is set to external
- The outreach stage cannot be initiated in parallel with previous stage. Subsequent stages can be initiated in parallel with the outreach stage.
- Multiple processes are now supported within the outreach stage. If a process does not contain the “Create Outreach Snapshot” task or “Import Outreach Snapshot”, the Task completion order of “In Any Order” may be selected.
Parallel Outreach Tasks
The outreach stage now supports multiple processes running in parallel. If a process does not include the “Create Outreach Snapshot” or “Import Outreach Snapshot” tasks, the task completion order can be set to "In Any Order". This configuration allows users to complete tasks flexibly, either as needed or when all required information becomes available, streamlining the workflow and accommodating more efficient task management.
Enabling Different Roles to Complete Different Tasks
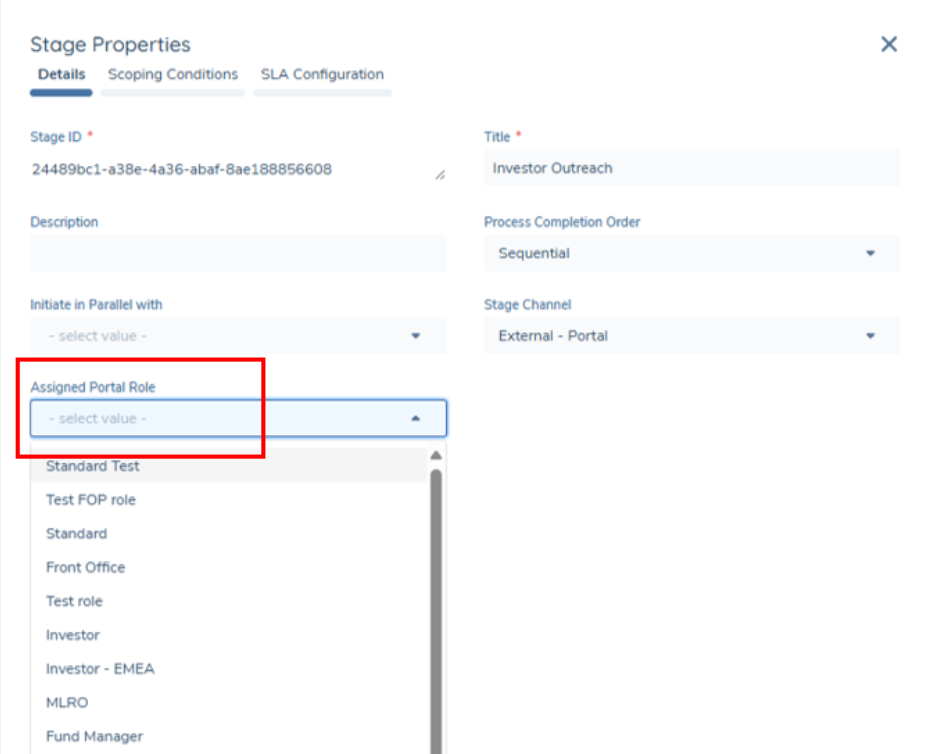
Journey Configuration-
- Set the journey Channel Type to Internal and External.
- Add an External (Outreach) Stage to the journey.
- Put the Stage Channel to External-Portal.
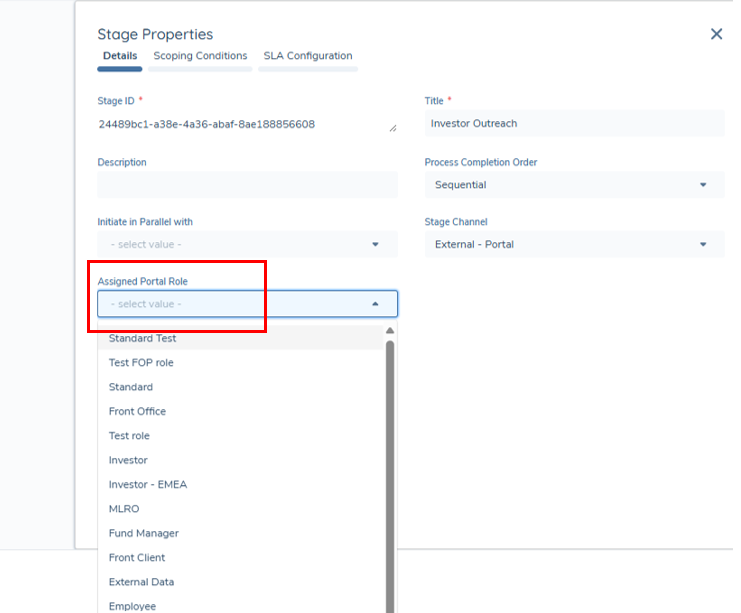
- Within this External Stage, click on the Assigned Portal Role dropdown.
- Select the role you would like to assign the tasks in this stage to.
Note: If no role is assigned, all linked users will receive the outreach email notification.
Any users who do not have the assigned role will not be able to view or update these tasks in Portal as they haven’t been assigned to them.
Only users linked to this role (using Portal User Management or the Quick Link Task) and who have the assigned role will be capable of seeing and completing the tasks in this stage in the Portal.
- If an Outreach stage is not assigned to a Portal Role, all roles and portal users will be able to complete the outreach tasks.
- Please ensure that each Outreach stage is properly configured and assigned to the appropriate user or role to avoid any unintended access.
Other Scenarios:
- When the Assigned Portal Role is left as an empty blank field: All portal users can view the tasks as no particular role has been assigned to it.
Note: Changes made to a stage and its assigned users will only affect the newly triggered journeys after this.
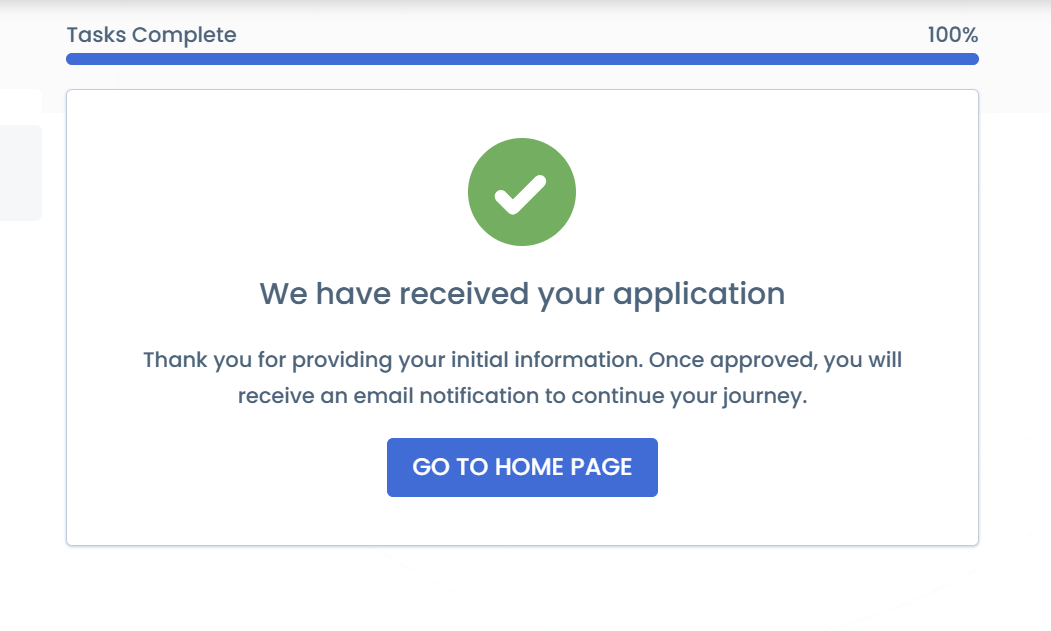
When a user does not see the tasks in an external stage in Portal, it means that their role has not been assigned to this task. They will see the below screen -
The second functionality introduced by the feature is Email Notifications.
If a user’s role is assigned to a task in the Outreach Stage, once the Snapshot task occurs, the user will receive an email notification.
For the user to receive an email notification-
- The user must be linked to the entity
- The “Receive Outreach Email Notification” toggle must be toggled on.
Note: This toggle is located in the Portal Configuration User Roles under the Email heading.

A user will not receive an email if:
- They are not linked to the entity.
- They have the Receive Email Notification toggle off.
- They are not the role assigned to the task.
Outreach Template
There are four outreach email templates in Portal Configuration.
The four templates allow for more flexibility as to what email content is to be sent to a portal user. A client may wish to send a different email template during different journeys (For example; Onboarding vs Review) or to different user roles interacting with a journey.
The client can specify the desired email template in the Outreach Stage and send the email content that they wish to.
Note: the email itself will be sent to the users with the role assigned to the Outreach Stage.
A dropdown has been added to the “ Create Outreach Snapshot” task, allowing the configurator to choose between ‘Outreach Email 1’, ‘Outreach Email 2’, 'Outreach Email 3' and 'Outreach Email 4'. 'Outreach Email 1’ is the default.
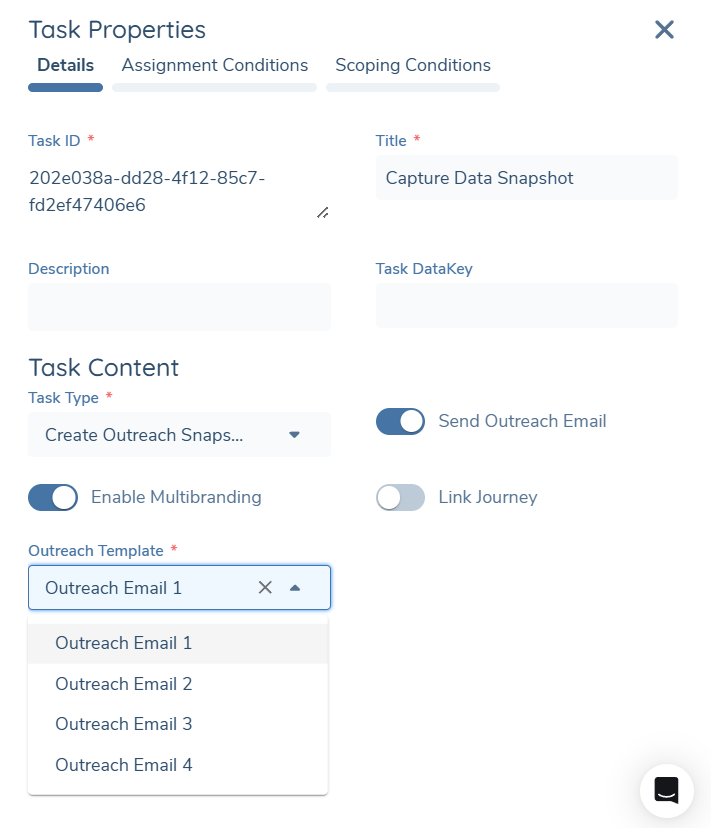
To configure this within the Journey Builder:
- Add an Outreach Stage to the Journey.
- Add a Capture Outreach Snapshot task.
- Navigate to the Outreach Template dropdown.
- Select Outreach Email 4 or Outreach Email 3 or Outreach Email 2 or Outreach Email 1
To customize the template, go to Portal Configuration and scroll to the Portal Emails section.

Personalising Outreach Emails with the Client Name
Portal outreach emails can be personalised with the recipient's client name by adding predefined placeholder tags to the email body. This is supported in Outreach Emails 1–4 and the Delegated Authority email.
No feature flag or toggle is required — personalisation is applied automatically whenever a supported tag is present in the template text. If no tags are added, the email content renders exactly as before with no change in behaviour.
Supported Placeholder Tags
The following placeholder tags are supported in the body of Outreach Emails 1–4 and the Delegated Authority email:
| Placeholder | Resolves for Companies | Resolves for Individuals |
|---|---|---|
{{entityName}} | Company name | First name |
{{entityFullName}} | Company name | First name and last name |
Templates can include either tag, or both, independently. Only {{entityName}} and {{entityFullName}} are supported — arbitrary placeholder keys are not processed and will remain in the rendered email as literal text.
Adding a Placeholder Tag to an Outreach Email
- Navigate to Portal Configuration and scroll to the Portal Emails section.
- Open the email template you want to personalise — Outreach Email 1, 2, 3, 4, or the Delegated Authority email.
- In the email body, insert
{{entityName}}or{{entityFullName}}at the position you want the client's name to appear. - Save the configuration.
Example
A template body such as:
Dear {{entityName}},

Thank you for beginning your onboarding journey with us. Please complete the outstanding tasks in your portal.
Renders as Dear Acme Corp, for a Company recipient called Acme Corp, or Dear Jane, for an Individual recipient called Jane Smith.
Handling Missing Client Name Values
If a template contains a supported tag but the underlying client name value is not available at send time, the tag renders as an empty string and the email is still sent. Outreach is not blocked by incomplete entity data.
- Only
{{entityName}}and{{entityFullName}}are processed. Other placeholder keys are left as literal text. - The feature applies only to Outreach Emails 1–4 and the Delegated Authority email. Other portal email types are out of scope.
- Templates without any placeholder tags behave exactly as before — there is no change to existing email rendering unless a tag is explicitly added.
Notifying the Journey Owner when Outreach Emails are Sent
The Journey Owner — typically the assigned Relationship Manager — can optionally be CC'd on portal outreach emails so that they have passive visibility of outreach activity without needing access to Portal.
To enable this for a given Outreach task:
- Navigate to the "Create Outreach Snapshot" task on an Outreach stage.
- Ensure the "Send Outreach Email" toggle is enabled — this makes the "Notify Journey Owner" toggle visible in Task Properties (Details tab).
- Enable the "Notify Journey Owner" toggle if you want the assigned Journey Owner to be CC'd on outreach emails for this task.
When enabled, at the point of sending the outreach email the system checks the journey scheme for an assigned Journey Owner. If a Journey Owner is assigned and their Fenx email can be resolved, they are silently added to the CC field of the outreach email. The portal outreach user remains the sole visible recipient and cannot see the CC.
- The Notify Journey Owner toggle is only visible when Send Outreach Email is enabled, and is hidden (and treated as inactive) if Send Outreach Email is later turned off.
- The toggle is disabled by default on all new and existing tasks; no migration is required.
- If no Journey Owner is assigned, or the Fenx user record cannot be resolved, or the resolved record has no email address, the outreach email is still delivered to the portal outreach user only — no error is raised and no CC is added.
- If no portal users are linked to the Legal Entity when outreach is triggered, the email is sent to the Journey Owner only.
- Only a single Journey Owner is supported as CC. BCC is not used.
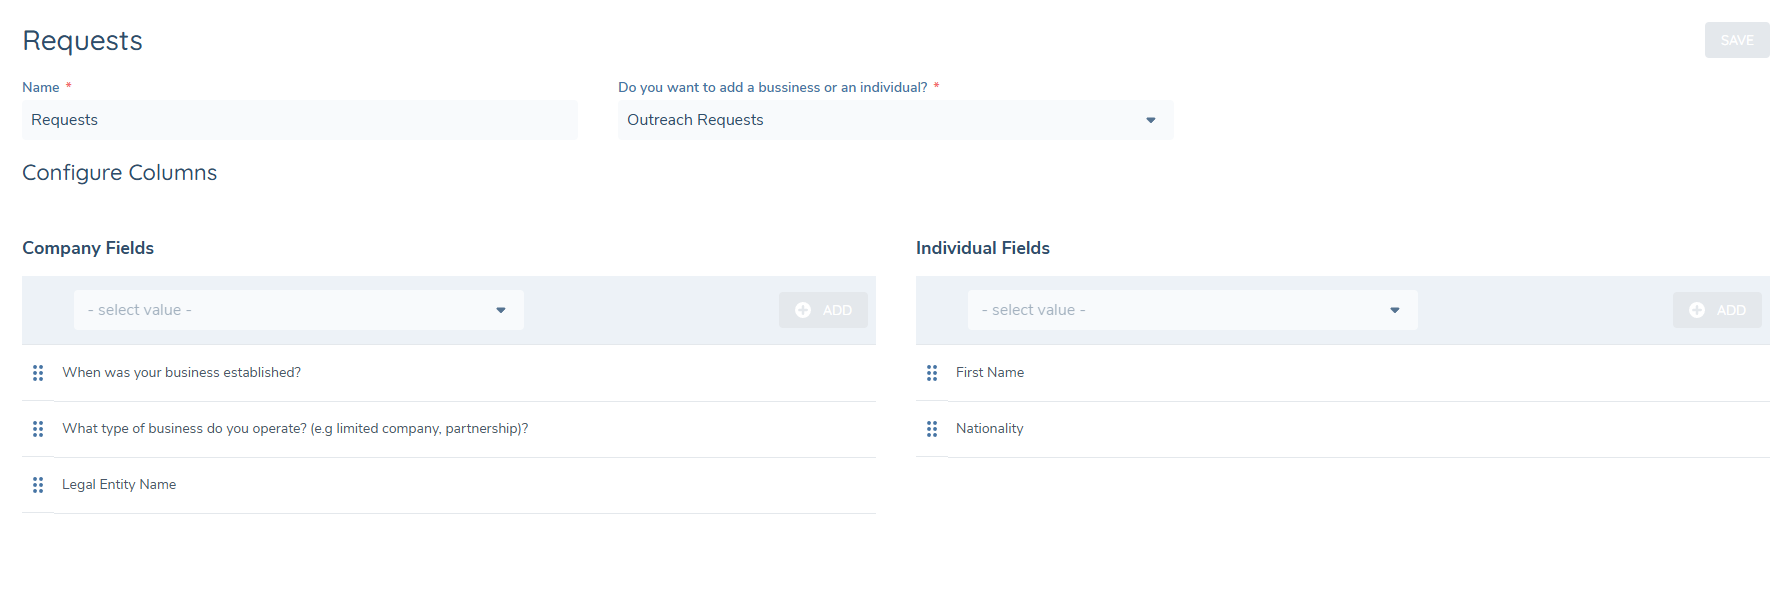
Outreach Requests Dashboard
The Outreach Requests Dashboard is designed to allow Portal users to focus only on entities that have open requests. The key column in the dashboard is the Entity Name, the other columns are configurable so can be adjusted based on user requirements.
To configure the columns:
- Navigate to Portal Dashboards
- Click on the Requests Dashboard
- Type: Outreach Requests
- Select values from the Company Fields dropdown and Individual Fields dropdown
- Click Save
Linking the Portal User to a Journey:
-
Navigate to the "Create Outreach Snapshot" task on an Outreach stage.
-
Enable the "Link Journey" Toggle if you wish to link the portal user's journey.
If the Link Journey toggle is enabled, the journey will be assigned to all Portal users associated with the Legal Entity and have the assigned role for the outreach stage. If no role is assigned to the outreach stage, no journeys are linked to any user.
-
The journey will automatically link to the portal user's entity, allowing them to view the outreach requests.

Note: Assigning an Outreach stage to a role can be done via clicking on the Portal stage in Journey Builder and selecting a role from the Assigned Portal Role dropdown.
Unlinking the Portal user from the Journey:
- Navigate to the "Import Outreach Snapshot" Task on an Outreach stage.
- Enable the "Unlink Journey" Toggle if you wish to unlink the journey.
- The journey will be deleted for the portal user, and the outreach tasks will no longer be visible.
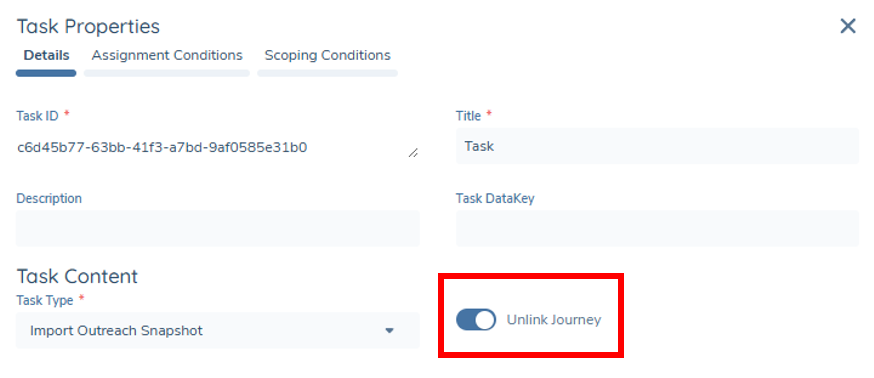
Note: These toggles are disabled by default.
Once a portal user is linked to an entity, they will retain access to it - even if the entity no longer appears on the Requests Dashboard.
This eliminates the need to re-link the entity in the future, but it also means that the user can continue to access the entity's profile directly, even when it’s no longer actively displayed on the Outreach Requests page.
Trader Portal:
When using the Trader Portal:
- The Link Journey toggle will not re-link an already linked journey.
- The Unlink Journey toggle will remove the journey for the portal user and will not be visible in the Standard portal and Trader portal.
Cancellation and Referral Scenarios
Outreach request links when journeys are cancelled or are older than 365 days will be automatically removed.
If a journey has been referred to a previous stage, the portal user will be presented with an information screen indicating that the request is no longer valid and will be removed from their dashboard.
Data Completion Checks on Related Parties
This feature introduces enhanced validation for the Related Party task within the Portal. It allows configurators to enforce mandatory review for related parties and enables portal users to clearly see the completion status of each Related Party. Clients can enable or disable this validation using the "Enforce Mandatory Related Party Data Capture" toggle.
To enforce the mandatory Related Party Data Capture:
- Login to Fenergo.
- Go to the Journey Builder and select the desired Journey.
- Click on the Related Party Task.
- Enable the Enforce Mandatory Related Party Data Capture toggle.
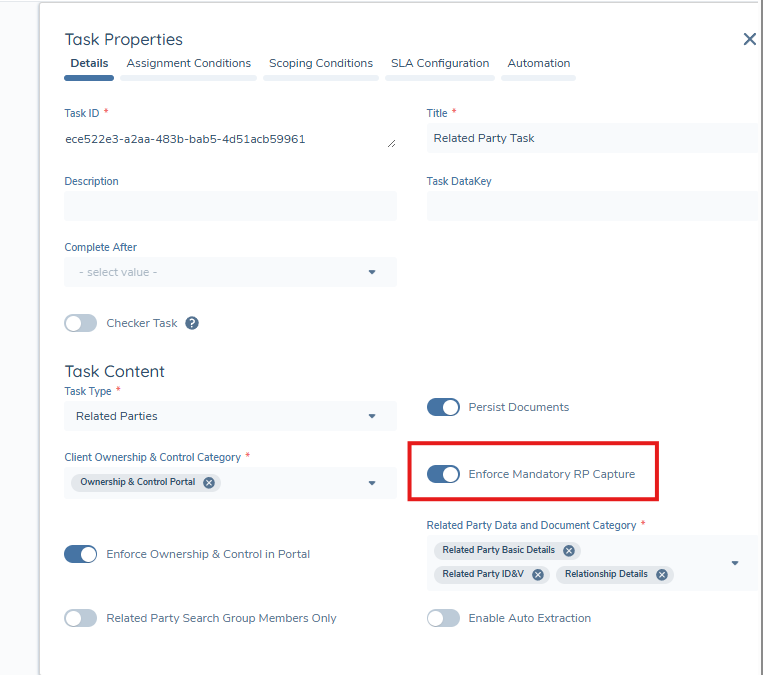
When this toggle is enabled, a user will be required to review all existing related parties before completing the related party task within the Portal.
- This toggle is disabled by default.
- This toggle will only be visible when Channel Type is External, or Internal/External with the current Stage being External.
- The toggle will not be visible when Channel Type or Stage is Internal.
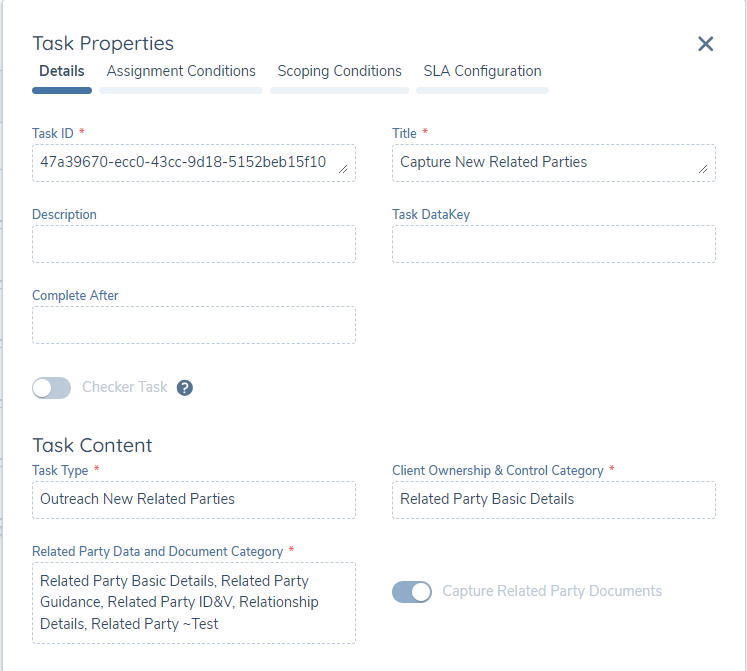
Outreach Related Party Documents
Configuration
In order to have Related Parted Documents included in the Related Party Outreach tasks the "Enable Related Parties Documents" switch on the task properties must be enabled. This will be set to disabled by default.
For the Outreach Existing Related Parties task :
- Document Requirements will be visible
- Document linked to requirements will be available to view or download
- Additional documents can be linked to a requirement
- Linked documents can be deleted.
For the New Related Parties task:
- Document Requirements will be visible once the Related Party is created
- Document can be linked to requirements and metadata added
- These documents will be available to view or download
- Linked documents can be deleted.
The New Related Party task supports multiple configurable categories, beyond the standard categories available in Fenergo Tasks.
Due to a current technical limitation, documents stored in the Related Party ID&V (Identification & Verification) category are not displayed in the Portal. Please ensure that documents are uploaded to another category to guarantee visibility.
Standard Related Parties Task Document Support
Document support for Standard Related Parties Task in Portal is controlled by a toggle in the Journey Builder called Capture Related Party Documemnts, and is off by default.
This allows Portal users to meet document requirements for existing and newly added Related Parties in this task, mirroring the behaviour of the task in the Fenergo platform.
Configuring Application Abandonment Reminders
Application Abandonment Reminders allow the Portal to automatically send reminder emails to portal users who have not completed tasks in an open outreach stage. Reminders are configured directly on the Create Outreach Snapshot task in Journey Builder.
Configuration Steps
-
Open the relevant journey in Journey Builder.
-
Navigate to the Create Outreach Snapshot task on an outreach stage.
-
Enable the Enable Email Reminders toggle.
-
Once enabled, the Reminder Schedule field becomes visible and mandatory. Enter a comma-separated list of values in hours representing when each reminder should be sent after the outreach stage is triggered.
Example:
24,168,720sends reminders after 1 day, 7 days, and 30 days.Up to 10 reminder intervals can be defined per task.
-
Select the Reminder Email Template to be used for all reminder sends on this task.
-
Save the task configuration.
Behaviour Notes
- Reminders are sent only while the outreach stage remains open and incomplete.
- Reminders stop immediately when the stage is completed or cancelled.
- If the outreach stage is reopened, reminder tracking resets and intervals restart from the reopen timestamp.
- Reminders are sent only to portal users linked to the entity who have the role assigned to the outreach stage. If no role is assigned, all linked portal users receive the reminders.
- If Enable Multibranding is toggled on in the journey, reminder emails use the brand resolved from the journey's
brandUrlvalue. If multibranding is disabled, the tenant default brand is used.
- Each outreach stage in a multi-stage journey has its own independent reminder configuration on its Create Outreach Snapshot task.
- A portal user who holds multiple roles assigned to the outreach stage receives only one reminder email per interval.
Configuring the Send Portal Email Task
The Send Portal Email task is a system task type in Journey Builder that sends a selected portal email template to portal users with specified roles when the task is executed. It can be placed in any internal or external stage.
Adding the Task in Journey Builder
-
Open the relevant journey in Journey Builder.
-
Add a new task and select Send Portal Email as the task type.
-
Configure the following mandatory fields: | Field | Description | |---|---| | Email Template | Select the portal email template to send. Account Verification and Password Reset templates are not available for selection. | | Portal User Roles | Select one or more portal user roles. The email will be sent to all portal users linked to the entity who hold at least one of the selected roles. |
-
Optionally, enable Enable Multi-brand Email to resolve the brand from the journey's
brandUrlfield when sending the email. When disabled, the tenant default brand is used. -
Save the task configuration.
Email Recipient Rules
- A user must be linked to the entity and hold at least one of the selected roles to receive the email.
- If a user holds multiple selected roles, only one email is sent to that user per task execution.
- If no linked users match any of the selected roles, no email is sent.
- The Send Portal Email task is a system task and is not visible to portal users in the Portal UI.
- The task can be placed in both internal and external (outreach) stages.
- The Enable Multi-brand Email toggle is disabled by default.
Configuring Webhook Notifications for Portal Reminders
For clients who manage their own email infrastructure and do not use Fenergo-managed email delivery, the Portal supports a webhook event that fires whenever a portal reminder becomes due. This allows external systems to receive the trigger and send reminder communications through their own infrastructure, while the Portal continues to own reminder timing and orchestration.
The event type is called Outreach reminder Sent.