Trader Request
The Trader Request serves as a dedicated channel for Sales users to interact with Fenergo, enabling them to initiate new requests such as Client Onboardings or New Product setups. This portal offers a streamlined, user-friendly interface that enhances communication between the Trader Request team and the rest of the organization. It centralizes the request process and ensures that Sales users can easily track the progress of their submissions.
Note: This is not a default feature for a tenant. To activate the Trader Request on your tenant, please raise a support ticket. Once enabled, the portal can be customized and configured to meet the specific needs of your organization.
Key Features & Expected Business Outcomes
- New Digital Channel: The Trader Request provides a dedicated digital space for Sales users to initiate and manage New Product Requests or Client Onboardings. This allows faster request initiation, reduces manual efforts, and ensures structured data entry.
- Entity Search & Creation: Sales users can search for existing entities (clients) within Fenergo before initiating a request. If no matching client is found, the user has the option to create a new client, ensuring that all necessary details are captured for future reference.
- Unified Request Form: A single form is provided for Sales users to capture key client and product information, simplifying the process and ensuring consistency across all requests.
- Client Data Review: For existing clients, Sales users can review detailed client and product data before submitting a new request, allowing them to make informed decisions and reduce errors.
- CRM-Style Dashboard: The portal includes a comprehensive dashboard that tracks both active and completed requests, giving Sales users full visibility into the status of their submissions.
- Automated Notifications: Sales users are notified via email when their requests (e.g., new product setups or client onboardings) are completed or if a journey (request process) has been canceled. This improves communication and ensures that users stay updated on the progress of their requests.
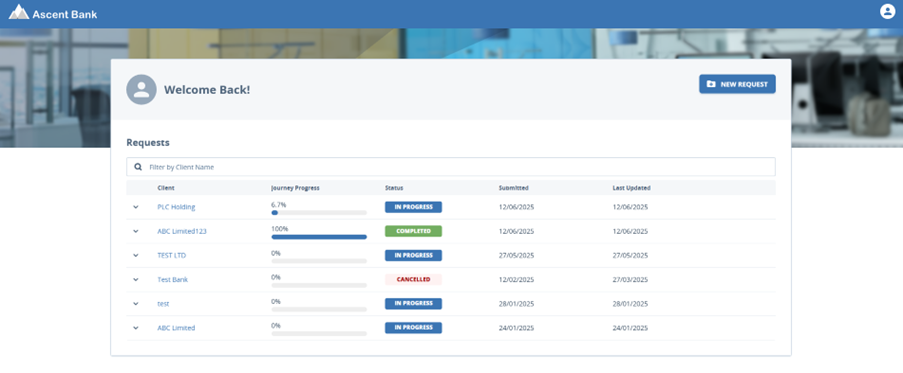
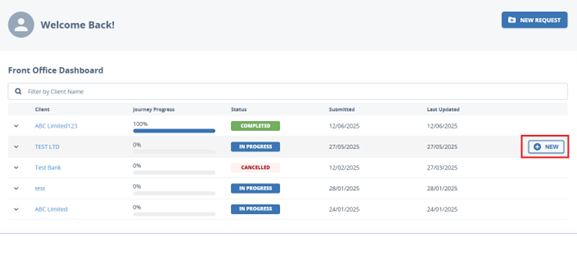
Requests Dashboard
The Requests Dashboard is a central feature of the Trader Request Portal. It provides Sales users with an at-a-glance view of all the requests they have submitted, including both active and completed requests. The dashboard offers full transparency into each request’s current status and progress, helping users stay organized and up to date.
Dashboard Columns
When a request is submitted, it will appear in the dashboard with the following details:
- Client: The name of the client the request pertains to.
- Journey Progress: Visual indication of how far along the journey (request process) is toward completion.
- Status: The current status of the request, displayed as "In Progress," "Complete," or "Cancelled."
- Submitted: The date the request was originally submitted.
- Last Updated: The date on which the request was last updated, either by the user or by another internal party.
First-Time Users
- When a user logs in for the first time, an empty state will be displayed, as they have not yet submitted any requests. Once one or more requests have been raised, the dashboard will populate with the above columns.
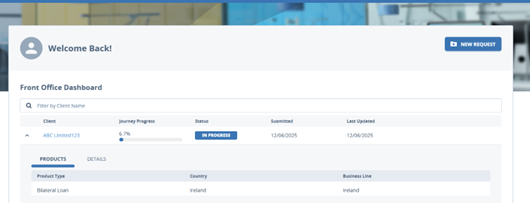
- Users can expand individual requests to see more detailed information, such as the products associated with a particular client and journey-level metadata related to the request. This gives users quick access to all relevant details without needing to leave the dashboard. The columns that display to the portal user are Product Type and all secondary identifiers in the Global requirement set.
- Products: Product Type and secondary identifiers from the Global requirement set.
- Journey-Level Metadata: Data from the Portal New Request Details in Global Policy.
Initiating a New Request
1. Client Search
To create a new request, users begin by performing a search for the client:
-
Click the New Request button in the top right corner.

-
Enter the client’s name to perform a basic search of the existing clients in the system.
- No Match Found: If no client matches are found, an empty state will display, prompting the user to add a new client.
- Matches Found: If one or more potential matches are found, the user will see search results showing the client’s name, along with nine additional columns (if configured), providing the trader with more visibility of information to identify the correct entity. The columns displayed are configurable in the Portal New Request Details category within Global Policy settings.
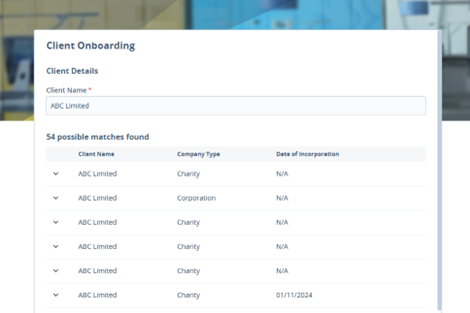
Users can also expand a search result to review the products associated with an existing client. The columns that display to the portal user are Product Type and all secondary identifiers in the Global requirement set.
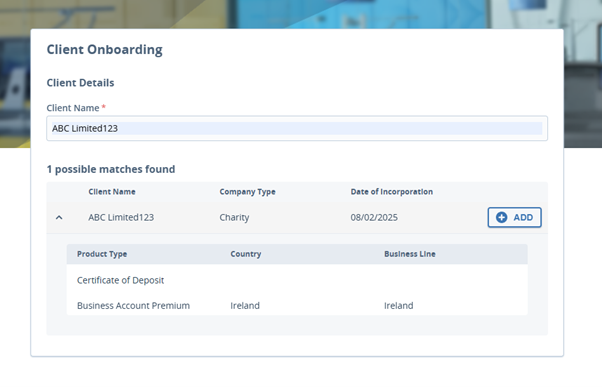
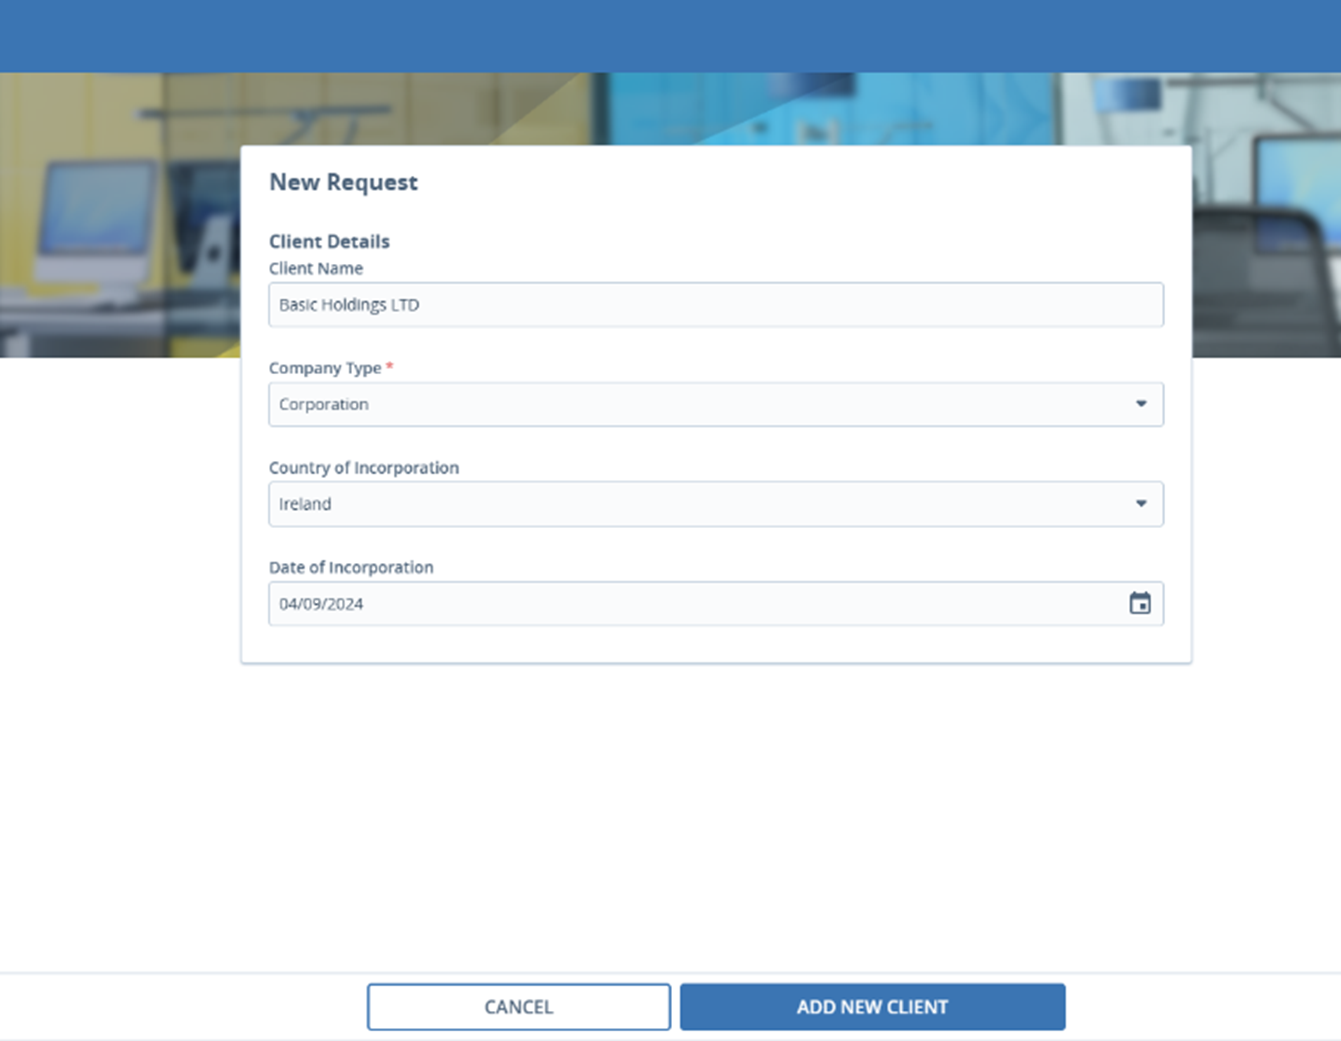
2. Creating a New Client Request
If no suitable match is found in the client search:
- Click the Add New Client button.
- Enter the required client information. The fields displayed are based on configurations in the Portal New Request Details field defined in the role configuration, which can be customized to meet your organization’s requirements.
- After completing the mandatory fields, click Add New Client to proceed to the Request Details page.
3. Capturing Request Details
Once on the Request Details page, the Trader Request user can capture the necessary details for the request.
- Product Information: At least one product is required for any new request. The category of product fields displayed to display to the user can be configured in the Portal Product Request Details field defined in the role configuration. Please note only fields in the global requirement set. Users can also add multiple products by selecting the Add Another Product button.
- Additional Data Groups: If any additional data groups are required, these can be configured in the Portal New Request Details category field defined in the role configuration. Mandatory fields will be marked in red, and users will be blocked from submitting a request until all required fields are completed.
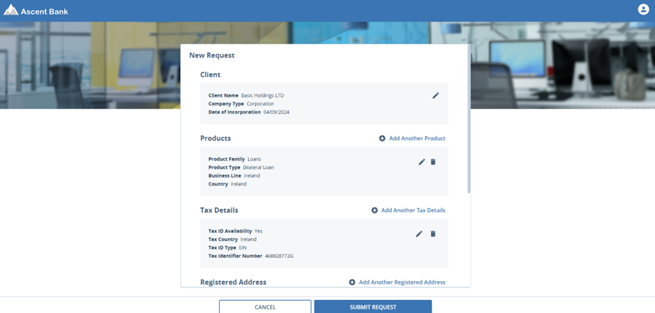
Once all necessary information is captured, the user can submit the request. The request is added to the requests dashboard, and a journey will be triggered.
Any tasks required to be completed by the Trader will display. To learn more on the different task types supported in Portal, please visit the Configuring the Fenergo Portal Guide.
New Product Requests
1. Adding a Product via the Requests Dashboard
For existing clients:
- Search for the client from the dashboard.
- Hover over the relevant request row and click New to submit a new product request for that client.
2. Adding a Product via Search Results
Alternatively, users can add a product to an existing client directly from the search results by clicking Add next to the relevant client. This will navigate the user to the New Request for Existing Client process, where they can proceed to add product information as outlined in the New Client Request process.
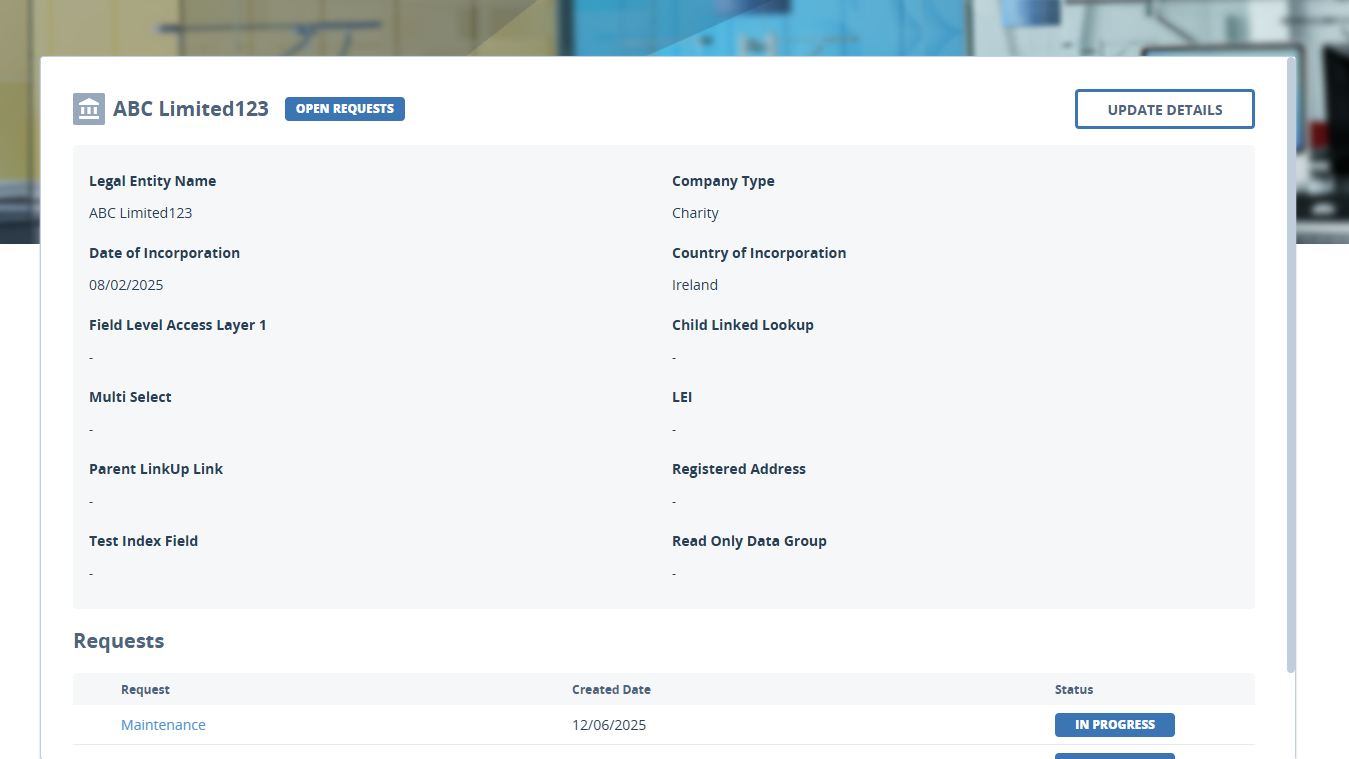
Entity Profile Page
Users can access the Entity Profile Page by selecting the entity name on a journey. Here, they can view details and information on that entity. Additionally, the Requests section on the profile page displays all current and previous requests for that entity to the user.
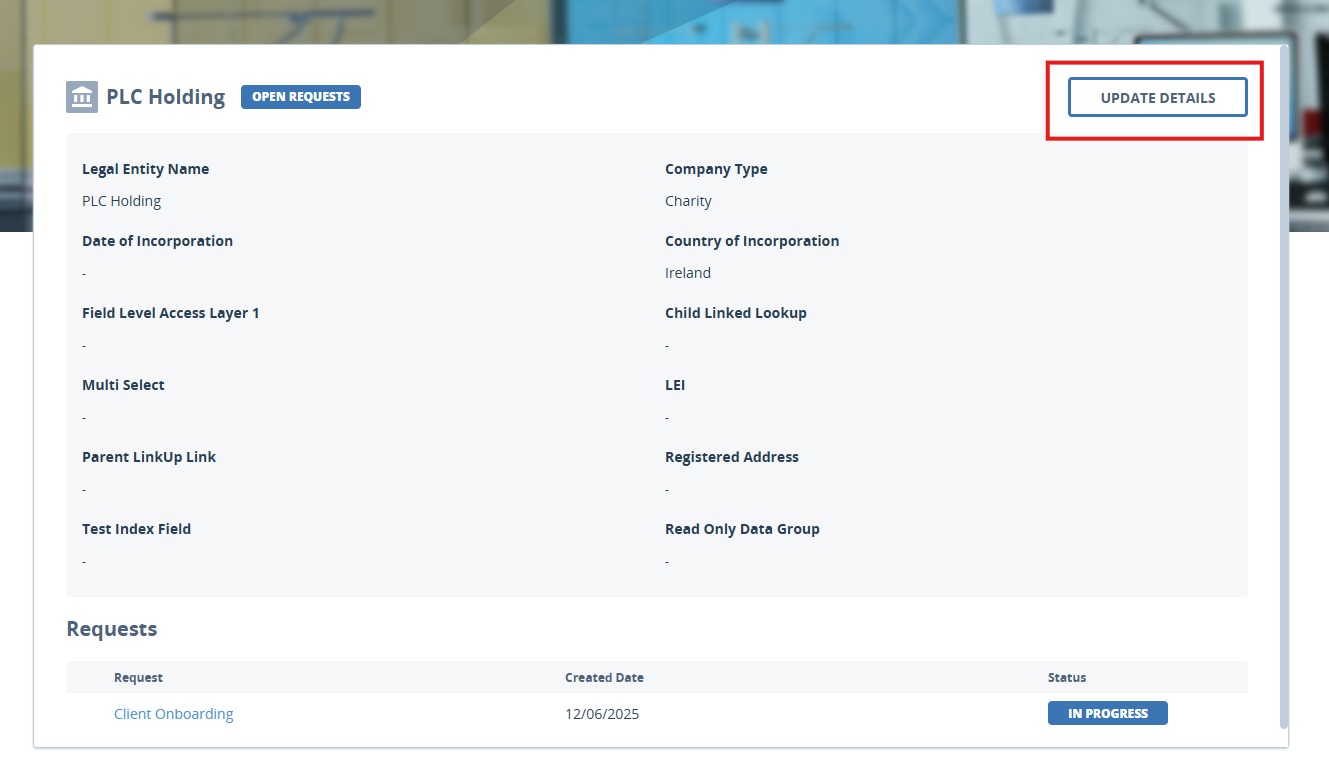
Maintenance Request
Maintenance Requests are now supported in the Trader Request, allowing users to update details if this functionality has been enabled in FenX. For more information on Maintenance please visit the Using the Fenergo Portal Guide.
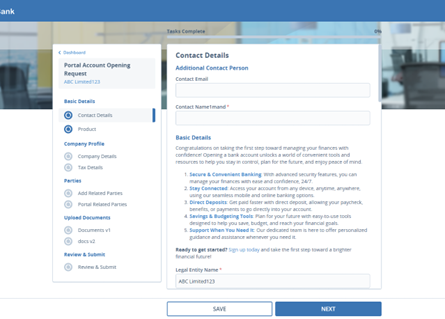
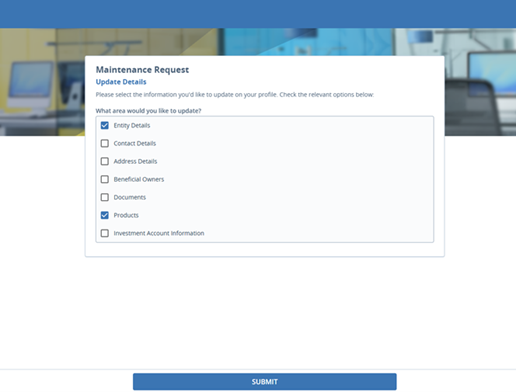
To update details, users must navigatw to the Entity Profile Page and click on the Update Details button in the top right corner.
This brings the user to the below screen, where they can select the area of information they would like to update. Once selected, the user click Submit and will be navigated to that area to update it.
Configuring the Trader Request
Before users can access the Trader Request, it must be enabled for your tenant. To do this, raise a support ticket with Fenergo, requesting activation. Once activated, you can proceed with the configuration and customization of the portal.
Step-by-Step Portal Setup
1. Setting the Portal Type
After activation, the next step is to assign users to the Trader Request:
- Navigate to the Configuration Area: Go to the "Portal User Roles" section in the configuration settings.
- Select the Trader Portal Type: In the "Portal Type" dropdown menu, choose "Trader." This option will only be visible after the service is enabled for your tenant.
- Save Configuration: Once the portal type is selected, this will refresh the page, and new configuration options specific to the Trader Request will appear.

Note: Enable New Client Requests toggle is always enabled as the Trader Request always supports new requests.
2. Journey Configuration
The Trader Request allows users to initiate specific types of journeys (requests). To set which journey types are available:
- This allows you to configure what journey types can be initiated from the Trader Request once the scoping conditions are met.
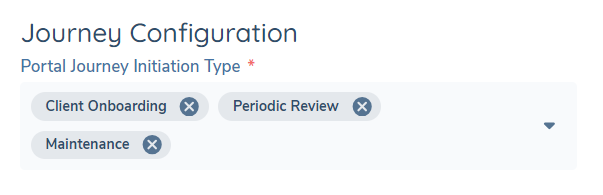
Note: Entity Type: Company is read-only as Trader Request only supports Company currently.
The following functionality is available under the Journey Configuration heading.

-
Portal Delegated Authority: Allows a Portal user to create and link Portal users.
-
Enable Journey Access: Allows a Portal user to access journeys.
-
Show Remove Legal Entity Link Button: Allows a portal user to remove a link to the legal entity on the Details page.
-
Portal New Request Details: This dropdown allows the Admin to specify the category of information displayed in the Trader Portal.
Maintenance can also be configured from this Journey Configuration section.
-
Enable Maintenance Requests: Allows Portal user to update details.
-
Portal Maintenance Journey Initiation Type: These are a list of configurable maintenance journeys types that can be initiated from the Portal.
-
Maintenance Request Details: These are a list of configurable maintenance categories available to the Portal user.
3. Task Interaction
Traders can now interact with tasks assigned to them in the same way as the Standard Portal. To assign tasks in a journey to a Trader, or limit only Traders to complete certain tasks, navigate to the Journey Builder in Fenx and go to the Outreach Stage in the journey. Click on the Assigned Portal Role field and update the assigned role to Trader like seen below. Then, only Traders will receive the outreach email notification and be able to interact with those tasks within the Portal.
The tasks supported are the following:
-
Data Task
-
Documents Task
-
Related Parties Task
-
Product Task
-
ID&V Task

4. Product Configuration
This section allows Portal Admin to control whether capturing product information is mandatory or optional for new and existing clients within the Trader Request. Clients will be able to toggle the enforcement of product capture to mandatory or optional, and can do so, depending on the request.

· Navigate to the Product Configuration section.
· Toggle on Product Requests and two new toggles and a field will display.
The Toggles:
· Product Requests: Enabling this toggle displays products as part of the new client request process and maintenance request process within the Trader Request.
· Enforce Product Capture New Clients: Enabling this enforces the capture of a product during the new client request process. Disabling this toggle will make product capture optional for new requests.
· Enforce Product Capture Maintenance: Enabling this enforces the capture of a product during the new maintenance request for an existing client. When disabled, product capture will be optional for the new maintenance request process.
· Portal Product Request Details: This field enables the user to specify the category of product information displayed to the user in the Trader Request. If the Product Requests toggle is enabled, then this field will display and is mandatory.
Note: When the Product Requests toggle is disabled, products will not be visible.
5. Email Notifications
The portal includes notification functionality, ensuring that Sales users are kept informed when important milestones are reached (such as a request being completed or canceled).
- To configure notifications, navigate to the Notifications section in the portal’s settings.
- You can customize which notifications are sent and when, as well as control additional settings such as the inclusion of client names in notification emails.
There are two main types of notifications supported within the Trader Request:
- Journey Completion Notification: Sent when a journey (request process) is successfully completed. To configure this, add the Journey Complete Notification service task to the journey configuration.
- Journey Cancellation Notification: Sent when a journey is manually canceled by an internal user or through the Cancel Journey service task. This feature can be enabled in the Portal User Roles section by toggling the "Send Cancelled Email Notification" option.
Optional: You can choose whether to include the client's name in notification emails. If this feature is enabled, both the Journey Complete and Journey Cancelled emails will display the client's name to provide better context for the Trader Request User.

Additionally, Email Notifications can be configured on the same page on the Trader role by enabling the Receive Outreach Email Notification toggle.
Once all configurations are complete and the relevant users are assigned the appropriate roles, they will see the new Trader Request dashboard upon logging into the portal.