Using the Fenergo Portal
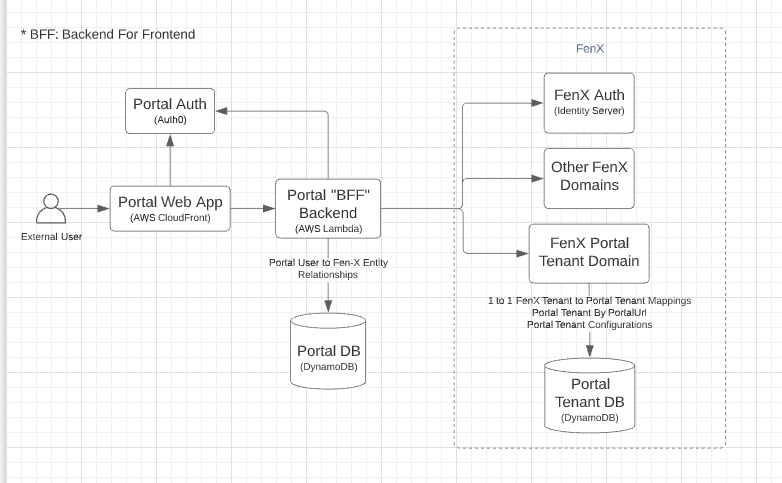
The Fenergo Portal provides a means for external users to securely initiate, access and progress Fenergo journeys. It allows them to interact with Fenergo entities and journeys and provide data and documents to support Fenergo Journeys. The Portal enables third party clients to interact directly with their bank, allowing them to initiate a request for onboarding or to provide the required data and documents to complete or enhance their profile. The Portal is configurable per role and per tenant, the following should be considered for each Portal Tenant.
- the look and feel of the Portal, this can be managed in the Portal Configuration area
- who has access to the Portal, and how they can access the portal, this is managed in User Administration
- the type of roles the portal users should have and the capabilities of those roles
- the journey type, if the entire journey is available or just stages within a journey, managed through Journey builder
- whether the portal user can initiate journeys, if so the journey type they can initiate, this is included in the Portal Configuration
Please see the Portal Configuration User Guide for further details on how to configure each of these aspect of the Portal.
Portal Administration
There are four aspects to Portal administration from Fenergo.
- Configuration - to configure portal details, appearance, footer & email
- Dashboard - to configure dashboard which can be assigned per role
- User Roles - to add configuration per role
- User Management - to add/remove portal users, assign roles, and link entities
Access to these configuration options is dependent on the user permission assigned in Fenergo. These are the permission that are applicable:
| Permission Name | Description |
|---|---|
| Portal User Administrations | Ability to add portal users, assign roles and entities, access to quicklink task |
| Portal User Delete | Ability to remove portal users |
| Portal Configuration Access | Ability to access the Portal Configuration |
| Portal Configuration Edit | Ability to update the Portal Configuration |
| Portal User Dashboard Access | Ability to see the dashboards details |
| Portal User Dashboard Edit | Ability to see update dashboards |
| Portal User Role Access | Ability to see details of portal roles |
| Portal User Role Configuration | Ability to see update portal role configuration |
| Quicklink Edit | Ability to see user linked to this entity from the quick link task |
| Quicklink Access | Ability to add portal users to this entity from the quick link task |
Portal User Management from Fenergo SaaS
There are two ways that users can be added to the portal from Fenergo SaaS. Firstly using the Portal User Management area and secondly using the Quick Link task.
Portal User Management
The administrator will be presented with a list of portal users who have access to the portal on this tenant. From here they can search the existing list of portal users, access a specific user or add a new portal user. On clicking into the Portal User Management area, the user will be presented with a list of portal users who have access to the portal on this tenant. From here they can search the existing list of portal users, access a specific user or add a new user.
Note: If the authentication flow configured for clients is SSO-only this will be indicated on the User Management page and the add new portal users functionality is disabled.
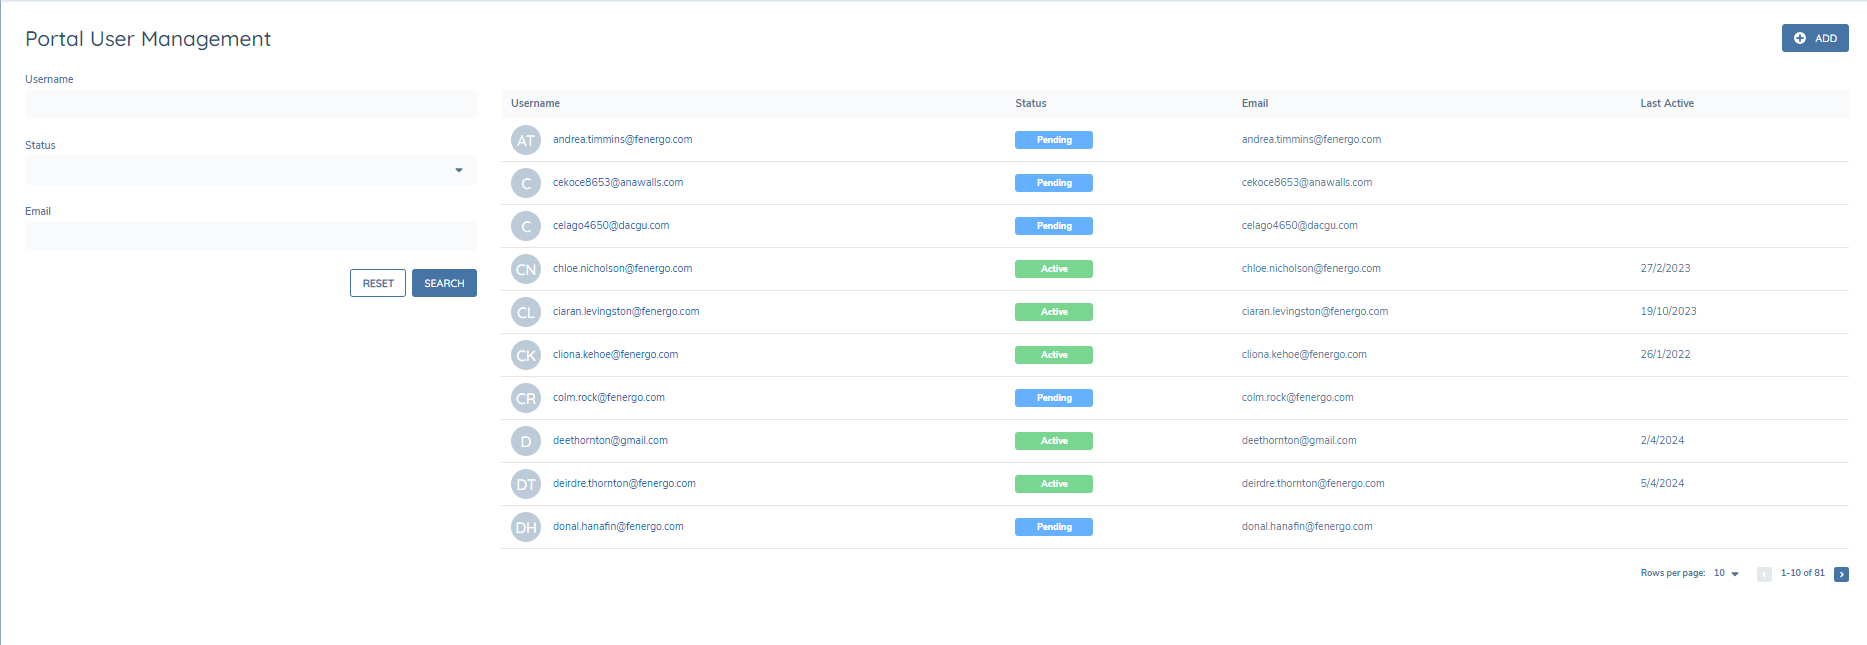
The Portal User Management page in Fenergo filters out entities that are already linked from the search grid by design. As a result:
- The total number of entities displayed in the grid may vary.
- Page size can differ between users and sessions, since already-linked entities are excluded from the available list.
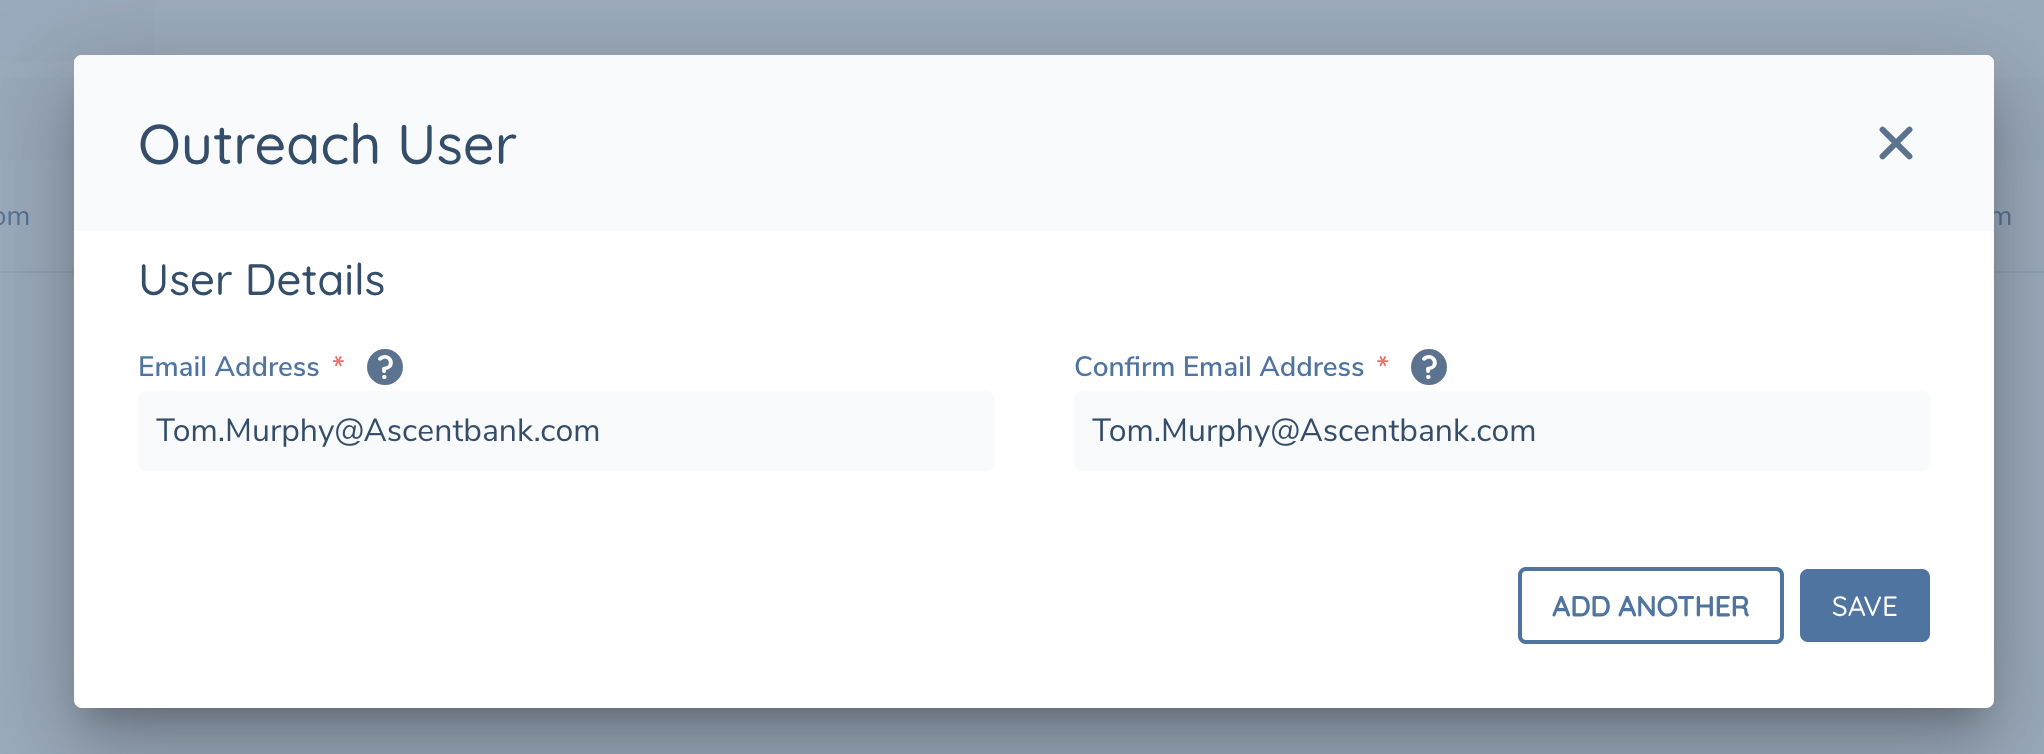
Adding a new user
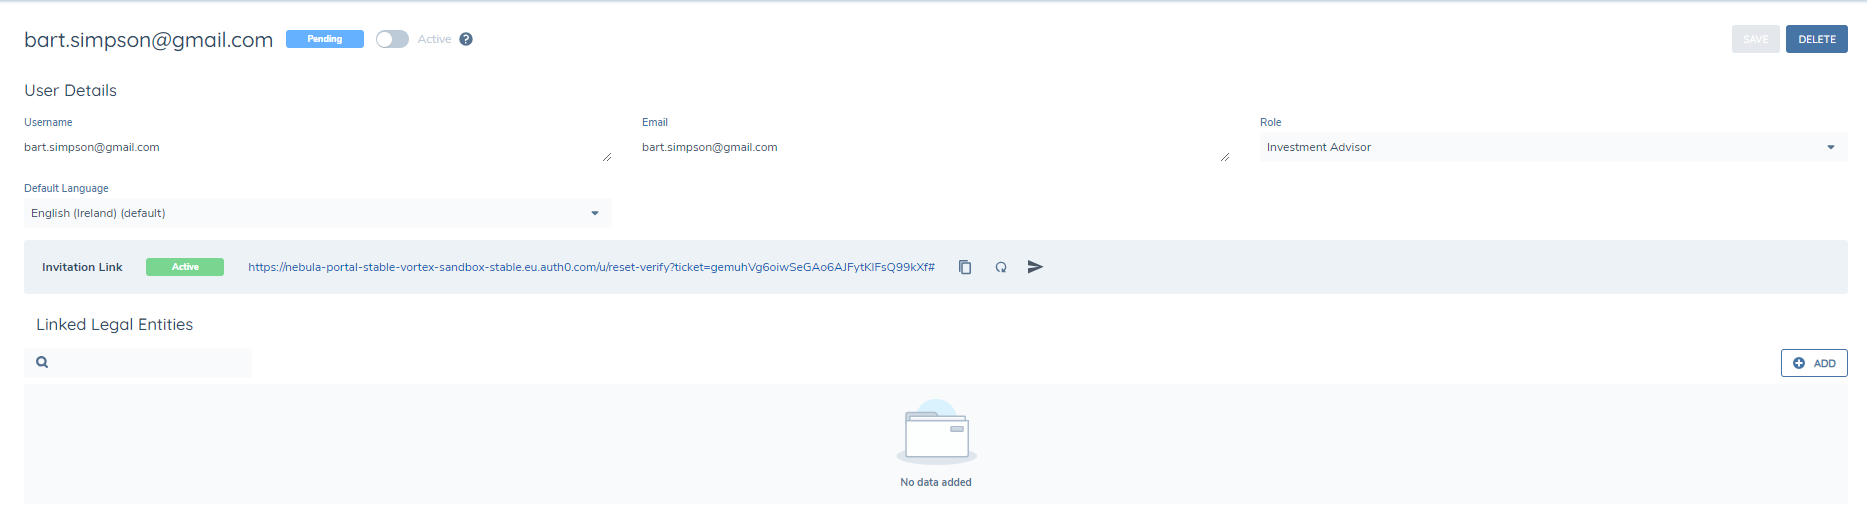
A new user can be added using their email address. A role can be assigned to new users from here. Once created, a unique link will be provided onscreen which can be directly emailed to the user, this will allow them to create a password and access the portal.
The link will expire after 5 days and can be regenerated (this expiration period can be extended per tenant). Once the user accesses the portal they will be set to "Active", and the link will no longer be shown.
Assigning Roles
- Users created from Delegated Authority or Portal Quick link will be assigned the default role
- Users created from the user management area can be assigned a role from the role dropdown in the User Profile page.
Multiple roles (up to five max.) can be assigned to a single Portal user, allowing the user to access multiple dashboards and gain visibility across different business contexts.
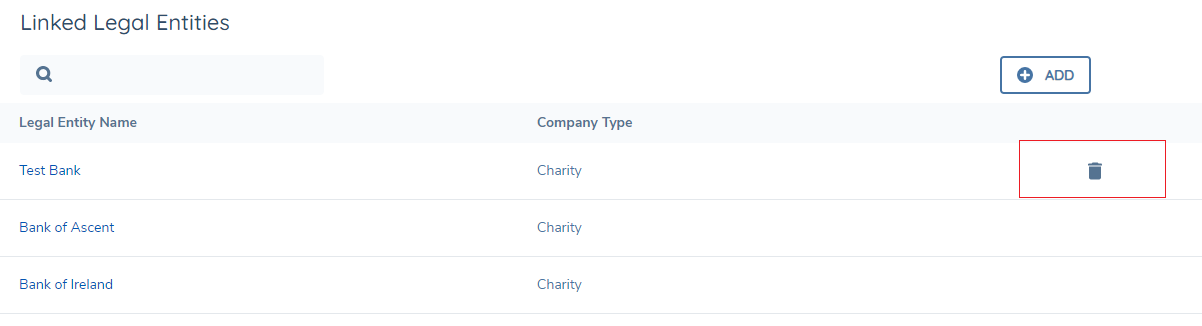
Linking and unlinking LEs to a portal user
LEs can be added to a portal user using the "+Add" button from the portal user page. Here there is a Search LE capability. Once the relevant LE’s are found, one or more can be selected and clicking on the "Link" button will create the user to LE link.
Note: There is currently a limit of 1000 LEs that can be linked and displayed on the configurable dashboards page.
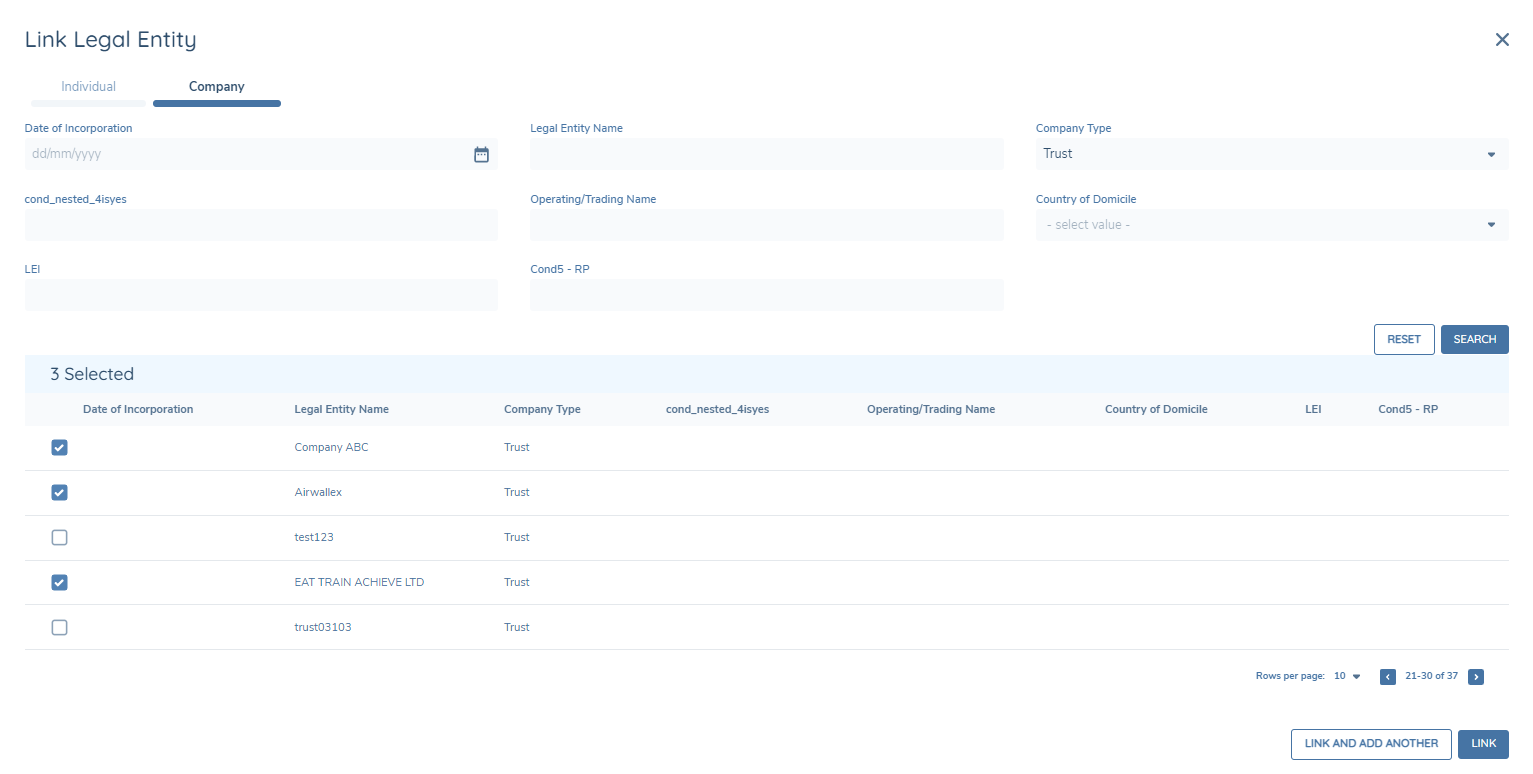
Hovering on a row of linked LEs will reveal a trash can which can be used to unlink the LE from that user.
Deactivating and removing portal users
With the Portal Administration User Delete permission, Fenergo SaaS users can remove a portal user. All LEs must be unlinked from a portal user before the user can be delete.
Portal user can also be set to inactive, if they are not going to be using the portal for a period, this option prevents them from logging into the portal, but their account is still available for reactivation.
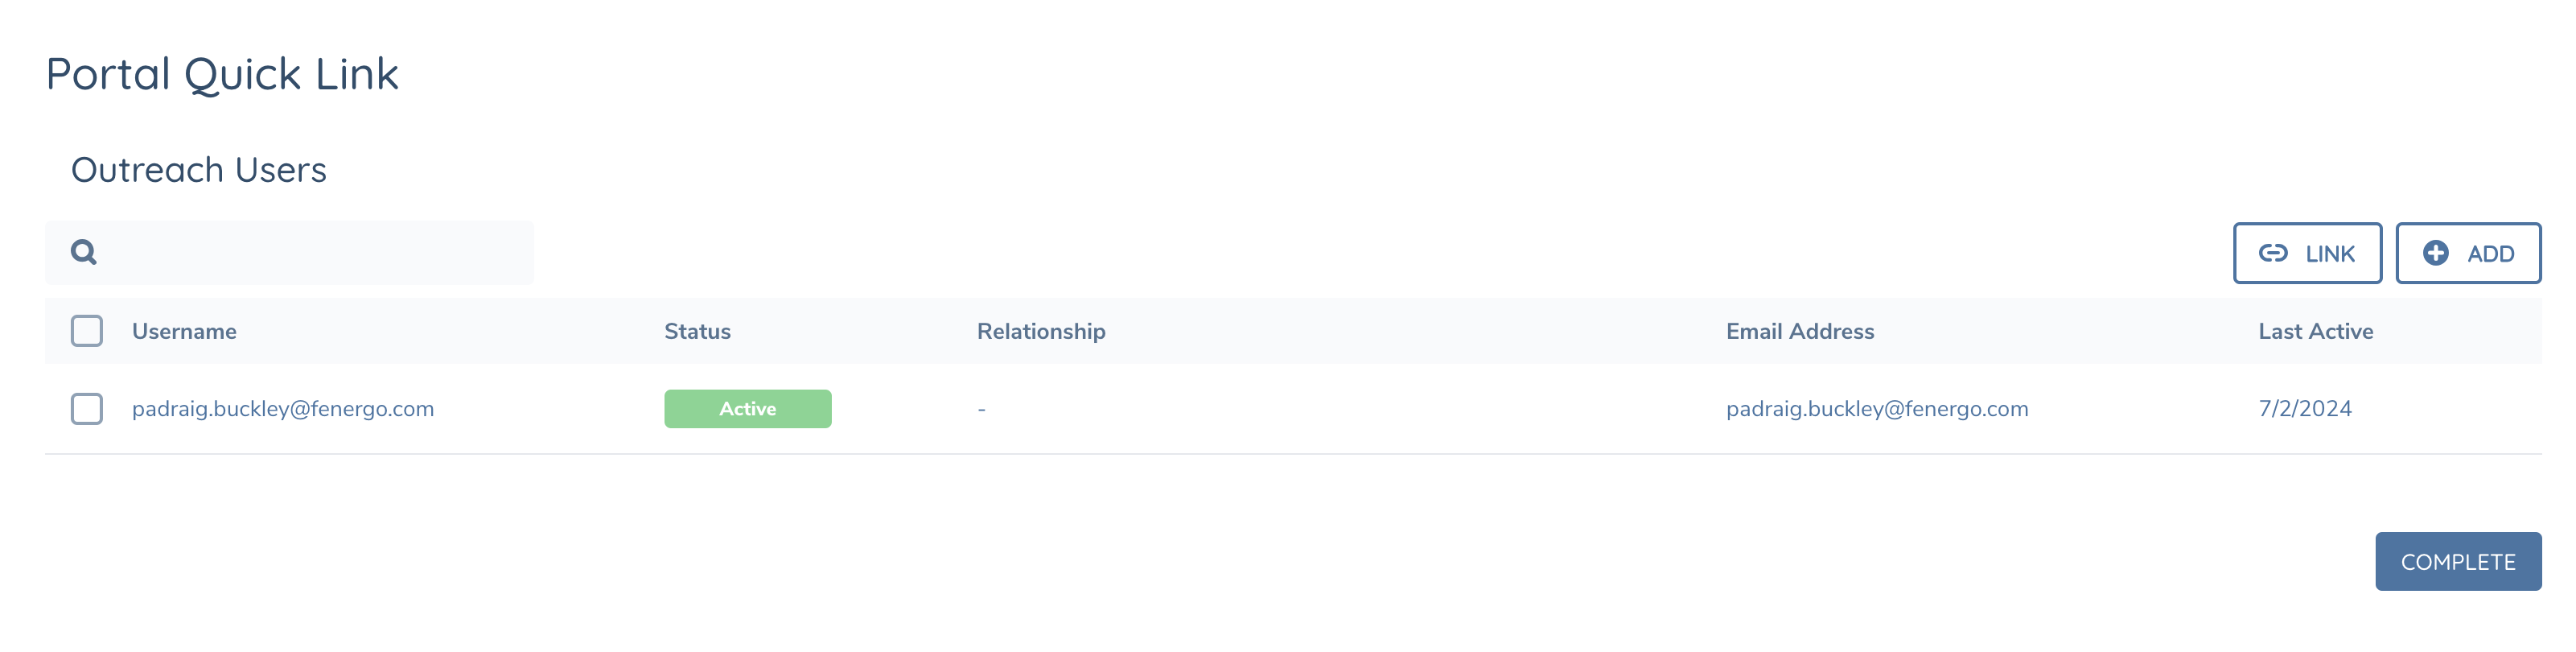
Portal Quick Link
A specific Portal Quick Link task has been created. This task can be added to a journey and with the correct permissions users can link portal users from within a journey. The task will
- show users that are linked to this entity
- allow new users to be added directly from the journey
- allow users to be removed portal access to this entity
Alongside information such as status, relationship, and email address, a users role is also displayed on the Portal Quick Link task.
Once users have the correct edit permission, they will see the +Add and Link button on the Quick Link task.

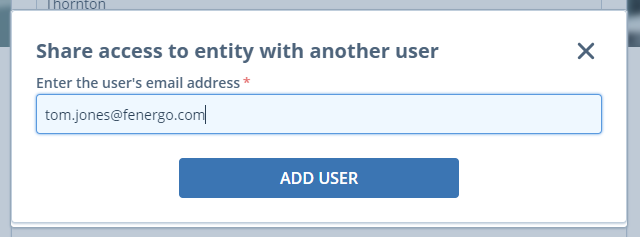
Clicking on the +Add button will invoke a modal which will allow them to link a new portal user by inputting the users email.
Clicking on the Link button will invoke a modal which will allow them to select a related party of type of individual that has been added to the hierarchy and add them as a portal user. Only related parties with an email address added can be linked as a portal user. If a related party is already linked, a user will not be able to link again and will be indicate by the blue info icon.

This new user will receive a verification email if they have not already verified their email address. If they have verified their email, they will receive an email notification once the outreach stage is triggered.
Entity Profile Page - Portal Users
A Portal Users tab is available on the Entity Profile page. Users who have the QuickLink Access permission will be able to access this tab. From here they can see the portal users that are linked to this entity, their state and when they were last active.

User Self Registration
The Fenergo SaaS portal uses Auth0 for user registration. Users can sign up or login via Auth0 login screen.
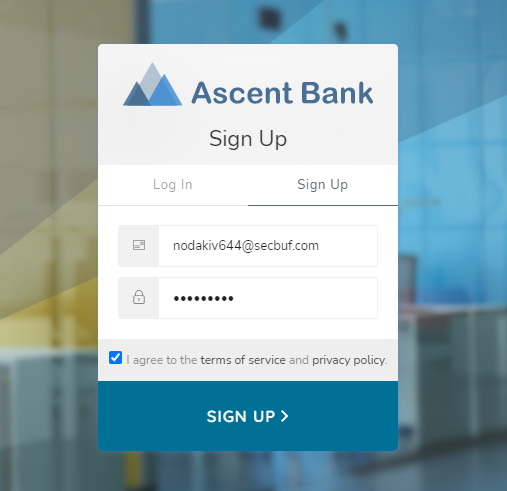
They will need to agree to the Terms and Conditions which will open in a new page if clicked.
Once users create an account, they will be sent a verification link via email, they will need to click on this link to verify their email before they can access Fenergo SaaS case initiation, or journeys which are assigned to them.
User can login or reset their password from the Log In page
Delegated Authority
For users who want to share the outreach process and gather information from multiple people, this facility will allow them to do so. Once the user has the correct permission set they will be able to extend an outreach to another user from the portal.
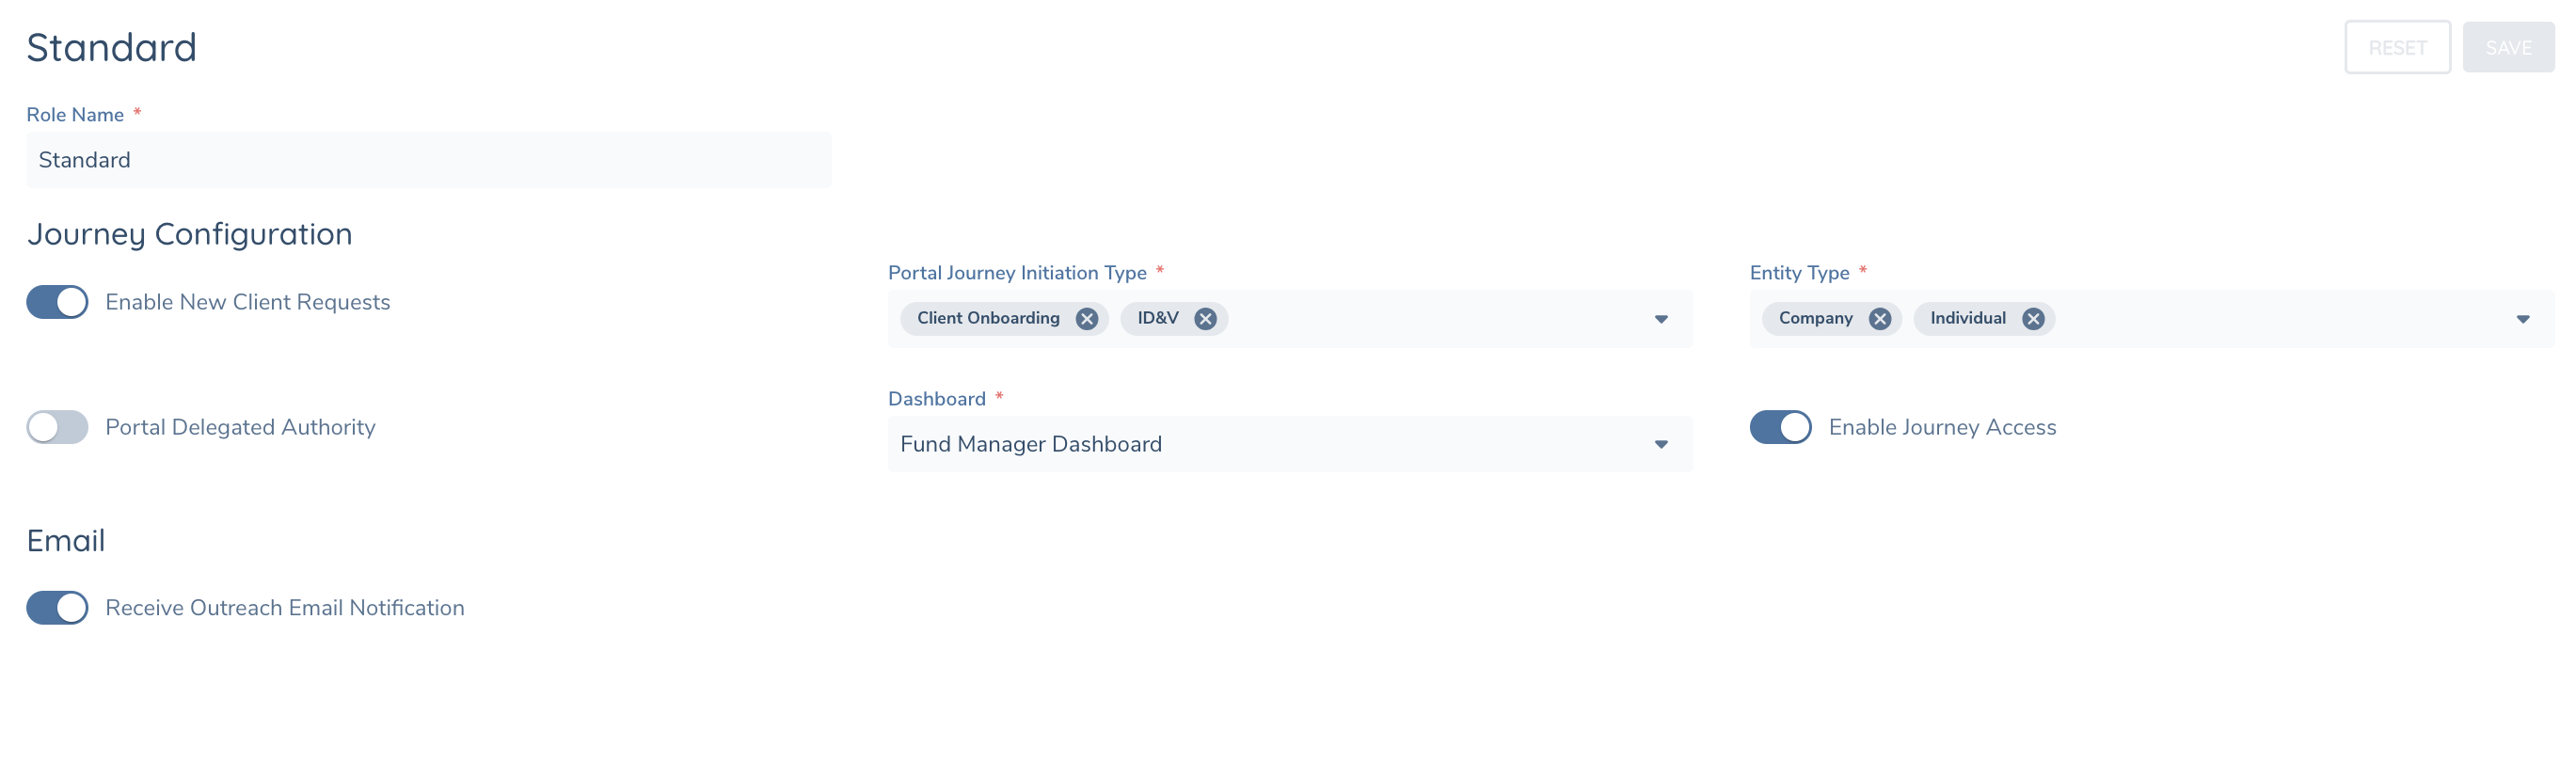
From the portal role configuration in Fenergo, users can use the Portal Delegated Authority toggle to enable this feature for a role. Where this is toggled on, users assigned this role will see the option to "Share Access" on their portal UI. This is opt-in functionality and can be added per user role. It will be toggled off by default.
Clicking on the "Share" button will open a modal where a new user can be added. This will invite the user to the portal and add a link to this entity. If this user is already a portal user then this entity will be linked to their profile and they will receive the Delegated Authority email.
The delegated authority email text can be enabled and configured in the Portal configuration > Portal Emails > Delegated User Notification.

Note: If a new portal user is created and the authentication flow is Username and Password, the user will need to verify their account prior to accessing by clicking Verify on the verification email that they receive. once verified, they can access the portal and any clients/journeys they have access to.
Note: If a client uses SSO, new users will not be created in the clients Identity provider. Portal Delegate Authority Feature does not trigger sending of verify email when using SSO because registration/creation and management of the user belongs to the responsibilities of client's Identity Provider. The following steps document the experience when using SSO and Delegate Authority
- An existing portal user has added the Delegated User using the Share Access functionality in Portal. An email address is required to Delegate Authority.
- The Delegated User will Not receive a "Verify Account" email. Instead, they will receive a "Delegated User Notification Email" if Enabled with a link to the client in Portal.
- Upon clicking the email link, the Delegated User will be directed to the portal's main page with a "Log In" button.
- Upon clicking Login, the Delegated User will be presented with the Client's IDP page and the client will determine if new user signup is permitted. If permitted, the Delegated User will be prompted to register with the client's IDP.
- If the user signs up with the same email address that they were Delegated Access with, then they will be presented with a portal Dashboard or navigated directly to an open journey if only one journey is available.
- For subsequent logins, the Delegated User accesses Portal home page, clicks Log In button and is redirected to client's IDP and may be automatically redirected to the Portal Dashboard page if the user has active session in client's IDP. Otherwise, he will be asked to provide credentials and login into client's IDP.
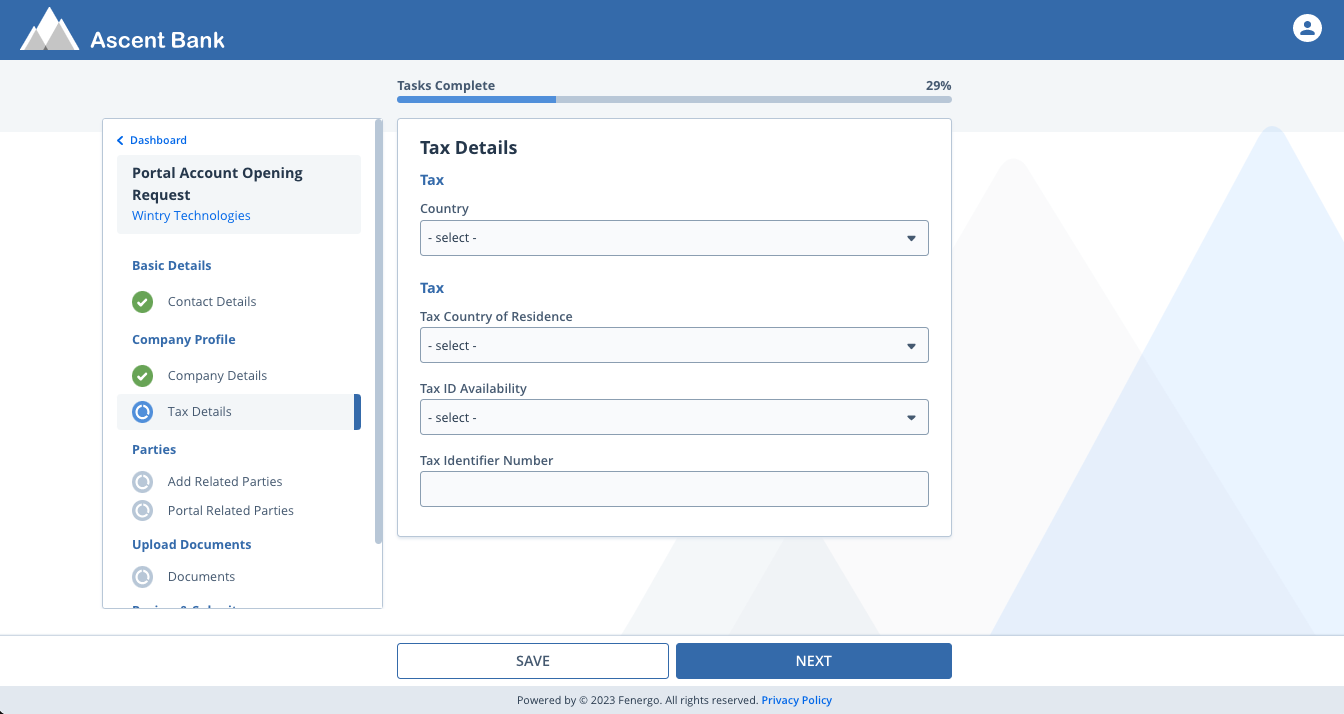
Journeys and Tasks
Journey Initiation
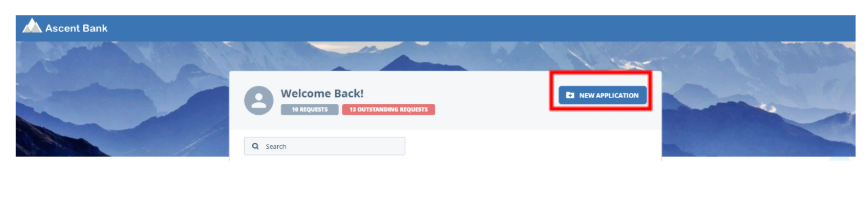
Once users are registered, they will be able to access the portal dashboard. From here they will be able to see and navigate to any journeys that they have access to or initiate a new one from the "New Application" button if this is enabled for their role. Within the Portal Role Configuration roles can be configured to enable users to initiate journeys for individual or corporate entities. The type of journey that is initiated from portal will depend on the Fenergo configuration for that role.
Exposing Journeys and Tasks
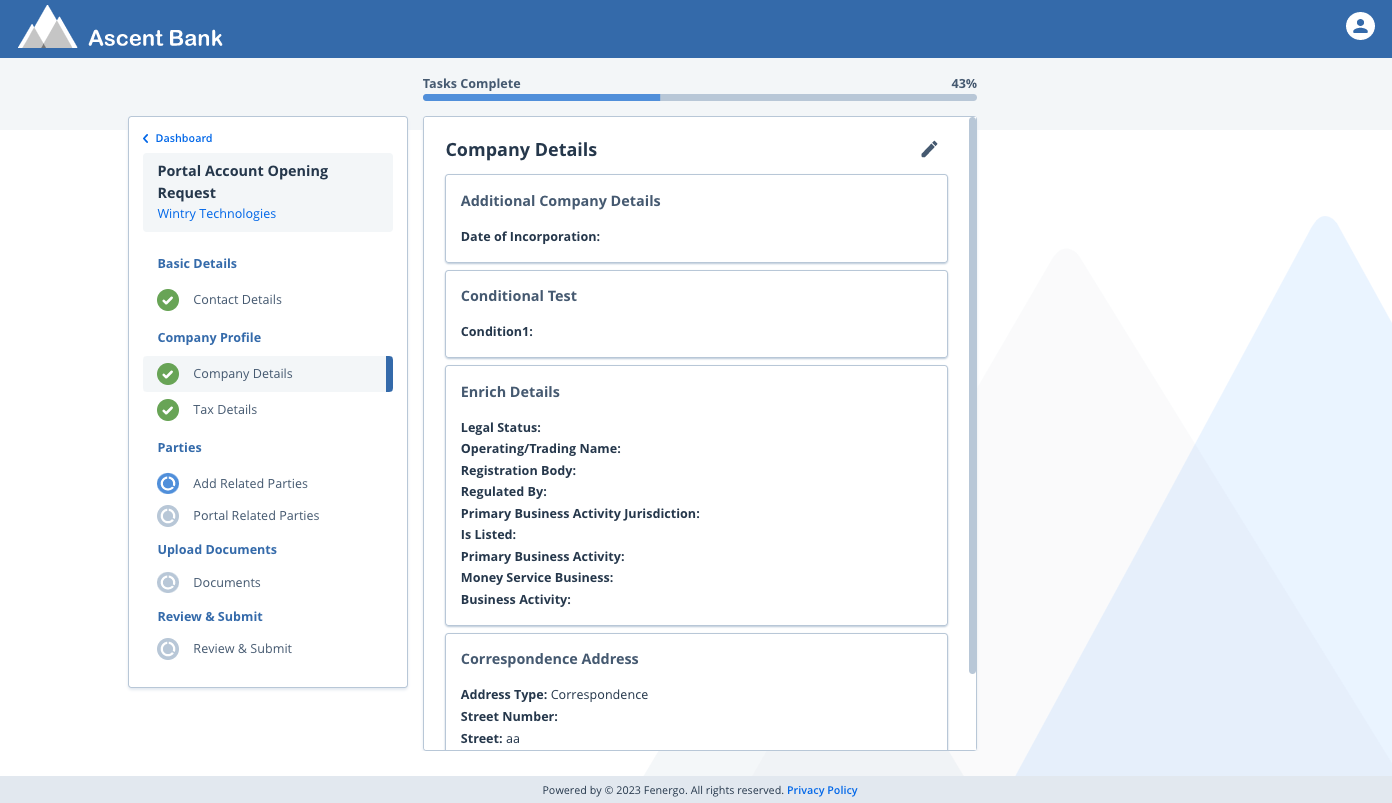
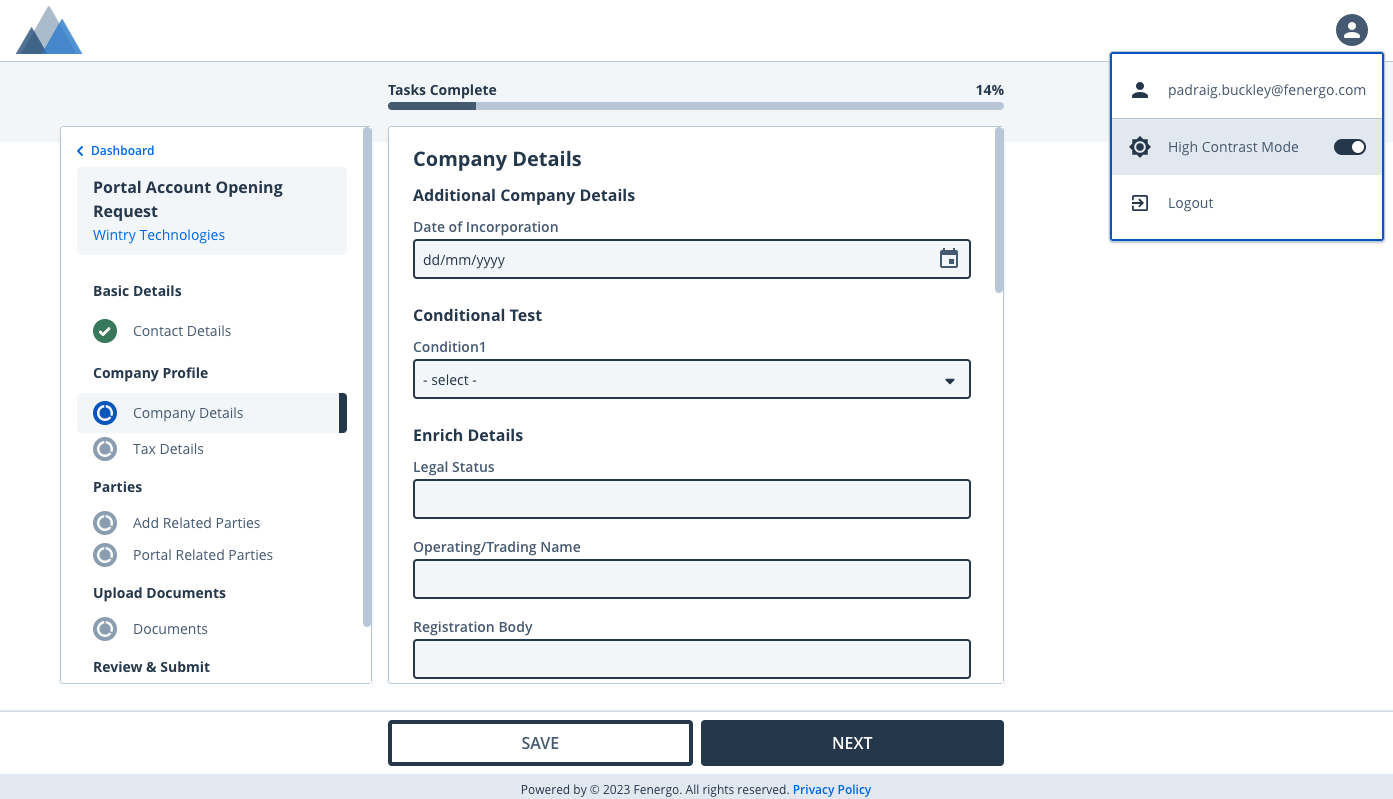
Journeys which are flagged as "External" in journey builder will be available for the associated users in Portal. Users can see the journeys available to them from the Portal dashboard. They can see their progress within a journey from the progress indicator along the top of the screen, this gives them an indication of the stages in their journey and how far along they have progressed.
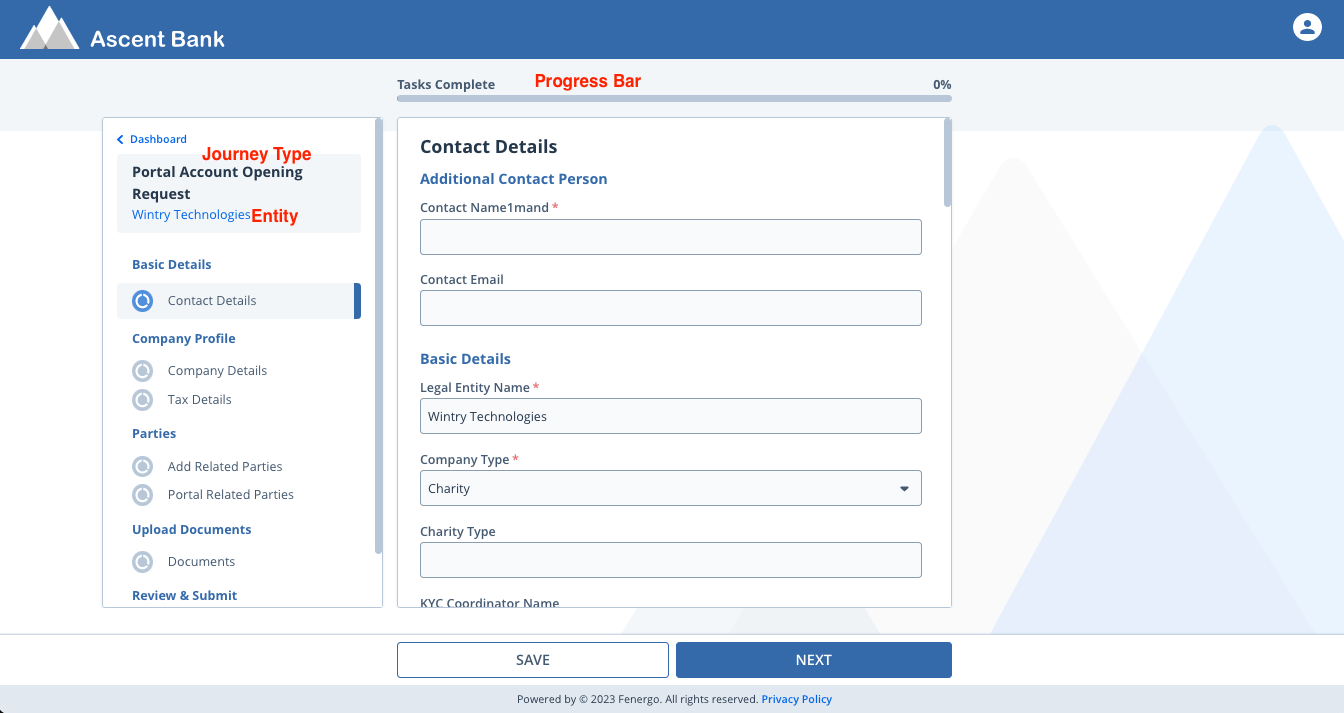
The tasks for this journey are detailed along the left-hand side of the screen, the user is navigated from one task to the next as they complete each one. The display of the task, ordering of the categories and the datagroups in these categories can be defined in the journey builder.
Read-Only Data Groups are now supported in the Portal. When enabled, all fields within a Data Group become uneditable, preventing modifications in the Portal for any Data Groups marked as Read Only in Fen-X.
Users can complete the tasks and save or complete each task as they progress. They will get positive affirmation that their data has been saved once they click Save or Next and the icon by each task name gives them visual confirmation of the task status, a green tick is complete, blue is in progress and grey is not yet started.
Task types available in Portal are Data, Documents, Data and Documents, Related Parties, Manage Products, Individual ID&V and Data Review Tasks. System tasks which are part of the journey are hidden from the portal user. Parallel tasks can also be configured for Portal journeys.
Conditional tasks configured as part of a portal journey will appear in the portal when triggered.
User can reopen a completed task by clicking on the pencil icon within the task, this will reopen this task and all subsequent tasks in a journey.
Users can save tasks in the Portal without completing all mandatory fields on Data tasks and Data & Documents tasks. Any fields completed are saved for when the user returns at a later time to fill out the rest.
If the user has not filled in all mandatory fields and attempts to click Next, an error message will display as users cannot move forward in a process without completing.
If a datagroup does not have all mandatory data completed, they will not be saved, and their data will not be visible when the user returns to the task.
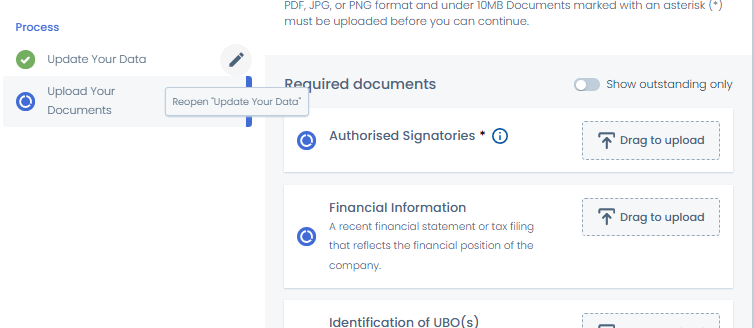
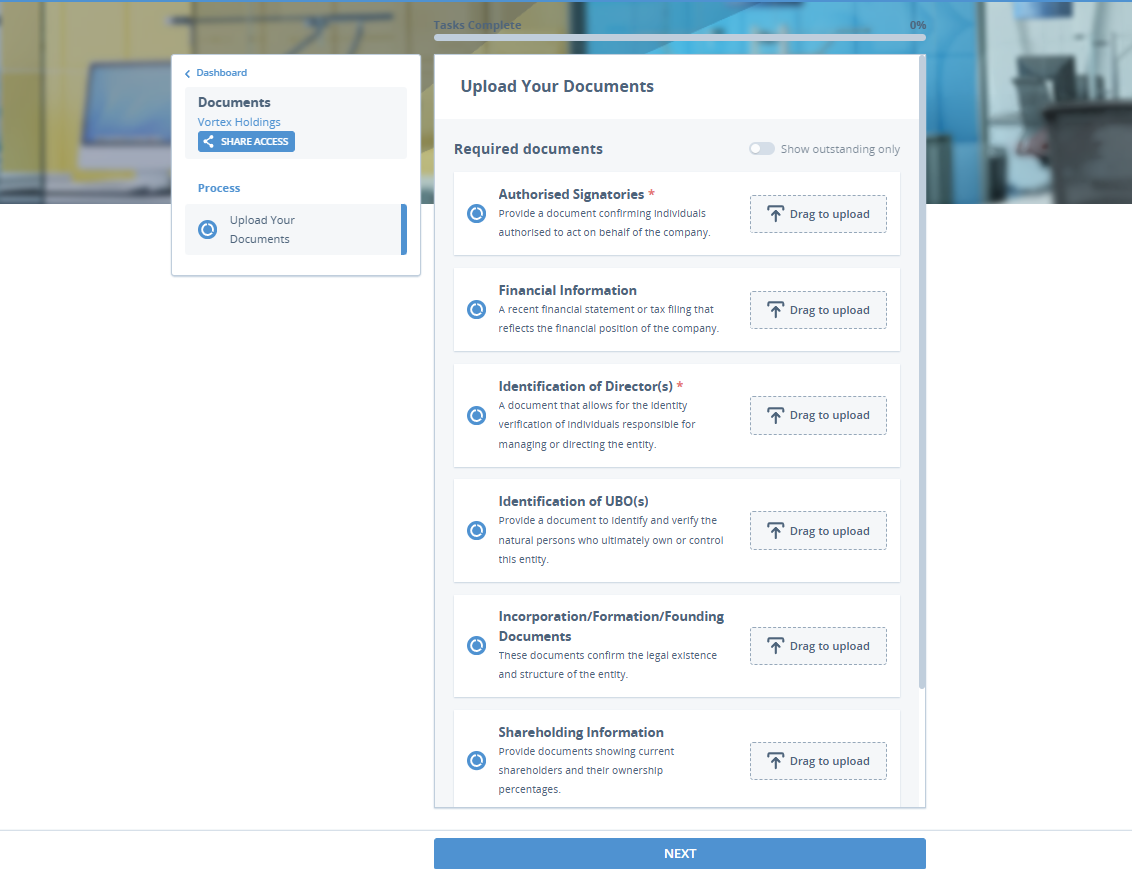
Document Management
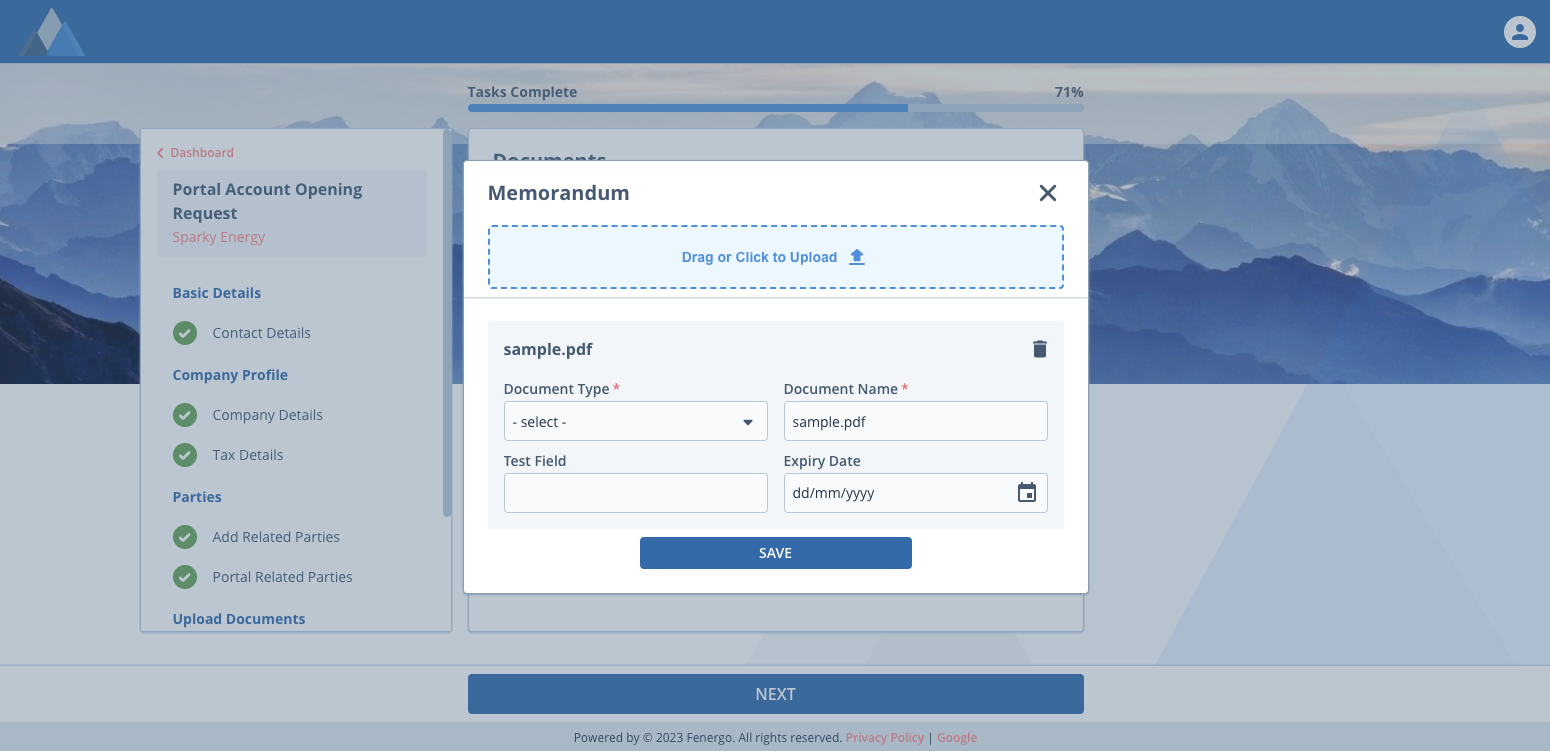
Document requirement tasks can be completed from the Portal. Users can upload single or multiple documents to fulfil a requirement. They will need to categorize their documents according to the Document Management configuration set up in Fenergo SaaS.
Each document is saved to Fenergo SaaS once the users saves it, no documents are stored in the Portal. Users can remove or update documents they have added. The file types currently supported are outlined here Managing Documents in the Fenergo Document Portal
Users will not be able to progress past this task until all mandatory requirements are satisfied. Once they are the "Next" button will become active.
Documents V1 Task
When the users click on "Next" the Document Requirement will be automatically set to "Approved" to allow the user to progress. Once these docs are picked up in a subsequent back-office journey, where document persistence is enabled, they will appear as "Approval Pending".
Additional Document metadata fields configured in Policy will display to the user when adding a document. Any new fields configured will immediately be available in Portal.
Note: If the document metadata datagroup is deleted and configured again, portal will refresh this after 24 hours.
Document Download
Documents which have been uploaded in Fenergo SaaS or Portal to document requirements available in the Portal can be downloaded using the document download icon.
Documents V2 Task
This section of the guide provides details on the functionality included in Documents V2 in Portal and the supported features.
Supported Functionality
-
Support for Acceptable Document Types
Only relevant document types, as defined in Fenergo, are supported and displayed to the portal user.
-
Streamlined Metadata Capture
The process of populating document data has been streamlined. Refer to the Portal Enrich Document Metadata Toggle section in the configuration guide for more details.
-
Display Document Requirements
Document requirements are displayed based on both global and conditional policies.
-
Support for Trigger Conditions
Document requirements are determined based on the current entity and any related product trigger conditions.
-
Conditional Fields
Conditional fields appear in the document upload modal, depending on specific requirements and configurations.
-
Hide Waived or Deferred Documents
- Waived Documents: Hidden when the corresponding toggle is enabled in Fenergo SaaS.
- Deferred Documents: Also hidden when the toggle is enabled, ensuring only active document requirements are visible.
-
Mandatory Document Capture
Enforced through policy configuration to ensure required documents are captured.
-
Data Extraction
Data within documents uploaded via the Documents V2 task in the portal can be extracted and displayed for review by a Fenergo user.
Additionally, we have introduced a number of Document UX improvements to Fenergo Portal’s Documents V2 Task, with an aim to make document submission clearer, more intuitive, and more user-friendly by improving visual design, helpful guidance, and interactive behaviour.
Display of Document Requirements
-
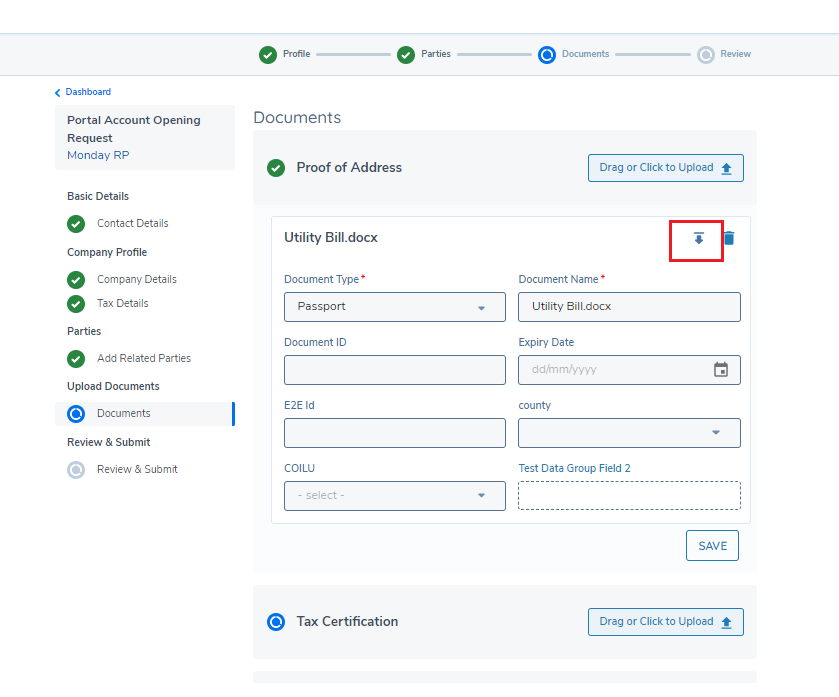
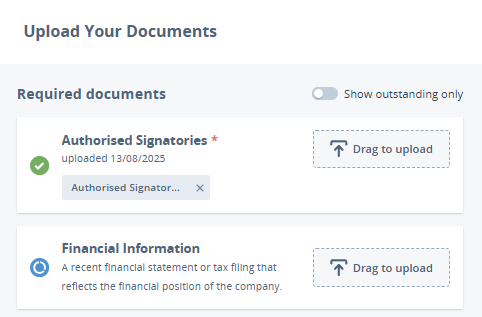
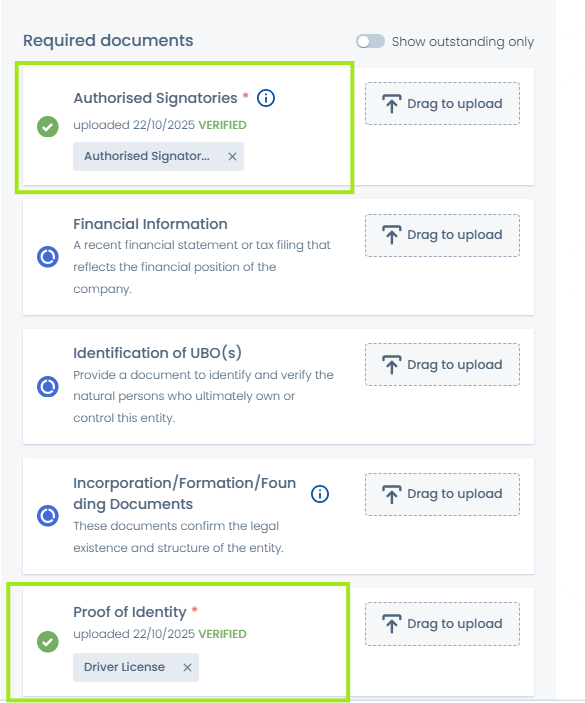
Each document requirement is shown as a card which includes:
- A Status icon representing current state.
- Document requirement name (e.g., "Proof of Identity").
- A Drag-to-upload component where files can be dropped.
- A Document Tooltip, describing the document required.
-
This is the default state for displaying document requirements before any document is uploaded by the Portal user.
-
This gives users a consistent, clear view of what’s expected before any action is taken.
Document Uploaded State
- When a document is successfully uploaded, the card updates to reflect this.
- The tooltip is hidden post-upload.
Single Document Upload:
- File name and upload date are shown.
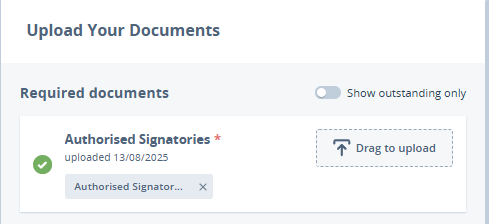
Multiple Documents Uploaded:
- Only the most recent upload date is shown.
- Each document is displayed as a chip, which users can click on to view the document.
- The full file name is shown as a hover tooltip.
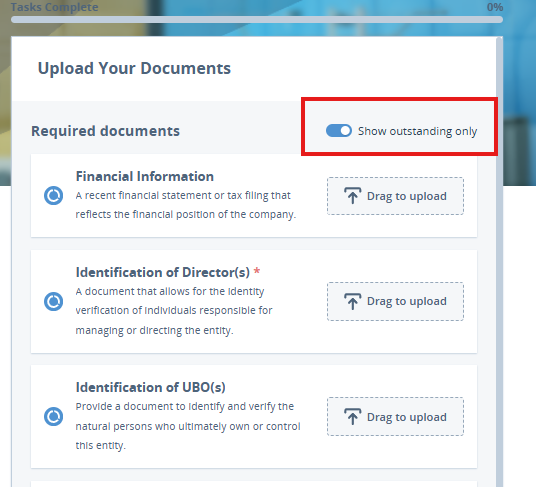
Show Outstanding Only Toggle
-
This toggle allows Portal users to filter the view to show only document requirements that have not yet been fulfilled.
-
When enabled: Completed requirements disappear from the list as documents are uploaded.
-
When disabled: All document requirements are shown.
-
When all documents have been uploaded:
- The full list is shown automatically.
- The toggle becomes disabled.
Drag-to-Upload Interaction
- Drag-to-upload functionality remains consistent with the previous version.
- The upload behaviour depends on the Enrich Documents V2 toggle.
For more information on configuring this feature, please visit the Configuring the Fenergo Portal Guide.
Please refer to the Configuring the Fenergo Portal User guide on how to configure.
Verified Documents Indicator
This feature introduces a Verified Documents Indicator for Outreach document tasks in Portal. When enabled, documents uploaded before the Outreach Start Date display with a “Verified” tag, helping users identify which documents have already been accepted and avoid re-uploading duplicates.
Display Documents on the Entity Profile Page in Portal
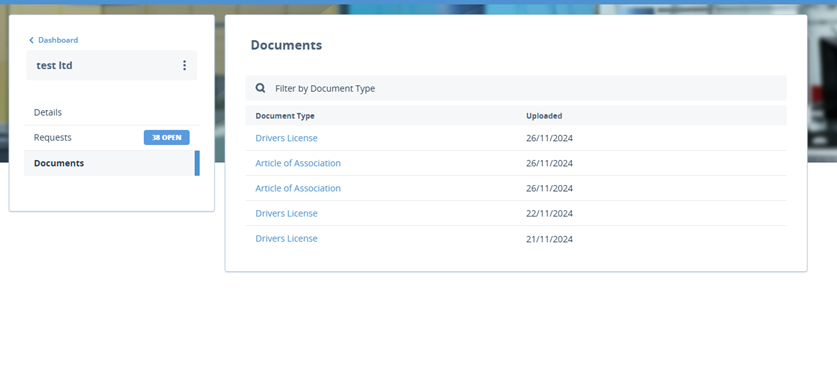
This feature introduces the Documents tab in the Portal Profile allowing users to view, search, and download documents directly via a dedicated tab - meaning users will now be able to access and interact with Documents outside of a Journey. This tab can be accessed by clicking on the View Client Details hyperlink under the name of the Entity in the Portal.
If no documents have been configured, or no documents match the user’s selection then an empty stage will display to the user. When documents are configured and match selection, a grid of columns displays to the user as seen below.
-
The Document Type column displays the type of document that has been added in a hyperlink format – clicking on this hyperlink downloads the document.
-
The Uploaded column displays the data that this document was uploaded.
-
The Search bar at the top of the grid allows Portal users to Filter by Document Type, allowing them to find a document quicker when there are multiple types added.
Please refer to the Configuring the Fenergo Portal Guide to learn how to configure this functionality.
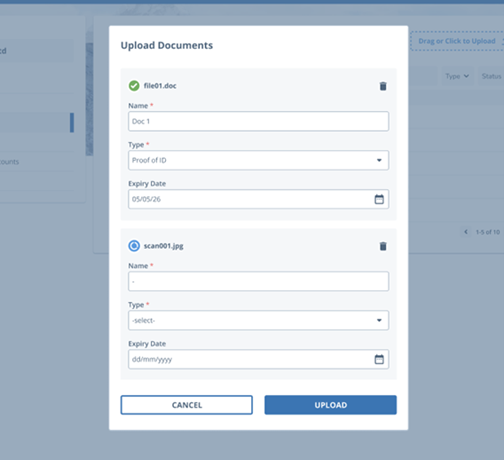
Additionally, Portal users can upload documents via the Entity Profile Page in Portal, meaning a user can upload a document without launching a journey.
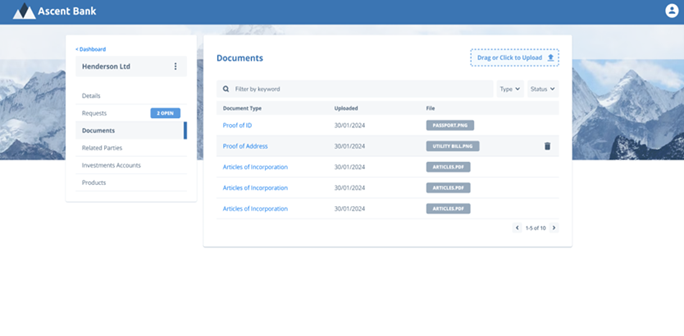
When a user clicks on the Drag or Click to Upload button in the top right corner of the Documents tab, the Upload Documents modal will appear on screen.
The user can fill in the Document Name, Document Type, Expiry Date and upload it to the profile page.
This feature also introduces an additional two tabs to the Portal.
- Details: This displays the information from the Entity Details Display field in Fenergo. It displays all the information on that entity to the user, and allows the user to update any information via the Update Details button.
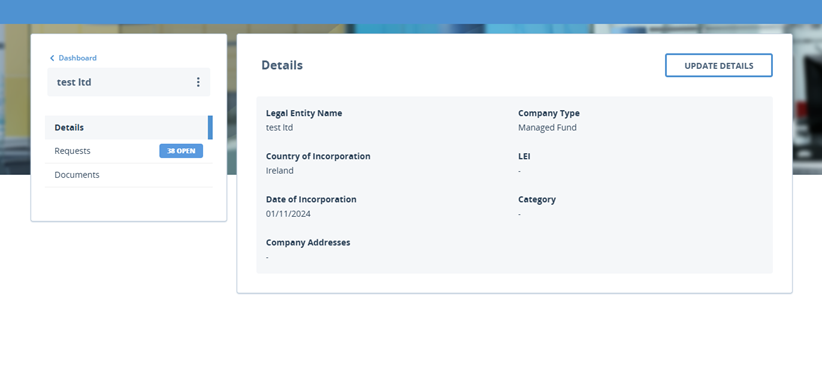
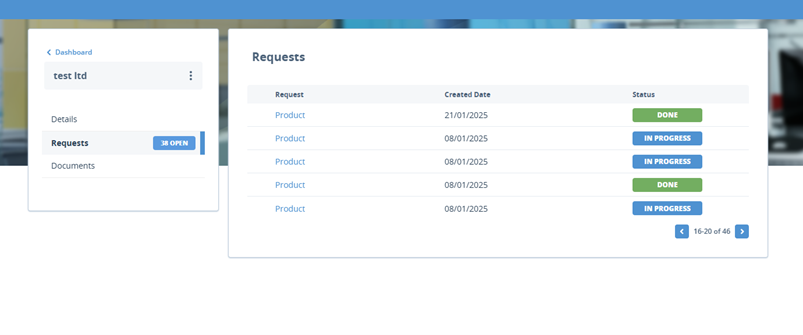
- Requests: Displays the list of journeys to the Portal user and their status.
Related Parties
Related Parties can be added or removed from the Portal. Users can select multiple relationship types at once, and once they select whether the relationship is with an individual or company, the relevant fields will be presented for completion. Users can also see the entity that this related party is linked to in the "Related Parent" field. All new related parties created from the portal will be linked directly to the entity at hand, it is not possible to create a hierarchy from the portal but relationships within a hierarchy will be shown, but cannot be edited.
Existing relationships can be viewed and the relationship type and LE metadata can be updated.
Data Completion Checks on Related Parties
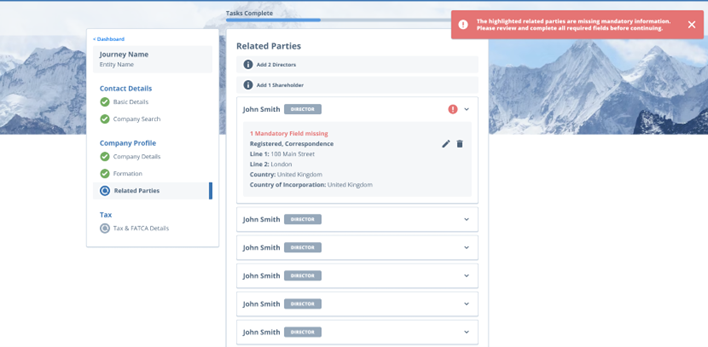
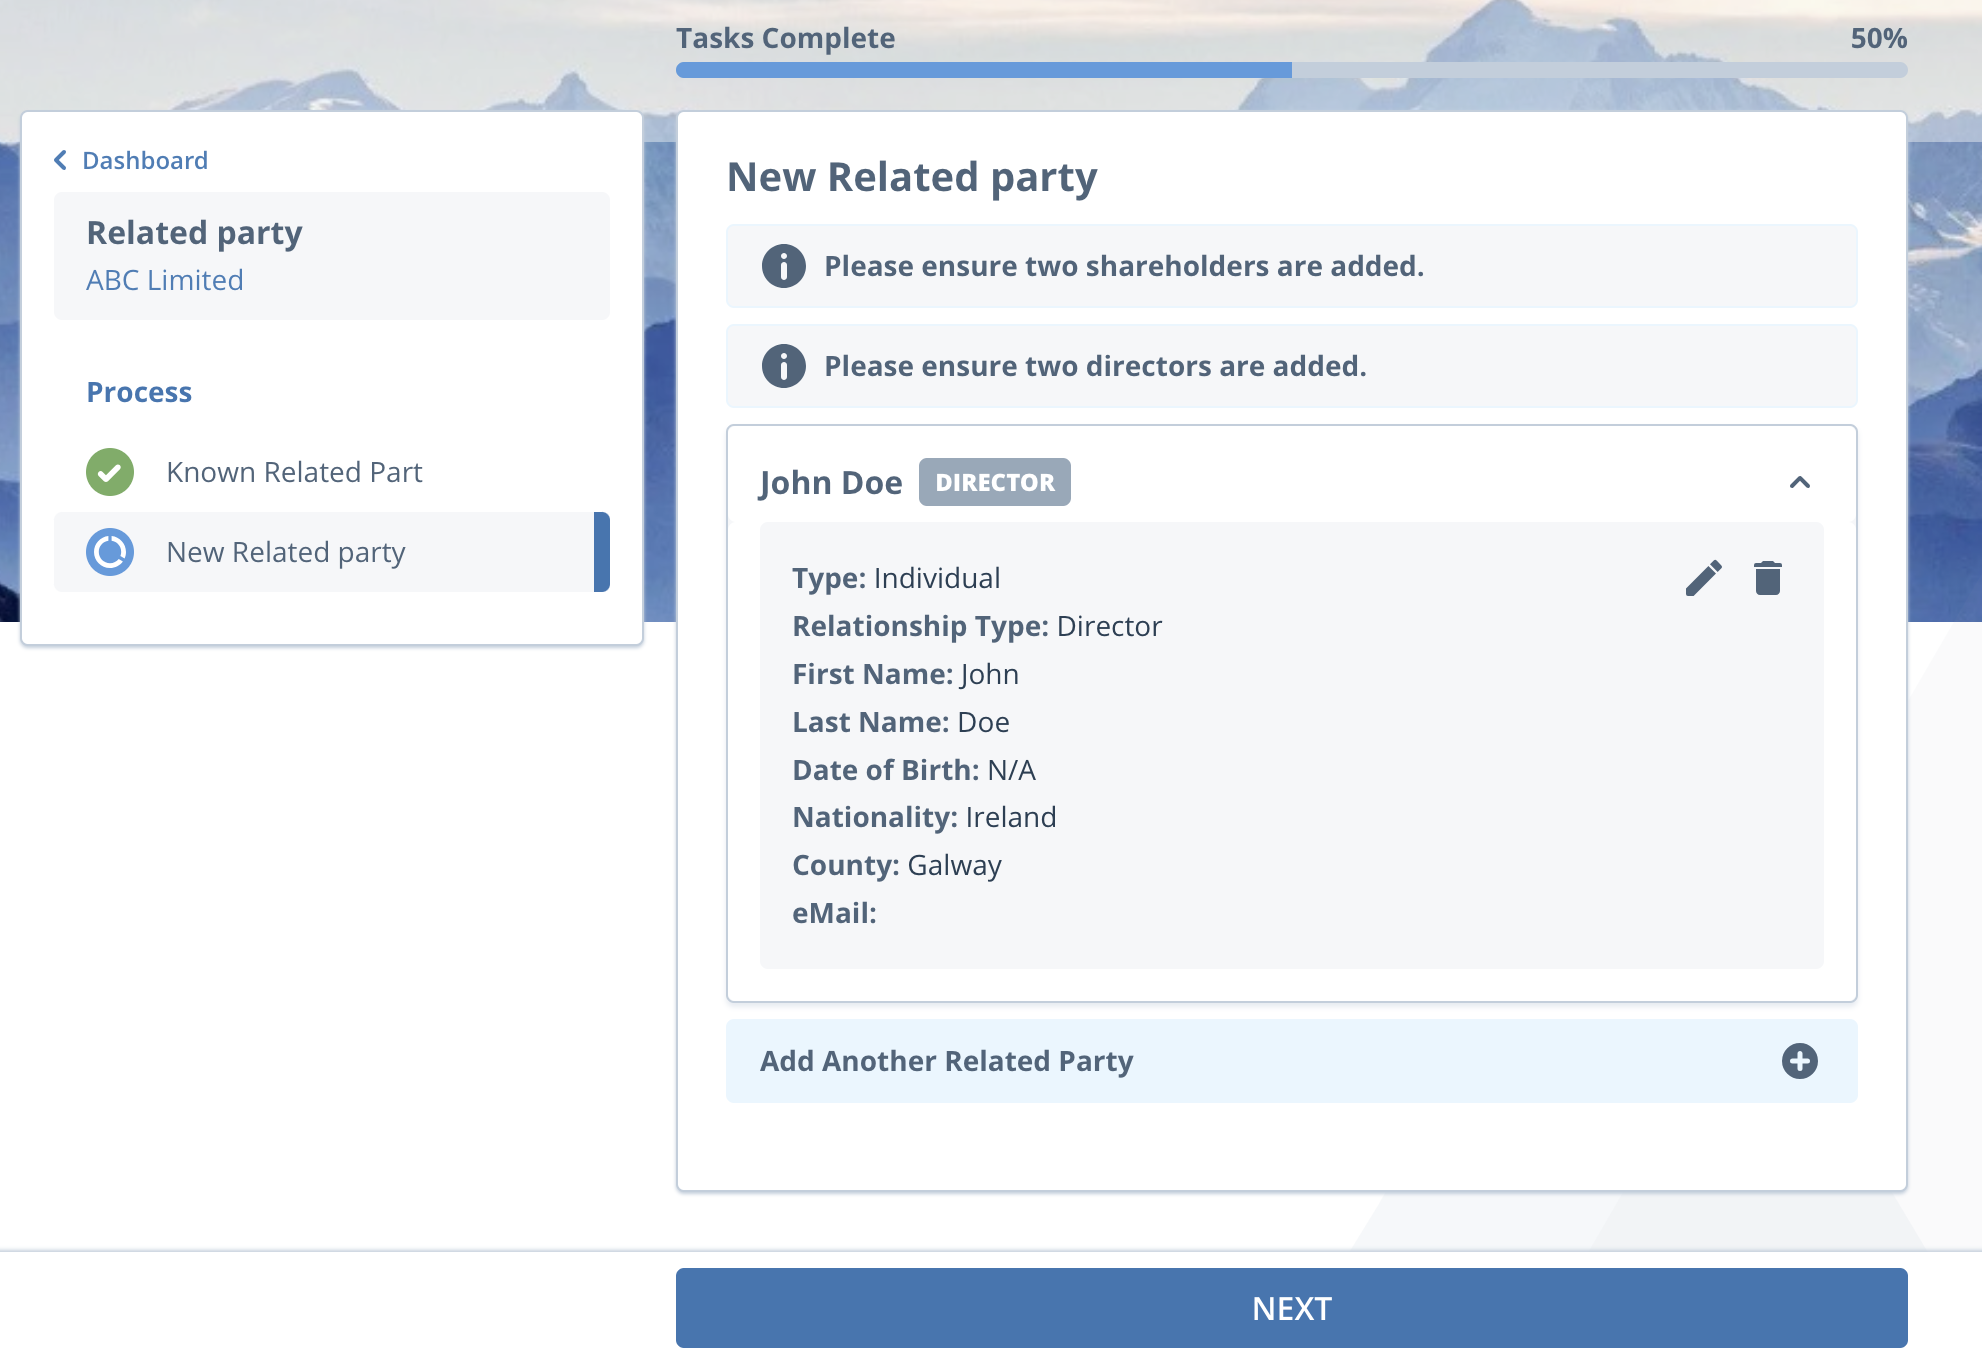
This feature introduces enhanced validation for the Related Party task within the Portal. It allows configurators to enforce mandatory review for related parties and enables portal users to clearly see the completion status of each Related Party.
Users will be blocked from progressing with their journey until all mandatory data for that Related Party task is populated. Users will be informed on which Related Parties need to be reviewed so that they can efficiently navigate to that Related Party and complete any required data entry. Validation is triggered when a Related Party is expanded.
-
Any Related Party that needs to be reviewed before the task can be completed, will be displayed in a warning state.
-
Any Related Party that has missing / incomplete mandatory data will be updated to an error state.
-
Any Related Party that has all mandatory fields and configured data categories complete, will update to display a success state.
Note: When a new Related Party is added, it will immediately display in a success state if all required data is entered at the time of creation.
For more information on configuring this feature, please visit the Configuring the Fenergo Portal Guide.
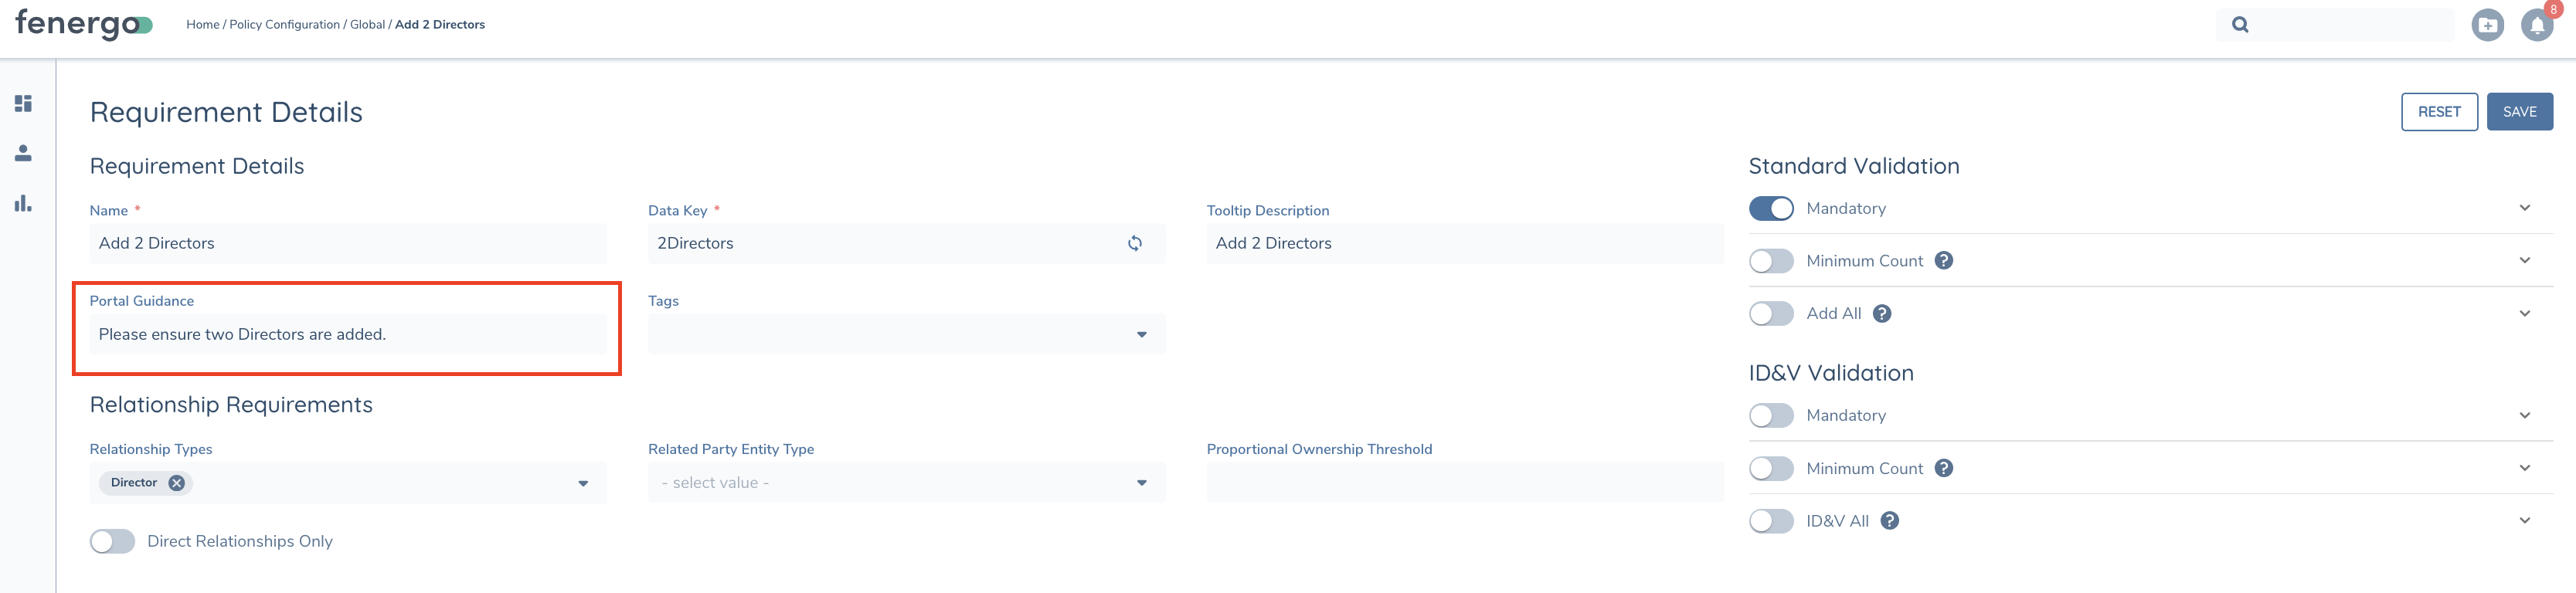
Ownership and Control Rules in Related Party Tasks
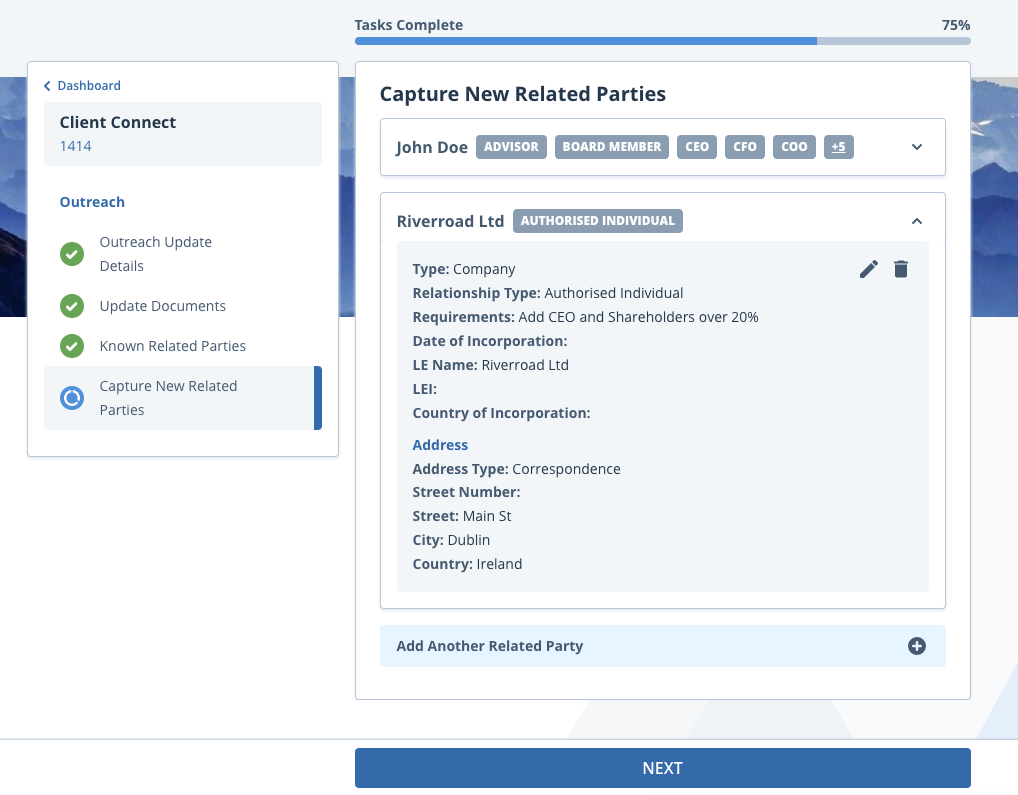
Ownership and Control rules can be displayed within the Standard Related Party and Outreach New Related Party task. This allows informational messages to be configured, guiding Portal users through the process of adding new related parties.
On the Standard Related Party Task, depending on how the rule is configured:
- If mandatory rules are in place, users will be blocked from progressing until the requirements are met.
- If no mandatory rules are configured, the Ownership and Control rules will serve as guidance only, without blocking the user’s journey.
On the Outreach related Parties task, the Ownership and Control rules is guidance only and will not block a user from completing the task. This is to avoid blocking users if the portal user does not have the information available.
To enable enforcement of Ownership and Control rules in portal, firstly a new toggle has been added to the standard related party task in the journey builder called Enforce O&C Rules in Portal. This is disabled by default to ensure this functionality is opt in by clients.
To configure Ownership and Control rules to display in Portal, a new field has been added to the Ownership and Control configuration page called Portal Guidance. The ownership and control text will display as information messages on the following tasks
- Outreach New Related Party task
- Standard Related Parties Task If the portal guidance field is not populated, the Ownership & Control rule text will display if marked as mandatory.
For more information on configuring ownership and control rules, refer to Related Party Management Configuration User Guide.
Manage Products
Portal allows for the capture and management of products related to an entity. Products can be captured within the context of a journey via the Manage Products task, which is displayed based on the journey’s configuration.
Adding a Product
When selecting the Manage Products task, if no products are captured against an entity, the default landing page is displayed.
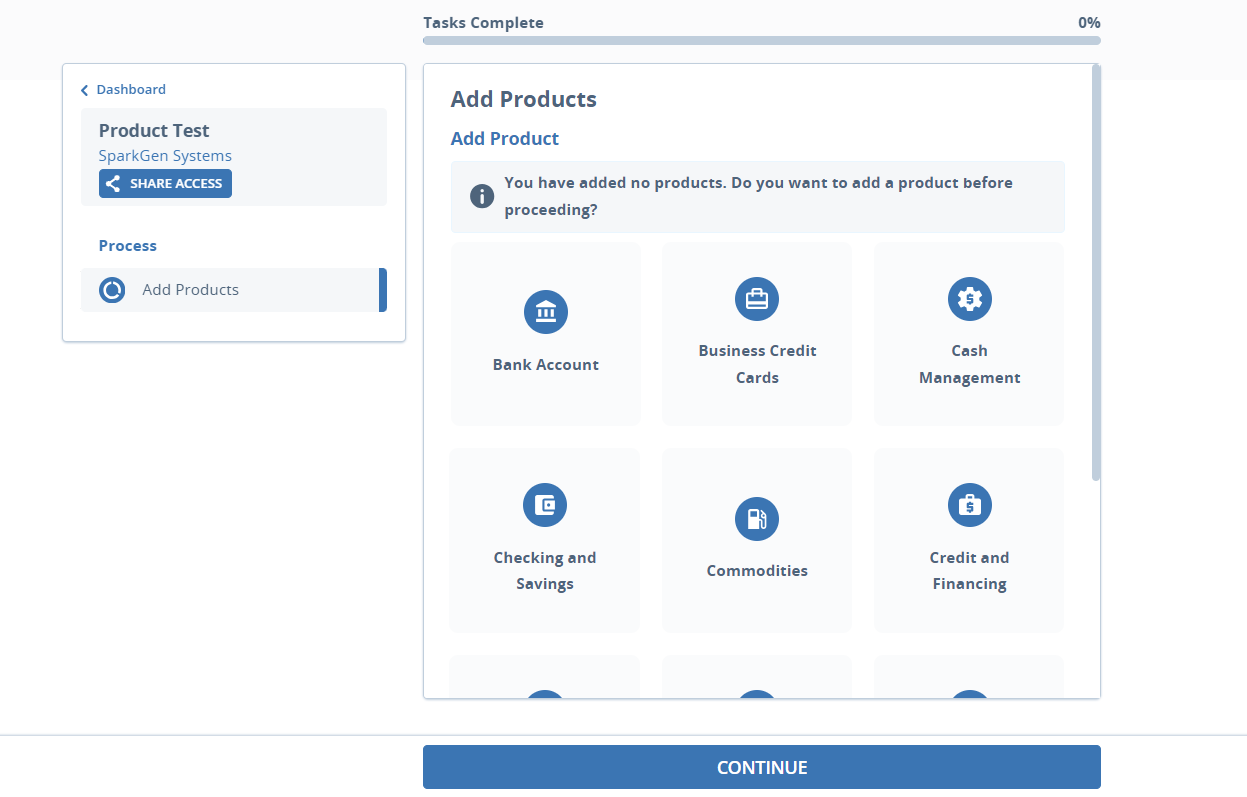
Steps to Add a Product:
- Select Product Family: The user can select a product family and click Continue. If the user does not select a Product Family, the user can complete the Manage Products task without adding a product by clicking the COMPLETE button.
- Populate Product Details: On selecting Continue, a new product page will be displayed. Depending on the task configuration, it will display the applicable product data requirements. The user will be required to complete all mandatory fields. When adding product details, Clicking Back will navigate the user to the previous screen without creating the product.
- Save Product: Portal users can now save products incrementally without needing to complete all mandatory data upfront. For more information please read below on Saving Products.
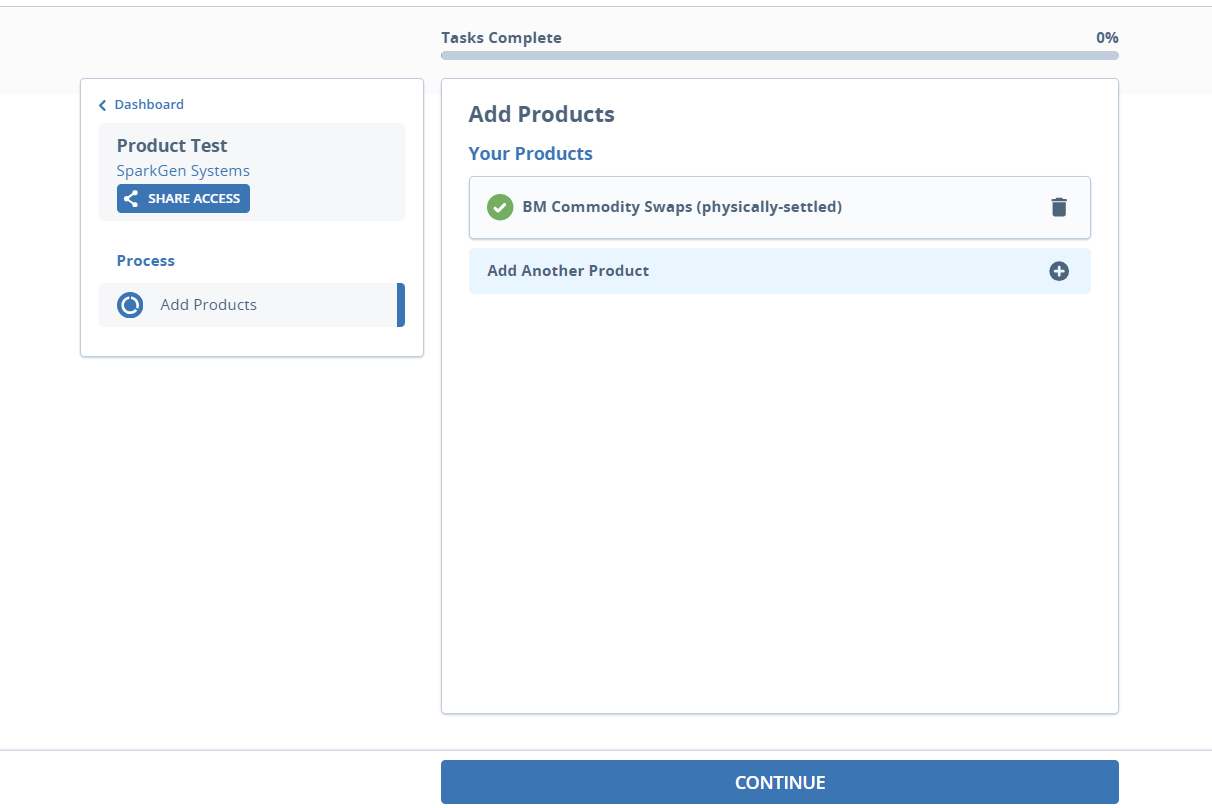
When a product is added, it is displayed to the user on the manage products task. The product type is displayed to the user. Note: Not all products will display to the user here. Only products with a status of Onboarded and Onboarding will display to the user. Products with a status of In Review, Offboarded or Offboarding do not display to the user.
The user can remove the product if no longer needed by clicking the remove icon.
To add another product, the user can click Add Another Product.
The Manage Products task in Portal does not support the following Task configuration options
- Display and Capture Product Documents
- Display and Capture Product Related Parties
- Editing, Cloning, Offboarding, Reverting of Products
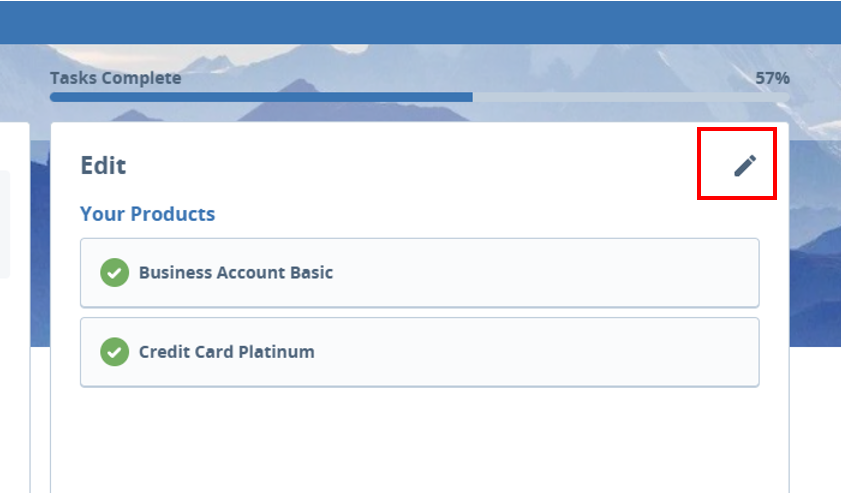
Edit Products: As part of an existing journey
This feature allows Portal users to complete missing product information, edit product details, and delete products within the Portal. The Edit Product function may be required for a variety of scenarios such as-
- Adding a new product which requires editing details
- An existing product requires an update
- Products added in Fen X that require further information from the Portal end user
Portal users are able to edit products regardless of their status (Onboarding, In Review, Onboarded).
Clicking on the Edit Icon will bring the Portal user to the Edit Details screen for that product. The Edit icon will be visible if either Enable All Product Actions or Edit is selected in Product Actions on the Products Task.
A draft of the product is not created when the user clicks the edit icon. The draft is only generated when the user saves the product. Until it is saved, the product will continue to reference the requirement set from its original creation.
For more information on configuring this, please visit Configuring the Fenergo Portal
Product Status
- For Onboarding and In Review products, editing does not change the products status.
- For Onboarded products, editing will update the status to In Review , and the Onboarded version will no longer be visible.
Products with a status of In Review
- Products with a status of In Review will now be visible in Portal alongside those with an Onboarding and Onboarded status.
- When a product is updated to In Review, only the In Review version will be shown in the Portal, while the Onboarded version will no longer appear.
Saving Products
The Fenergo Portal now supports improved save and navigation behaviour within the Manage Products task. This allows Portal users to create and update products incrementally without being blocked by mandatory fields during early data capture.
Users can now:
- Save products as drafts with partial data
- Progress without completing all mandatory fields upfront
- Only be blocked when attempting to complete the task
Product Family and Product Type are required in order to save a product as a draft.
Any other mandatory fields (highlighted in red) will not be required until the user wants to complete the task.
If products are incomplete, task completion is blocked and user is prompted to update the outstanding products.
Deleting Product
Products with In Review Status
- When a product with the In Review status is deleted, the product is no longer visible in the Portal and the draft version of this product is deleted from Fen X.
- The corresponding Onboarded product version is updated to Offboarding, making it no longer visible in the Portal (As Offboarded products do not display in the Portal).
Products with Onboarding & Onboarded status
- Products with an Onboarding status can be deleted from both Portal and Fen X.
- When an Onboarded product is deleted, the product is no longer visible in Portal and is updated to a status of Offboarding.
Displaying Products on the Entity Profile Page V2
The Products tab provides Portal users with a clear overview of all products associated with an entity.
It appears as a new tab on the Entity Profile Page (V2).
Users can view products in a grid format and click any Product Type to view detailed information on the Product Details Page.
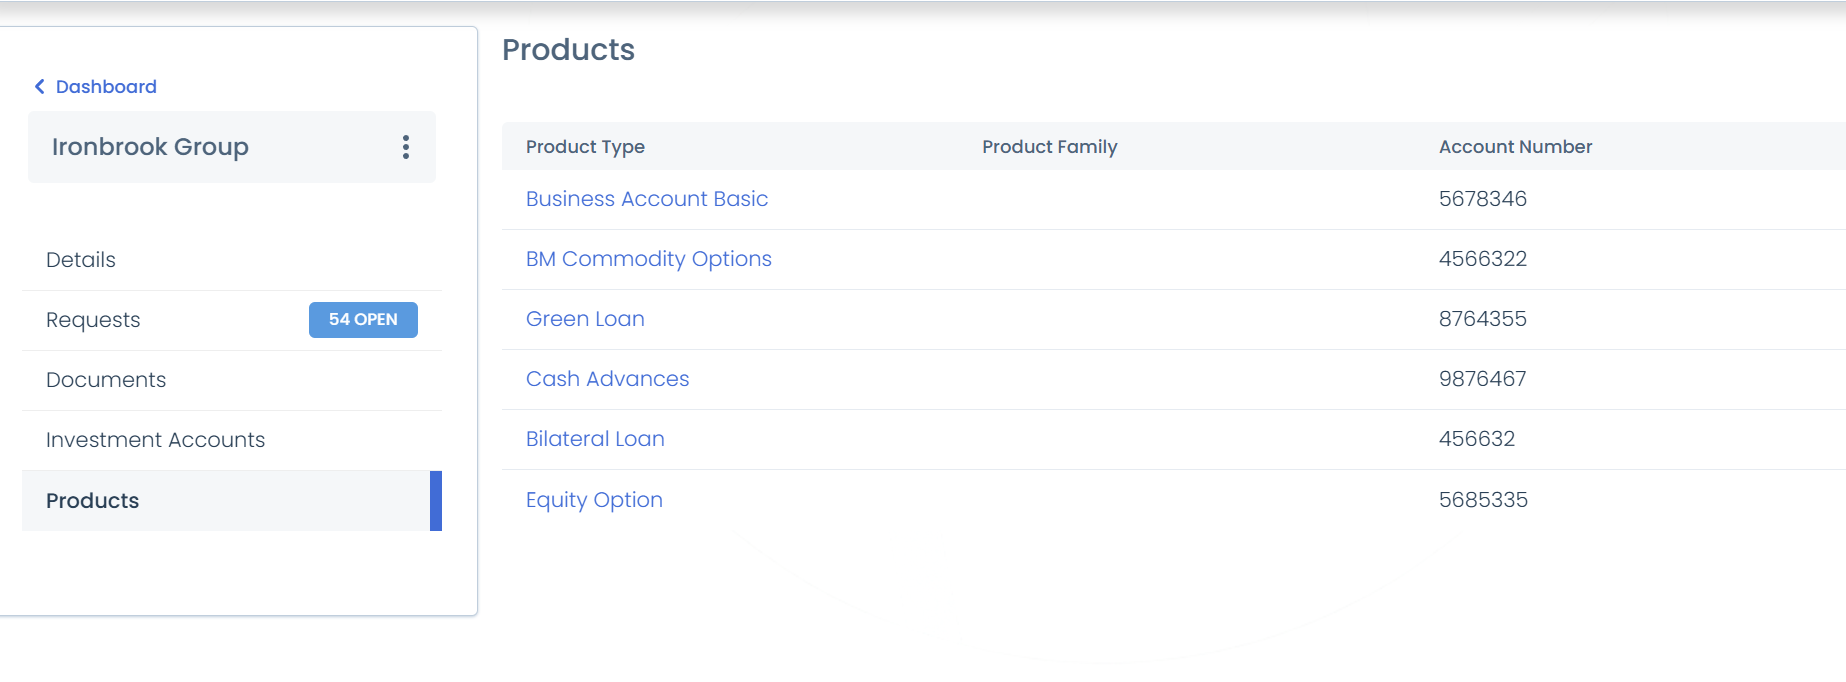
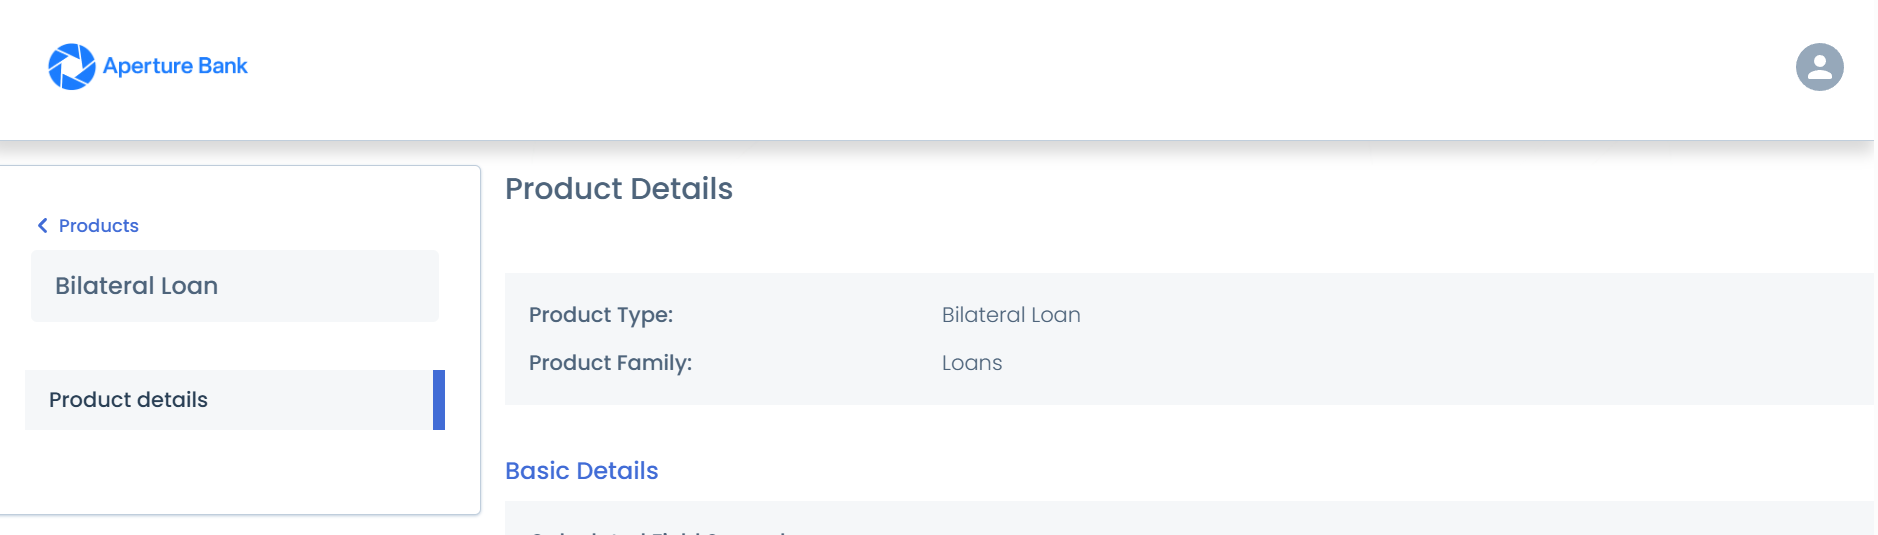
Product Details Page
- When users click a hyperlinked Product Type from the Products grid, they are redirected to the Product Details Page.
- This page provides a read-only view, meaning no editing, adding, or removing options are available.
Product Scoping Rules
When completing a journey in Portal, users may be required to review or manage products associated with their entity. Depending on how the journey is configured, a Portal user may only see products that are relevant to the current request. Portal now supports Fenergo’s product scoping rules.
Note: These scoping rules only apply to Verified Products
For more information on the configuration of Product scoping rules, please visit Configuring the Fenergo Portal Guide
Investment Accounts
Portal users can now view investment account information directly from the Entity Profile Page (V2). This includes account data, documents, bank accounts, and related parties, all tailored based on Portal user role configuration. Users with the appropriate access will see a new Investment Accounts tab on the Entity Profile Page (V2), enabling quick and easy role-based access to detailed investment account details.
If a user’s role has Investment Accounts enabled, they will see a new Investment Accounts tab on the Profile Page (V2).

- The tab displays a paginated grid (10 accounts per page) of all investment accounts this user is authorised to access.
- Only accounts with a status of Onboarded or Verified are shown.
- The grid is sorted by Last Updated Date (descending).
- If no accounts are available, an empty state will be displayed.
Navigating to Account Details Page:
- Each Investment Account Name appears as a clickable hyperlink.
- Selecting the link opens the Investment Account Details page, where the user can view account-specific information.
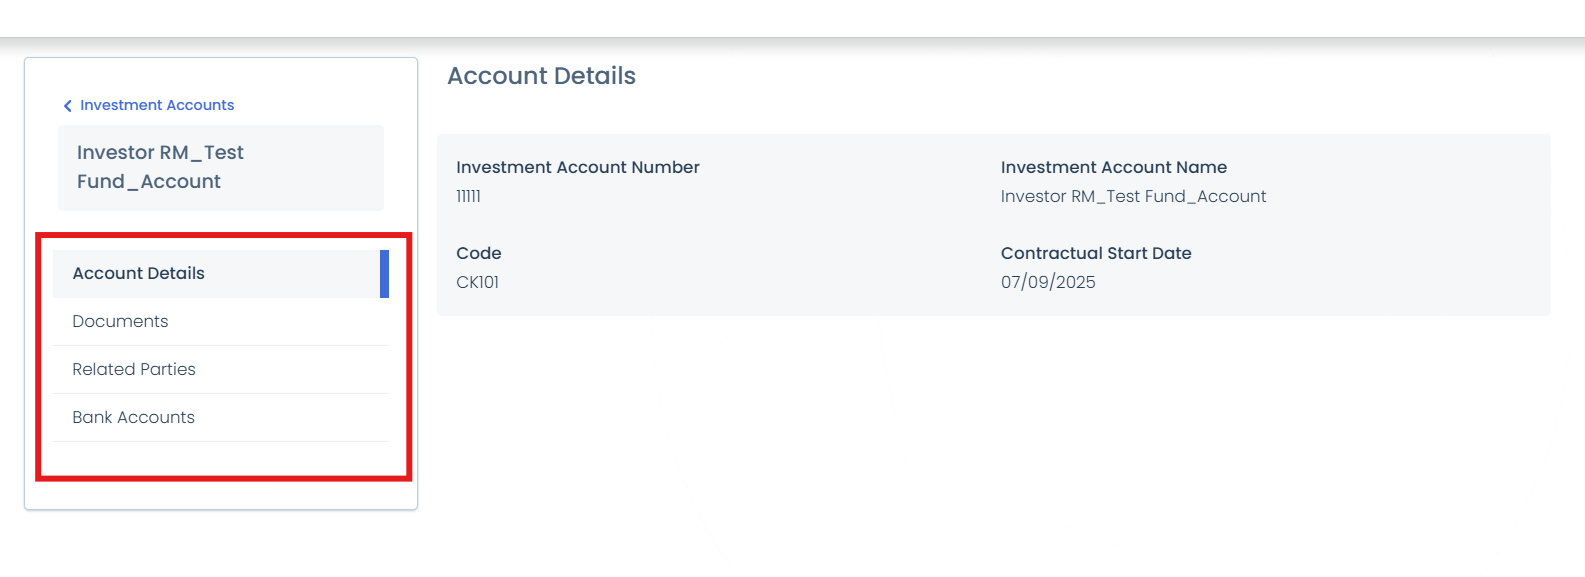
The information visible on the Investment Account Details Page depends on how the user’s role has been configured regarding the following categories:
- Data
- Documents: shows document requirements and uploaded documents, with filters for Document Type and Uploaded Date.
- Related Parties: a read-only grid showing Related Party Name, Type, and Relationship.
- Bank Accounts
Note: If a Portal user is accessing Investment Accounts via the Funds Dashboard, only accounts linked to funds that the Portal user is linked to will be displayed. If a user loses access to a fund, you will also lose visibility of its investment accounts in Portal. Attempting to access an account directly via a saved URL will redirect the user back to the dashboard for security reasons.
Note: Investment Accounts can also be viewed in the Trader Portal, provided the user’s role has been configured to display them.
ID&V
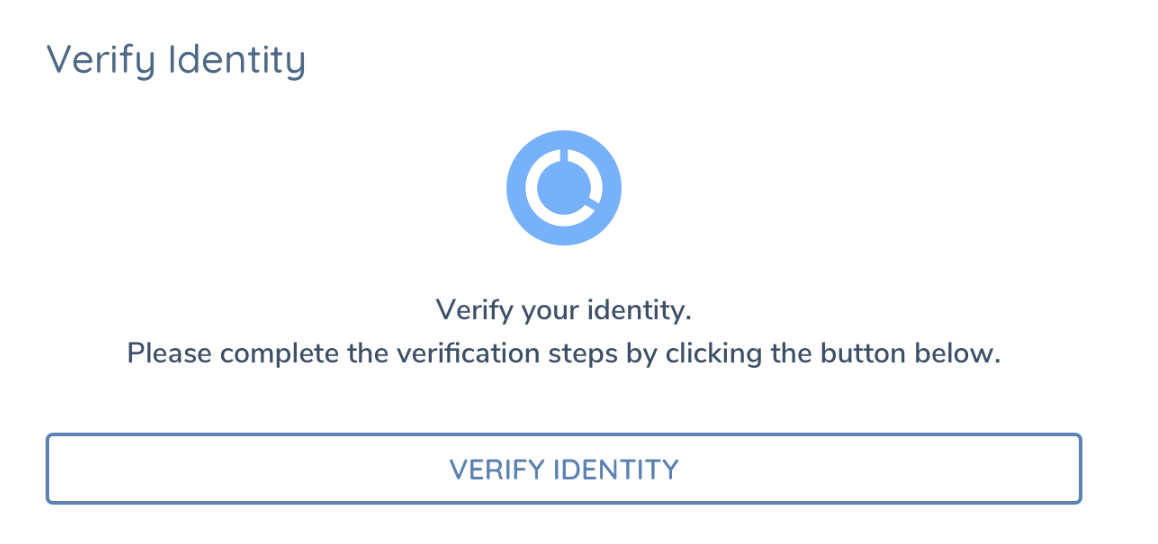
Individuals can verify their identity using an external provider Jumio to collect documents from a customer and verify their identity. The ID&V task for individuals is available for external journey's and can be completed in Portal.
When a user navigates to the ID&V task for the first time in a journey, a Jumio link is automatically created and presented to the user. Users can click Verify Identity and will be navigated to a new window where the user can complete each of the verification steps.
ID&V Statuses
There are 6 possible statuses that Jumio which are presented to the user as follows:
Pending
Awaiting completion. When there is an open Jumio record that has not been completed, this is presented to the user.
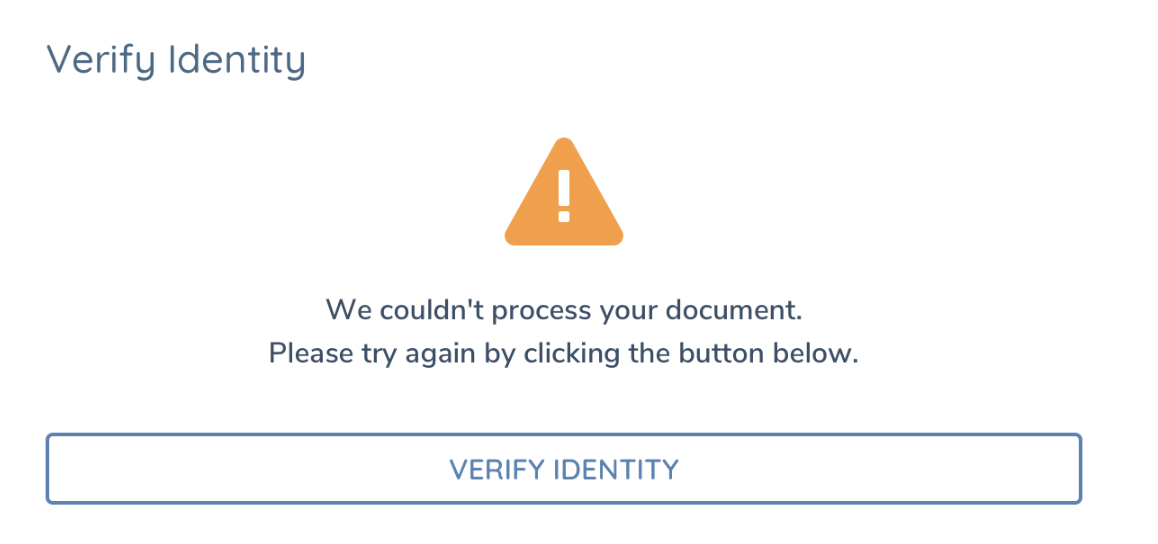
Failed
Request has expired. Users can click Try Again to verify their identity.
Denied
The face didn’t match the document, or the liveness test failed. Users can click Try Again to verify their identity.

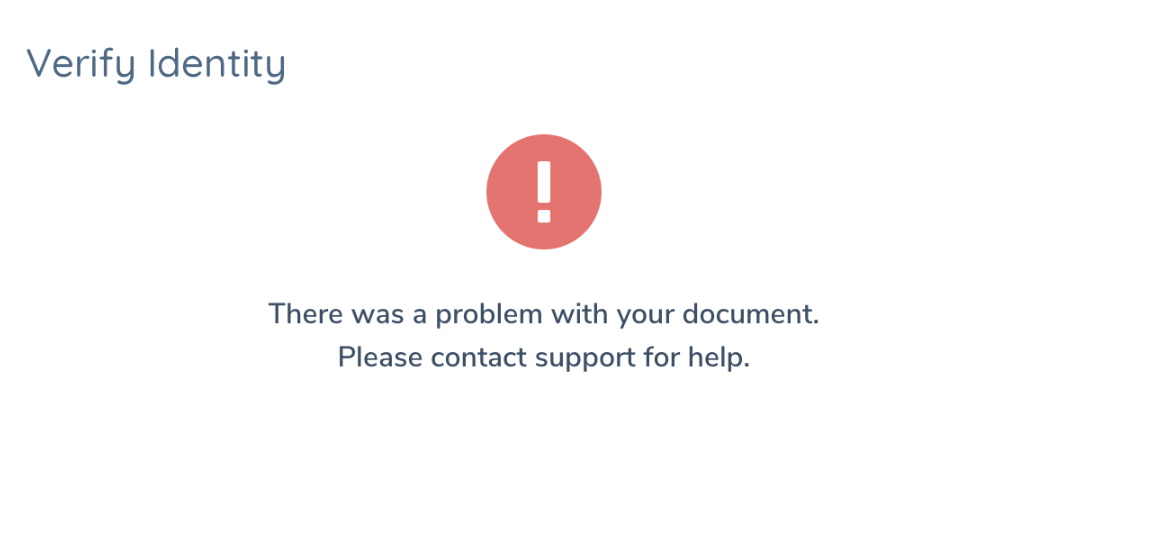
Fraud
The ID uploaded was fraudulent (fake, altered, etc). In this scenario as fraud is detected, the user is blocked from attempting to complete ID&V again and directed to contact support for more information.
Incomplete
ID type not supported. Jumio was unable to verify validity of document. Users can click Try Again to verify their identity.
Passed
Passed ID check, similarity check, and liveness test. User has successfully completed ID&V.

Usage & Configuration
If there are multiple Jumio records in Fen X, the latest Jumio link is always displayed to the user.
ID&V is now enforced within the Portal, meaning the User will not be able to click "Next" without completing the necessary ID&V steps.
Documents collected by Jumio are saved directly to the documents area in FenX and are not accessible from Portal.
Consideration should be given to the placement of the ID&V task within a portal journey either as a task in a separate journey or as a task at the end of an existing journey. Users may not have a valid document present with them to complete the Jumio verification request. This will allow the bank to collect data on the individual and reduce the chances of an individual quitting the journey and not returning.
For more info on configuring Jumio, refer to Jumio user guide.
UX Features
Navigation
- Clicking on the logo will return the user to the dashboard
- Users can use the task or stage navigation for available tasks
- Users can see completed tasks as read only or they can reopen using the edit icon
- There is a dashboard link available from within a journey
Usability
- All screens in portal are mobile responsive
- Users will be automatically logged out after 15 minutes of inactivity
- Users will be advised if they navigate away without saving their data
- Users will be advised if the journey they are working on is cancelled or completed internally
- Users are advised on completion of a task that their data has been saved
MultiBranding
The Multibranding functionality allows clients to configure and manage multiple branded experiences within a single Portal instance. Each brand can have its own distinct look, feel and content, enabling organisations to deliver unique digital experiences for different client groups or business lines. With Multibranding, Portal configurators can define and maintain multiple Portal URLs, each associated with a specific brand identity. These brands can have their own configurations including:
- Distinct URLs for each brand experience
- Logos and colour palettes tailored to the brand’s identity
- Customised content and email templates aligned with brand messaging
- Independent configuration management through a centralised Brand Configuration section
1. Multiple Business Lines or Divisions
Use Case: A financial institution operates several business lines (e.g., Corporate Banking, Wealth Management, and Retail Banking) under the same group.
Multibranding Benefit: Each business line can have its own branded Portal URL, visual identity, and tailored content, ensuring the right tone, design, and messaging for each client segment while maintaining shared backend infrastructure.
2. Asset Servicers Managing Multiple Clients
Use Case: An asset servicer provides whitelabelled onboarding and lifecycle management services to multiple asset management firms.
Multibranding Benefit: The servicer can configure a dedicated brand experience for each client, including custom branding, logos, and email templates, allowing clients’ end-users to interact through a Portal that reflects their own firm’s identity.
3. Regional Branding for Global Organisations
Use Case: A global bank operates across multiple regions (e.g., EMEA, APAC, etc.) with different regulatory, linguistic, and branding requirements.
Multibranding Benefit: Each region can have its own branded Portal instance (URL, language, and visual identity), ensuring compliance with local standards and improving the user experience for regional clients.
External Data Support: New Request Flow
This feature enables streamlined user data entry by sourcing information directly from an external data provider. It optimizes entity selection and search processes, reducing manual input and ensuring accurate data retrieval. Below, provides an overview of the New Request Flow with External Data Integration.
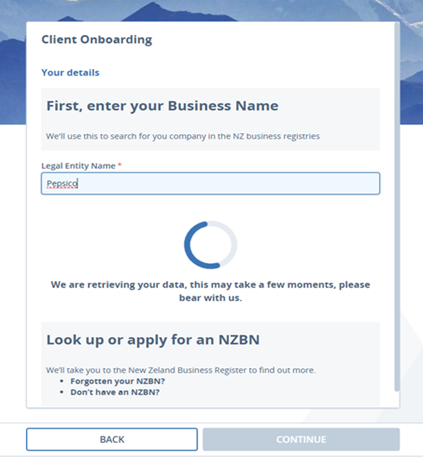
The user will log into the Portal and click on New Application.
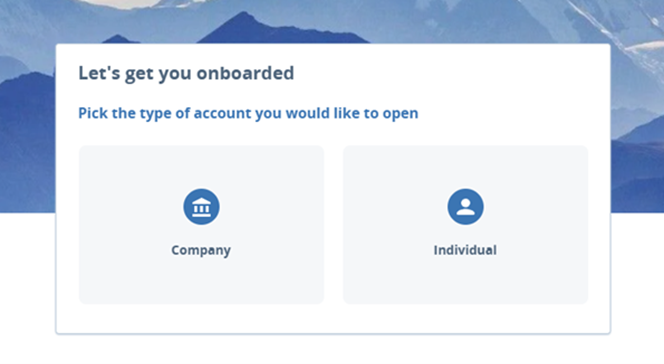
The screen below is displayed, where the user selects the entity type of the Client they are onboarding. Note: External Data is only available for Companies.
After selecting Company , the user is presented with the following screen, where they can search the Client by its Legal Entity Name. This Search Field is configurable; thus, users can search the external data providers using other identifiers such as a National ID, Orbis ID etc.
Note: Certain providers may require a country field value to be included in the search also.
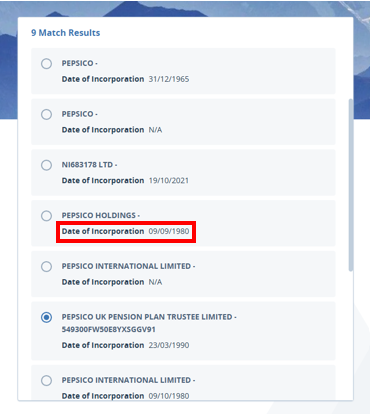
Then, the user is displayed with any potential matches. Alongside having this Primary Search Result Fields , Secondary Search Result Fields can also be configured. This makes it easier for the user to select the correct entity from the returned results if there is more than one match.
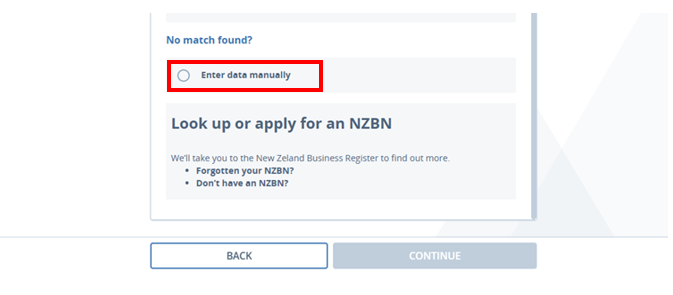
No Match Found
Where there is no match found, users can select to Enter Data Manually , which will navigate them to the New Request Details page to populate details manually.
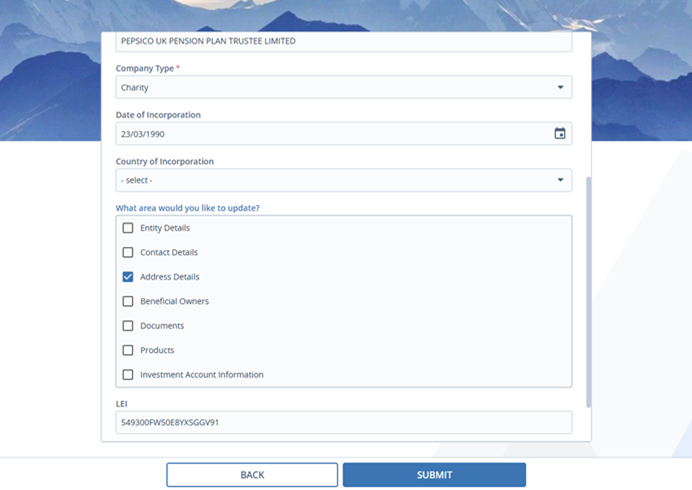
Once the user has selected the correct Entity from the potential matches, they are presented with this page (below), where they can make amendments to the profile details ( If Populate New Request Details is enabled ) and click Submit.
If the Populate New Request Details is disabled, then the New Request details page will be hidden and the details from the search provider will be used to create the entity and relevant journey.
External Data Task
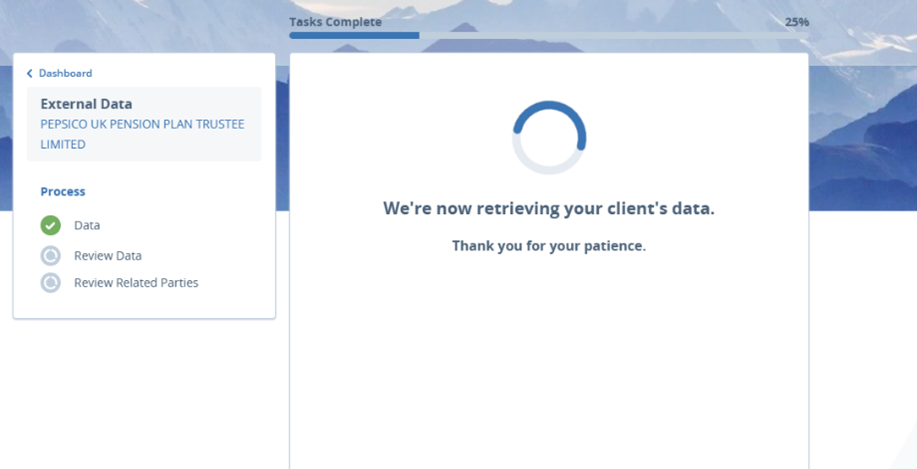
The external data task can be embedded in a journey. This automatically imports detailed entity data, including related party information, for a complete dataset.
Note : Depending on the response time from the external data provider, this could take a while. Please take note the placement of this task in the journey to avoid having the user wait for the task to auto complete. The external data task could be placed in parallel with a basic data entry task or a documents task which would allow the user to continue with their journey will the system is importing the relevant data.
Importing Related Parties
Fenergo will attempt to auto-import related parties using the following deduplication logic from Fen-X for Related Parties.
Please review the Configuring External Data Sources Guide for details on how to configure auto completing of the external data task.
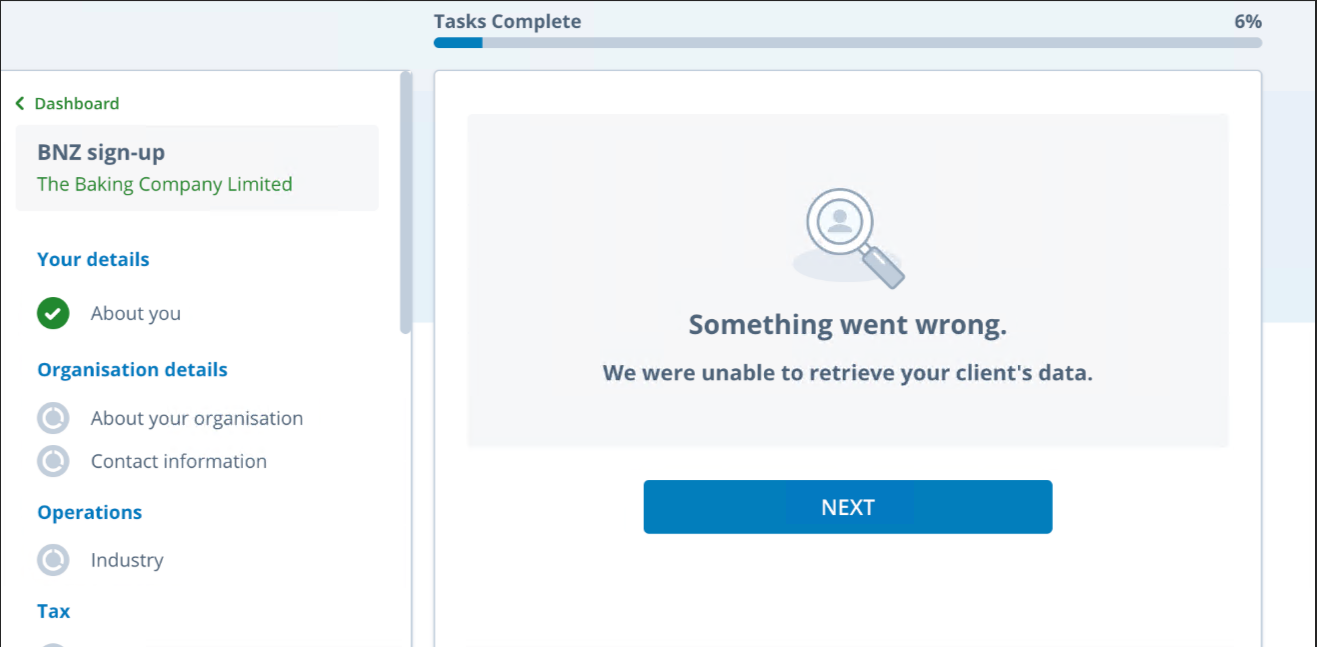
Note : If auto-importing fails due to a system error or if Related Party deduplication is required – the external data task will not auto-complete and the user will be required to manually complete the task.
No data or Related Party will be imported in this scenario and the user will have to manually add this information.
Launch Maintenance Requests
This feature enables the launching of maintenance journeys for an entity/investor in the Portal, and in doing so, allows users to update and edit details in a journey.
The user will click on the Update Details button on the entity profile page.
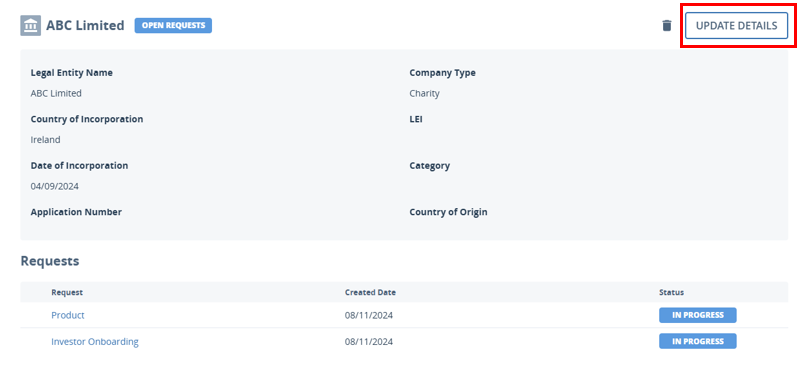
Clicking on this opens the Request Details page where users can update and edit the fields displayed to them, which are based on configurable categories.
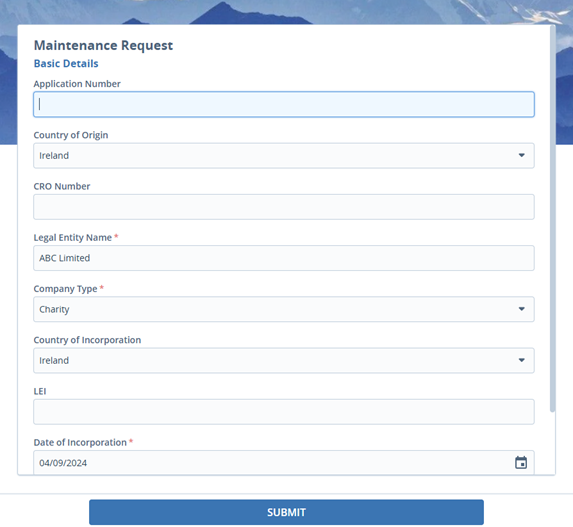
Upon submission, a journey is launched. The journey type and category are configured by an admin in Portal User Roles.
For more information on the configuration of maintenance journeys, please visit Configuring the Fenergo Portal Guide
Support Journey Level Data
This feature enables Portal Admin users to manage the visibility and utilization of Journey Level Metadata in the Portal. Users are able to toggle the visibility of these data fields across several areas, such as External Journeys and Outreach Stages. Admin users are also able to configure this Journey Level Data for Trigger Conditions, Conditional Values and Scoping Conditions.
-
When the toggle is enabled; Journey Level Metadata becomes visible to Portal users.
-
When the toggle is disabled; Journey Level Metadata is hidden, meaning this data will not be visible to use as a trigger condition, conditional value or scoping condition.
Please visit Working with Journey Level Data and Configuring the Fenergo Portal Guide for more information.
Compliance and Audit
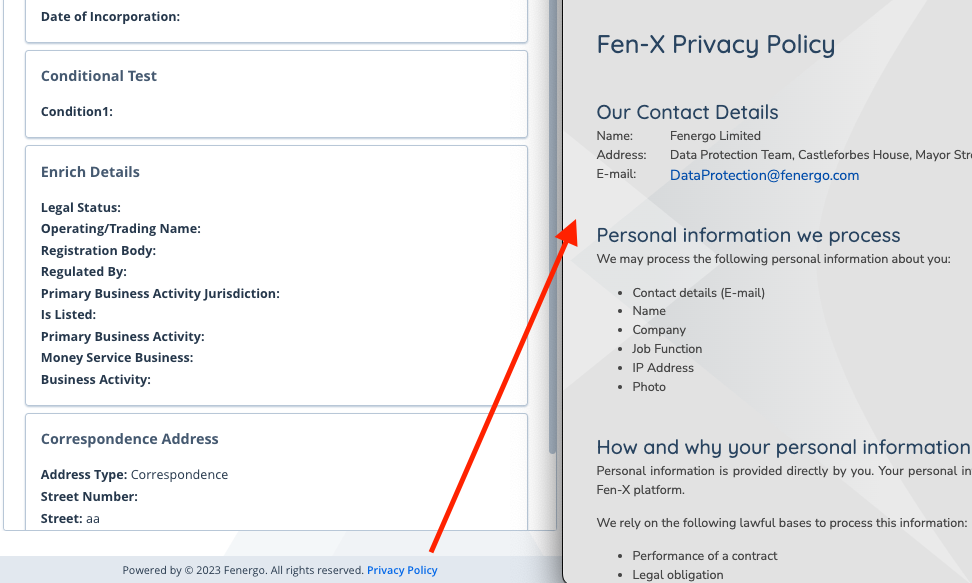
Privacy Policy, Cookie Policy and Terms and Conditions are all available from the footer. Once clicked they will open in a new tab.
Audit
User-initiated actions performed within the Fenergo Portal are captured by the Fenergo SaaS Audit Log and can be viewed directly in FenX Audit. This provides traceability of who performed an action, what was changed, and when it occurred.
Audit logging applies to Portal actions that update Fenergo Entity or Journey data, including:
- Task lifecycle events (start, completion, reset, reopen)
- Product creation and updates
- Document uploads and updates within journey tasks
- Access to Entity Profile Pages (recorded in the Access Log)
Actions performed by Portal users are clearly identified in FenX Audit and are indicated by adding 'Portal - ' to the username, ensuring a clear distinction between Portal activity and system-generated updates.
Changes made during Outreach stages are not recorded as user actions in the Audit Log.
This is because Outreach updates are applied to a separate Outreach data store and do not directly update the Entity or Journey draft. As a result, these changes do not generate the audit events until the data is imported as part of the Outreach Data Review task or Outreach related party Review task.
Once Outreach data is reviewed and accepted within the journey (for example, during Outreach review tasks), any resulting updates to Entity data are fully audited in FenX in line with standard Fenergo behaviour.
Multitenancy
The Fenergo SaaS Portal is multi tenanted, each Portal tenant can be independently configured and white labelled to meet customer needs. Each Portal tenant connects to a single Fenergo SaaS tenant.
Accessibility
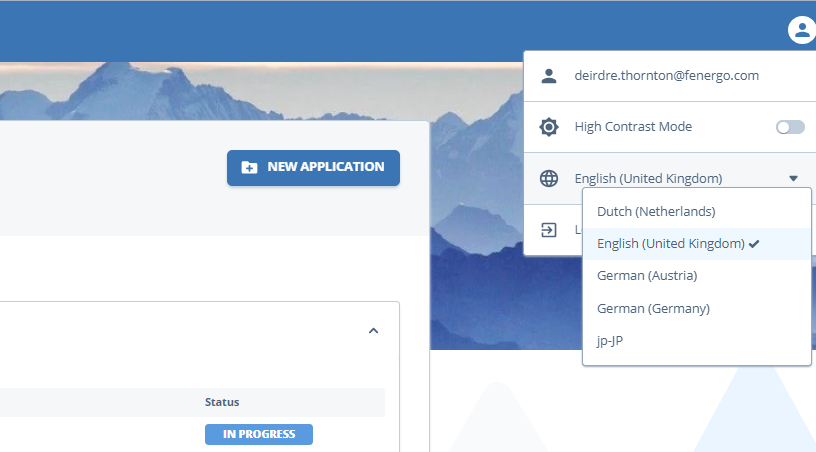
A user toggle is available in portal to allow users to view the portal in High Contrast Mode.
- All buttons in the portal have an associated label, for screen readers
- All text on the Portal is defined in REM rather than pixels to ensure it reacts to browser zoom correctly
- Users can skip to content directly when they access a portal task rather than having to navigate through the left hand panel
- In order to meet industry standard accessibility guidelines for public facing web applications, the Fenergo SaaS portal has been designed, built and tested against WCAG 2.0, targeting a level AA compliance.
- To meet these standards there have been several changes made to the Portal UI
- All colours used throughout have been revised to ensure they meet the minimum colour contrast recommendation
- Page title has been added to each page, this will appear in the Portal Tab and is available through a screen reader
- The ability to tab through each portal page
- Each component of the page can be accessed using the tab key
- The users is guided through the tabbing visually, with the addition of a focused style on elements to make it clear to the user where they are on the page
- Each field has an enhanced border for definition, as well as added colour contrast using shadowing on the field input area
- Tabbing away from a mandatory field will cause it to colour red and will alert user using screen readers
Localisation
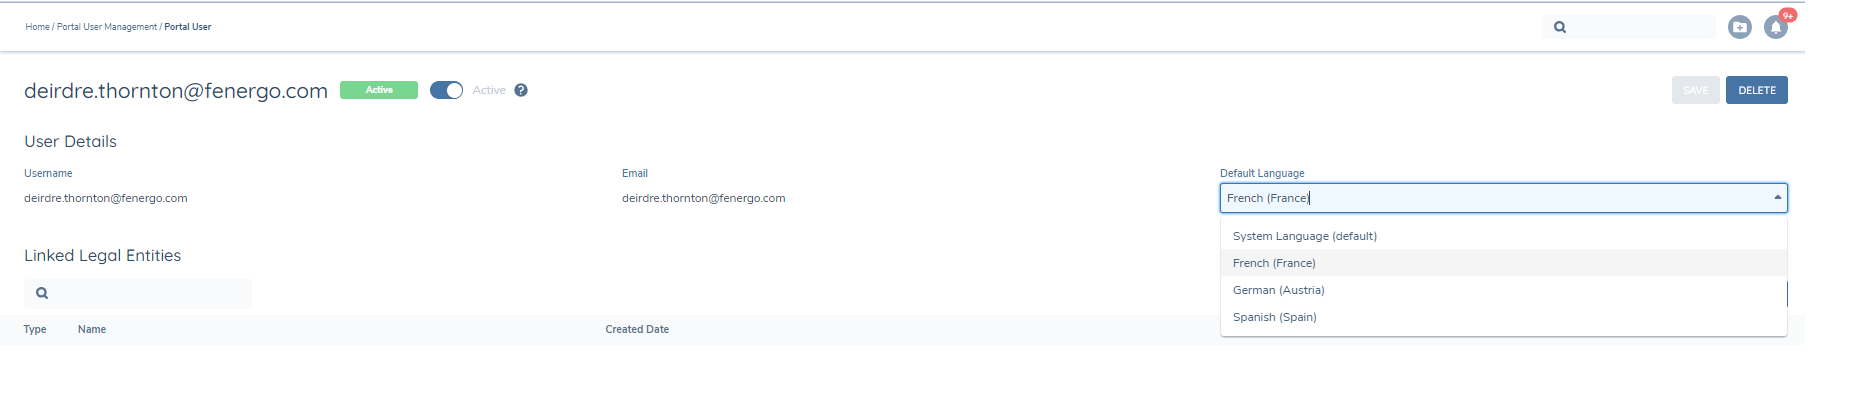
Portal users can select the language they would like to work in from the user profile menu, the language options available will be driven from the options available in Fenergo SaaS. The user can select their preferred language and this will be saved to their profile, their choice will be reflected in the Fenergo SaaS user management area. Users language preference can also be set from the user management area. The language set in Portal and User management will be set to system default and will be synchronised once it's updated in either Fenergo SaaS or the Portal. Date format will also be driven by the locale.
All configurable portal strings in the Portal Configuration area should be added to the language file for localisation.
Summary of Performance Limits
The following outlines the performance limits of the portal for different user functionalities and features. Appropriate warnings will be displayed when these thresholds are approached or exceeded.
Legal Entities Linked to a Portal User Account
- Limit: Maximum of 1000 Legal Entities linked to a single user account.
- Behaviour:
- If a Fen-X user attempts to link more than 1000 entities via Portal user Management or Share access button via Portal, an appropriate message will be displayed.
- A similar message will appear if a portal user attempts to create a new entity via the New Request button after reaching this limit.
Digital Investor Functionality for Fund Entities
- Limit: Maximum of 1000 entities per Fund.
- Behaviour:
- When the number of entities exceeds 1000, only the first 1000 are displayed.
- An additional warning message will appear to indicate that the display limit has been reached.
Front Office Journeys
- Limit: Maximum of 2000 journeys per user.
- Behaviour:
- The system supports up to 2000 journeys for each individual user within the front office functionality.
Default Dashboard for Legal Entities
- Limit: Recommended not to exceed 150 linked legal entities for users leveraging the "Default Dashboard."
- Reason: This recommendation ensures optimal dashboard performance and user experience.
Performance Limits Summary Table
| Portal Area | Limit |
|---|---|
| Number of Legal Entities linked to a Portal User | 1000 |
| Number of Front Office Journeys Requests | 2000 |
| Number of Funds on Funds Dashboard | 1000 |
| Number of Entities within a Fund on Funds Dashboard | 1000 |
| Number of Legal Entities on Default Dashboard | 150 |