KYRA:Source User Guide
KYRA:Source
KYRA:Source automates the retrieval and population of customer and counterparty data from configured external providers. By applying provider selection and rule logic that you define, orchestrating the Entity Enrichment task, and writing results back to the journey, KYRA:Source reduces manual collection effort, accelerates onboarding, and ensures consistent, auditable outcomes.
KYRA:Source offers
- Provider & Rules Configuration: Choose default providers and define rule-based trigger conditions (e.g., by jurisdiction, entity type) to control when and how KYRA:Source runs.
- Task Orchestration: Initiates and progresses the Entity Enrichment task automatically based on your Journey Builder and Task Configuration settings.
- Autonomy Levels: Operates in Manual, Semi‑Autonomous, or Fully Autonomous modes so you can align automation with your risk appetite and rollout plan.
- Profile‑Aware Retrieval: Uses the entity’s Search Data Profiles and input criteria to request the right attributes from selected providers.
- Structured Updates: Populates Entity Details, Data Groups, Related Parties, and Documents with returned data (as configured), preserving original values for review.
- Review Workflow: Surfaces results in Data Reviews (including Datagroup Reviews) so analysts can compare, accept, or reject proposed updates.
- Audit & Transparency: Logs actions, provider responses, and outcomes for traceability in audit views and task history.
- Safety Controls: Enable/disable per agent instance at any time without losing configuration, allowing safe pauses and staged rollouts.
- AI Assist: Uses AI to support the external data enrichment task
- Entity Details: AI Assist is used to compare third-party Data Group values with the existing Fenergo value and generate an AI Summary of insights.
- Related Parties: AI Assist is used to merge duplicate entites from the same provider into one single entity and provide detailed insights into the decision.
- Summary: AI Assist provides a consolidated view of all AI activity and data resolution outcomes that occurred throughout the task as well as flag any items that still require review.
Configuring KYRA:Source
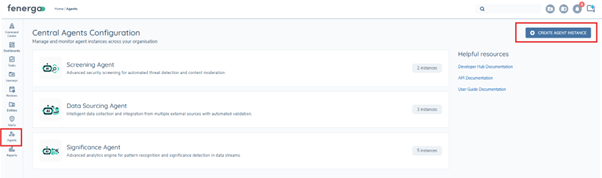
Create an Agent Instance
To access the ‘Central Agents Configuration’ area, click on the ‘Agents’ icon on the left- hand Navigation Bar.
Click the ‘CREATE AGENT INSTANCE’ button to begin the creation of a new instance of the Data Sourcing Agent (DSA)
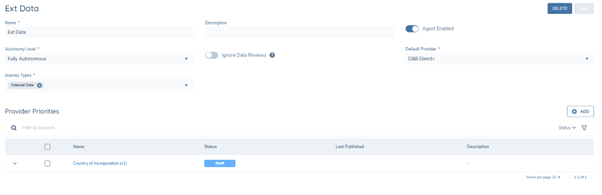
Select ‘Data Sourcing Agent’ from the ‘Agent Type’ and provide the Agent with a Name (mandatory).
Select Autonomy Level from the dropdown.
- Semi Autonomous – Automation of Data and RPs will cease at the summary page, where there are no reviews required.
- Fully Autonomous – Automation of Data and RPs will complete the task, where there are no reviews required.
- STP – Ignores Reviews and completes regardless.
Select the Journey types to be used by the Agent from the ‘Journey Types’ dropdown list.
The Agent instance can be Enabled or Disabled by toggling the ‘Agent Enabled’ toggle. When Enabled, the Agent will be available for use. When Disabled the Agent will not be available for use until enabled again.
Click the ‘CREATE AGENT’ button. The Agent instance will now be created, and the instances count of the ‘KYRA:Source’ will be incremented.
To view the Agent instances, click on the ‘Data Sourcing Agent’ card to open the ‘Data Sourcing Agent Instances’ screen.
To DELETE an instance of the Agent, click on the ‘Trashcan’ Icon for that instance and press the ‘CONFIRM’ button.
To EDIT an instance of the Agent, click on the ‘Pencil’ icon to open the Agent Configuration screen for that instance. Edits can be made and saved by clicking the ‘SAVE’ button.

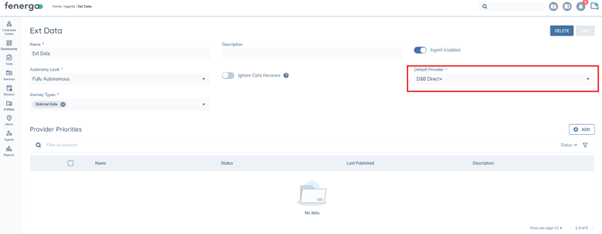
Default Provider & Rules Configuration
A Default Provider is mandatory for each Agent instance, as a starting point for data and RP choices in the ‘External Data Entity Enrichment’ Task. The default provider can be overwritten with rules, where a rule condition is triggered.
To select a Default Provider, click on the ‘Default Provider’ Dropdown and select the provider from the list of enabled providers (Providers can be OOTB, Custom or FLOW based integrations)
This provider will then be the default provider for all data and RPs returned in the task, unless overwritten by a rule.
To configure a RULE:
In the ‘Provider Priorities’ section to add a rule the user should follow these steps:
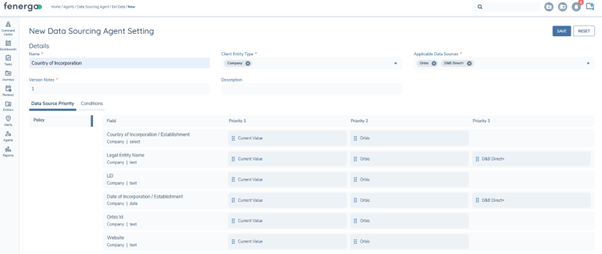
Add Rule:
- Click the 'Add' button.
- Fill in the mandatory fields.
- Select Provider(s) from 'Applicable Data Sources'
- All available mapped fields from the selected providers will appear under the 'Data Source Priority' Tab
- Providers can be dragged and dropped into priority position for each datapoint.
Conditions Tab:
- Click 'Add' to create a new condition.
- Configure the desired trigger condition.
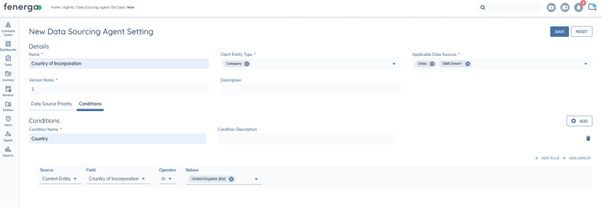
Click the ‘SAVE’ button, the Rule and associated configuration is saved for that Agent instance.
Task Configuration
Journey Builder
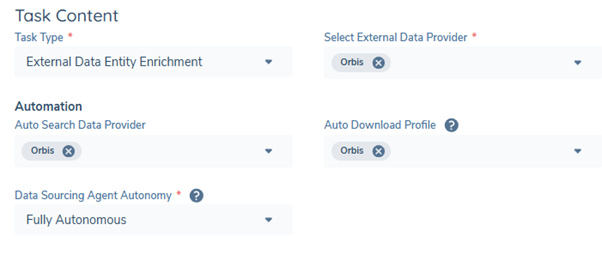
Task Type: 'External Data Entity Enrichment'
- Select the providers you want to use in the task from 'Select External Data Provider' dropdown.
- Set Automation if desired.
- Add a Basic Details Task before it in the journey (easier to change search criteria)
The Agent configuration takes precedence over the task configuration.
Example, if ‘Fully Autonomous’ is configured in the Agent configuration and ‘Semi Autonomous’ is configured in the journey task, then the task will operate in ‘Fully Autonomous’ mode.
Configuring Document Providers
This guide explains how to configure document retrieval behaviour within the Entity Enrichment Task using the Document Providers configuration option. This configuration controls whether documents are retrieved during task execution and whether the Documents step is displayed to end users.
Overview
The Entity Enrichment Task allows users to control if, and from which providers, documents are retrieved as part of task execution. Document behaviour is driven entirely by the Document Providers multi-select dropdown:
- Selecting one or more providers, which have document calling functionality, enables document retrieval and displays the Documents step in the task flow.

- Leaving the selection empty disables document retrieval and removes the Documents step from the UI.

This allows for customisation of flows based on provider availability, cost considerations, or jurisdictional requirements.
How to Configure
- In the Journey Builder.
- Task Type: External Data Entity Enrichment.
- Select the providers you want to use in the task from 'Select External Data Provider' dropdown. Providers can be OOTB, Custom or FLOW based integrations.
- Once at least one provider selected has the capability to call documents e.g. Kompany, a new dropdown field will appear ‘Document Providers’.

Here a user can select from which provider they wish to call documents from. One, multiple or no providers can be selected.
Using KYRA:Source
Task Execution
The External Data Enrichment task is a multi-step process and consists of the following steps:
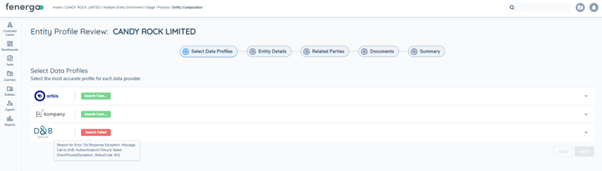
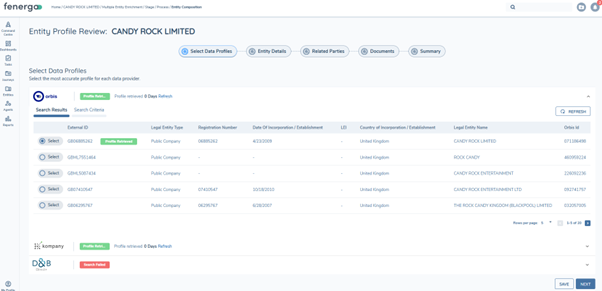
Search Data Profiles
The ‘Search Data Profiles’ step allows the user to select up to a maximum of four enabled data providers, to be used in the task.
Providers can be selected from a combination of ‘OOTB’, ‘Custom’ or ‘Integration FLOWS’ providers.
When the user supplies the standard required search criteria (Company Name and Country of Inc.), the system will call out to the provider when the Search Request button is clicked (Manual search), or when ‘Auto-Search Data Provider’ has been configured in the journey builder task.

The user has the option to refresh the search request at any time by clicking the ‘REFRESH’ button.
Once the search results have been returned, the Status chip will turn Green and the ‘Search Complete’ text will appear on the chip.
If a Search has failed for any reason, the chip will turn Red and the ‘Search Failed’ text will appear on the chip. Hovering over the Chip will surface the reason for failure.
Users can use ‘LEI’ or ‘Registration Number’ in the Search criteria to ensure a single exact match is returned from the provider which will then drive automation of the Company Profile call to the Provider, if the ‘Auto-Download Profile’ setting has been configured in the journey builder task.
To manually retrieve the Profile of any returned record from the provider, the user must click the ‘Select’ Radio button for the record they want.
Once clicked, the system will call the provider for that record. NOTE: This can take up to a minute depending on the provider.
While in progress the Chip colour will change to Blue and contain the text ‘Profile Requested’.
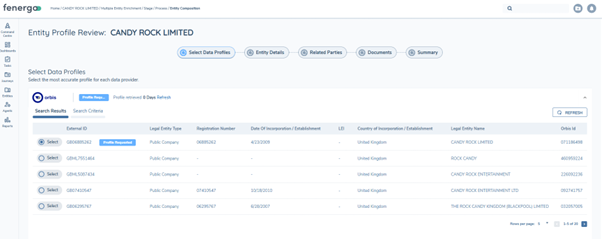
When the Profile has been returned the Chip will change colour to Green and the text will read ‘Profile Retrieved’. The Profile can be recalled at any time, by clicking the ‘Refresh’ Hyperlink
The ‘SAVE’ button can be clicked to persist user selections.
The ‘NEXT’ button also becomes enabled and when clicked, will progress the task to the ‘Entity Details’ Step once any Profile has been called.
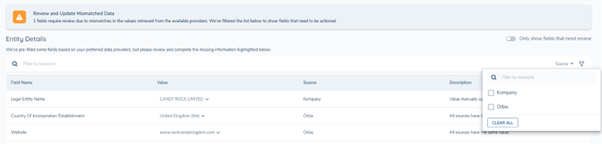
Entity Details Step
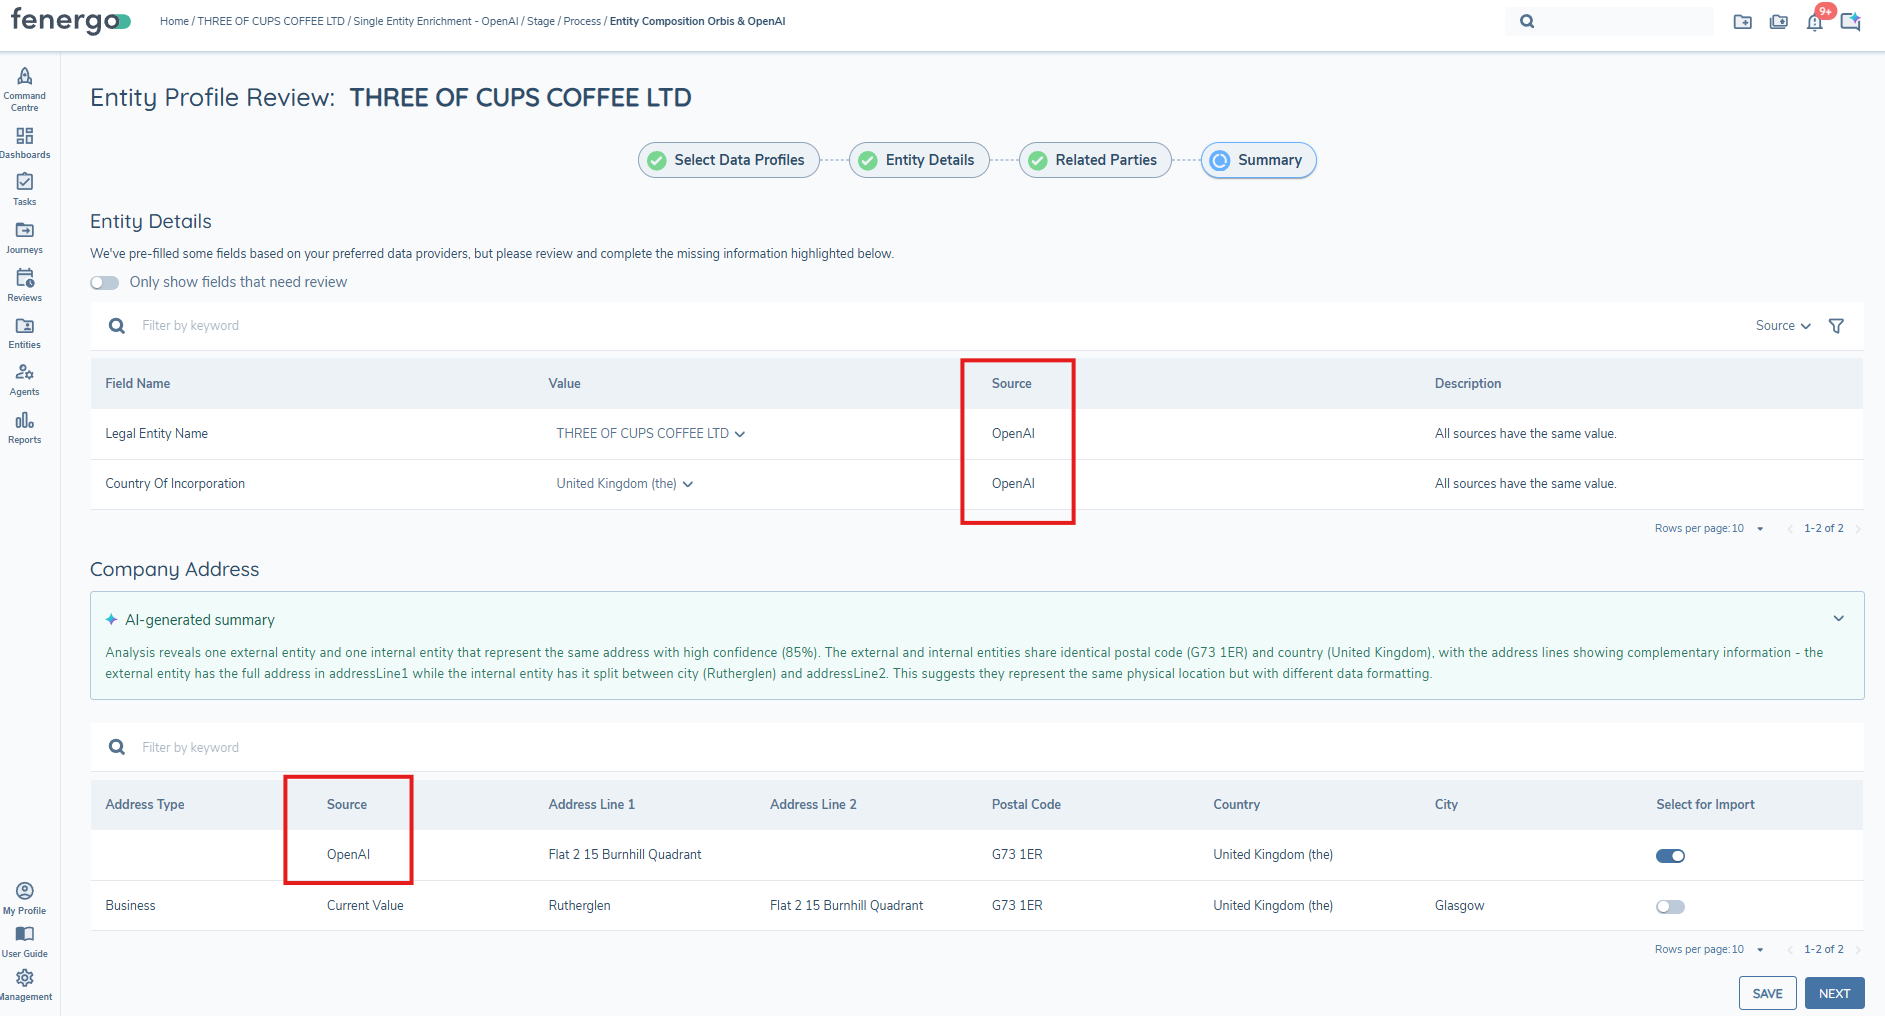
The Entity Details Step displays the list of mapped Policy fields from all selected providers in a table with the following columns:
- Field Name: The Name of the field configured in Policy and mapped in the provider Adaptor.
- Value: The provider returned value, or current value (depending on Default Provider or Rules configuration)
- Source: The provider where the displayed value has come from.
- Description: Information to inform the user on system decision making.
When the user arrives on the Entity Details Step, KYRA:Source will have evaluated the displayed results based on the configuration settings in the ‘Provider Priorities’ configuration area in the Agent Configuration.
- Default Provider: Where no Rules exist to overwrite the configured default provider, the values returned from the ‘Default Provider’ will be the values that are displayed in the Value column for each Field Name.
Example: If ‘Orbis’ is the configured Default Provider, then the source column will show ‘Orbis’, and the values displayed will be ‘Orbis’ values for all fields where ‘Orbis’ has returned a value.
- Triggered Rule: If a Rule is triggered based on that rules condition, then the Default Provider will be disregarded and the provider priorities configuration for each Field in the rule will be implemented, and the corresponding results displayed in the UI.
The user can override the Value selection by clicking the dropdown for any Value. This will open a modal where the user can view and select the Current Value on the Fenergo record for that Field, or view and select a value from other Providers.
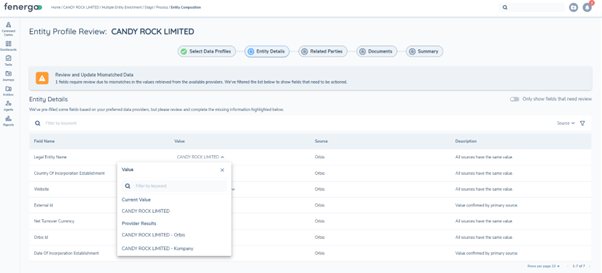
When the user overrides a value, the new value will then appear in the ‘Value’ column, and the ‘Source’ column will capture the change in source.

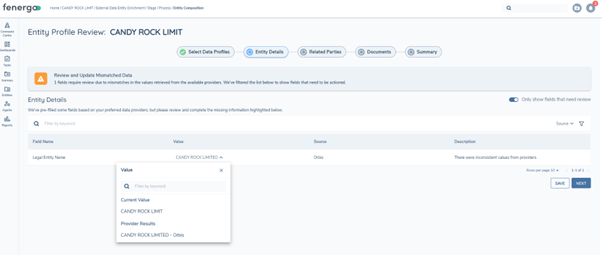
Data Reviews
KYRA:Source will attempt to evaluate the Preferred Provider returned values, against the Current Fenergo values, to identify any discrepancies or differences in those values.
Example:
Field = ‘Net Turnover Currency’
Current Fenergo Value = USD
Preferred Provider (Orbis) Value = EUR
Review Result: Due to the mismatch between the two values, this field will be flagged for Review by the user.
The ‘Review and Update Mismatched Data’ banner will be displayed and any automation configured in the task will cease to allow for a user to decide on the data they want to import.
Datagroup Reviews
Datagroups will always be flagged for review, unless the ‘Fully Autonomous’ Mode has been configured and the ‘Ignore Reviews’ toggle is toggled on, in the Agent Configuration.
The preferred provider datagroup will be displayed on the ‘Entity Details’ step along with datagroups from other providers. The preferred provider datagroup will have the ‘Select for Import’ toggle toggled on by default.
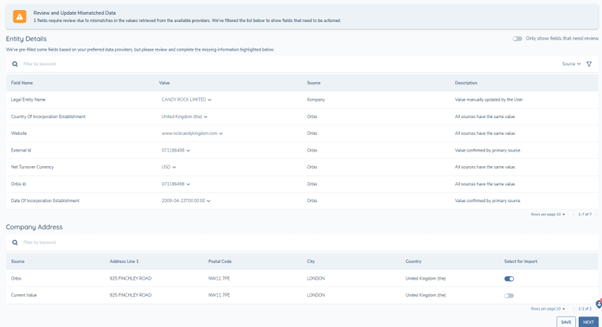
By default, where no reviews are required, the user will not see any data in the step until they toggle the ‘Only show fields that need review’ toggle switch, to the off position.
This is because all of the decision making has been handled by the pre-configured user settings, and there is nothing for the user to review.
The Data table offers Search capability through the search bar and Filtering is supported by Source through the Filter actions in the search bar also.
The user can click the ‘SAVE’ button to persist choices should they move away from the step or refresh the page.
The ‘NEXT’ button will save all data selections, and move to the next step, but the data is not saved to the Entity Record until the task is completed after the ‘Summary’ step.
Related Parties Hierarchy
The Related Parties step allows the user to visualise and select the provider returned Related Parties, to create a Hierarchy and then import that Hierarchy structure into Fenergo.
KYRA:Source will attempt to automate this as much as possible based on the configured Default Provider and internal deduplication logic.
If the user arrives on this step and the system has auto-resolved the Related Parties, the user will not see any related parties by default, as the ‘Only show fields that need review’ switch is toggled on by default.
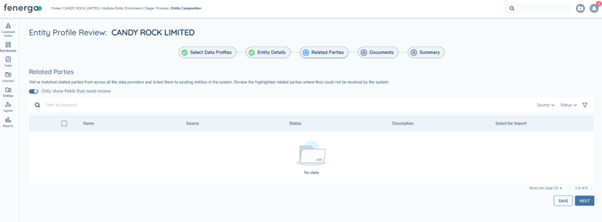
To see the results, the user must toggle that switch off.
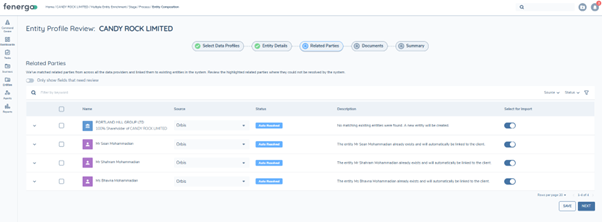
The details of the Related Parties are displayed in a table format with the following columns:
-
Name: The Name of the Related Party and its description when returned from the provider, indicating if the RP is a Shareholder or Official. Also includes Ownership % when returned.
-
Source: The provider from where the Related Party has been returned.
-
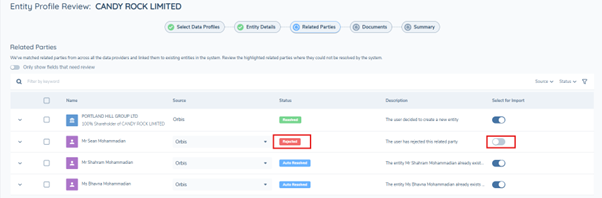
Status: The Resolution status of the Related Party.
-
Auto-Resolved: The Fenergo logic has resolved the RP status, and it is available for import.
-
Resolved: The user has resolved the RP status, and it is available for import.
-
Rejected: The user has Rejected the RP, and it won’t be imported.
-
-
Description: Information to inform the user on KYRA:Source or User decision making.
-
Select for Import: A toggle switch to confirm the selection of an RP for Import to Fenergo. This must be toggled on to complete the Import of the RP to Fenergo
Interacting with Related Parties
To view further Related Party detail, the user should click the dropdown for any Related Party to expand the row and reveal the dropdown view.
When KYRA:Source has Auto-Resolved an RP, or the user has manually resolved an RP, as a New Entity, the associated mapped data for that RP, will be displayed in the dropdown, and a message bar will inform the user that a new entity will be created.
The ‘Select for Import’ toggle will be automatically toggled on.
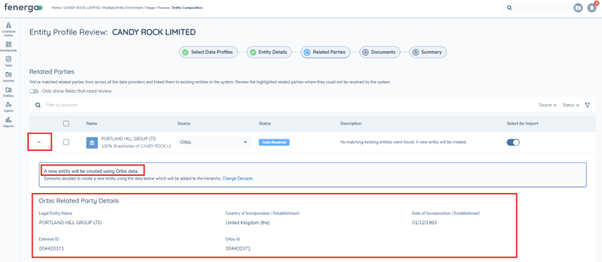
To change the ‘Resolved’ or ‘Auto Resolved’ decision, the user can click the ‘Change Decision’ hyperlink in the information bar.
The status chip will change to ‘Review Required’ and the user will now see the record of the Related party from the third-party Provider and any Potential Duplicates in Fenergo (Existing Entity). The ‘Select for Import’ toggle will switch off.
The user can manually select the Related Party from the third-party provider, or an Existing Entity, by clicking the ‘Add to hierarchy’ hyperlink for the record of choice.
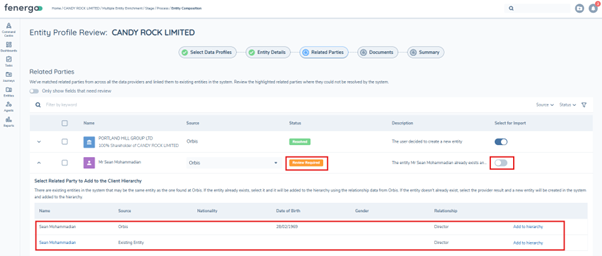
If an ‘Existing Entity’ is selected the message bar will indicate this accordingly.
If an ‘Existing Entity’ is selected for import, when the import completes, the RP Data and Association data will be updated on the existing entity, with the latest third party provided data and associations.
NOTE: Associations are not deleted.

To ‘Reject’ a Related Party and not import it to Fenergo, the ‘Select for Import’ toggle must be switched off.
Search and Filtering of Related Parties is achievable through the table Search Bar and Filtering features.
Auto-Resolution Logic:
KYRA:Source will attempt to Auto-Resolve Related Parties by default, based on the following logic.
-
Where a Unique Identifier (e.g. Orbis ID) exists on the ‘Existing Entity’ record, and is also present on the incoming Third-Party Provider record, KYRA:Source will compare these values, and if an exact match is found, KYRA:Source will Auto-Resolve the RP by linking to the existing entity, and updating the record with the latest entity data and associations data, from the third party provider.
-
Where no Unique Identifier (e.g. Orbis ID) exists on the ‘Existing Entity’ record or Third-Party provider record, KYRA:Source will use a Secondary Search to compare and if an exact match is found, KYRA:Source will Auto-Resolve the RP by linking to the existing entity, and updating the record with the latest entity data and associations data, from the third party provider.
-
Secondary Search matching criteria:
-
Individual: FirstName & LastName – Exact Match
-
Company: LegalName & Country of Inc. – Exact Match
-
-
-
Where more than one exact match duplicates are returned, KYRA:Source cannot Auto-Resolve. In this case KYRA:Source will not Auto Resolve and will instead highlight that RP for User Review.
-
When no ‘Existing Entities’ are returned for an RP, KYRA:Source will consider this a New Entity. The RP and its data and association information will be created as a new entity and added to the hierarchy in Fenergo upon Import.
Note: For best Auto-Resolution results, the guidance is to use a provider that keeps a unique identifier for each of the Entities it returns, example Orbis. Kompany does not keep a unique identifier for all its returned entities.
Documents
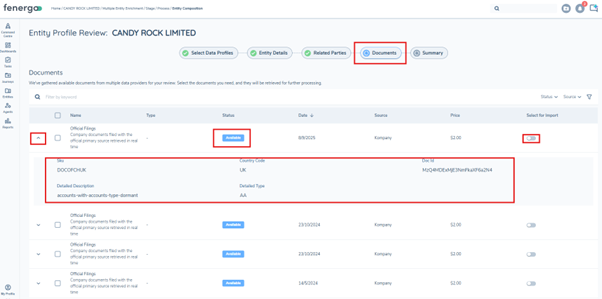
Where a third-party provider returns Documents, the ‘Documents’ step will display the available documents to the user, in a table, and allow the user to select one or more documents for Import to Fenergo.
When imported these documents will be stored on the Entity Record and can be viewed from the Enrichment task or from the Entity Details Page.
The Table is displayed with the following columns and information returned from the provider:
-
Name: The Name of the Document and its Description
-
Type: Set by the user from a Reference List
-
Status: Current Status of the Document
-
Available – Can be requested from the Provider.
-
Requested – Request is in Progress.
-
Retrieved – Document has been returned.
-
-
Date: The Date on the document (from the provider).
-
Source: The Source of the document.
-
Price: Price of the document if the user is to purchase.
-
Select for Import – Toggle switch to Import a Document to Fenergo.
Each Document record has a dropdown which exposes further Document metadata when provided from the third-party provider.
To Request an available document:
-
Toggle on the ‘Select for Import’ switch.
-
Click ‘Confirm’ on the message pop-up.
-
The ‘Add MetaData’ Modal will open, enter the Mandatory details.
-
Click the ‘SAVE’ button
The Status will change to ‘Requested’ and a snack bar notification will notify the user that the request has been made. The Type selected by the user will also be added to the ‘Type’ column for that record.

When the document has been returned, the Status will change to ‘Retrieved’ and the ‘Select for Import’ will toggle on automatically.
The document can be opened by clicking the hyperlink of the document ‘Name’

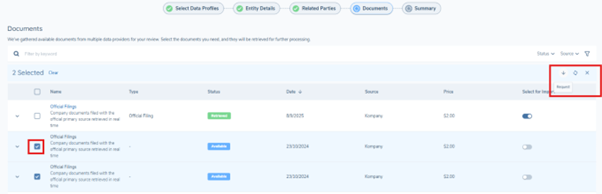
The Bulk Request/ Reset/ Reject of documents can be achieved by clicking the checkbox for any documents.
The action icons will appear at the top of the table, and the user can use these icons to ‘Request’, ‘Reset’ or ‘Reject’ multiple Documents.
Document Search and Filtering is supported by the Table search bar and filter feature.
Users can Save their choices by clicking the ‘SAVE’ button and to move to the next step click the ‘NEXT’ button, which will save the preferences and prepare for Import.
A warning pop-up will appear to inform the user of their document choices and allow them to ‘Cancel’ or ‘Confirm’ those choices.
Note: Document import is not complete until the task has been completed.
Summary
The Summary step is the final step of the External Entity Enrichment task. In this step, the user can see a consolidated view of KYRA:Source decisions that occurred throughout the task, giving them a clear, end-to-end picture of what was enriched and how.
The following information in this steo:
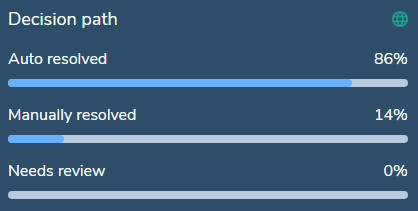
- Decision Path: Summarises which decisions were autoresolved by KYRA:Source and which by the user and how many items, if any, need review.
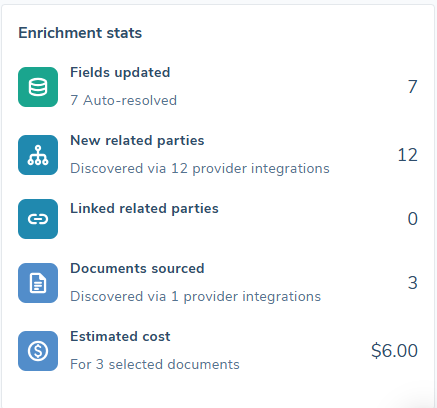
- Enrichment Stats: A summary of key metrics from across the enrichment task, giving the user an at-a-glance view of the final outcomes.
If AI Assist is be enabled in Central Agents Configuration to see the KYRA:Source Summary and the Flagged Items for Review sections will also be visible in this step.
To complete the task the user must click the ‘COMPLETE’ button.
Once clicked, all of the Data, Hierarchy and Document selections will be persisted to the entity record and the task will close.
AI Functionality & Activity
AI(OpenAI) as a Data Provider
The system supports the use of OpenAI as a Data Provider in the same way it does for other 3rd Party Providers. Once configured, using Flow studio, the user can use OpenAI to search for Client data and Related Parties, and import the completed data Profile to Fenergo.
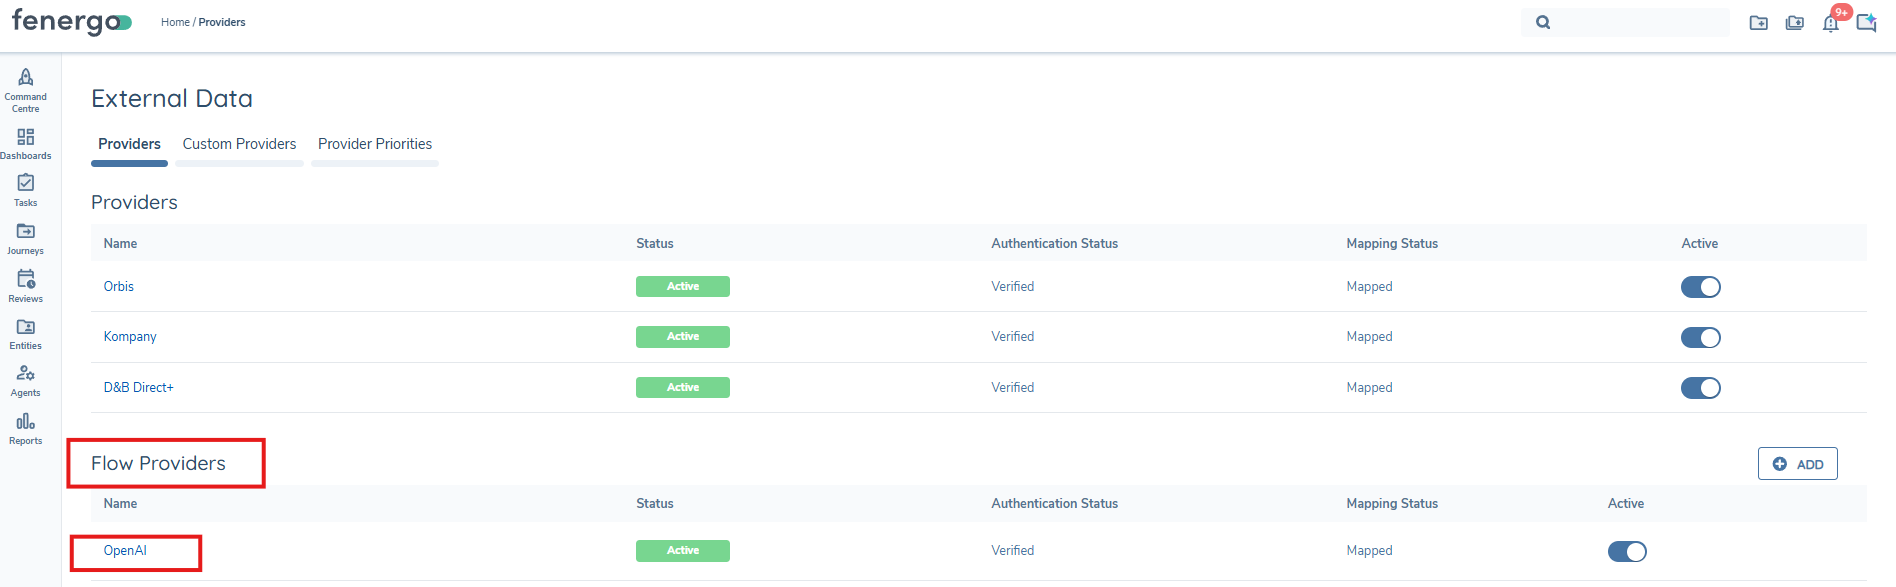
For clients who have Flow Studio enabled, the OpenAI Flow template will be deployed by default to their tenants.

Once deployed, the OpenAI adaptor mapping tool will be visible, and available to map from the External Data configuration screen.
To configure the OpenAI mapping tool, the user must provide a mandaroty Name, and select OpenAI from the following dropdown boxes:
- Test
- Search
- Get
Then click the SAVE & TEST button.
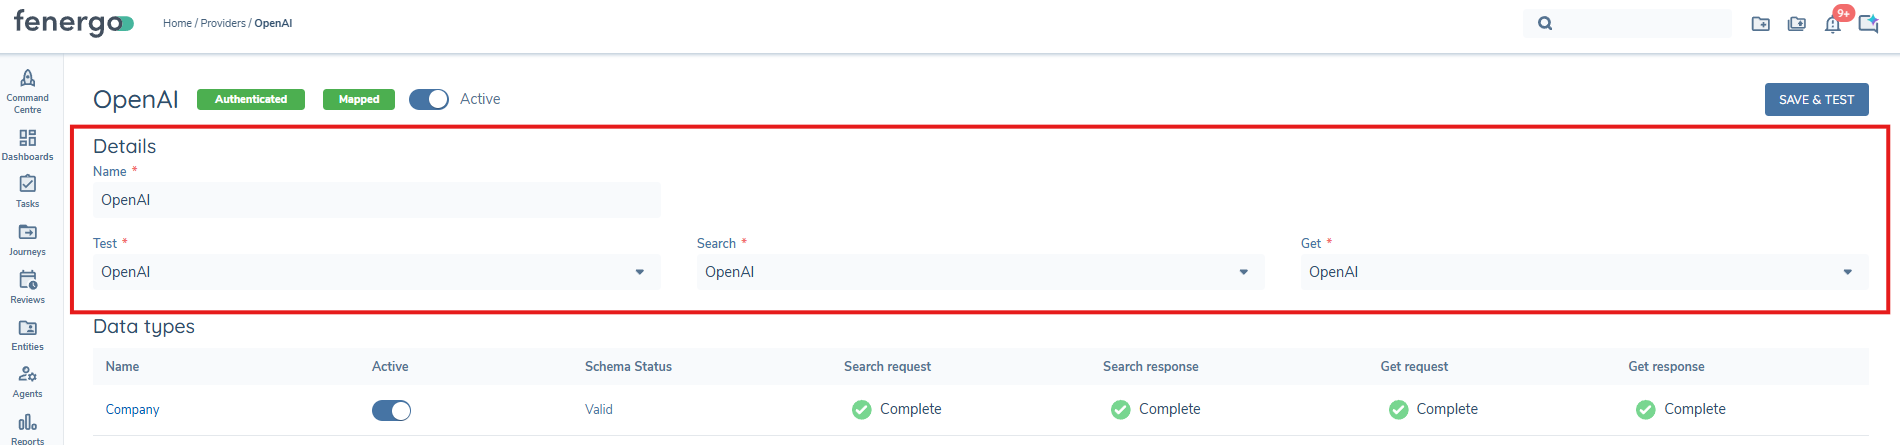
Once authenticated, the user can then click into the Company hyperlink to expose the Mapping tool and can map fields to policy, in the same way they would for any other adaptor.
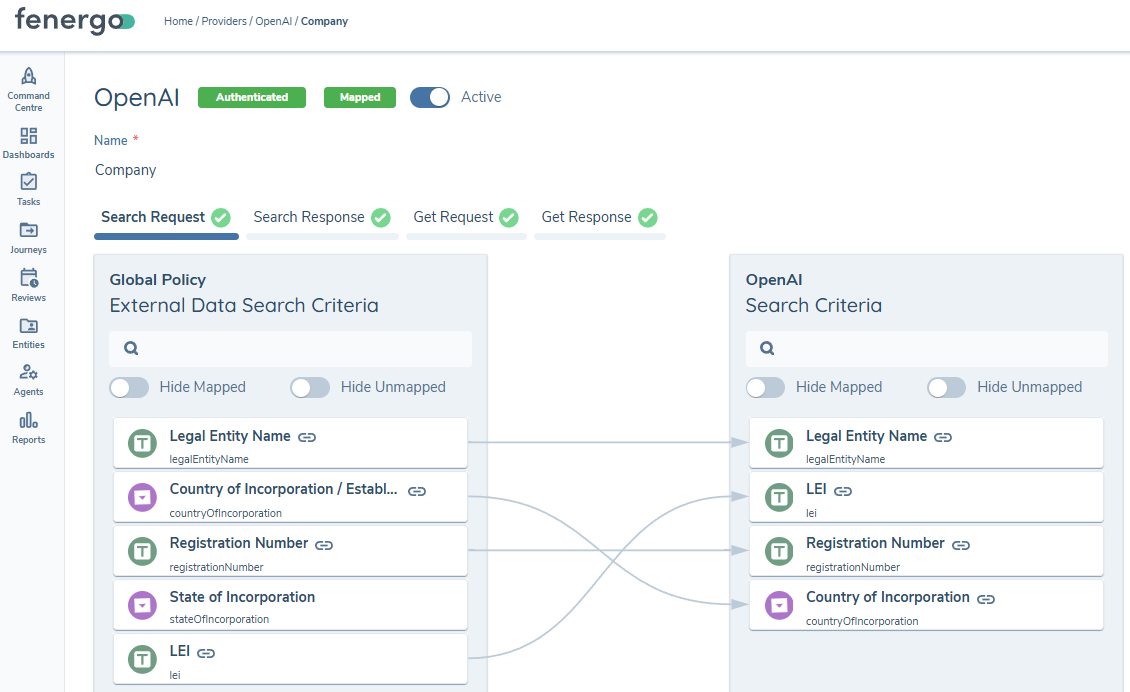
The User can now configure OpenAI as a data provider in the External Data Entity Enrichment journey builder task, for use in a journey.
AI Assist
KYRA:Source allows users to enable AI assistance within the External Data Entity Enrichment task. When enabled, AI Assist supports enrichment by providing information around which resolutions were assisted by AI and why, providing transparency into the automated decisions made.
When AI Assist is enabled, the Enrichment Task utilises AI across the following steps:
- Entity Details
- Related Parties
- Summary
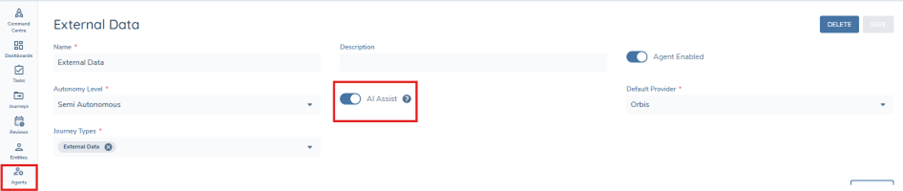
How to Enable
- In Central Agents Configuration
- Select/Create an Agent Instance
- Toggle on the AI Assist Toggle
Entity Details
During the Entity Details step, third-party data providers may return values for configured Data Groups (for example, Address). AI Assist is used to compare any third-party Data Group values with the existing Fenergo value. The system submits all Data Group values to the Large Language Model (LLM). The LLM evaluates:
- The similarity between the values
- The likelihood that the Data Groups represent the same information
The result of this evaluation is returned as an AI-generated summary, which is surfaced in the UI to support the user’s decision-making.

In order to see results that have been auto resolved and the AI-generated summary, ensure the ‘Only show fields that need review’ toggle is off

Related Parties
Some third-party providers return duplicate Related Party entities under different associations or name formats. A common example is the same individual returned separately as a Shareholder and a Director.
When AI Assist is enabled, the system uses AI to help resolve these potential duplicates before import into Fenergo. The system submits the relevant information to the LLM which evaluates the likelihood that the entities represent the same individual.
If the LLM determines that the entities are the same person:
- The data from the same provider is merged into a single Related Party entity
- Multiple associations (for example, Shareholder and Director) are retained on that entity
This merged entity can then be auto-imported into Fenergo as a single Related Party, avoiding duplicate records.
In order to see results that have been deduplicated and the AI Insights, ensure the ‘Only show fields that need review’ toggle is off

In the Status column of the Related Parties grid there will be a blue ‘Auto-Resolved’ chip and an AI Assisted icon for all resolved matches. The Description column displays a brief AI-generated insight into the resolution. For more information, the user can click the ‘View Details’ hyperlink, and an AI Insights panel is displayed showing the Summary and Reasoning of the AI decision making. This provides visibility into AI-assisted decisions and supports user confidence in automated resolutions.
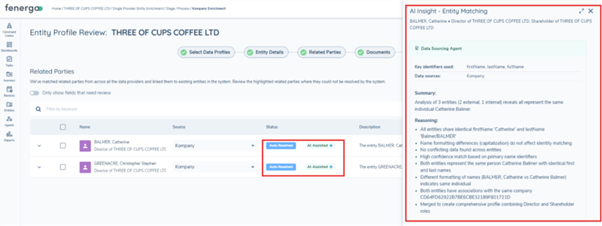
If the potential duplicate was not able to be resolved just with AI, there will be an orange ‘Review Required’ chip and an AI Assisted icon.

Hierarchy Comparison Insights
As party of the Related Parties step, KYRA:Source compares hierarchies from one or more third-party providers with each other as well as any existing Fenergo verified hierarchy. This comparison highlights missing entities, missing associations and other differences and supports the user in making informed decisions on whether to retain, update or remove associations. This feature is designed to remove the manual effort of cross-referencing multiple provider outputs side by side. Instead, KYRA:Source flags what needs user attention.
This collapsible panel in the Related Party step displays a brief AI-generated insights into the identified discrepancies including any missing entities and/or relationships.

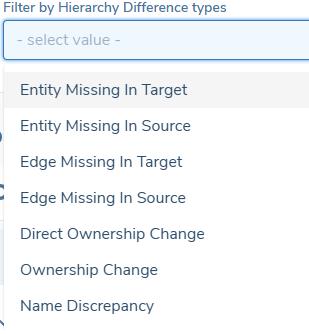
The user is also able to filter by Hierarchy Difference type from a multi-select dropdown list.
All insights are advisory only and should be reviewed by the user before action is taken.
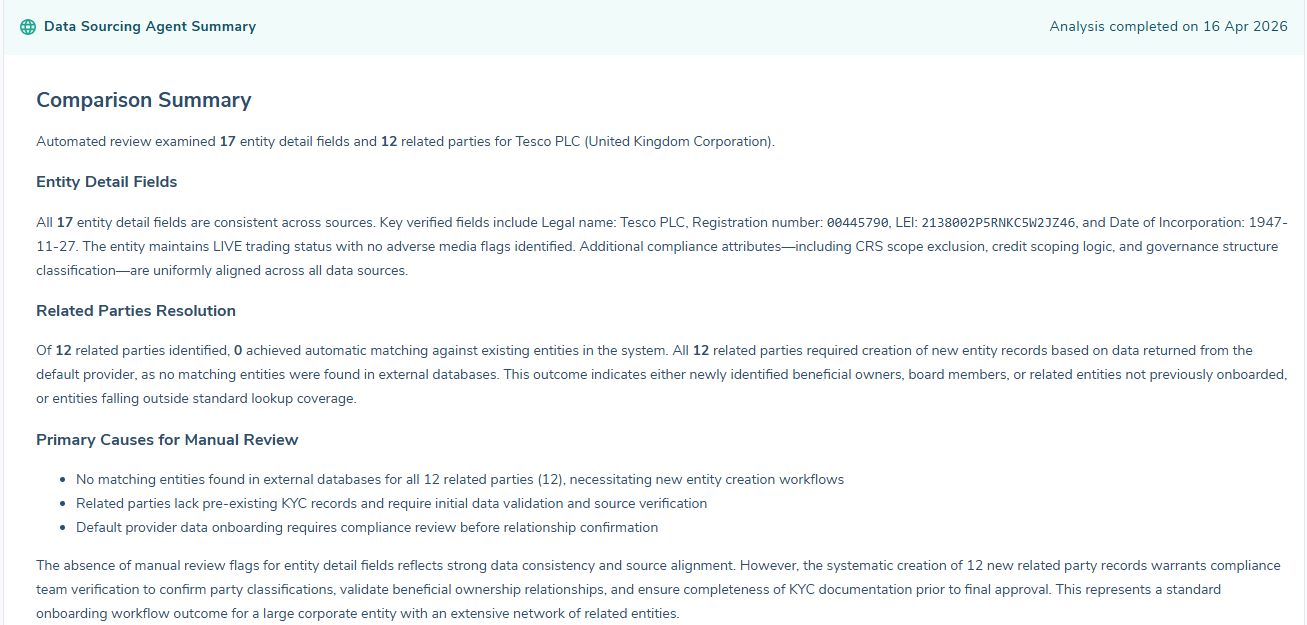
Summary Step
The Summary step is the final step of the Entity Enrichment task. It provides a consolidated view of all AI activity and data resolution outcomes that occurred throughout the task, giving the user a clear, end-to-end picture of what was enriched and how.
The Summary step surfaces the following information:
- KYRA:Source Summary: A high-level overview of AI activity that occurred throughout the enrichment task:
- Datagroup Resolution Insights from the Entity Details step, showing how AI compared and resolved third-party data values against existing Fenergo records.
- Deduplication and Merge Insights from the Related Parties step, showing where AI identified and merged duplicate related party entities.
- Decision Path: Summarises which decisions were autoresolved by KYRA:Source and by the user and how many items, if any, need review.
- Enrichment Stats: A summary of key metrics from across the enrichment task, giving the user an at-a-glance view of the final outcomes.
- Flagged Items for Review: Lists any outstanding items in the Entity Details or Related Party Steps. The user can select the hyperlink to go to the required review.

AI Assist must be enabled in Central Agents Configuration to see KYRA:Source Summary and the Flagged Items for Review sections.
To complete the task the user must click the ‘COMPLETE’ button.
Once clicked, all of the Data, Hierarchy and Document selections will be persisted to the entity record and the task will close.