KYRA:Screen User Guide
KYRA:Screen
KYRA:Screen is an intelligent, autonomous solution designed to reduce the operational burden of resolving screening hits. By applying match resolution logic, generating explainable rationales, and automating hit closure in real time, KYRA:Screen significantly reduces manual workload, accelerates onboarding, and ensures consistent, auditable outcomes.
KYRA:Screen offers:
- Match Resolution Logic: Automatically processes screening results from third-party providers (e.g., LexisNexis, Grid, WCO, custom providers).
- Auto-Resolution: Resolves hits as either true match or false positive based on screening provider data. This reduces the volume of unresolved hits requiring analyst intervention.
- Agent Autonomy: Supports multiple autonomy levels (manual, semi-autonomous, fully autonomous), allowing organisations to tailor KYRA:Screen to their risk appetite.
- Decision Rationale: Provides full transparency on the decision made for each match or non-match, with rationale recorded for each decision.
Configuring KYRA:Screen
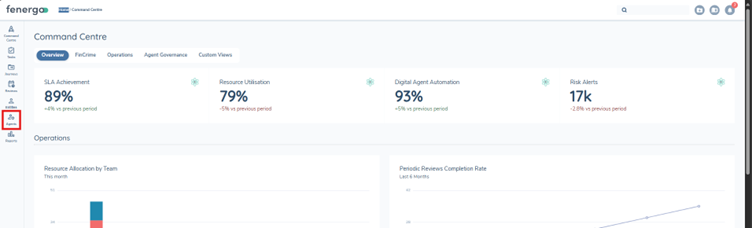
KYRA:Screen can be managed and monitored through the Central Agents Configuration area.
In order to use KYRA:Screen, screening must first be configured in your tenant. Refer to the Configuring Screening Functionality User Guide for setup instructions.
To enable and configure KYRA:Screen:
-
Navigate to Agents
- In the left-hand navigation menu, click Agents.
- Select KYRA:Screen from the available list.

-
Create a KYRA:Screen Instance
- Click Add Instance.
- Enter a name and description for the KYRA:Screen Instance.
- Assign the agent Instance to the relevant Journey Type(s).
- You can create a maximum of five KYRA:Screen Instances.
- A Journey Type can only be assigned to one KYRA:Screen Instance.
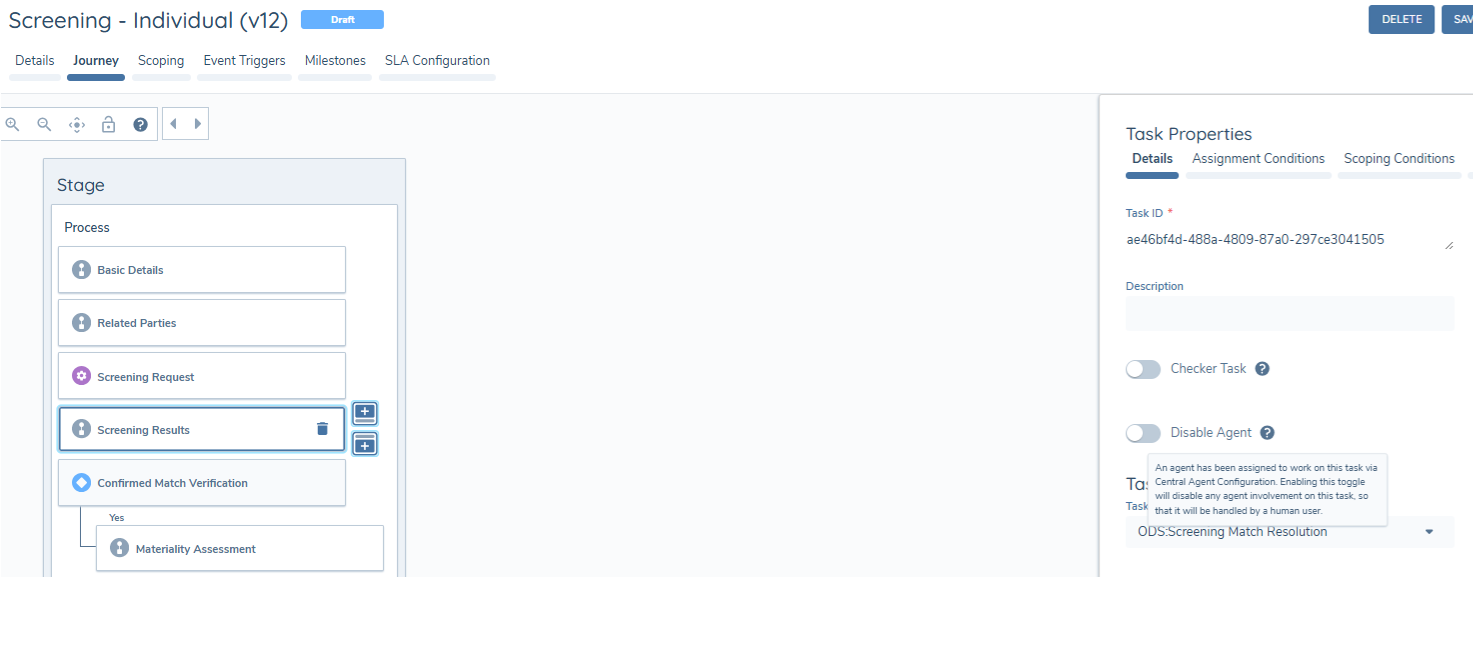
- To disable KYRA:Screen for a specific Journey Schema while keeping it active for the overall Journey Type, use the Disable Agent toggle within the Screening Match Resolution task.
-
Set Autonomy Level Within each agent instance, select the Autonomy Level appropriate for your organisation's needs.
Autonomy Levels Explained
-
Manual
- The agent does not take any resolution action.
- All hits must be manually reviewed and resolved by an analyst.
-
Semi-Autonomous
- The agent resolves hits where possible but leaves the task open for analyst confirmation.
- Recommended as the default rollout mode, as it reduces workload while maintaining human oversight.
-
Fully Autonomous
- The agent resolves all hits it can and automatically completes the task.
- Provides the highest efficiency gains but should be enabled only once confidence in the agent's performance is established.
- All agent decisions and rationale are available in the Audit drawer.
-
-
Enable the Agent
- Toggle Agent Enabled to activate the agent.
- If required, you can disable the toggle at any time while retaining your configuration (e.g., to pause agent activity temporarily).
-
Save Configuration
- Click Save to apply your settings.
- KYRA:Screen will now run according to the selected configuration for the specified journeys.
Using KYRA:Screen
Once KYRA:Screen has been enabled and configured, analysts can interact with its results directly in the Screening Results task.
-
Open the Screening Results Task
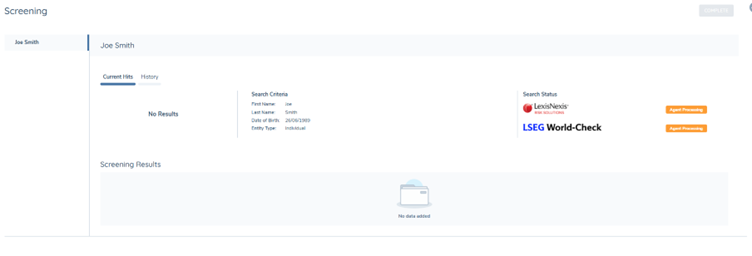
- When a screening request is initiated, the Search Status will display as "Agent Processing" while KYRA:Screen analyses the results from the selected provider and compares them with the entity's Search Criteria (name, date of birth, entity type, etc.).
- Once processing is complete, all screening hits are displayed in the Screening Results table.
-
Review Agent Decisions
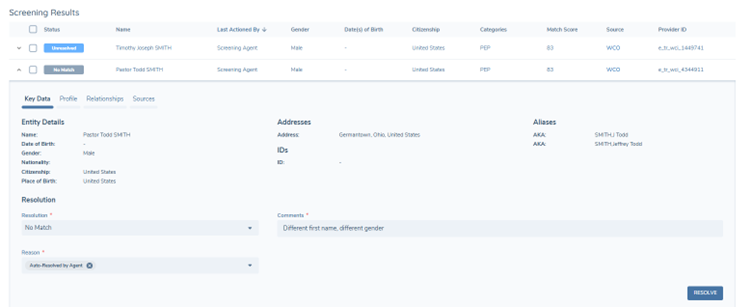
Expand each hit in the Screening Results table to view the Agent's decision and rationale.
Each resolution includes:
- Resolution (e.g., No Match, Match, Unresolved)
- Reason (e.g., Auto-Resolved by Agent)
- Comments (e.g., Different first name, different gender)
The Last Actioned By column indicates whether the hit was handled by:
- KYRA:Screen
- A user/analyst (for example, re-used resolutions from previous screening runs)
- The screening provider in some cases, if auto-resolution of false positive hits is enabled
This ensures analysts can always verify how and by whom a decision was made.
-
Resolve Any Outstanding Hits
In Semi-Autonomous mode, KYRA:Screen will attempt to resolve screening hits but will leave the task open for review. To override an Agent decision:
- Expand the hit, update the Resolution, add the Reason, and record Comments.
In Fully Autonomous mode, if all hits are resolved by KYRA:Screen, the task will auto-complete without analyst intervention. Analysts must resolve any remaining unresolved hits before the task can be completed.
-
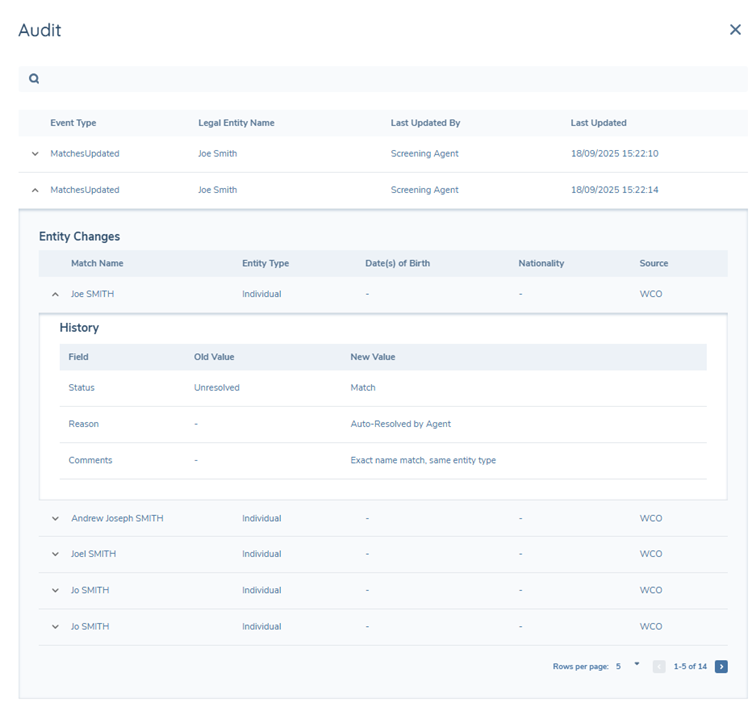
Audit Trail & History
Every decision made by KYRA:Screen is fully auditable.
Open the Audit view to see:
- Event type and entity name
- Who last updated the match (Agent, User, or Provider)
- Timestamp of the change
- A detailed history of changes (e.g., status updated from Unresolved → Match, reason recorded as Auto-Resolved by Agent)
This provides full transparency and accountability for compliance purposes.
Best Practices for Adoption
- Start with Semi-Autonomous mode to maintain oversight while reducing analyst workload.
- Monitor early outcomes using the Audit drawer before switching to Fully Autonomous mode.
Ongoing Screening
KYRA:Screen can be used in Ongoing Screening (OGS) journeys to automatically analyse and resolve hits generated, allowing organisations to maintain continuous monitoring without increasing manual workload for their operations teams.
How It Works When an OGS journey is triggered, KYRA:Screen evaluates the resulting hits using the same resolution logic applied in on-demand screening journeys.
Depending on the autonomy level configured for the agent instance, it may:
- Automatically resolve matches,
- Leave them open for analyst confirmation (Semi-Autonomous), or
- In Fully Autonomous mode, complete the task automatically.
Configuration Requirements To enable KYRA:Screen for OGS:
-
Create a KYRA:Screen Instance
- Navigate to Agents → Add Instance, and create a new instance dedicated to OGS journeys.
- Assign the instance to the Journey Type that represents your OGS process.
- A Journey Type can only be linked to one agent instance, so Ongoing Screening should have its own instance, separate from on-demand screenings.
-
Set the Autonomy Level
- Choose between Manual, Semi-Autonomous, or Fully Autonomous, depending on organisational risk appetite and oversight needs.
-
Enable the Agent
- Turn on the Agent Enabled toggle to activate automated match resolution for the assigned OGS journeys.
Once configured, KYRA:Screen will automatically evaluate and resolve hits for all ongoing screening events associated with that journey type.
- Unlike On Demand Screening, for OGS KYRA:Screen resolves hits before the journey launches.
- Therefore, no initial audit record is created.
- An audit entry will only appear if a user later reviews and changes KYRA:Screen's decision.
Sources Summarisation
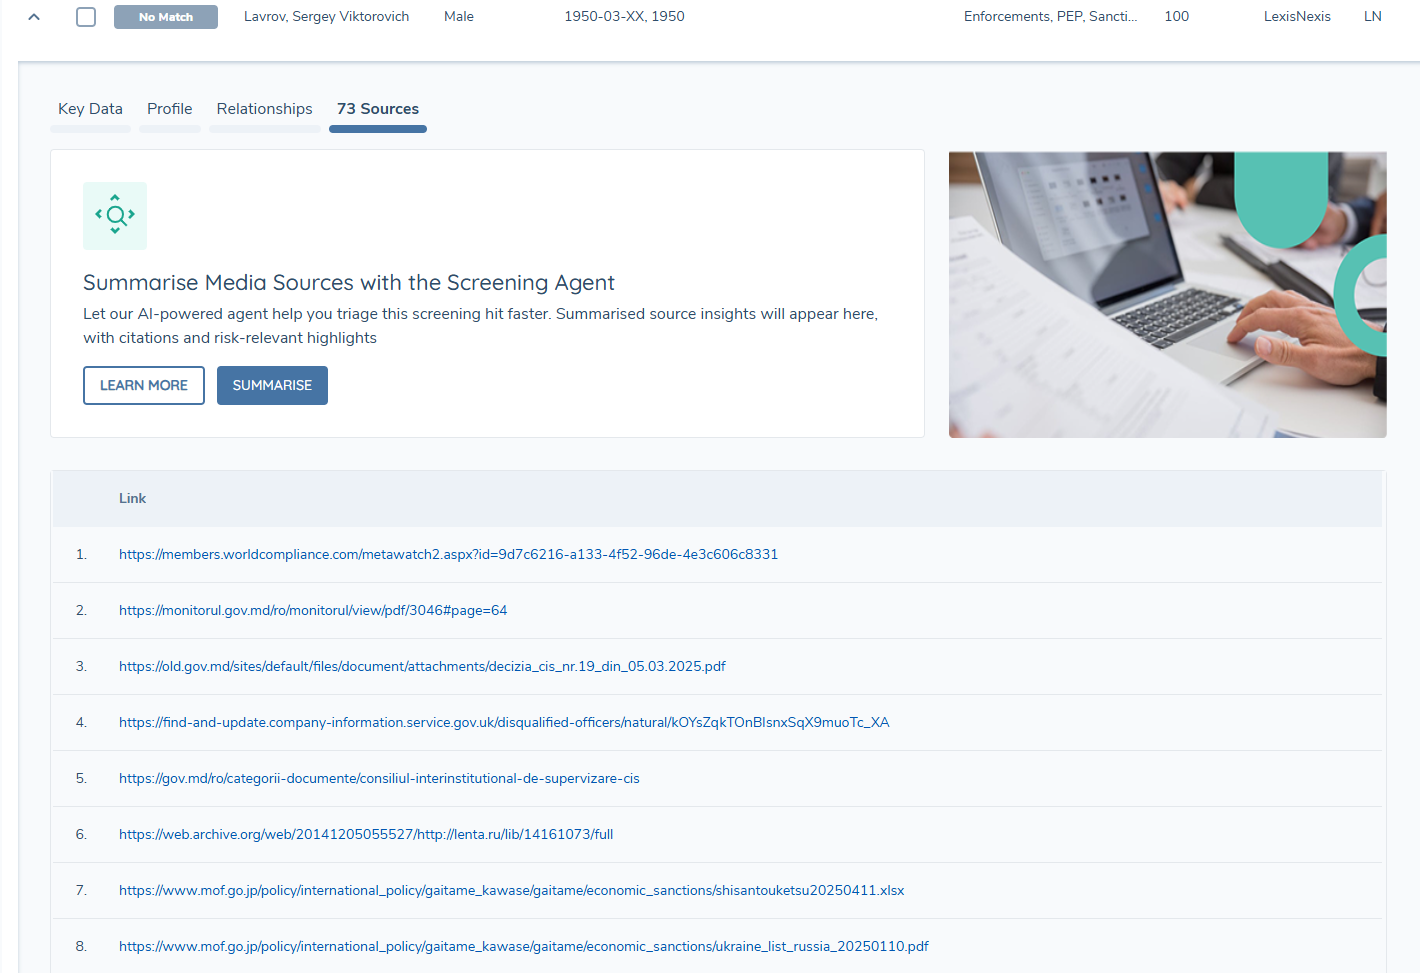
Sources Summarisation enables KYRA:Screen to generate AI-powered summaries of articles linked within the Sources tab of a screening match.
Instead of manually opening and reviewing each link, analysts can request a consolidated summary directly within the Screening Results task.
Summarisation runs asynchronously, allowing you to continue reviewing the task while summaries are being generated.
How to Use Sources Summarisation:
- Once screening results have been generated, open a screening match in the Screening Results task.
- Navigate to the Sources tab.
- Click Summarise Sources.
- A progress bar will indicate when the summarisation is complete.
KYRA:Screen will:
- Generate a structured summary for each applicable source in the right hand pane, available through clicking the "View Sources" button.
- Provide a Sources Overview, summarising the key high level information across all links.
- Highlight common themes identified across articles in bullet point format.
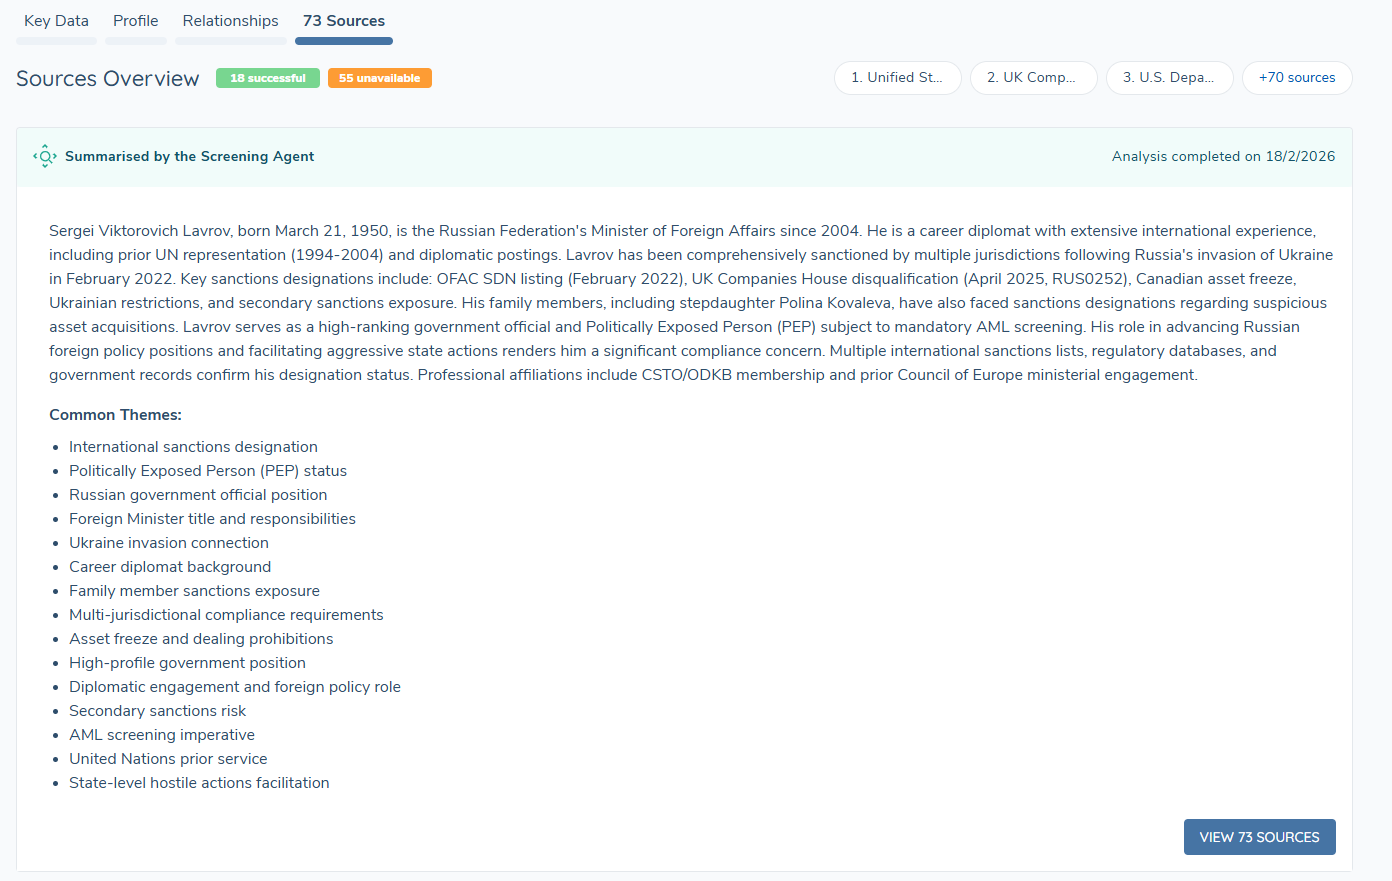
What to Expect:
- The original source links remain clickable at all times.
- Links that cannot be summarised (for example, unsupported formats or inaccessible content) are clearly flagged as Unavailable in the right hand pane.
- Non-English sources are automatically translated into English for summarisation.
Screening Instructions
The Screening Instructions page allows you to configure the instructions KYRA:Screen uses to evaluate and resolve screening hits. Six system default instructions are provided as a starting point and can be edited, removed, or supplemented with your own custom instructions.
To access Screening Instructions:
Navigate to Agents (left navigation panel) → KYRA:Screen → Screening Instructions tab.
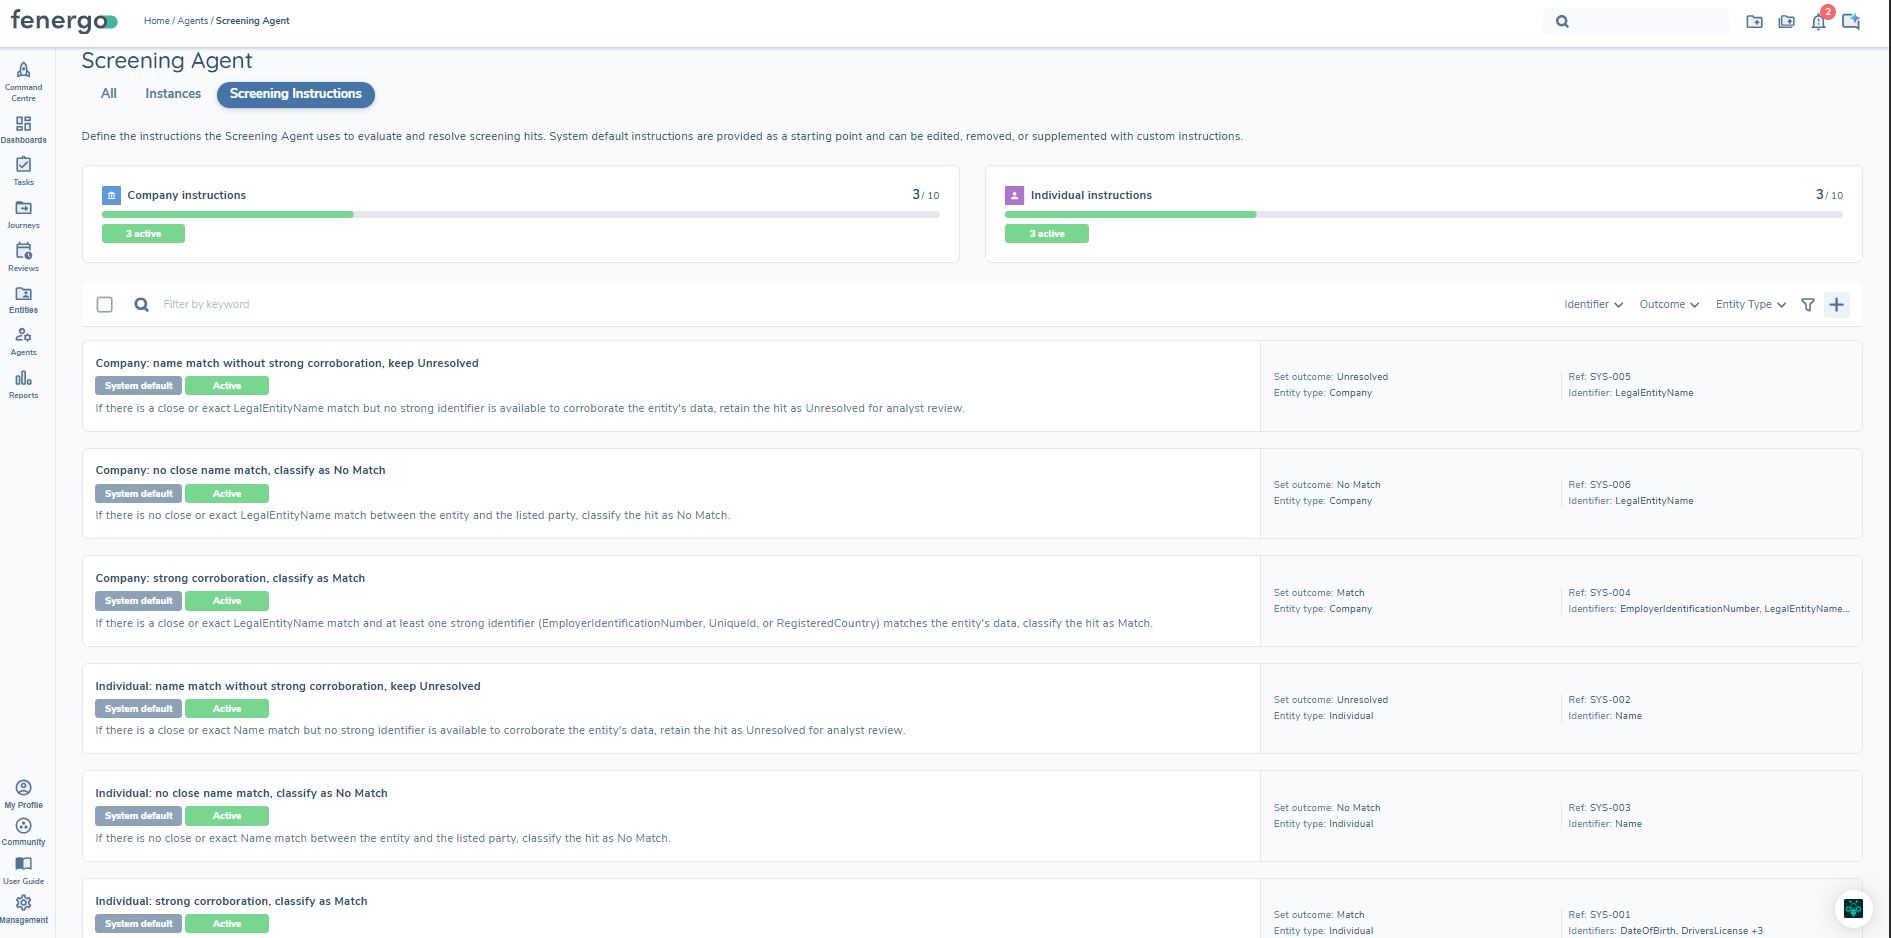
System Default Instructions
Fenergo provides six system default instructions out of the box — three for Individual entities and three for Company entities. These cover the most common screening scenarios and are active from day one. They are labelled with a System default badge in the instructions list.
System default instructions can be edited, moved to draft, or deleted. Once a system default has been edited or deleted, it can be restored to its original content at any time.
The system default instructions are designed to cover the most common screening scenarios. If you significantly reduce the number of active instructions, KYRA:Screen will return Unresolved for any hit where no instruction applies. Review the Best Practices section before deleting or deactivating defaults.
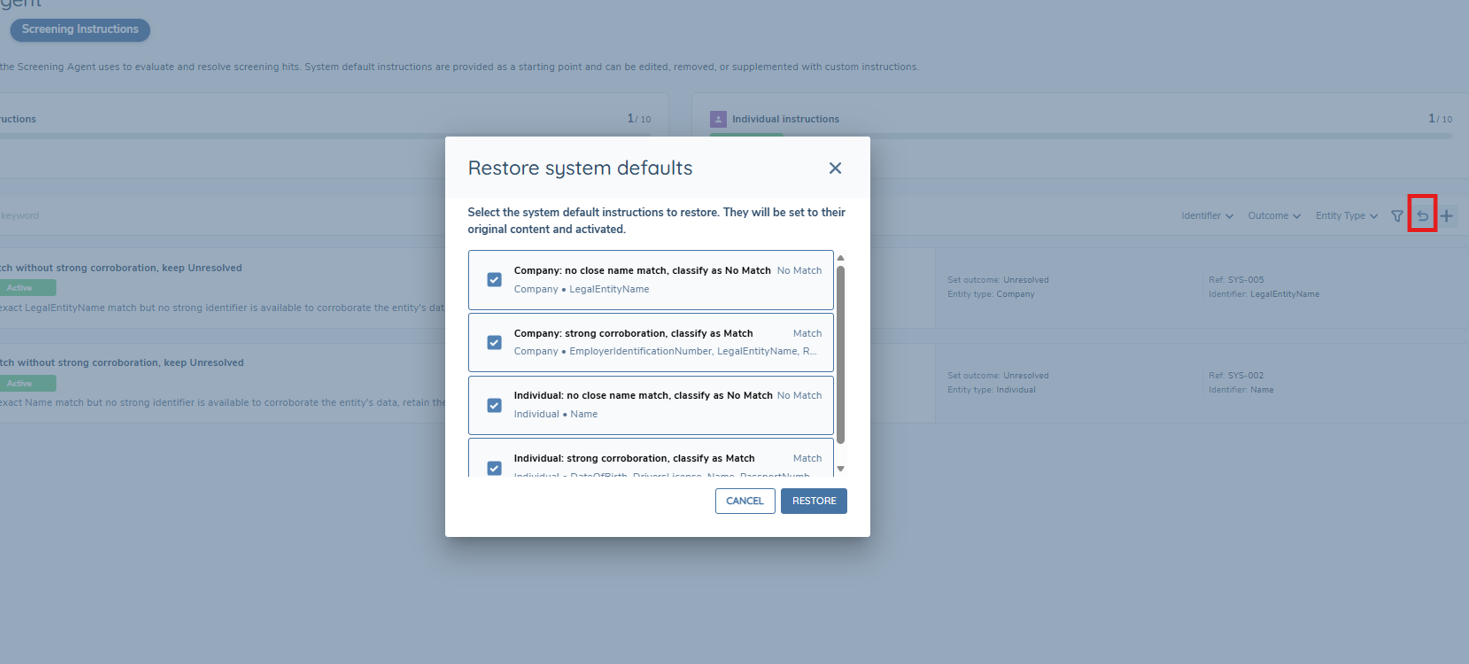
Restoring System Defaults
If you have edited or deleted a system default instruction and want to return it to its original content:
- Click the Restore defaults button in the top right of the instructions list.
- A panel will open showing any system default instructions that have been deleted or are no longer in their original state.
- Select the instructions you want to restore and click Restore.
- Restored instructions are set to Active with their original content.
If restoring an instruction would exceed the limit of 10 active instructions for that entity type, you will need to move an existing instruction to draft first.
Instruction States
Each instruction has one of two states:
| State | Description |
|---|---|
| Active | The instruction is applied by KYRA:Screen when evaluating screening hits |
| Draft | The instruction is not applied and has no impact on screening decisions |
Managing Instructions
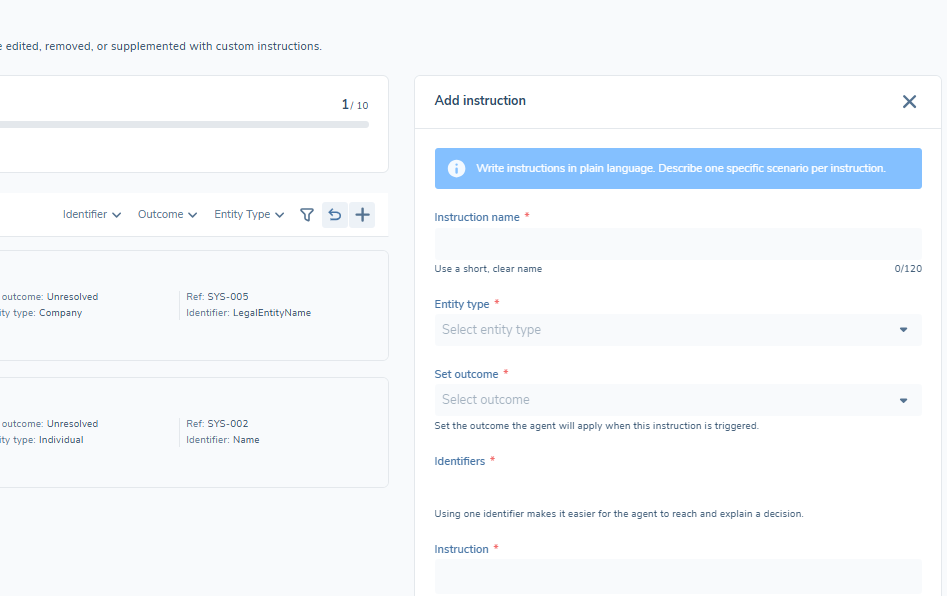
Adding a custom instruction
Click the + (Add instruction) button in the top right of the instructions list to open the add instruction panel, then complete the following fields:
| Field | Description |
|---|---|
| Instruction name | A clear, descriptive name for the instruction |
| Entity type | Select Individual or Company |
| Set outcome | The outcome KYRA:Screen will apply when this instruction is triggered — Match, No Match, or Unresolved |
| Identifiers | The data points the instruction references. Using fewer identifiers makes it easier for the agent to reach and explain a decision |
| Instruction | Write the instruction in plain language. Reference each identifier by its exact name in the instruction text, for example "Date of Birth" or "Legal Entity Name" |
Instructions are always created as draft. You must explicitly activate an instruction before KYRA:Screen will apply it.
Activating an instruction
To make a draft instruction live, click Activate on the instruction card and confirm. Once active, KYRA:Screen will apply the instruction to all relevant screening hits going forward.
Editing an instruction
Click Edit on any instruction card to open the edit panel. All fields can be updated. Changes are saved as draft — you will need to reactivate the instruction after saving for it to take effect in live screening.
Moving an instruction to draft
To deactivate an instruction without deleting it, click Move to draft on the instruction card. The instruction remains in the list but is no longer applied by KYRA:Screen. It can be reactivated at any time.
Deleting an instruction
Click Delete on any instruction card to remove it. Custom instructions are permanently deleted. System default instructions can be restored at any time using Restore defaults.
At least one active instruction must remain for each entity type. The delete and move to draft options are disabled on the last remaining active instruction for that entity type.
Instruction Limits
Each entity type supports a maximum of 10 active instructions — 10 for Individual and 10 for Company, counted separately. There is no limit on the number of draft instructions. The counter at the top of the page shows how many active instructions you currently have for each entity type.
When the limit is reached, the activate option is disabled on all draft instructions for that entity type. Move an existing instruction to draft to make room before activating another.
Identifier Overlap
If two active instructions share the same identifier and are both triggered for the same hit, the following logic applies:
- If both instructions return the same outcome — that outcome is applied.
- If the outcomes differ — the hit is set to Unresolved for analyst review.
A warning is displayed in the instruction form when a selected identifier is already used by another active instruction. This is to prevent conflicting instructions from producing inconsistent outcomes on the same hit, which would require manual analyst review to resolve.
Decisioning Rationale
The Comments field on a resolved hit shows exactly which instruction was applied and why the decision was reached.
This makes it straightforward to audit decisions, trace outcomes back to the instruction that drove them, and validate that your configured logic is working as expected. If you are testing a new instruction, you can see immediately whether it is being picked up and applied correctly.

What Happens When No Instructions Apply
The outcome for a screening hit depends on the instructions that are active at the time it is processed:
- If no instructions are active for an entity type — KYRA:Screen returns Unresolved with the message: "No enabled instructions configured for this entity type."
- If instructions are active but none are relevant to the hit — KYRA:Screen returns Unresolved with a message indicating that no instructions were relevant.
- Provider-set false positives — hits that the screening provider has already resolved as false positives will display as No Match regardless of your instruction configuration.
In all other cases where no instruction applies, the hit will be set to Unresolved and will require manual analyst review.
Best Practices
- Ensure your instructions cover all expected scenarios. KYRA:Screen can only resolve a hit if an active instruction applies to it. Any hit that does not match an active instruction will be returned as Unresolved, increasing manual workload. The more comprehensively your instructions cover the range of screening outcomes your organisation encounters, the greater the automation benefit.
- Use the system default instructions as a baseline. Before deleting or deactivating defaults, consider whether the scenarios they cover are genuinely irrelevant to your screening programme. Restoring defaults at a later stage is straightforward, but any hits processed in the interim will have been left as Unresolved if they have no corresponding instruction.
- Test new instructions before activating at scale. Review the rationale within the Comments field of resolved hits to confirm that a new instruction is behaving as expected before relying on it in production.
- Monitor Unresolved volumes. A sustained increase in Unresolved hits can indicate that your instructions no longer cover the scenarios being generated by your screening provider. Review and update instructions accordingly.
- Use precise, specific language. Avoid generic or vague instructions. The more exact and unambiguous your instruction text, the more reliably KYRA:Screen can apply it. Reference identifiers by their exact names and define clear conditions — this removes ambiguity for the agent and reduces the likelihood of unexpected Unresolved outcomes.