Bulk Upload and Request
Bulk Uploads Overview
The Bulk Upload feature provides clients with a user-friendly way of bulk creating / updating Entities within Fenergo SaaS. It will also assist our Funds Clients to leverage it for Funds Onboarding within the Fenergo SaaS Application. Upon completion of the Bulk Upload, by default, we will launch the following Journey Types:
- For Entity Creation: "Client Onboarding"
- For Entity Update: "Maintenance"
The specific Journey Types launched for Entity Creation versus Entity Updating is decided by a User when running a Bulk Upload job. Please see the "Custom Journey Types" section at the end of this user guide for more information.
Previously in Fenergo SaaS, Clients could only use the Data Migration APIs to bulk create / update Entities in Fenergo SaaS. This meant that for our Clients who are more business focused / do not want to rely on an inhouse tech team to run the migration jobs, they were limited in how they load Entity Data into the system. Data Migration APIs also should only be used for already existing clients that are already verified.
This means that following a Migration Job, the Entities are created / updated directly to the verified Entity record. This is fine for existing Clients sitting in an old system, but for net-new Clients, it makes sense to provide the ability to review / enrich / edit the Data on screen in a Journey before then verifying the changes.
- The Bulk Load functionality will not be included in the standard Fen-X License used by our clients. This means that it is an add-on feature which will need to be specifically requested to be enabled in user tenants. Please reach out to your relevant Client Portfolio Lead or Product Manager for more information.
- When using the Bulk Upload File, there is a max limit of 1000 Entries that can be created in a single request. This can be thought of as a maximum of 1000 total user-inputted rows in the file. An "Entry" is defined as an Entity, Product or an Association. This is a Product controlled limitation to ensure maximum performance. Product Team will assess functionality and client requests for larger files if required over time. There is also a limitation on number of requests that can be ran at once which is 10 requests.
- When using the Bulk Upload functionality, it is advised to use a specific Policy for Bulk Load requests that is not necessarily Jurisdictional. Users need to ensure that they do not use large Policies like Global in order to prevent creating large Data Sets Templates. This will also reduce the risk of misconfiguration / cross domain dependencies between Policies and Domains like Lookups. Additionally, keeping the Policy being used in Bulk Upload smaller will be advantageous to the end-user, as it means that they are only seeing the specific requirements needed in their Bulk Upload job.
- When configuring a Policy to be used as a Bulk Load Template, users should not attach Policy Scoping Conditions to this Policy. The reason for this is that when Journeys run for an Entity that has been created / updated using the Bulk Upload file, the associated Policy will not be used in the Journey itself as the system is identifying it as a Bulk Load Template rather than a valid Jurisdiction specific Policy to come into scope. If Scoping Conditions are configured for this Policy, the evaluation will occur but the system will reject the Policy returning a message saying "Version ID is required".
- Straight Through Processing (STP) is now supported in Bulk Upload functionality. STP describes a scenario where clients configure automated verification tasks in a Bulk Load Journey to have the data loaded into the system before immediately verifying to the Published Entity record.
Configuring Bulk Upload Templates
Configuring Bulk Upload Templates is a straight-forward process and one that configurators will be well accustomed to as they only need to either use an existing Policy that they have configured or else configure a unique Policy and optionally a product policy to use as the Bulk Upload Template.
The Bulk Request Dashboard
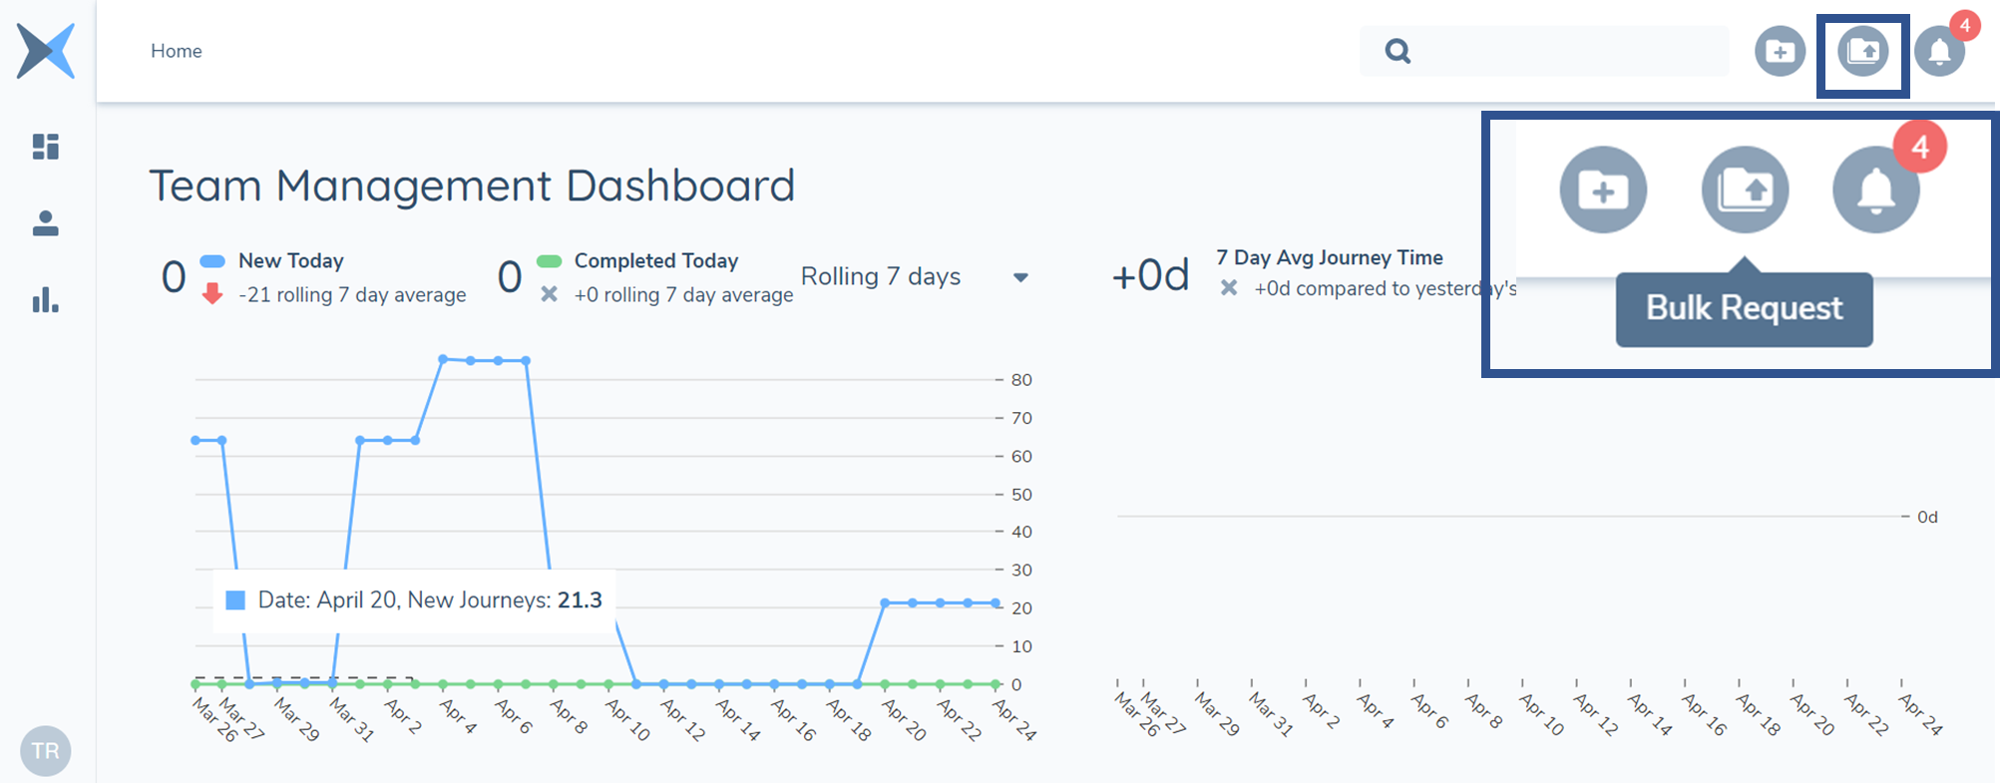
To support the new Bulk Request functionality, we have introduced a new component called the Bulk Request Dashboard, which can be found by clicking on the new Bulk Request icon on a user’s Fenergo SaaS Home page (Team Management Dashboard):
Screengrab of Bulk Request Component
Within the Bulk Request Dashboard, users will see the below table:
Screengrab of Bulk Request Dashboard
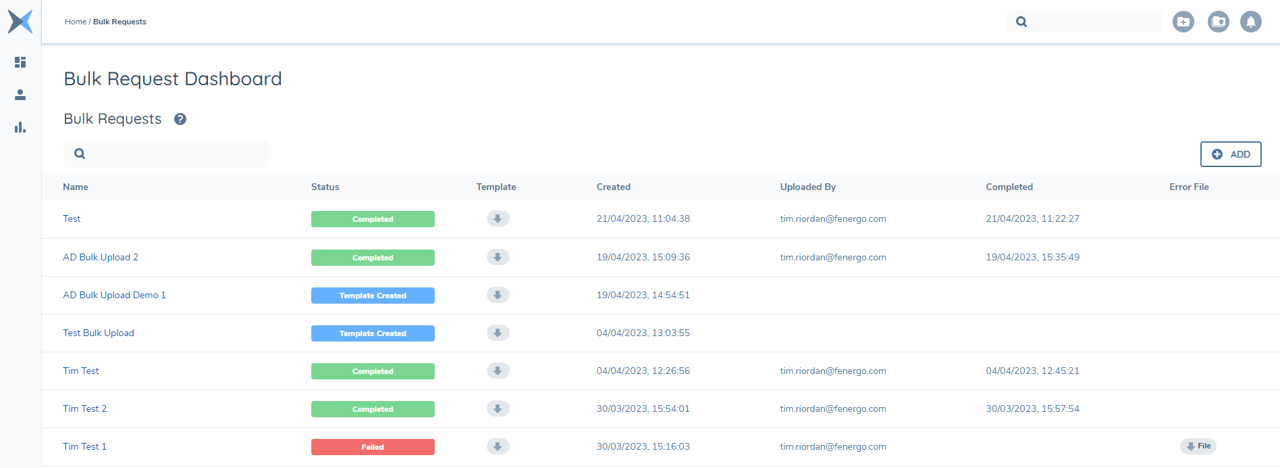
Within this table, users will see information on each Bulk Request that has been created including:
-
Request Name: The given name of the Bulk Request.
-
Request Status: The status of the Request which can be:
- Creating Template: The excel template to use in the Bulk Request is being generated.
- Template Created: Request is ready for Upload.
- Validating: Request is validating file format and contents.
- Processing: Request is passed - now creating / updating Entities.
- Completed: Request successful and complete.
- Failed: Request has failed - see error file for reasons for failure.
-
Template: The excel template that will be used as part of the file upload. Users can configure these Templates but using the Policy configuration tooling. Available Templates are any Policies configured within that tenant.
-
Created: Data and Timestamp of when the Request was created.
-
Uploaded By: Email of user who uploaded the file to the Bulk Request.
-
Completed: Date and Timestamp of when the Request was completed.
-
Error file: If the Request has failed, users will be able to download an error file to see why the file request failed.
Creating a New Bulk Request
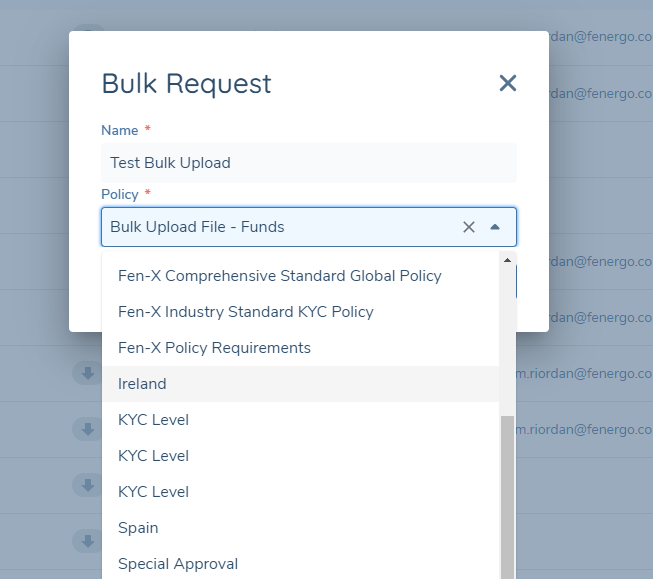
To create new Requests, users will select the ‘+ ADD ‘ button at the top right of the Bulk Request Dashboard. When doing so, a modal will be displayed allowing users to create the Request Name as well as select which Policy that they wish to act as the Bulk Upload template: If products are to be included in the bulk upload request, a product policy set must also be selected.
Screengrab of Bulk Request Modal
Downloading and Uploading a Bulk File
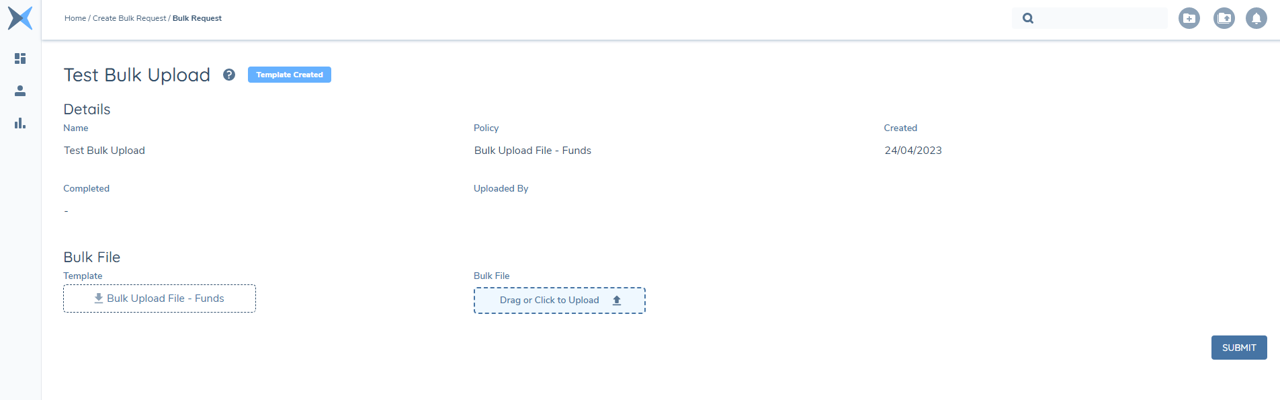
Once the request has been created in the Dashboard, users will be able to download the selected Policy template either on the Dashboard or from the Request Page that has been created. This will be downloaded in an excel format and will allow users to populate before being able to upload the completed file to the request:
Screengrab of Bulk Request Page
When a user opens the Bulk File, they will be presented with an excel file where each tab will display based on the Entity Type Requirements in the associated Policy (E.g. If Requirements have been created for ‘Company’ Entity Type and ‘Individual’ Entity Type, they will see these reflected in each respective Tab in the file:
Screengrab of Excel File Entity Tabs

Within each Tab, users will find the requirements displayed as Column headers (presented in datakey format) as well as fields in Columns A & B called ‘#referenceId’ and “#entityID” respectively. The purpose of the “#referenceID” field is to act as the unique identifier in the Bulk Request for each Entry. If the Request fails, users will be able to use this value (also available in the associated Error file) and map it to the original file used in the Request to determine what may have called the Request to fail:
Screengrab of Excel File Field Name Column Names and Reference ID

Here, a User will enter their desired values against each datakey. Any validation configured in the selected Policy from which the template was generated from will be applied here. For example, if a User applied a character limit of "20 Characters" on a text field, the file will fail if a User enters 21 or more characters against that datakey.
The purpose of the “#entityID” field is to provide users with the option to update an existing Entity in a Fenergo SaaS tenant. More information on updating Entities using the Bulk Upload file can be found in the section below ‘Updating Entities using the Bulk Upload File’.
Once the file has been populated and the user is happy, they will save and upload back into their Bulk Request and select ‘Submit’. This will then initiate the validation process of the Request.
Data Groups
For Data Groups, each Data Group will be presented in its own Tab in the file. When adding Data Group Entries, users will need to map each Entry to a ‘#parentReferenceId’. This is the unique value for the Entity being uploaded in the other Individual / Company / Other / Entity Group Tabs "referenceId" column.
The "#parentReferenceId" column is used to append a data group record against a specific entity, with the #parentReferenceId being the link to the entity being updated in the file. The "#referenceId" column is the unique referential ID against a specific data group record, so that we can report any errors in the generated error file after upload.
When updating an Entity through Bulk Upload, the User should be aware of any existing Data Group records on the Entity. When a user is updating a Data Group or set of Data Groups on an Entity, the Data Group entries included in the request will override the existing Data Group Entries on the Entity. An example of this would be 'Addresses'. In our example we have an Entity that has two Addresses (Correspondence & Registered). If we are using the Bulk File to add a third Address (Headquarters), and we do not include the other two Addresses in the file, the Entity will be updated to include just the new Address - overriding the previous two. The reason for this is that the Bulk file is by default, additive. To handle this scenario, users need to copy all existing Data Group Entries into the Bulk File.
Important Note: When configuring Data Groups to be included in the file, users must be aware that there is a character limit of 31 Characters for a Data Group Name. Please also note that the following characters are not allowed to be used when generating a tab, and therefore the name of your Data Group must not contain the following:
- : (colon)
- / (forward slash)
- \ (backslash)
- ? (question mark)
- "*" (asterisk)
- [ ] (square brackets)
Screengrab of Excel File Data Groups

Product
If a product policy has been selected, a ‘Product' tab and tabs for any relevant product data groups will also be in the file template.
The Product tab will display data requirements as configured in the elected Product policy associated with the template. In addition, Columns A-D show
- - ‘#referenceId': unique identifier in the Bulk Request for each product.
- - '#productid': Fenergo id of an existing product if the bulk file is to edit an existing product.
- - ‘#ownerReferenceId': unique identifier in the bulk file for the entity that will be the owner of the product in context.
- - '#ownerid': Fenergo id of an existing entity within Fenergo that will be the owner of the product in context.
Note: An owner must be specified for product creation. This owner may be included/created the bulk file or be an existing Fenergo entity. When editing an existing product, no owner reference can/should be added, as user cannot change the owner of a product, via bulk file or within the application. File validation will produce an error should a user add owner details for an existing product.
Users should not specify both a #ownerReferenceId and #ownerid for the same new to business product
Data groups for products can be added in the same fashion as they are for other parent entities (by including the product #referenceId as the parent reference id of the data group). As for other entities, data group addition will clear existing data group listings for the entity, so existing data group data will need to be included in the file.
Adding associations to product via bulk file (outside of the owner association created on product creation) is not currently supported.
Screengrab of Excel File Field Name Column Names and Reference ID

Validating a Bulk File
When a file is being validated, Fen-X will assess two things:
- That the file type is correct and acceptable (acceptable file type is XLSX): If the user tries to upload a Word Doc or a PDF, the Request will fail as the file type has been deemed ‘incorrect’.
- Validations configured for the requirements in the file have all been satisfied.
When configuring requirements in the selected Policy for the Bulk Upload, users can use the same validations used in typical policies to ensure that for example mandatory information is captured or that correct Lookups are used. If data does not meet the minimum mandatory or format requirements, the file will fail validation, and an error file will provide context of the issues.
Mandatory Data Validations
Mandatory data requirements can be configured in the policies used in the bulk upload process. The bulk upload process will validate against static mandatory data requirements configured in policy. Validation of dynamic mandatory data requirements is not supported at present. To support users with file preparation, mandatory data requirements are visually differentiated in the file template. Mandatory data requirements are indicated by bolded red text for the column name. When a user selects a mandatory column name, they will also see supporting text 'Info: This column is mandatory. Please enter a value'

The column name differentiation for mandatory fields is available for .xls file formats only, not .csv.
Reference Data Validations
The bulk upload process will validate select and multiselect dropdown fields against the version of the reference data list published against the policy.
Linked lookup validation is supported, but only for the legacy linked lookup approach.
Other Data Validations
The bulk upload process will validate against all format requirements configured for a specific field, for example, max/min and allowable characters, etc.
Success! Request has been completed
Once the system has confirmed that the file type used is correct and that all validations have passed, the Request will move to a state of ‘Processing’ before then ‘Complete’. This means that Entities have been created in the Fenergo SaaS tenant and the associated Journeys have been launched (dependent on configured scoping conditions being met):

Request failed! File Upload has not been completed due to validation errors
If the validations are not passed then the Request will fail. The user will be able to locate a generated Error file either in the Dashboard or else within the Request itself:

When the user downloads and opens the Error File, they will be able to identify the reason(s) for the Request to fail as well as the associated Entities that are the source of the errors which can be determined using the corresponding Reference ID property that we used in the original file upload:

When a Bulk Request fails, users will be able to re-upload and reprocess making it easier for them to manage number of Bulk Requests in the system.
The Bulk Report File
Upon completion of a Bulk Request, a Bulk Report file will be generated which will provide users with a list of Entity IDs (“FenXID”), Reference IDs, the Table that the Entity was uploaded from in the File as well as the associated launched Journey IDs:


Updating Entities using the Bulk Upload File
In order to update any existing Entities in a Fenergo SaaS tenant using the Bulk Upload file, users will be need to include the Entity ID in the request. The Entity ID can be located in the following ways:
- Through clicking the ID reference tag on the Entity Profile Page:
![]()
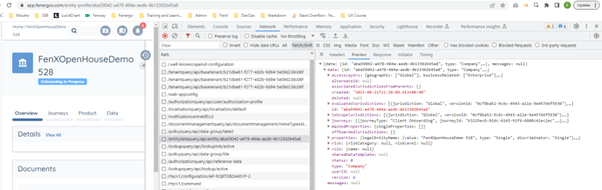
- Through copying the Entity ID through the URL in a browser:
![]()
- Or through retrieving it through the Entity Data Query API requests:
In the case of updating an Entity already in the application, a User may wish to remove Data. For existing Entities, any rows that are left blank will not validated. In other words, the Bulk Upload process will validate a field if there is a defined value provided in the file. As an example, if a User were to leave the "legalEntityName" column blank for an Entity, Fenergo SaaS would simply persist what was already on the Verified Data record for that Entity.
If a User wishes to actually remove data from an Entity during the Bulk Updating process, a specific format needs to be entered against the relevant datakey. This will be the value of {NULL}. This should include the rounded-brackets and casing here. This expression allows a User to tell Fenergo SaaS to actively remove the value associated on the datakey for that Entity. As mentioned earlier, leaving an excel cell blank will simply persist whatever was there previously on the Entity.
In the below example, a User is denoting in the Bulk Upload file that:
- "countryOfRegistration" should have its value set to null.
- "legalEntityName", "nextReviewDate" and "dateOfIncorporation" should persist their previous value (unchanged).
- "companyType", "entityRiskRating" and "countryOfIncorporation" should have their values updated as per the file.

The same process can be followed for removing values on Data Group Records.
Bulk Creating Associations
When it comes to creating associations between Entities using the Bulk Upload file, users will have the following options:
- Create associations between Entities in the Bulk Upload File
- Create associations between an Entity in the Bulk Upload File and an Entity in Fenergo SaaS
- Create associations between two Entities in Fenergo SaaS using the Bulk Upload file
In order to achieve the above scenarios, new properties have been introduced in the Associations tabs in the Bulk Upload file:
- sourceReferenceId (the Related Party in the file we are adding to the Client Entity)
- targetReferenceId (the Client Entity in the file that we are adding the Related Party to)
- sourceEntityId (the Related Party in Fenergo SaaS we are adding to the Client Entity)
- targetEntityId (the Client Entity in Fenergo SaaS that we are adding the Related Party to)
Here are some examples of how these four properties should be used in combination:
- "I want to associate an existing entity (sourceEntityId) with a to-be-created entity (targetReferenceId)"
- "I want to associate a to-be-created entity (sourceReferenceId) with a to-be-created entity (targetReferenceId)"
- "I want to associate an existing entity (sourceEntityId) with an existing entity (targetEntityId)"
- "I want to associate a to-be-created entity (sourceReferenceId) with an existing entity (targetEntityId)"
As a rule, any association being created in the Bulk Upload file must always define one of the "Source" properties and one of the "Target" properties.
As well as the above system fields, users will be required to configure a ‘Relationship’ Data Requirement in their selected Policy for Bulk Uploads. The configuration for this is displayed below:
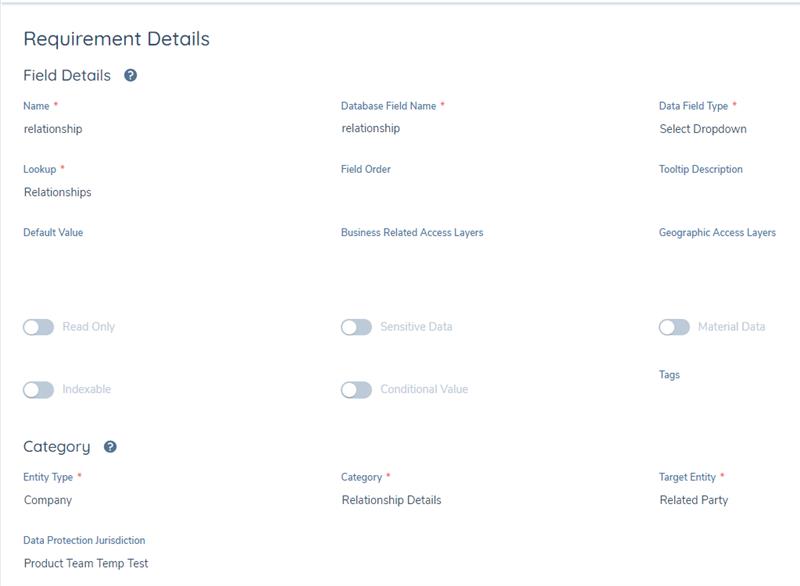
Other attributes found within the "Relationship Details" Policy Category can be added here as well, such as "Ownership Percentage".
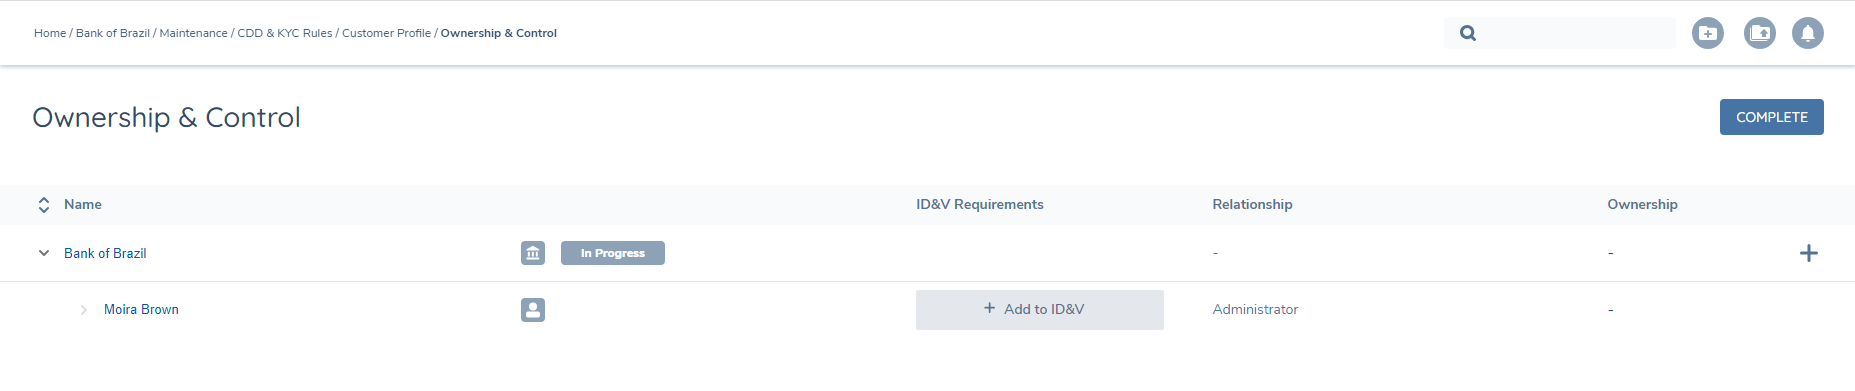
Once this is done, you can publish the policy and then use this in your Bulk Upload Template. When this is done, you will see a new Tab on your generated excel file which highlights the association to a given entity type - in the example below, this is associations to the "Company" entity type. Therefore, this Excel tab is labelled as "AssociationsToCompany".

In a simple example, in the structure below, "Moira Brown" was the sourceReferenceId and "Bank of Brazil" was the "targetReferenceId".
Associations are added at a direct level. For the handling of complex association hierarchies, please see the "Multi-Tiered Hierarchies" section in this User Guide.
One final note, is that these entities' associations are created as draft associations. A Journey containing the "Verify Related Party Associations" Task is required so that these draft can become verified, and thus visible across other Journeys and on the Entity Profile.
Please note that unlike policy data requirements, we do not apply validation against Select or Multiple Select Dropdown field types that are referenced within the "Relationship Details" Policy Category. Please exercise caution when inputting your lookup values against requirements of these field types when interacting with associations, and ensure that they are aligned with your expected allowed values.
Creating Non-Clients using Bulk Upload
Entities created via the Bulk Upload file within the columns of "Individual", "Company", "Other", "Managed Relationship" or "Entity Group" will be created as Client Entities. In simple terms, this means that these are Entities that a User wants to create or update in the application that should go through the full onboarding process via a Client Onboarding Journey, or be updated via a Maintenance Journey (when using the default Journey Types). In the context of building an association hierarchy for an Entity, Users will often create what are called "Non-Client" Entities. These are Entities that are created within Fen-X solely to exist within a different Entity's hierarchy.
The key callout here for the creation of "Non-Clients", is that a "Non-Client" Entity will not have a Journey launched for it. The "Non-Client" is being created for the purpose of attaching this Entity to another Entity.
The Bulk Upload functionality supports the creation of these Non-Client Entities. The data required to be captured against an Entity Type is determined by the context of which you are adding this Entity; if they are being added to Fenergo SaaS as a Related Party (Non-Client) or as a Client. The configuration of these requirements is done as normal, with the distinction of the "Target Entity" Type on each Data Requirement.
In the below example, the fields marked within the red border ("Legal Entity Name", "Date of Incorporation" and "Account Type") will be data points that can be captured against Non-Clients. The remaining fields visible in the blue border will be data points captured against a Client Entity:
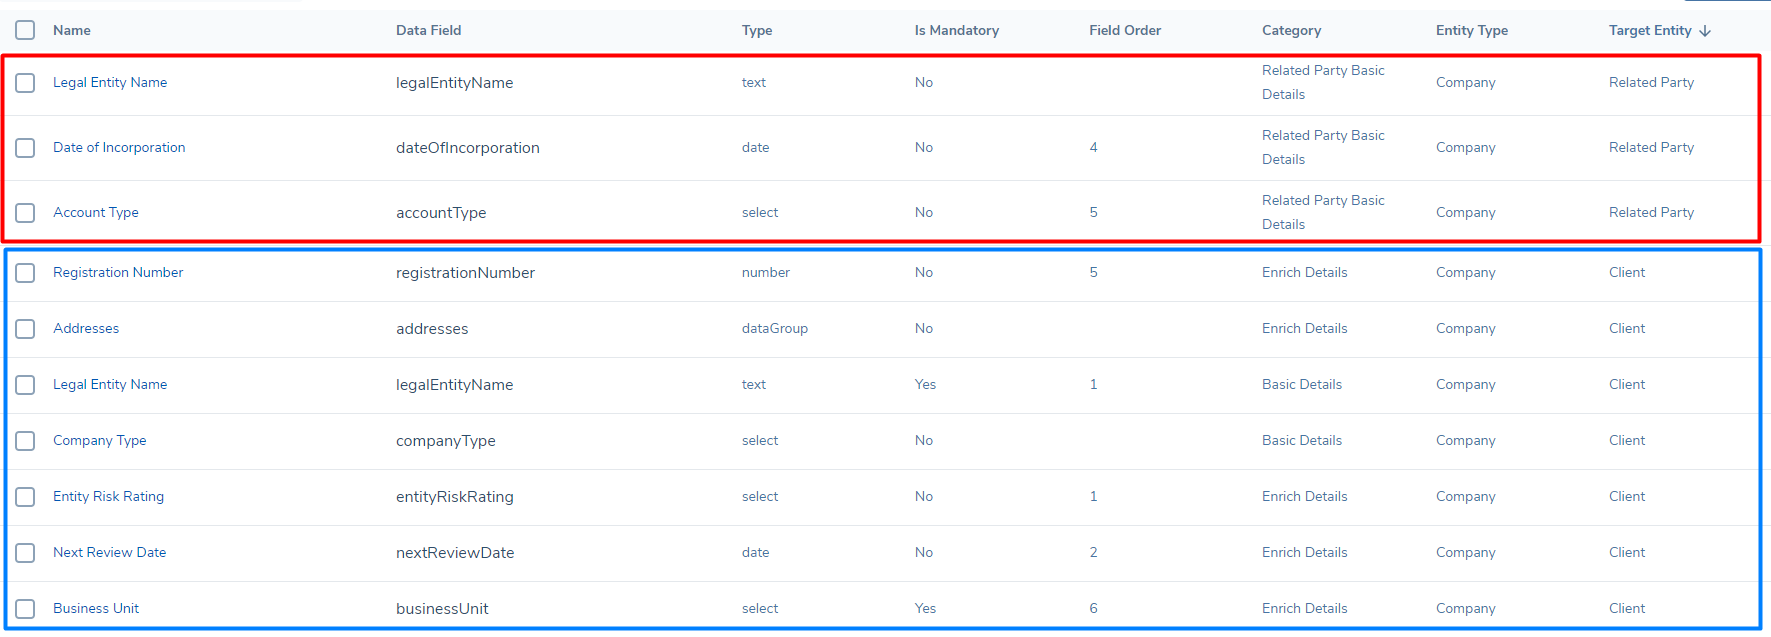
To allow a User to differentiate between those requirements that are required in a "Client" and "Non-Client" context, the Bulk Upload file will reflect the configuration of the selected Policy. Any Data Requirements with a Target Entity of "Client" will be reflected in their respective Entity Type's Excel sheet. Data Requirements with a Target Entity of "Related Party" will be reflected in a separate Entity Type sheet, titled "NonClient[EntityType]". As an example, using the above screenshot:
- "Registration Number", with Target Entity = "Client" and Entity Type = "Company", would be within the "Company" Excel sheet within the Bulk Upload file.
- "Account Type", with Target Entity = "Related Party" and Entity Type also = "Company", would be within the "NonClientCompany" Excel sheet within the Bulk Upload File.
Note: Bulk Upload has the ability to update existing entities in a tenant, and this is done via the journey that is launched for the respective entity. The Non-Client specific tabs can only be used to create non-clients. If you wish to update a non-client, a journey is required and therefore the user should use the standard "Company" / "Individual" / "Other" tabs.
Multi-Tiered Hierarchies
When creating a hierarchy in Fenergo SaaS, the associations between Entities can often span many tiers. In a simple example below:
- "Primary Entity" has a Trustee relationship in "Obsidian Studios"
- "Obsidian Studios" has an Online User relationship in "Todd Howard"
- "Todd Howard has an Online User relationship in "Joel Embiid"
- "Obsidian Studios" has an Online User relationship in "Todd Howard"
Similarly:
- "Primary Entity" has a Beneficial Owner relationship in "Bethesda Studios"
- "Bethesda Studios" has three associations below:
- "Adam Copeland", a Shareholder
- "Michael Jordan", a Senior Manager
- "Joe Duffy", a Primary Administrator
- "Bethesda Studios" has three associations below:
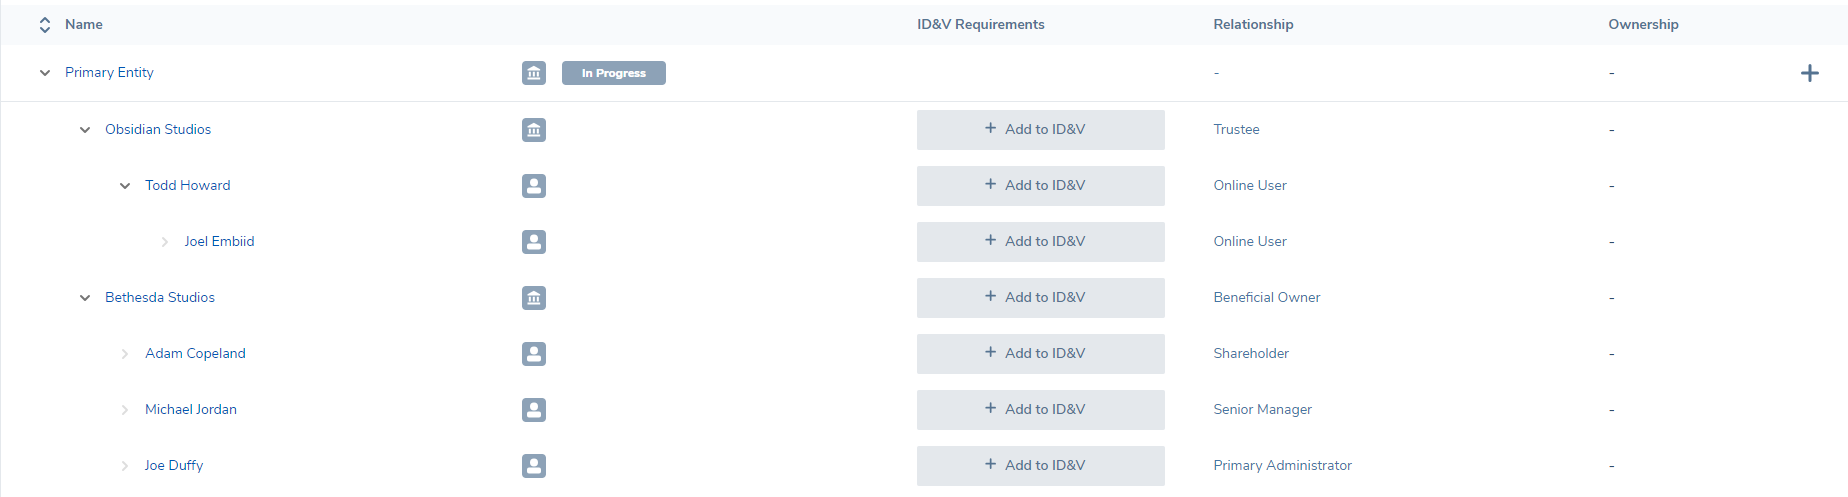
Within the Fenergo SaaS UI using our Related Parties task, we can dictate these associations clearly by adding the next Association at the required level or tier. In this manner, we know that all of these associations exist within the contextual hierarchy of "Primary Entity".
Should a User wish to create a similar structure using Bulk Upload, it is required that the User provide under which hierarchy the two associations exist. This is done through two new properties in the associations sheets:
- "#rootEntityReferenceId": this should be used if a User is creating associations in a multi-tiered hierarchy, and that Entity is being created in this Bulk Upload job.
- "#rootEntityId": this should be used if a User is creating associations in a multi-tiered hierarchy, but the Entity already exists in Fenergo SaaS.
It is worth noting that if a User is only concerned with creating direct associations between two entities, they can ignore the "rootReferenceId" and "rootEntityId" properties.
When using the "#rootEntityReferenceId" or "#rootEntityId" to create these multi-tiered structures, the same attribute and value should be defined against all of the indirect associations (assuming all of these associations should be bound to the same hierarchy). Using the same example above, let us first assume that all of these Entities are being created via the Bulk Upload file. In this scenario, we are using the "sourceReferenceId", "targetReferenceId" and "rootEntityReferenceId" properties, as all of these Entities are to-be-created.
We do not provide a "rootEntityReferenceId" for the associations between "Obsidian Studios" and "Primary Entity", or between "Bethesda Studios" and "Primary Entity", as these are direct associations. For "Todd Howard", we need to associate this Entity to "Obsidian Studios", but provide the context that this association is within the hierarchy of "Primary Entity". Similarly, we then need to associate "Joel Embiid" to "Todd Howard", but again in the context of the overall hierarchy of "Primary Entity". Following this pattern, the end-result for this file would look like the below:

Finally, if updating a complex multi-tiered structure, a User will need to provide all existing associations in addition to the new associations they wish to add. This is so that we can accurately calculate the hierarchy's various tiers.
Bulk Creating Group Associations
The Bulk Upload functionality can solve for the mass creation of either Entity Parent or Entity Child associations to an Entity Group. This follows the same flow as what a User would do within the "Manage Group Information" Task in the application. To add either of these Group-specific associations, a particular format needs to be adhered to:
- To create an Entity Grouping association of Child Entity, a User will enter GroupChild in the "Relationship" column of their associations Tab.
- To create an Entity Grouping association of Parent Entity, a User will enter GroupParent in the "Relationship" column of their associations Tab.

Please note that casing is important here. The values must be entered as "GroupChild" or "GroupParent" exactly.
Bulk Load Notifications
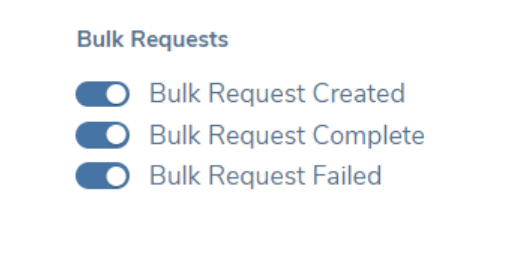
In the "My Profile" domain, we have introduced three additional notifications within the Bulk Requests section of the Notification Settings. Users now have the option to customize the enabling or disabling of these notifications according to their personal preferences. The three new notifications are as follows:
- Bulk Request Created
- Bulk Request Created with Entities Missing Journeys
- Bulk Request Complete
- Bulk Request Failed
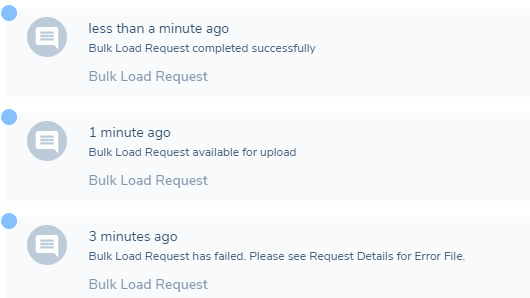
Once these notifications are enabled, users will receive both a system notification and an email notification. Clicking on the notification will redirect the user to the corresponding Request from which the notification was generated.
Bulk Upload Permissions
Bulk Upload access will be managed via Permissions. In the Security Configuration Domain, we have introduced a new permission called "Bulk Request Access".
This permission when used will allow users to access the Bulk Request Dashboard and launch new Bulk Requests. The permission is API based so users will also be able to query Bulk Requests / Create new Requests using the Bulk Request endpoint if they have this permission in their tenant.
Additionally, users will require the "Policy Configuration Access" permission so that they may select their required Policy that they wish to use as the Bulk Upload template.
Additional validation considerations when using the Bulk Upload file
When using the Bulk Upload functionality, users will be required to select a Policy that they wish to act as the Bulk Upload template in their request (i.e. which Policy and configured datakeys do they want to act as a the framework for populating data and loading it into the system). When the request is processing, the populated file and associated values included will be evaluated against the configured validations in the Policy that was selected to act as the template (e.g. if you have selected a field to be mandatory, then the file will fail if you do not populate this field for an Entity).
There are also some additional considerations however which come into play post Bulk Upload request and that is the Policies in scope for the Entity being created / updated. What this means is that if you have a field in Global Policy for example that has rules configured against it, these rules will also be evaluated when the Request has been complete and the information is loaded into Fenergo. Following completion of the request, the Entity is either created or updated by launching a Journey and creating an Entity draft to take in the changes. What this means is that even though the information loaded in was correct against the validations in the Bulk File Policy, they may not pass the validation rules configured for the other Policies in scope. So it is important for users to be mindful of this when passing information into Fenergo using Bulk Load.
Example of validations impacting post Bulk Load
A good example of where we have seen this is where a user is trying to update an existing Entity using the Bulk load file. In the file, we may have a particular field, say Next Review Date, which is editable in the Policy being used for the Bulk Request. The information is loaded in and the request completes. However, when the journey launches, this field may not be updated, as in the Global Policy, this same field has a rule to say that this field is read only. For read only fields, we can only ever add a value to the field at point of Entity creation or when the field is first in scope. After a value has been defined for it, it cannot be updated. These validation considerations are important for users to be aware of, that just because they have a rule configured in one Policy, that rule may be contradicted in another and it comes down to which Policy is in scope and the prioritisation of the version of the field. For more information on this, please review the Fenergo User Guide for Policy configuration.
Custom Journey Types
Bulk Upload now supports the ability to select the Journey Types that will be used for the Entity Create and Entity Update events. This means that a User can dictate on a case-by-case basis. Each time a Bulk Request is being creating, a User can dictate the Custom Journey Types applicable to that job, offering greater flexibility on the types of Journeys that should be created for the respective Create and Update events occurring in that job.
When a User is creating a new Bulk Request, they will see a new toggle exposed to them labelled "Custom Journey Types". By default, this will be disabled. Once the toggle is selected, two dropdowns will display:
- Entity Create Journey Type: this will be the Journey Type we evaluate if the Entity is being created via Bulk Upload.
- Entity Update Journey Type: this will be the Journey Type we evaluate if an Entity is being updated via Bulk Upload.
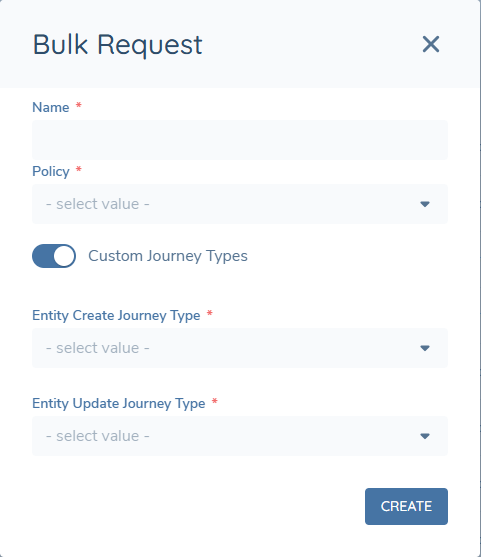
If either value is not provided - either by the User not selecting the toggle, or only providing one of the two dropdowns - we will use the system defaults of "Client Onboarding" for "Entity Create Journey Type", and "Maintenance" for "Entity Create Journey Type" respectively.
Once a User confirms their request, these two properties can be found on the job's "Details" page, where the values for both "Entity Create Journey Type" and "Entity Update Journey Type" will be displayed:
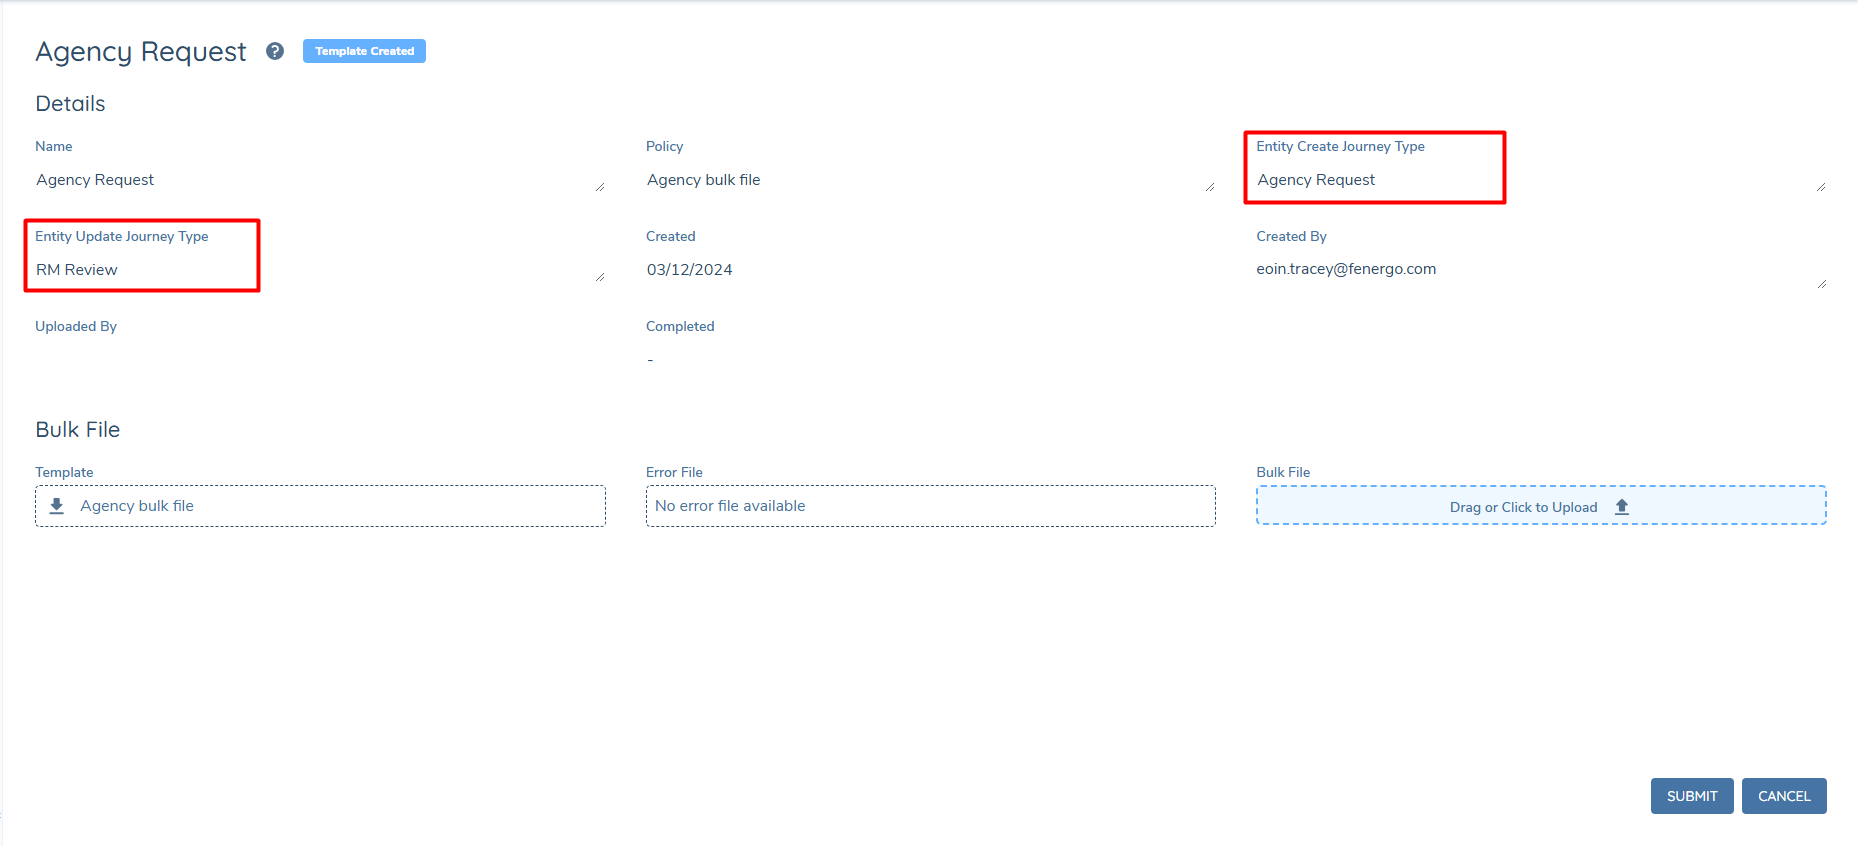
Once the Bulk Upload job is processed, we will use the selected Journey Types to create the respective Journeys. As noted above, the "Entity Create Journey Type" is used when no "entityId" is provided in the record for a given Entity, or when the "entityId" does not exist in the Tenant. The "Entity Update Journey Type" is used when the "entityId" is provided and maps to an already existing entity in the system.
Client Offboarding and Client ReOnboarding journey types are not supported via Bulk Upload.
Technical Considerations around Bulk Load Performance
Some important notes for our functional users to be mindful of when it comes to performance around Bulk Upload file capabilities:
- As stated above, users can include up to 1,000 Entries in a Bulk Upload file Request. This is an intended Product constraint as we roll out the Feature so as not to risk impacting performance of processing large amounts of data at once.
- Users must also be aware that there is a limitation of 10 Requests that can be run at any one time. Again, this is intended in order to ensure optimal performance of processing of large amounts of data at same time.
- Please be aware that Rich Text Editor field types are not supported via Bulk Upload. Please ensure that the Policy selected to be used in your Bulk Upload does not contain a field type of "Rich Text Editor". Additionally, Journey Level Data requirements are not supported via Bulk Upload.