Advanced Dashboards
Feature Overview
The Advanced Dashboards feature provides clients with the ability to customise their own view when managing Journeys and its’ respective tasks. Previously, clients gave feedback that the legacy Team Management and My Journeys Dashboards were too generic, and the lack of configurability meant that clients were seeing and interacting with fields that had no real relevance to how they completed their work. This new Dashboard, when enabled, will allow users to define which fields they wish to have presented on a Dashboard grid, so that they can effectively manage their workload by only seeing the information relevant to them.
Configuring Advanced Dashboard View
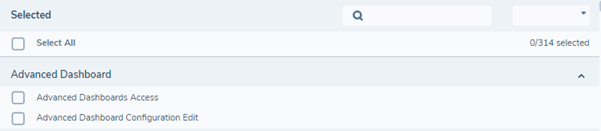
To enable Advanced Dashboard functionality in a tenant, users will be required to have the two Advanced Dashboard Permissions:
- Advanced Dashboard Access: Allows user to access Journeys and Tasks Dashboards
- Advanced Dashboard ConfigurationEdit: Allows user to configure views of Journeys and Tasks Dashboards
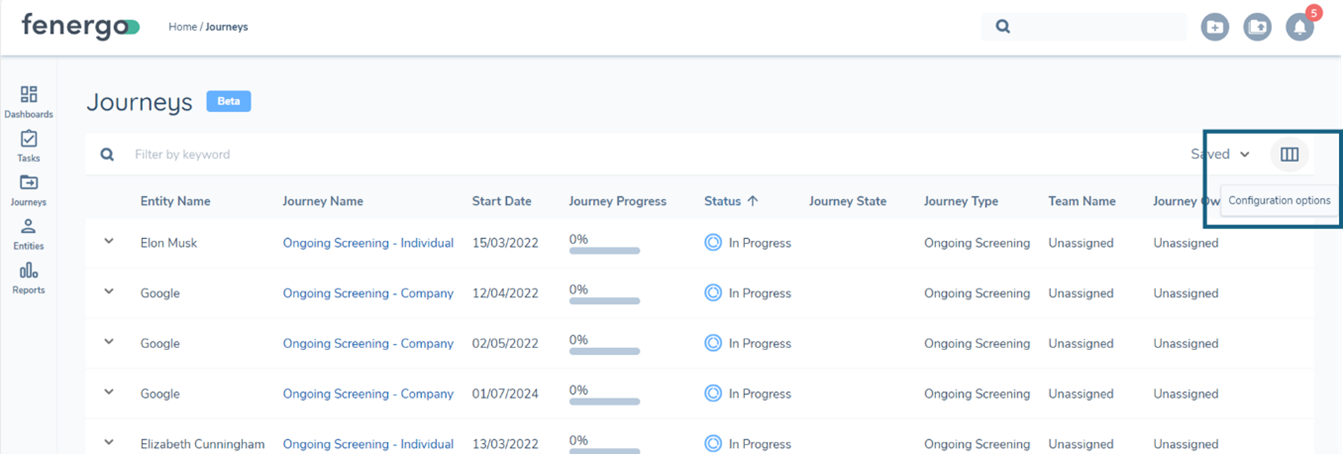
Once enabled, users will need to navigate to left hand Nav and see the icons for ‘Tasks’ & ‘Journeys’. By clicking each icon, the user will be redirected to the ‘Tasks’ Dashboard and ‘Journeys’ Dashboard respectively.
![]()
On the Tasks or Journeys Dashboards, users will be presented a default view in their grid, with the option to customise the view through the 'Configuration Options' icon on the far-right hand side of the search bar:
When this icon is selected, users will see a pop up window, allowing them to either ‘Choose your default view’ or ‘Add or Edit View’. The first option, will show any already configured views available to the user. A view is a pre-defined layout of the Dashboard. More information on views will be provided in a separate section below. The second option to ‘Add or Edit View’ will provide the user with ability to configure the layout of the Dashboard itself in the Advanced Dashboards domain.
Accessing the Configuration component of Advanced Dashboards is controlled by the Advanced Dashboard Configuration Edit permission. Users without this, will not be able to configure views or make changes to their dashboards outside of creating saved filters which will be covered in a later section.
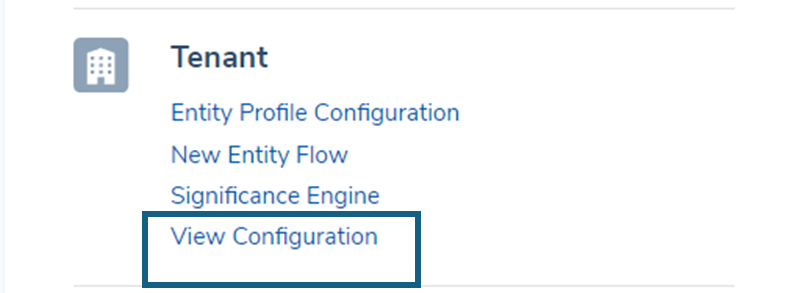
Users can also access the Task or Journey Dashboard configuration screens by navigating to the left hand Management panel and selecting ‘View Configuration’ under the ‘Tenant’ section:
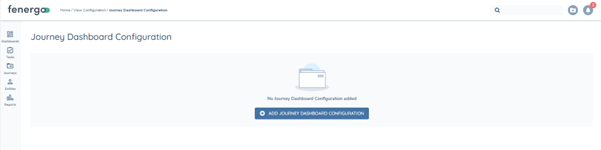
Depending on the Dashboard in which the user is working with, they will be redirected to either the ‘Task Dashboard Configuration’ screen or ‘Journey Dashboard Configuration’ screen respectively:

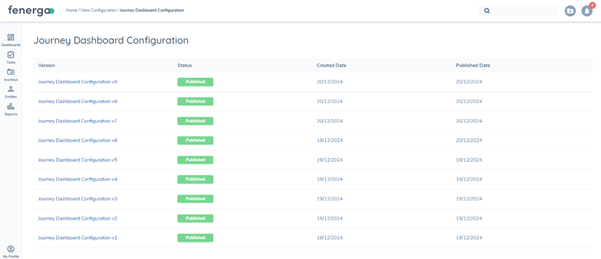
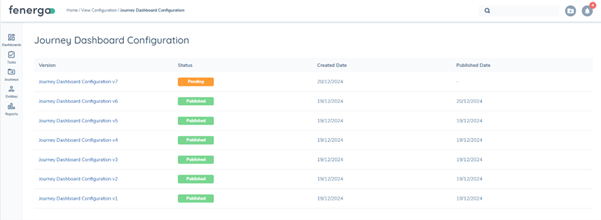
Versioning of Configuration
Task & Journey Dashboard Configuration will be versioned in each tenant. The reasons for this are twofold:
- We do not want to impact existing Dashboards while we are making configuration changes until we are ready to ‘Publish’.
- We want to support configuration exchange of Advanced Dashboards functionality, which requires implementing versions for the configuration.
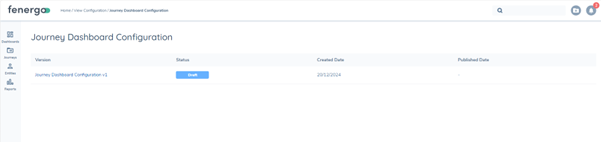
To create a new draft from an already existing Published version, users will need to navigate to the latest Published version and select ‘New Draft’:
When the draft is created, users will be able to start adding configuration which can be broken down into two sections:
- Choose Policy fields
- Configure Views
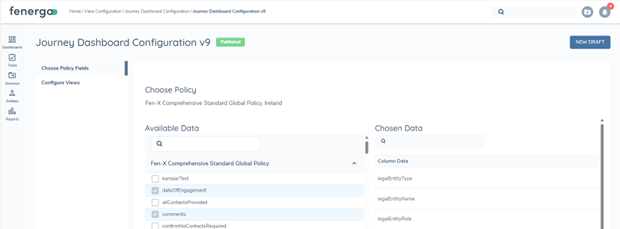
The Choose Policy fields section allows users to search across all configured Policies in their tenant for a datakey which they wish to add to their Dashboard Index.
There are two Indexes in Advanced Dashboards (Tasks & Journeys). There is a limit of 150 fields which can be added to each index. By adding datakeys to the Dashboard Index, users will be able to configure Dashboard views in their tenant.

When the Policies are selected, users will see all datakeys configured in those Policies displayed below. Users must remember that they are working with datakeys and not Policy requirements. This means that when searching for the fields, they must search by camel casing format (e.g. ‘countryOfIncorporation’).
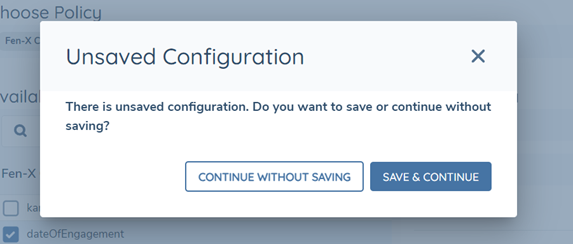
Once users are satisfied with their selection of datakeys to be added to the Index, they will need to select ‘Save Configuration’ before moving forward. Failure to do so will risk losing their work so this is an important point. To assist the user, a popup modal has been introduced to inform the user that there is unsaved configuration and asking the user if they would like to ‘Save & Continue’ or ‘Continue without Saving’:
Views:
Following confirmation of the indexed fields, the user will then move onto the ‘Configure Views’ section.
Views are differing representations of the Tasks and Journeys Dashboards that can be configured to suit the operational needs to the business. It allows for scenarios where multiple teams, business units and jurisdictions are all operating within the same tenant but have a very different set of data points that they are interested in, in terms of an operational perspective. Being able to configure specific views for each of these segments, allows our clients to provide their users with Dashboards that look and feel relevant to their work.
When the user first lands on the Configure Views section, they will be presented with a pre-defined ‘Default’ configuration. The purpose of this, is to provide users with a baseline of configuration which they can change if they wish or by selecting ‘Add New View’ have the ability to create up to 50 additional views in their tenant.
We have introduced a hard coded ‘entityName’ datakey. This field is concanated and will handle the below fields + the Entity type of the respective Entity:
- Company: legalEntityName
- Individual: firstName + lastName
- Other: legalEntityName
- Group: groupName
The reason for this is that by using this field, users only need to configure entityName to see all Entities within their tenant. Otherwise, they would need to configure specific Views per Entity type.
Within a view, users will see the below layout, with the option to rename a view (Default cannot be renamed but any additional views can) as well as select which datakeys can be added from the Index to the view. The left hand ‘Available Data’ column represents the datakeys on the Index and the right hand ‘Chosen Data’ column shows the existing configuration on the chosen Dashboard.
Within the Chosen Data Column, users will have the ability to re-order the fields added, change the UI labelling of each field and set which field will act as a filter when this view is enabled on the Dashboard:

It is important to call out that while users can configure multiple views within a tenant, they cannot yet assign views to users or teams. This means that within the Dashboards themselves, users will be required to manually select which view is relevant to them. So, the naming conventions of the Views are important as they need to be clear enough for the user to know which View to use.
Once users are satisfied with their configured views, they can then Publish their Configuration.
There is no Submit for Approval function with Dashboard configuration. The user responsible for Configuration can ‘Save’ or ‘Publish’. Once Publish is selected, it takes some time for the changes to be implemented, including the Index to be updated and the Views to be built. The user will see an updated Status on the Dashboard Configuration versions screen called ‘Pending’. This process typically takes a few seconds to a minute depending on the number of changes being applied. Once this process has finished, the Status will be updated to Published.
There may be some instances where the indexing fields time out, in which case a ‘Failed’ Status will be generated. If this occurs, users will have the ability to go into the failed draft and select ‘Re-Publish’ to re-run the indexing job. Notifications for this process are available to notify the user when the Publish job is complete. This notification can be set within the standard "Notifications Settings", and is titled "Advanced Dashboard Configuration Failed".
Importing Journey and Task Dashboards (Configuration Exchange)
To import Journey & Task Dashboard configurations across tenants, users will be able to use Configuration Exchange.
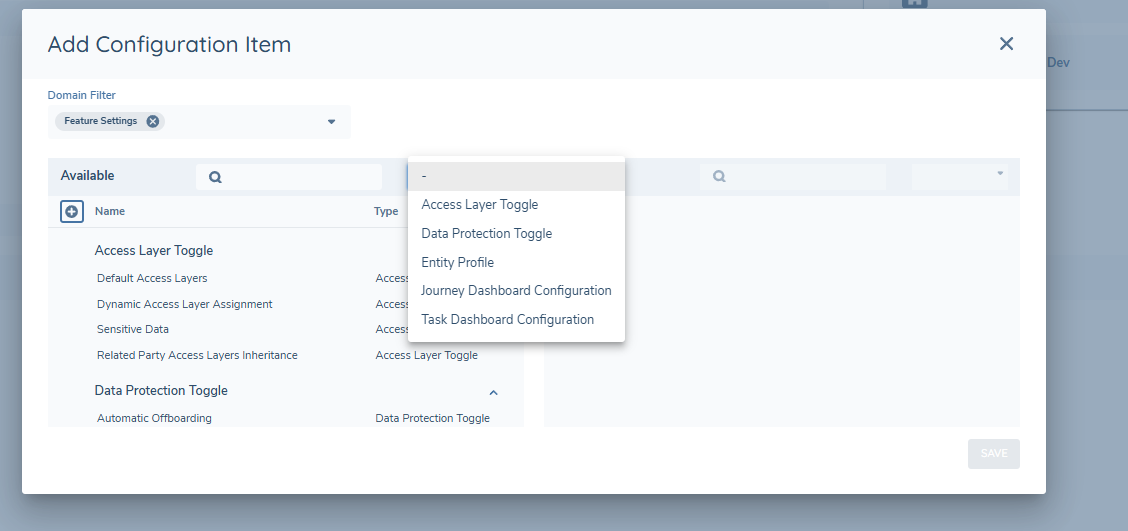
Within Config Exchange, users will select the 'Feature Settings' Domain Filter. They will then be able to filter by Type of 'Journey Dashboard Configuration' or 'Task Dashboard Configuration' or both.
Validation in Config Exchange for Dashboard configuration: In order for a Configuration Exchange to be successful for Task or Journey Dashboard configuration, the configured fields in the Dashboards must be present in the same Policy between Source and Target tenant. The reason for this, is that config Exchange is looking for those fields to add them into the Dashboard Configuration so they can be visible on the Dashboards. If this does not happen, users will be presented with a "Error Message: Policy fields with null policyReferenceId. Invalid fields:..."
Managing Views in a Dashboard
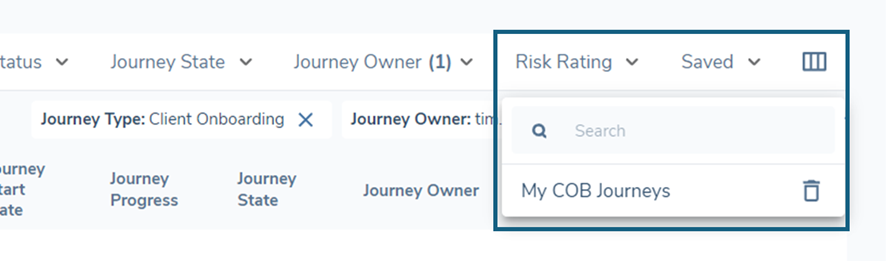
Within the Dashboards themselves, users will be able to access their Views be selecting the ‘Configuration options’ icon:
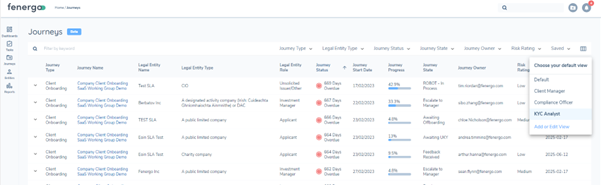
Users will then be able to switch their views simply by clicking on each one in this window.
Saved & Sticky Filtering
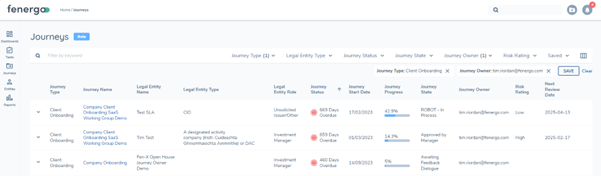
Within the Dashboards, users will be able to apply filters to their Views, depending on what has been configured (i.e. has a field been configured to be a filterable field). Fields which can act as filters are Lookup fields and hard coded fields such as Journey Type, Status, Team and Journey Owner. Free text, number or date fields cannot be added as filter options but they can be retrieved via the Search box on the Dashboard. In order to prevent users from losing their place when managing their work, Sticky & Saved filtering features have been introduced.
Sticky Filtering
Sticky filtering refers to when a user applies a filter, then navigates away from the page (maybe to work on a task or Journey) and when they navigate back, the same filtering is applied. This selection is stored in the Browser Session storage memory so it is worth noting that when a user logs out or closes their browser, they will lose their filter selections.
Saved Filtering
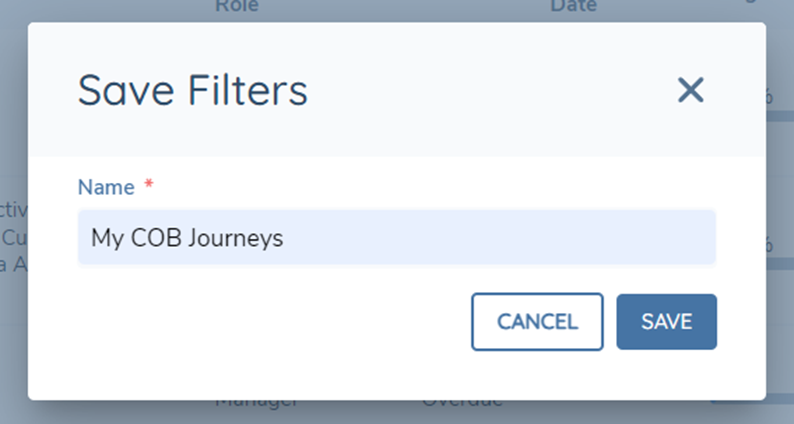
Saved filtering is a much more powerful tool as it can remember the selection of the user and save it against their user profile. For example, a user can filter by a ‘Journey Type’ and by a ‘Journey Owner’ combination and save this selection so the next time that they login, they will be able to see this combination as an option to choose from. To save filters, users will select the ‘Save’ button and when the modal is presented, they will enter in the name of the Saved Filter selection.
Currently, you cannot change or override a saved filter selection, the user must instead, create a new set by adding a new name before deleting the old one. This behaviour will be changed in the coming months as Product & Engineering work to enhance this flow.
Saved Filter Persistence Across Login Sessions
Advanced Dashboards now remembers your last-selected saved filter between login sessions, so you no longer need to re-select your filter preference at the start of each day.
When you log back into Fen-X, the saved filter you had active on the Tasks or Journeys dashboard will be automatically restored. A toast notification will briefly appear confirming the name of the restored filter — it can be manually dismissed, or will auto-dismiss after a short timeout.
The Tasks dashboard and Journeys dashboard each remember their saved filter selection independently, so you can maintain a different default filter on each.
- If a saved filter has been deleted since your last session, the dashboard will load with no filter applied and no error will be shown.
- Your View selection is not affected by this feature — Views and saved filters continue to work independently.
- This feature is controlled by a tenancy-level feature flag. If your saved filter is not being restored after login, contact your administrator to confirm the feature is enabled for your tenant.
Using the Search Bar on Advanced Dashboards
The search bar in our application uses elastic search technology to return results as soon as you type three or more characters. For example, if you're looking for 'Test Bank Inc,' the search will find results based on partial matches like 'Tes,' 'Ban,' and 'Inc,' ensuring that you quickly locate relevant records even with incomplete input.
Using Filtering on Advanced Dashboards
When applying a filter on Advanced Dashboards, "contains" logic is used for Entity (Policy Fields) and for Journey metadata fields (such as Journey Name, Task Name, etc) exact match is used.
Bulk Actions on Dashboards
- Task Assignment: The ability to single and bulk assign tasks on both the Journeys and Tasks Advanced Dashboards is supported.
- Journey Owner Assignment: Individual Journey Owner assignment is supported. Bulk Journey Owner assignment is not yet supported.
- Bulk Editing of Entity Data: Ability to update Entity Data for one or more selected tasks in the Tasks Dashboard. See section below for more information.
- Bulk Completing of Tasks: Ability to complete one or more tasks from the Tasks Dashboard. See section below for more information.
When configuring Journeys / Tasks Dashboard, within the Journey section in Configure views, there is a datakey called 'team'. This 'team' property refers to the Team of the Journey Owner, not the team of the latest open task in the Journey.
Completing Bulk Actions on Tasks Dashboard
With the introduction of Advanced Dashboards functionality, users now have the ability to customise Dashboards to match their day to day operational requirements. Within the Tasks Dashboard, users now have the ability to update Entity Data and Complete Tasks in bulk. The purpose of these new bulk actions is to streamline workflow management and significantly reduce time spent by users of navigating into each individual task to make updates and instead being able to make those updates at the Dashboard level. These actions include:
- Update Entity Data for multiple Entities linked to selected tasks simultaneously
- Complete multiple Tasks in bulk directly from the Tasks Dashboard.
Bulk Actions Configuration
To enable Bulk Actions functionality in a tenant, the following configurations are necessary:
-
Journey Configuration:
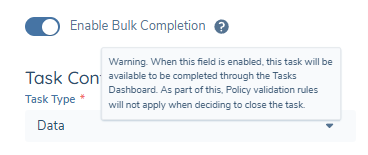
Open a new draft for a journey and configure a task using Task Type 'Data' In Task properties for Data Tasks, check for a Field in Task properties called 'Enable Bulk Completion':
-
This Field is a non-mandatory toggle field
-
This Field has a tooltip that says "Warning, when this field is enabled, this task will be available to be completed through the Tasks Dashboard. As part of this, Policy validation rules will not apply when deciding to close the task"
-
The Policy Categories in this selected task will dictate which fields can be bulk completed from the Tasks Dashboard. For example, if you configure two categories called 'Basic Details' & 'Enrich Details', all fields in scope in these categories will be shown on the Tasks Dashboard when users are completing a Bulk Action.
-
Publish Journey schema and launch a journey using the configured schema
-
-
Permission Settings:
Configure the 'Bulk Actions on Task Dashboard' permission to be assigned to your selected team
infoWhen enabling the 'Enable Bulk Completion' toggle, please consider the implications carefully. Policy validation rules that would normally apply during individual task completion will not be enforced during bulk completion. Only enable this feature for tasks where bypassing validation rules will not negatively impact the integrity of your data or journey outcomes.
-
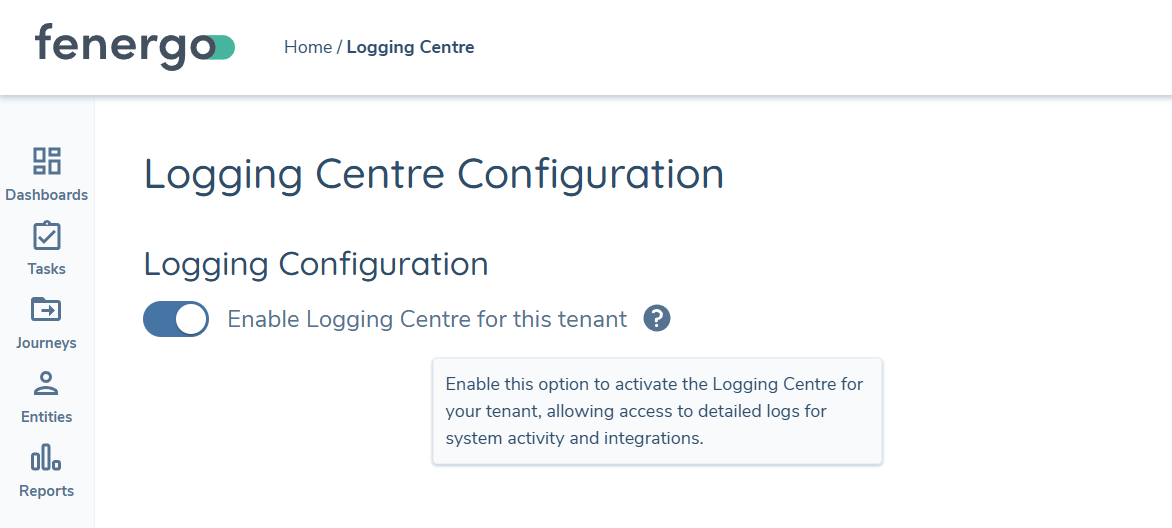
Enable Logging in Event Hub:
Bulk Completion on Tasks Dashboard uses Data Import through Event Ingress functionality to be able to faciliate the requests into Entity and Journey domains. In order to ensure that Bulk Action requests are tracked and so thaty information can be provided to the user, Logging must be enabled on each respective tenant. To do this, users must navigate to the Logging Centre Configuration page in Event Hub & enable logging.
Field information for Bulk Actions Requests
As part of Bulk Actions, there are some important caveats for users to be aware of, particularly around which fields and task types are in scope for this feature.
Task(s) in scope
- Data Task
Field types in scope
- Data
- Number
- Date
- Text Area
- Select Dropdown
- Muiltiple Select Dropdown
- Legacy Linked Select Dropdown
- Legacy Multiple Linked Select Dropdown
- Linked Select Dropdown
- Multiple Linked Select Dropdown
Field types not supported
- Calculated Number Field
- Calculated Date Field
- Calculated Time Period
- Data Groups
- Search Text
- Rich Text
- Legacy Status
- Status
Fields in scope logic
Only non-conditional fields from the latest published version of the Global Policy are supported here. The rationale for this is that when selecting up to 200 tasks, the system will potentially be dealing with multiple versions of different Policies. In order to standardise as much as possible, Global (which is the typical Baseline Policy configured for tenants) is used. When it comes to fields, non-conditional fields are used for a similar reason. If conditional fields were to be included, as part of the bulk actions request, the system would need to evaluate different versions of Global Policy each with potentially conflicting rules for different fields. In order to reduce complexity and risk of applying the wrong field to the wrong Entity, non-conditional fields are displayed for the user to populate.
If a field configured in the latest published version of Global Policy is not in scope for a particular Entity due to it using an older version of Global Policy, that field will not be written to that Entity.
Journey Level Data fields are also supported.
Using Bulk Actions on Tasks Dashboard
On the Tasks Dashboard, users with appropriate permissions will have the ability to perform two new bulk actions:
- Bulk update Entity Data for Entities linked to selected tasks
- Bulk complete selected Tasks
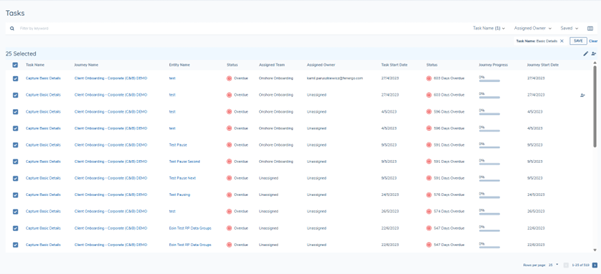
To begin the process, users will need to:
- Navigate to the Tasks Dashboard
- Apply filters as needed to locate the relevant tasks
- Select the checkbox next to each task that requires action
- Click the Edit icon displayed on the top right hand side of the grid (alongside the reassign button)
- The Bulk Actions feature currently supports up to 200 tasks per request. A user can only initiatiate one request at a time.
- Only Tasks that have the toggle of ‘Enable Bulk Completion’ enabled will be able to be completed. The rest will be skipped in the process. When this occurs, users will be able to see which tasks were skipped by clicking on the Request Completed 'Warnings' component.
When the user hovers over the icon, they will see a tooltip that says: "This function allows you to either save data only or complete tasks while saving data":

When the user clicks on the Edit icon, they will be presented with a slide out drawer on the right hand side of the screen labelled 'Edit Data for [number of tasks selected] tasks':

The drawer will display editable fields based on the Policy Categories configured for the selected tasks. These fields must be configured in the Global Policy and must be non-conditional. The reason for this, is that we want to ensure that when writing updates to impacted Entities, that these Entities are in scope. When multiple tasks are selected, if these tasks have different Policy categories configured, only the fields from the common categories will be presented to the user. When the fields are displayed, they are presented in a UI friendly format. They may not necessarily be the same as the Requirement configured in the Global Policy as they are a UI conversion of the associated Datakey configured. It is also important to note that the fields presented will be from the latest Published version of the Global Policy:
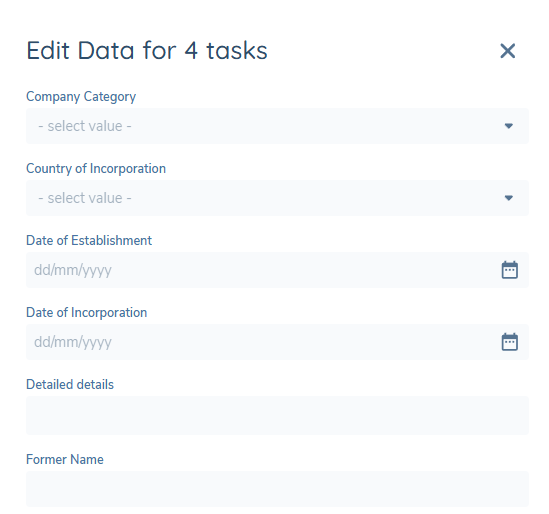
Users have two action options at the bottom of the drawer:
- Save Data: Updates the Entity data without completing the tasks
- Complete Task: Updates the Entity data and complete the selected tasks
It is important to note that when making updates to the selected Tasks, each datakey presented will display as optional. The reason for this is that the user will have the option to update only specific fields if they wish. They are not required to complete all displayed fields.
Saving Data without Completing Tasks
When the user opts to Save Data instead of completing tasks:
- A call will be made to each selected Entity draft to update the populated datakeys in the request
- The tasks will remain open for further work
- Entity data will be updated with any values provided
- No validation rules will be enforced on the data updates
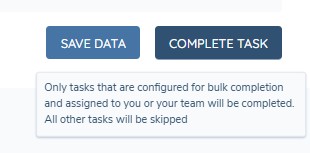
Bulk Completing Selected Tasks
When the user opts to Complete the selected Tasks:
- A call will be made to each Journey to close the Task
- Entity Data will be updated with any values provided
- At least one field must be populated in the request from the presented fields
- The tasks will be marked as completed and removed from the active tasks list
In some cases, users will not be able to complete Tasks due to assignment rules or if the task has not been configured for Bulk Completion. When this happens, the impacted task(s) will be skipped. The user will be informed of this by hovering over the Complete Task button and seeing a tooltip that says: "Only tasks that are configured for bulk completion and assigned to you or your team will be completed. All other tasks will be skipped":
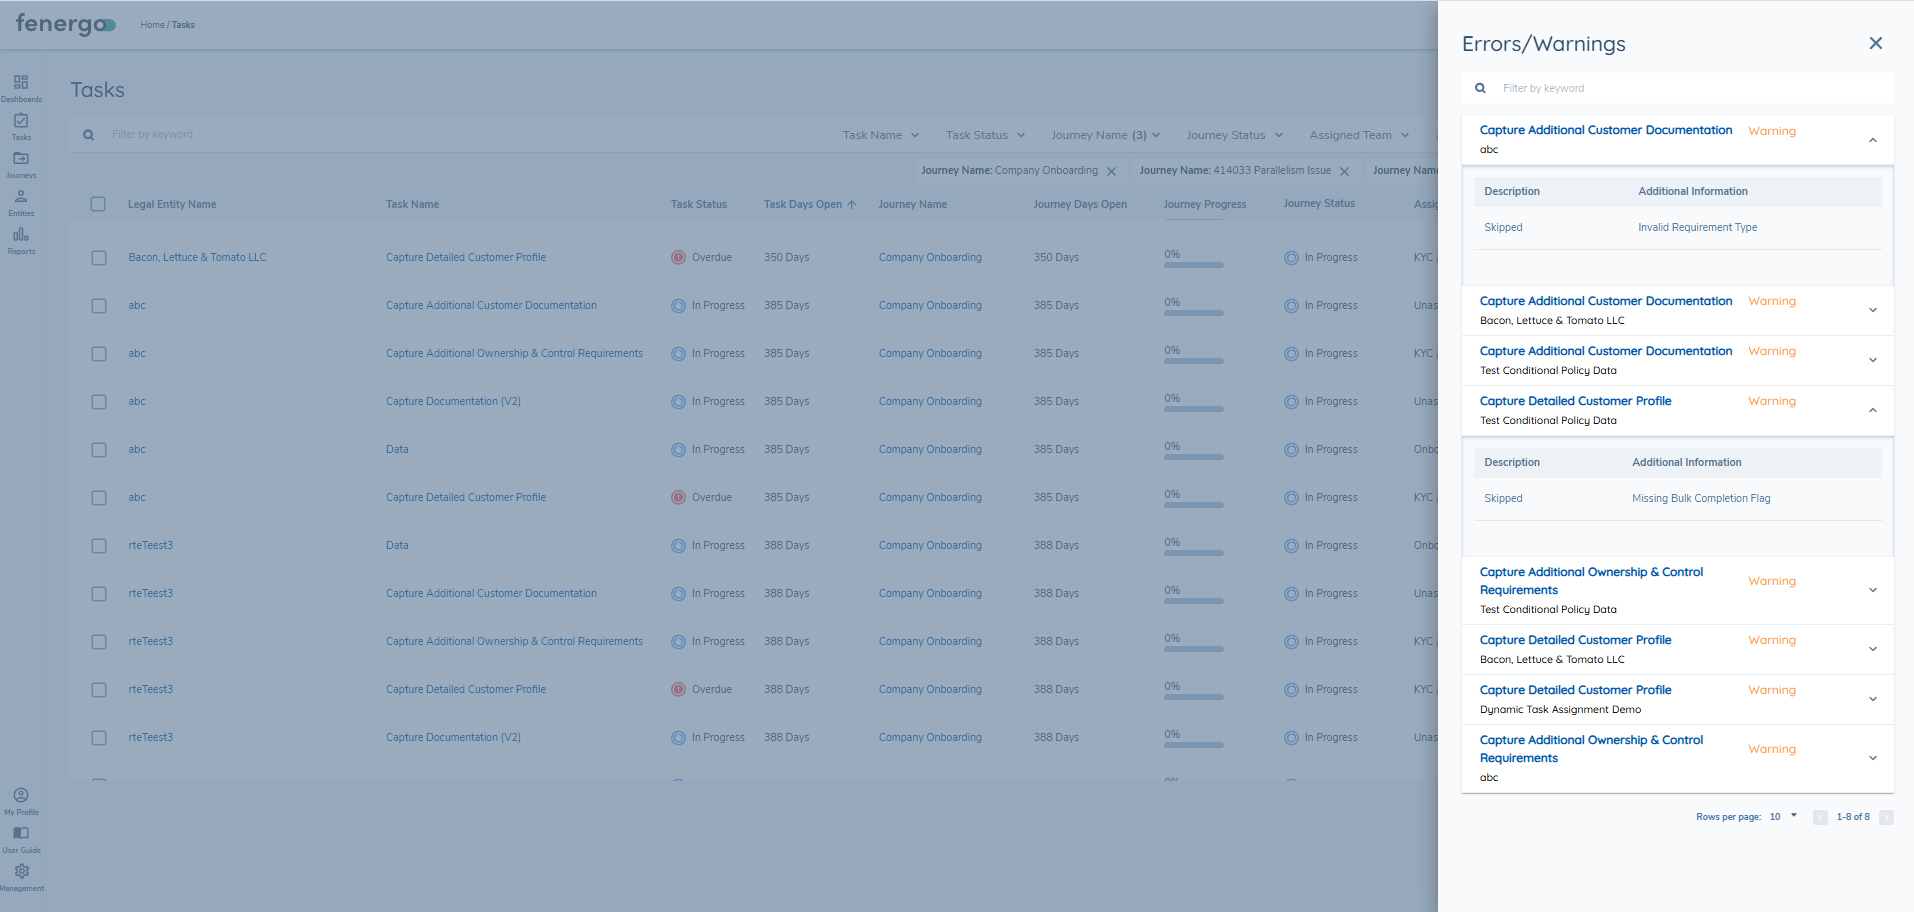
Errors and Warnings Information
When the above scenario occurs (where updates cannot be made because an Entity is not in scope for a particular field or a task cannot be completed because it is not supported for Bulk Completion), the user will be notified in the 'Errors / Warnings' window which can be access by clicking on the Bulk Completion Request Completed prompt

Auditing Bulk Actions
When completing a bulk action through the Tasks Dashboard, the events will be audited and stored in the Audit Drawer for each respective Entity. This means that when a user navigates to either the Entity Profile or Journey Hub for chosen Journey and click on the Audit Drawer, they will see the updated event with the timestamp and email of who completed the bulk action.
Best Practices for Bulk Actions
- Selective Configuration: Only enable bulk completion for tasks that do not require strict validation rules.
- Clear Field Labelling: Ensure datakeys are clearly understandable to users performing bulk actions.
- Regular Auditing: It is important to ensure that Bulk Actions are regularly audited to ensure that mandatory fields that should have been captured against the Entity have not been skipped through using this functionality.
- User Training: Ensure users understand the implications of bypassing validation rules.
- Documentation: Maintain documentation of which tasks are eligible for bulk completion.
Known Limitations
- Validation rules configured in Policies are not enforced during bulk completion
- Fields are displayed using datakey names rather than UI labels
- Users must have appropriate task assignments to complete tasks in bulk
- At least one field must be populated to complete tasks (cannot complete with no data updates)