Using the Document Agent
The introduction of the Documents v2 task included the concept of 'Acceptable Documents' and a new user experience which uses this concept to introduce efficiency into the process and allows users to be guided by the system. Intelligent Document Processing (IDP) is the next step in the evolution of the Documents v2 task and it has been embedded as a configurable option. Ultimately IDP allows users to drop one or more documents into the dropzone and with the use of generative AI and Large Language Models (LLMs) amongst other tools, the system takes care of the rest, from classifying the documents, extracting relevant document metadata, linking the documents to the relevant requirements and even completing the task automatically in the happy path scenario.
Below is a high-level breakdown of the efficiency gains:
Document Classification:
When a document is uploaded, the system analyses the content of the document and determines the 'Document Type' that is most appropriate from the full list of user-configured Document Types.
Document Metadata Extraction:
In parallel to the auto-classification process, the system will also interrogate the document and its content to determine whether it contains any relevant document metadata. This is based on the set of Document Metadata fields that a user has configured, and any relevant extracted data is formatted appropriately and stored in these fields against the document.
Document Auto-linking:
Once the document has been classified, the system will automatically link the documents to all the requirements for which it is deemed to be an acceptable document. Again, this is based on user configuration and the mapping of acceptable documents to document requirements.
Document Splitting:
A single file containing multiple documents within it can be uploaded and the system will break this into individual documents and proceed to classify each one and extract metadata.
Auto Task-completion:
Once all documents are processed, if all the document requirements in the task are satisfied then the system will automatically complete the task without any further manual intervention.
Entity Data Extraction:
When the Documents task is completed, the system will begin to extract data from eligible documents and map these to the applicable data requirements configured in Policy so that a user can quickly enrich the entity data record with these values. Please note that the entity data extraction is only possible where a previous Documents V2 task has had "Data Extraction Enabled".
Hierarchy Extraction:
When the Documents task is completed, the system can extract related parties from eligible documents and map these to either existing entities within Fen-X, or create new entities so that an entity's hierarchy can quickly be created or enriched via information found in the uploaded documents. Please note that this hierarchy extraction is only possible where a previous Documents V2 task has IDP enabled.
In some tenants, this feature may be referred to as Intelligent Document Processing or as the Document Agent. Both terms refer to the same functionality and capabilities. If you are interested to learn more about our Agentic capabilities, please see the Fenergo Digital Agents section for more information.
Documents V2 Task (IDP Enabled)
When IDP is enabled in the Documents v2 task, interactions with the generic drop-zone will no longer result in the upload modal opening. Instead automation will kick in as soon as one or more files are dropped into the generic drop-zone or when files are selected after clicking on the drop-zone.
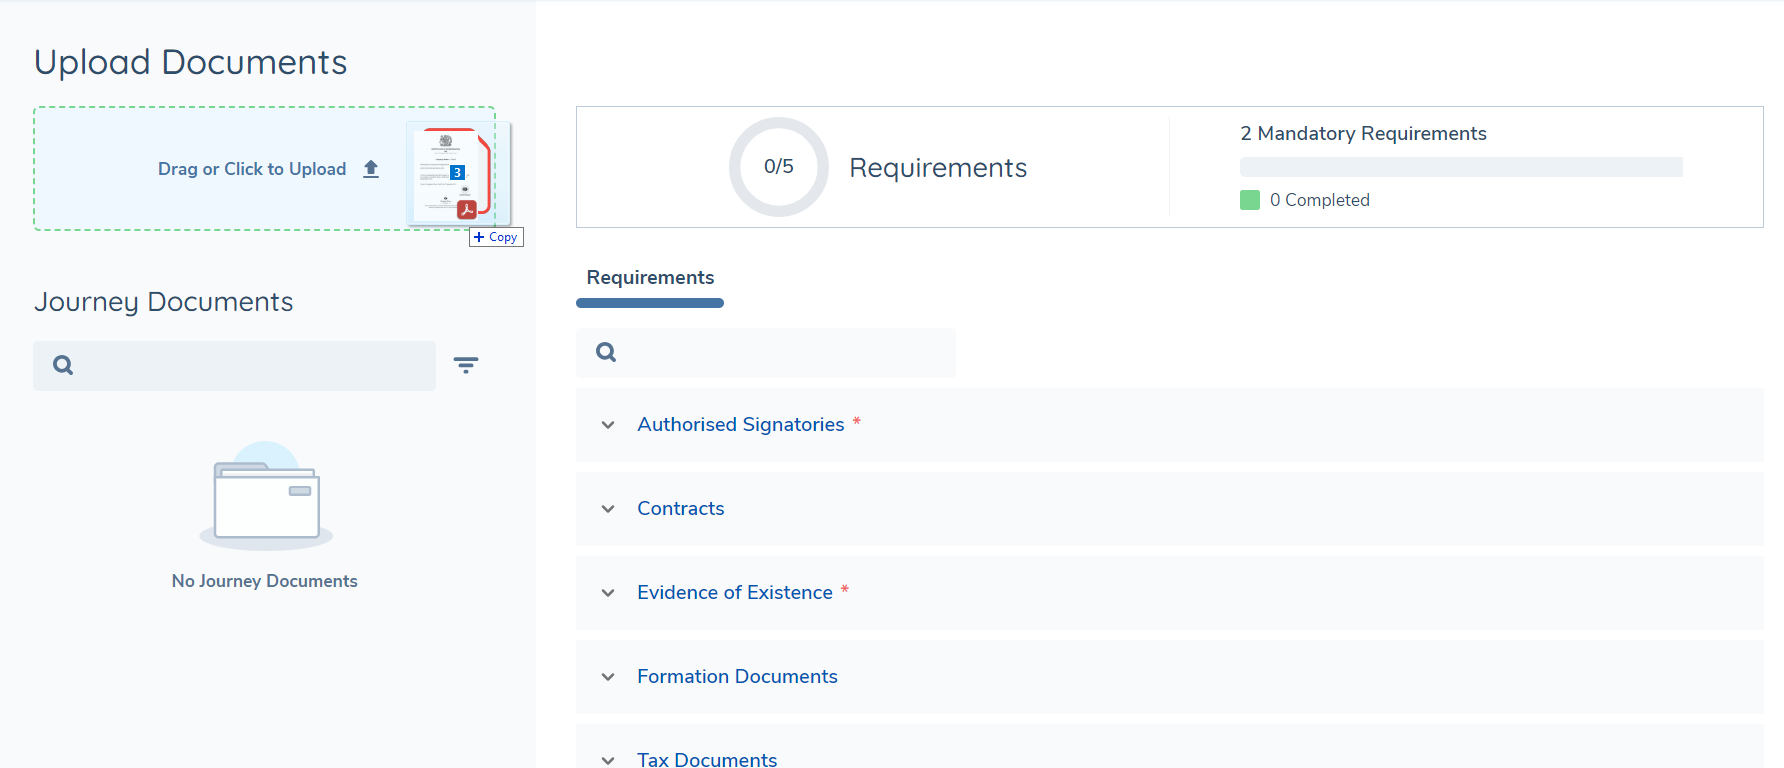
In the background, the system will evaluate the content the documents that are uploaded, and for each of these, the document type will be determined and available document metadata will be extracted and saved against the document model in Fen-X. These two processes currently take place in parallel but may complete at separate times.
Once the document type is established, if the document is deemed to be acceptable for any of the document requirements in scope in the task, it will automatically be linked to the corresponding document requirements automatically.
Documents uploaded directly to a specific requirement rather than to the generic drop-zone will require manual processing and will not undergo auto-classification or metadata extraction.
Auto-Classification
The system will first read and extract text from the uploaded document and then make a request to the LLM to classify the document as best it can to match one of the values in the configured Document Types set.
If none of the values in the Document Type set are a suitable match the document type will be set with "Unknown", and the user will be able to manually update this by clicking on the edit icon on the Journey Documents grid. On occasion if there is another issue with classification, for example if the file is of an unsupported format for classification (see Appendix) then the type will be set to "Not Classified".
Classification works best when document types in the set are configured with an easy-to-understand label. Additionally, ensure where possible that the names of the Document Types don't overlap, as this can cause confusion. In future, the system will also leverage the document descriptions when determining which document type is most suited to the document it has analysed, so it would be worthwhile to include these descriptions when configuring the set of types now.
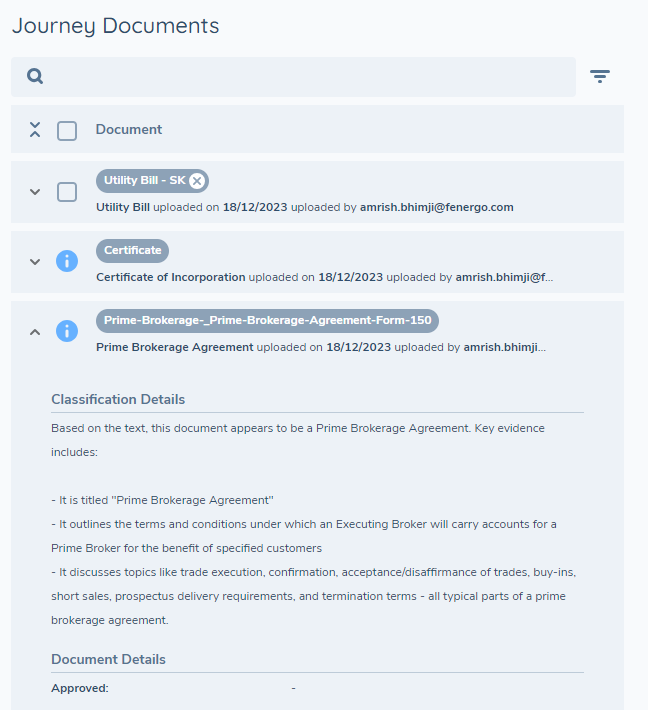
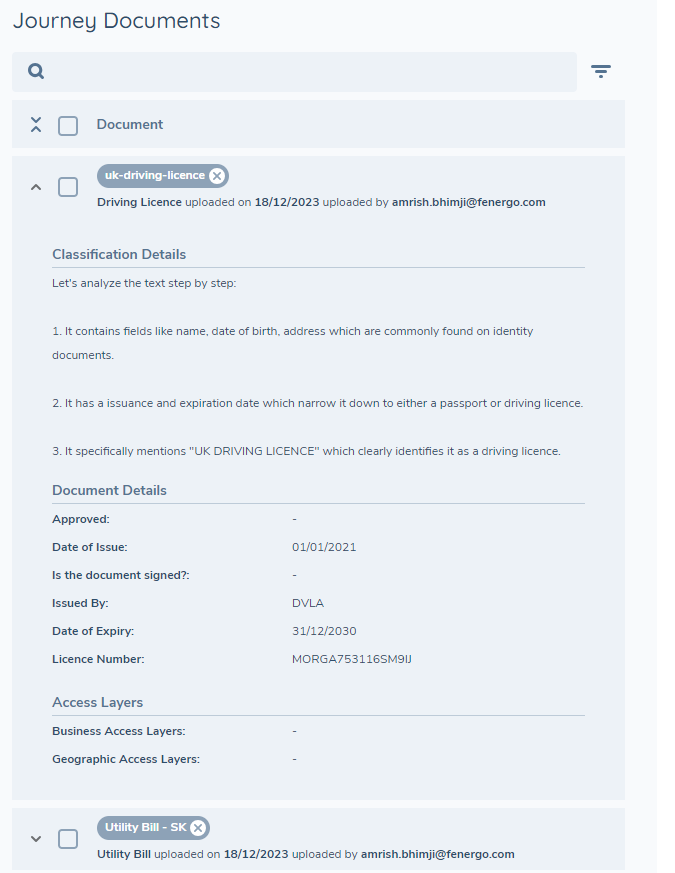
In the Journey Documents grid, when the document details are expanded, you will also see a section which provides an explanation from the system as to why it chose to classify the document as it did. This provides valuable justification for the choices the system makes and adds to the traceability for system-driven decisions.
Document Metadata Extraction
In parallel to the auto-classification process, the system will also use the extracted data to identify whether any of the content is suitable to populate the configured document metadata fields. If so, these extracted values will be stored against the configured metadata fields on the document model. To be clear, currently other data outside of the context of document properties such as entity data like "Name", "Address", "Nationality", etc. which would typically be stored against the entity record will not be in scope for extraction. Of course, if these fields are configured as document metadata then they will be extracted but these will be stored against the document rather than the entity itself. The metadata extraction page limit is a global platform setting and cannot be configured per document type. This is because document classification and metadata extraction run simultaneously, before the document type is known.
Supported Fields
In the Document Metadata data group, it is possible to configure a variety of field types, however extraction of metadata is only supported for the following:
-
Text Field and Text Area - extracted data will be in the format of a string of text.
-
Number - extracted data will be numerical characters only.
-
Date - raw date values will be converted to ISO format and saved.
-
Select Dropdown and Multiple Select Dropdown - raw extracted data values will be sanitised and matched to a corresponding value in the lookup list associated with the dropdown field.
Currently any fields that are configured with trigger conditions are not extracted.
At the moment only primitive validation is applied when saving data to these fields i.e. letters will not be saved to a number field, however custom validation as set when configuring fields will not be taken into consideration.
Auto-linking to Document Requirements
If the system is able to classify the document, and the type that is set is deemed to be an acceptable document for any of the document requirements that are in scope for the task, then the document will be linked to each of these document requirements automatically.
Auto-completion of Task
When configured to auto-complete via the Automation tab in the Journey Builder (either by setting "System Autocompletion" or "Conditional System Autocompletion"), the task will close automatically under the following conditions:
- ALL document requirements in the task have at least one linked document.
- The last document in the task was processed by the system, rather than manually by a user.
Document Splitting
The system can analyze patterns within a file to identify distinct documents and split them into separate files. For example, if a single PDF file contains multiple document types such as a passport, identity card, and tax forms, the system can split this into individual documents automatically.
Initiating Document Splitting
- In the Documents v2 task, locate the "Multiple Documents File" toggle switch at the top of the screen
- Enable the toggle before uploading your document
- Upload your document to the generic dropzone area by either dragging and dropping or clicking to select a file
Split Document Review Process
When a multi-document file is uploaded, the system will display the file in the Documents grid with a "Split document" action available. As soon as the split action button is clicked, the system will analyse the content and Present a preview interface where a user can:
- View thumbnails of all pages in the document
- See the system's suggested split points indicated by dashed lines
- Review the proposed individual documents (Document0.pdf, Document1.pdf, etc.)
- Manually adjust split points if needed using the scissors (✂️) icons
- Edit the name of each file
Please note that special characters are not supported when renaming the files. Please ensure you do not key in any special characters if performing this step.
Post-Split Processing
After the splitting process is complete, the individual documents will be auto-classified, have metadata extracted and be linked to any matching requirements automatically, as standard. The filenames can be updated via the standard pattern of either editing unlinked documents directly from the Journey Documents grid or linked documents via the Linked tab beneath the corresponding document requirement.
Post-processing Actions
Once a document has been processed by the system, you may review the outcome by checking the document details from the Journey Documents grid.
If the document is not linked to any requirement, it can be edited from the Journey Documents grid directly and you may reclassify it and/or update the document metadata.
If the document is linked to a requirement, it can be edited from the Linked tab beneath the corresponding document requirement. Here the metadata can be updated but it can only be reclassified to one of the other acceptable types for this requirement. Else you must delete the document from this requirement and manually upload it again.
Entity Data Extraction
In addition to document metadata which is stored against the document object in the system, it is also possible to extract data fields configured in Policy from documents that are connected to the current journey and store these against the entity draft of the primary entity in the journey.
Entity Data Extraction Flow
Entity Data extraction is initiated only after the Documents v2 task that is enabled for data extraction is completed. First, the system will determine which of the documents connected to the current journey are eligible for extraction based on the type of document and how that has been configured in the Document Types set. Then for each eligible document, the system will determine which policy fields need to be extracted from the document, and once the document is prepared for the language model to work with, it will begin analysing and extracting the relevant data fields from each of the documents.
Once all documents have been processed, a notification will be sent to confirm that data extraction is complete. At this point in time the Document Data Extraction task will display the extracted data.
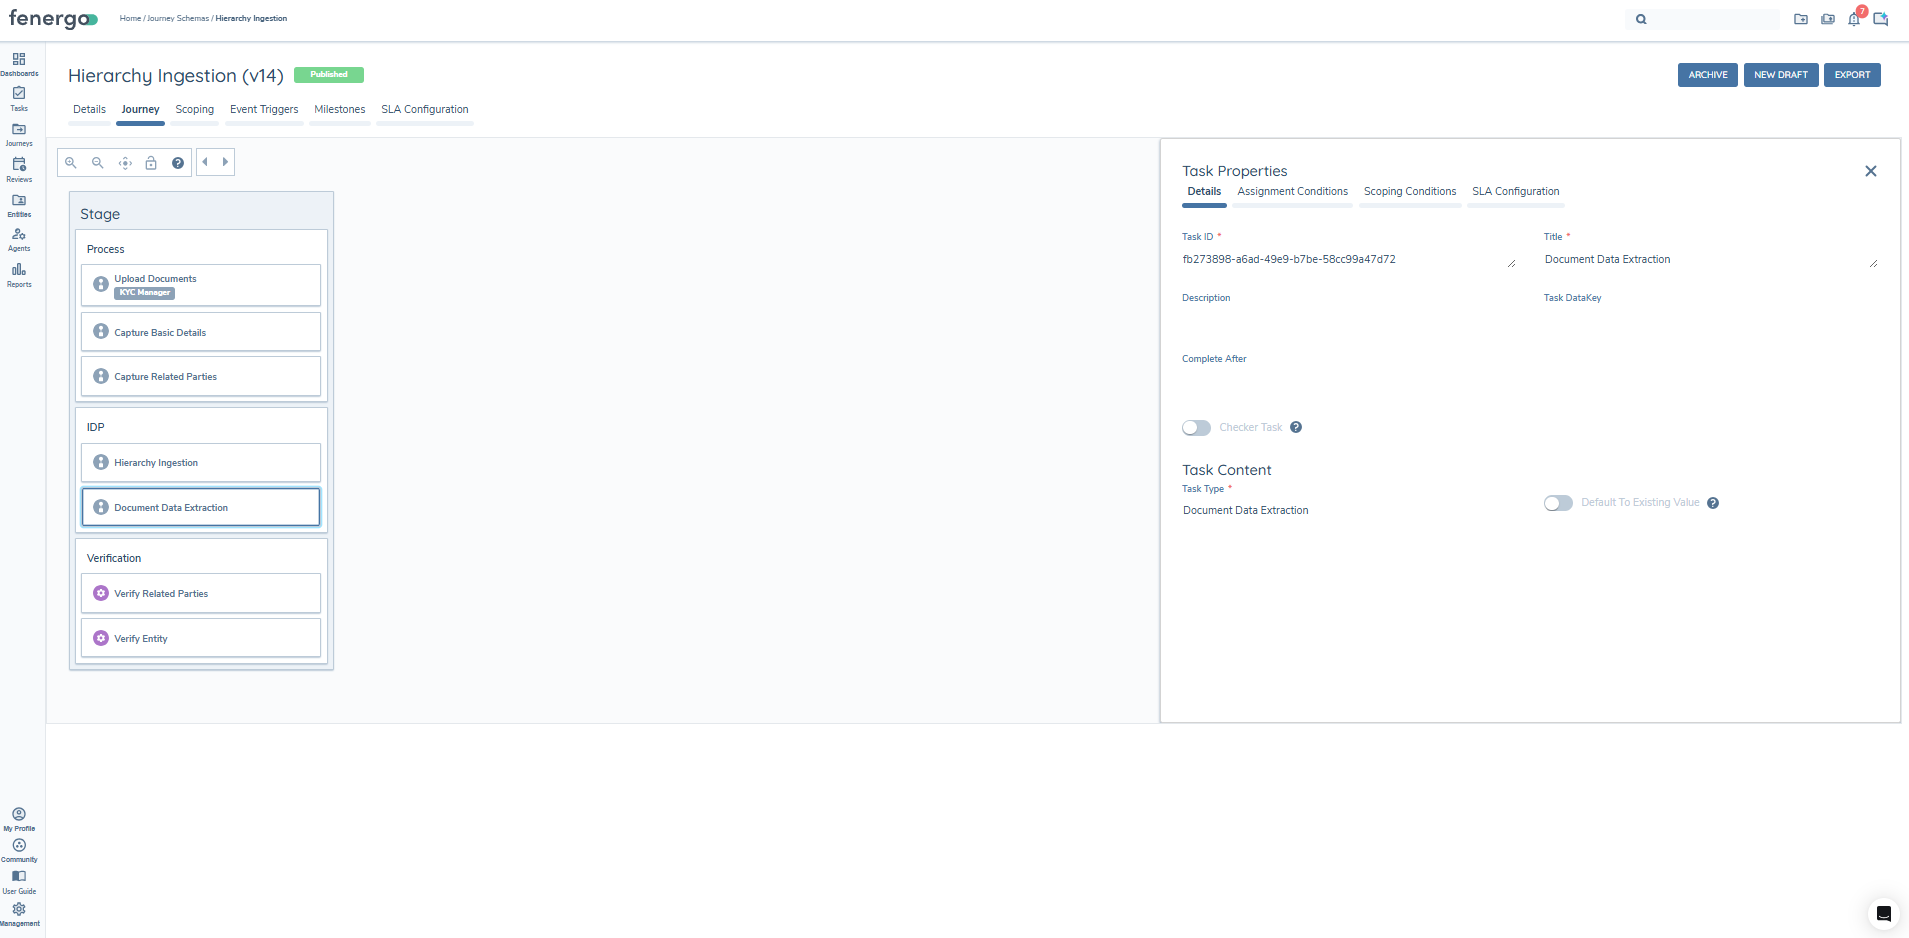
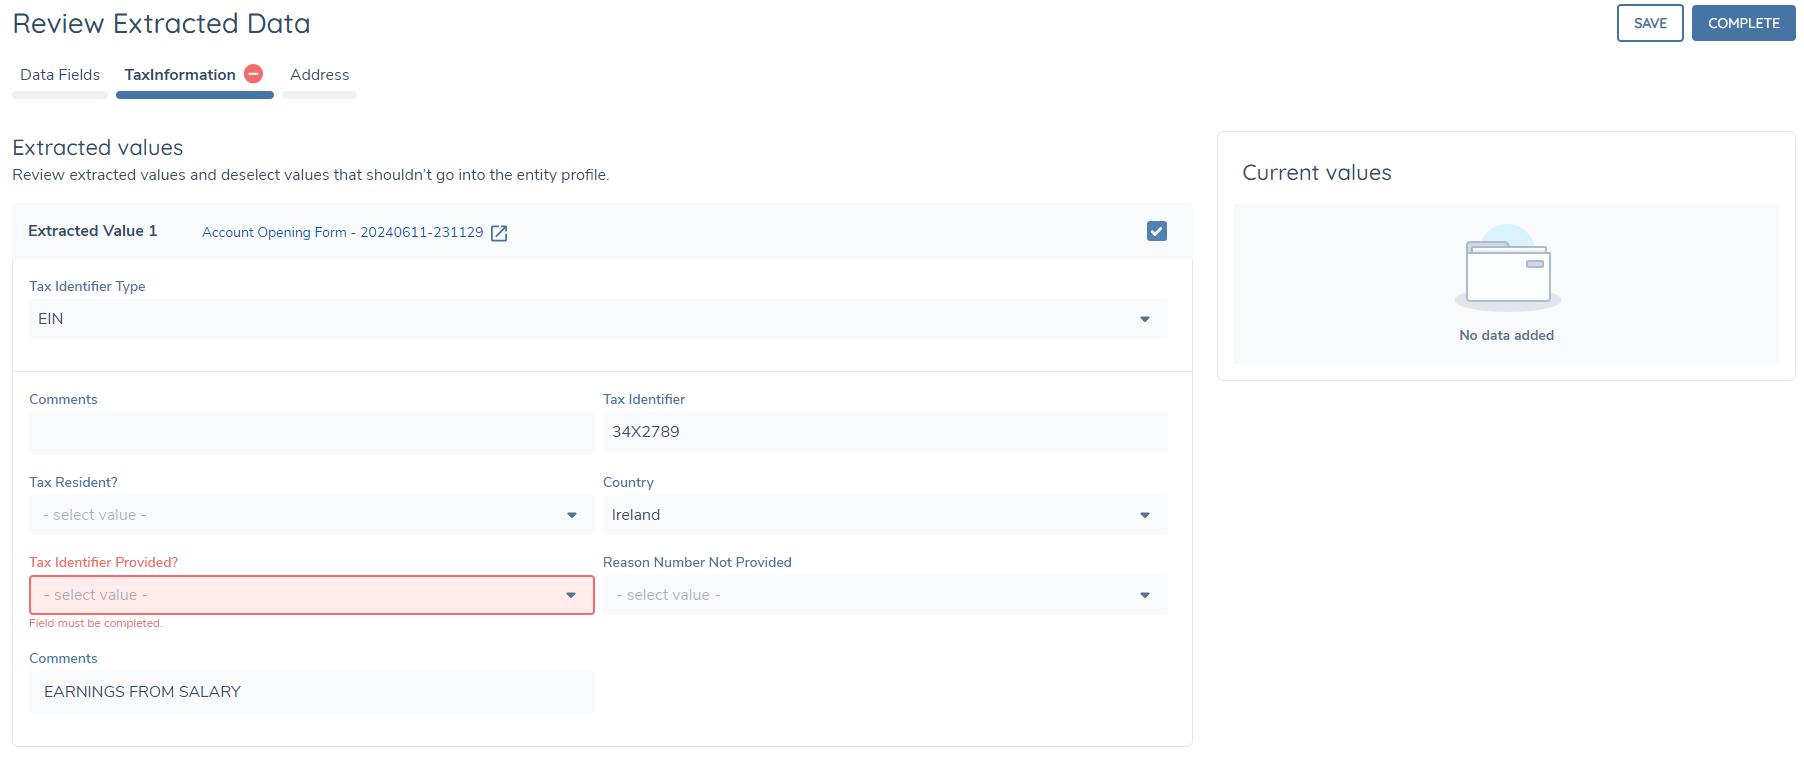
Document Data Extraction Task
The Document Data Extraction task allows a user to review the extracted values for each field and update these if necessary before writing the values to the entity record. To aid this review we also display the current values for each field to offer a comparison in case there are any differences.
The task will display both standard data fields as well as data groups - the first tab will always display standard data fields, and if any data group values are extracted then a tab will also be displayed for each data group.
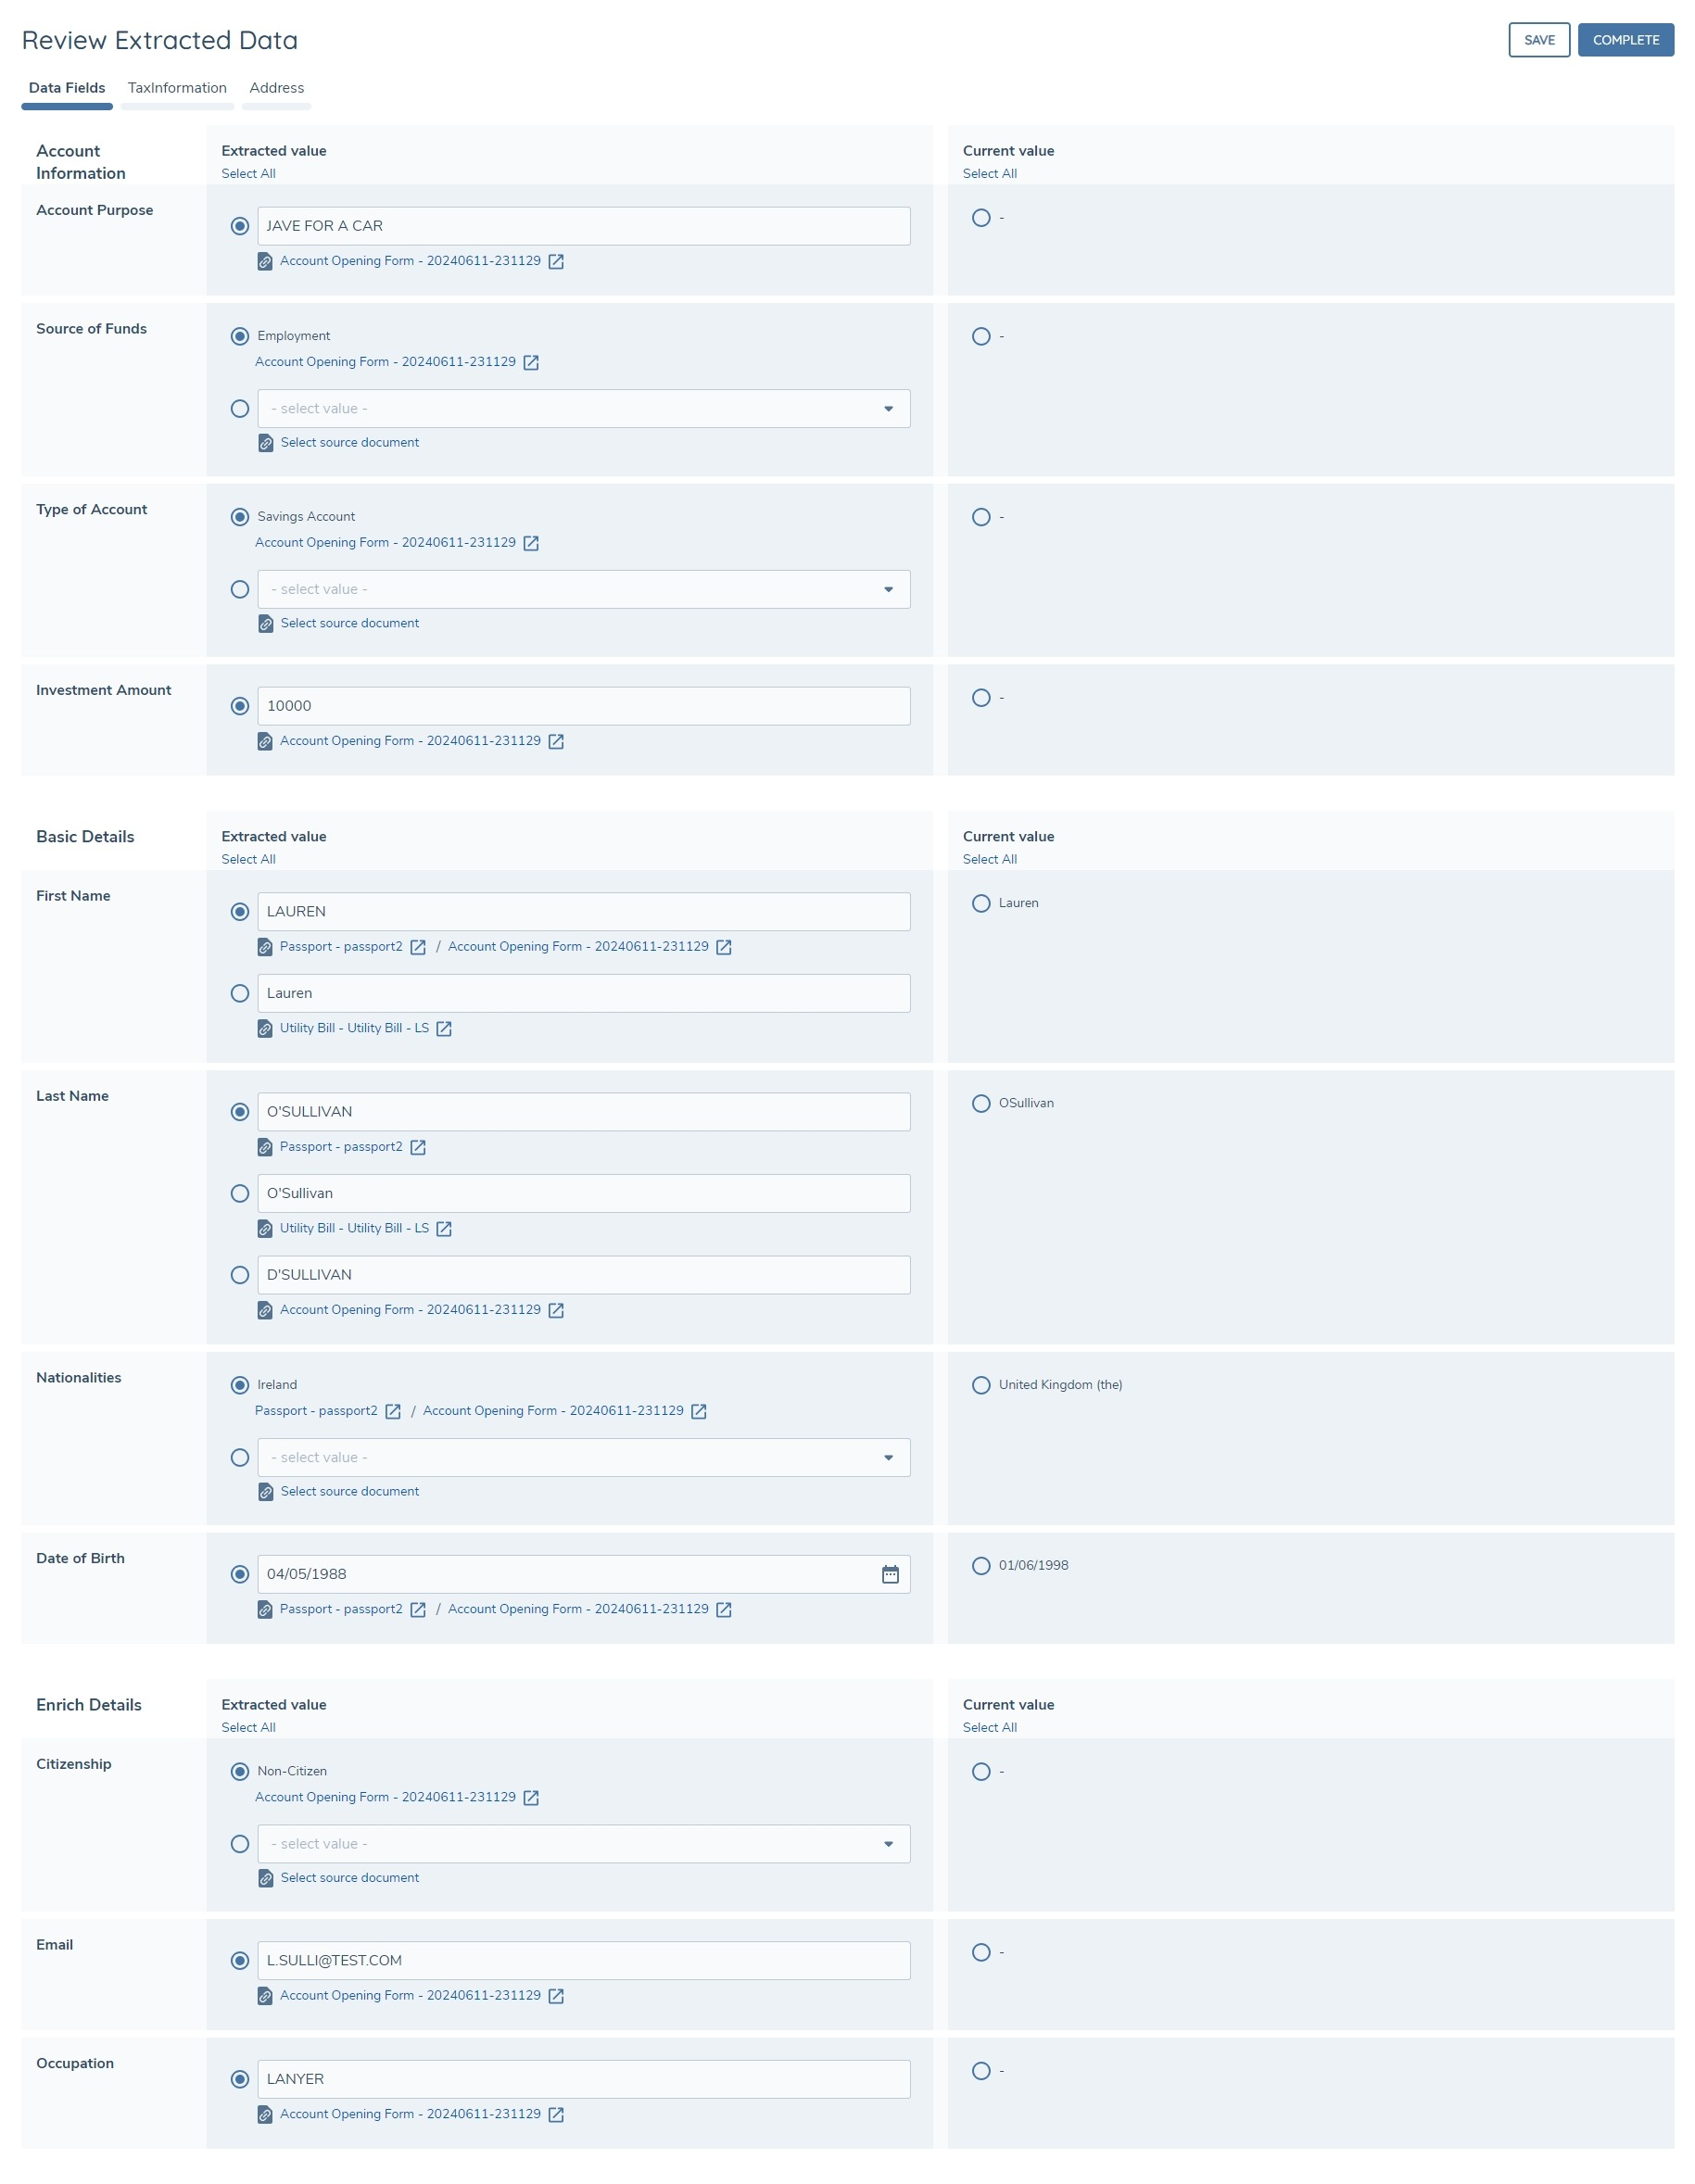
Standard Data Field Extraction
In the task, for standard data fields, the page is organised so that the fields are grouped by category in alphabetical order, with field names displayed in the first column. The second column displays the extracted value(s) and the third column displays the current value for the field. A field is only displayed on this page if the system was able to extract a value for it. If a field is configured in multiple categories, these will be deduplicated so that the field will appear only once in the first category alphabetically. If the same field value is extracted identically multiple times from the same document, it will appear only once. For example: if the first name of "John" is extracted multiple times in a "Employment Contract" document, then it will appear once as "John".
The user in this task will be able to review the extracted values for each field and use the radio buttons to choose either one of the extracted values or the current value of the field. If one of the extracted values is selected, on task completion the entity record (draft) will be updated with the selected value. If the existing value is selected for a given field, then this field will retain its current value on task completion.
All extracted values are selected by default, so if a user clicked Complete immediately, these values would be written to the entity record assuming there are no validation errors.
Extracted Values:
When extracting entity data, the same types of fields are supported as for document metadata fields i.e. - Text Field, Text Area, Number, Date, Select and Multiple Select Dropdown fields and these are extracted in the same type of sanitation applied.
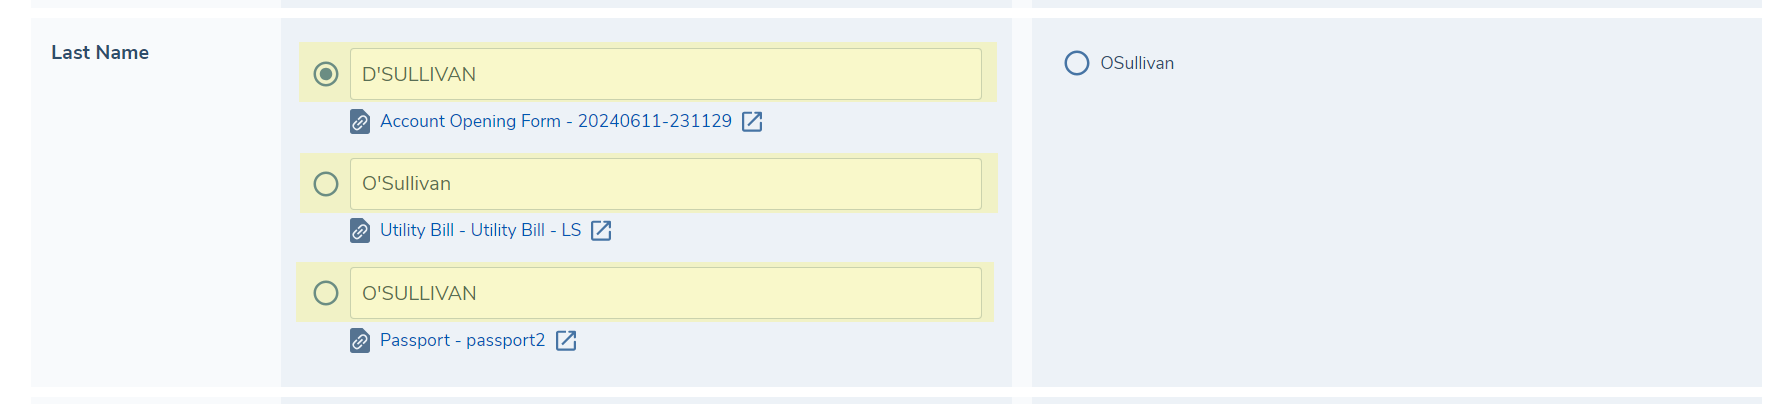
In some instances, the system will extract more than one value for a given field. In this case the Extracted Value column will list all the extracted values for a given field and the user can use the appropriate radio button to select which value should be written to the entity record.

Directly beneath each extracted value we also display a link to the document from which the value was extracted. In some instances the same value may have been extracted from multiple documents in which case a link to each of these documents will be included beneath the value. Clicking this link will open the document in a separate tab so that it can be referenced.
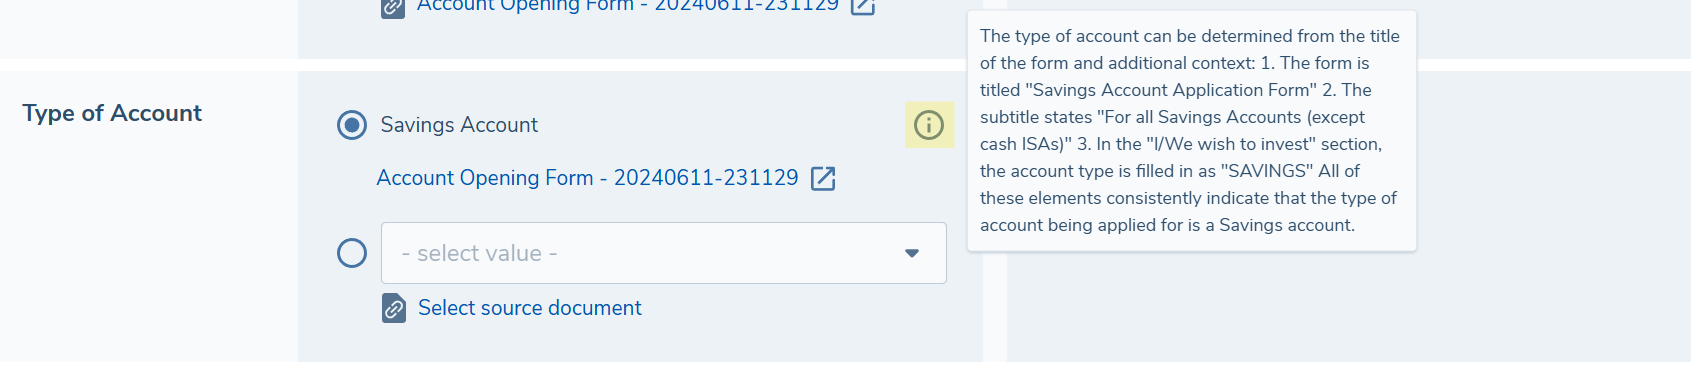
For each extracted value, an information icon is displayed. Hovering over this will reveal the explanation provided by the LLM which provides some context as to why this value was extracted from the document. This can be a helpful tool for a reviewer as it may provide information about where in the document the value was extracted from and also the reasoning it provides may quickly allow you to confirm or reject the value.
Please note, that explanations will be provided for all standard data fields. If there is no indicator against a field, this may be because the extraction was completed prior to explanations being available as a feature. For Data Group Fields specifically, we will only show explanations where a value was extracted, and will not show an explanation for empty Data Group Fields. Again, if there is no explanation beside an extracted Data Group Field, then this means the extraction was completed prior to explanations being available as a feature.
All extracted values are displayed in an editable field - this allows you to make easy corrections to any of the extracted values. For text, number and date fields you may simply edit the extracted value directly, and once done the value will be annotated as "Edited" along with an option to revert the value back to the original extracted value. Select dropdown fields are not directly editable, however an editable field will appear below the extracted value and you can select any other value from this dropdown to take forward. Additionally, when selecting a custom dropdown value, it is optional to select the source document from the list - this allows you to maintain a link to the document from which the value was sourced for future reference.
Default Value Selection Mode
By default, all extracted values are pre-selected when the task loads, so if a user clicked Complete immediately, the extracted values would be written to the entity record. The Default Value Selection Mode feature gives configurators control over this behaviour. A new toggle — Default To Existing Value — is available on the Document Data Extraction task in Journey Builder. When this toggle is enabled, the current system value will be pre-selected in the review panel instead of the extracted value.
In either case, both values remain visible and selectable — the toggle only affects which value is highlighted when the task first loads. The user can always override the pre-selection by clicking the radio button of their preferred candidate before completing the task.
Default To Existing Value disabled (default):
All extracted values are pre-selected when the task loads. If the user clicks Complete without making any changes, the extracted values will be written to the entity record.
Default To Existing Value enabled:
The current system value is pre-selected for any field that already has a value stored on the entity record. The user must actively select the extracted value if they want it to be applied.
If the toggle is enabled but a field has no current system value — for example, a field that has never been populated before — the extracted value will be pre-selected as a fallback. This ensures new fields are still captured during the review.
| Scenario | Pre-Selected Value |
|---|---|
| Toggle disabled (default) | Extracted Value |
| Toggle enabled, field has a current system value | Current System Value |
| Toggle enabled, field has no current system value | Extracted Value (fallback) |
This feature requires a feature flag to be enabled on your environment before the Default To Existing Value toggle will be visible in Journey Builder. Contact your Fenergo administrator or Customer Success Manager to have it activated.
Data Group Extraction
If any of the data requirements in the relevant categories are data groups, these may also be extracted by the system. Only multiple cardinality data groups are supported - no data will be extracted for single cardinality data groups.
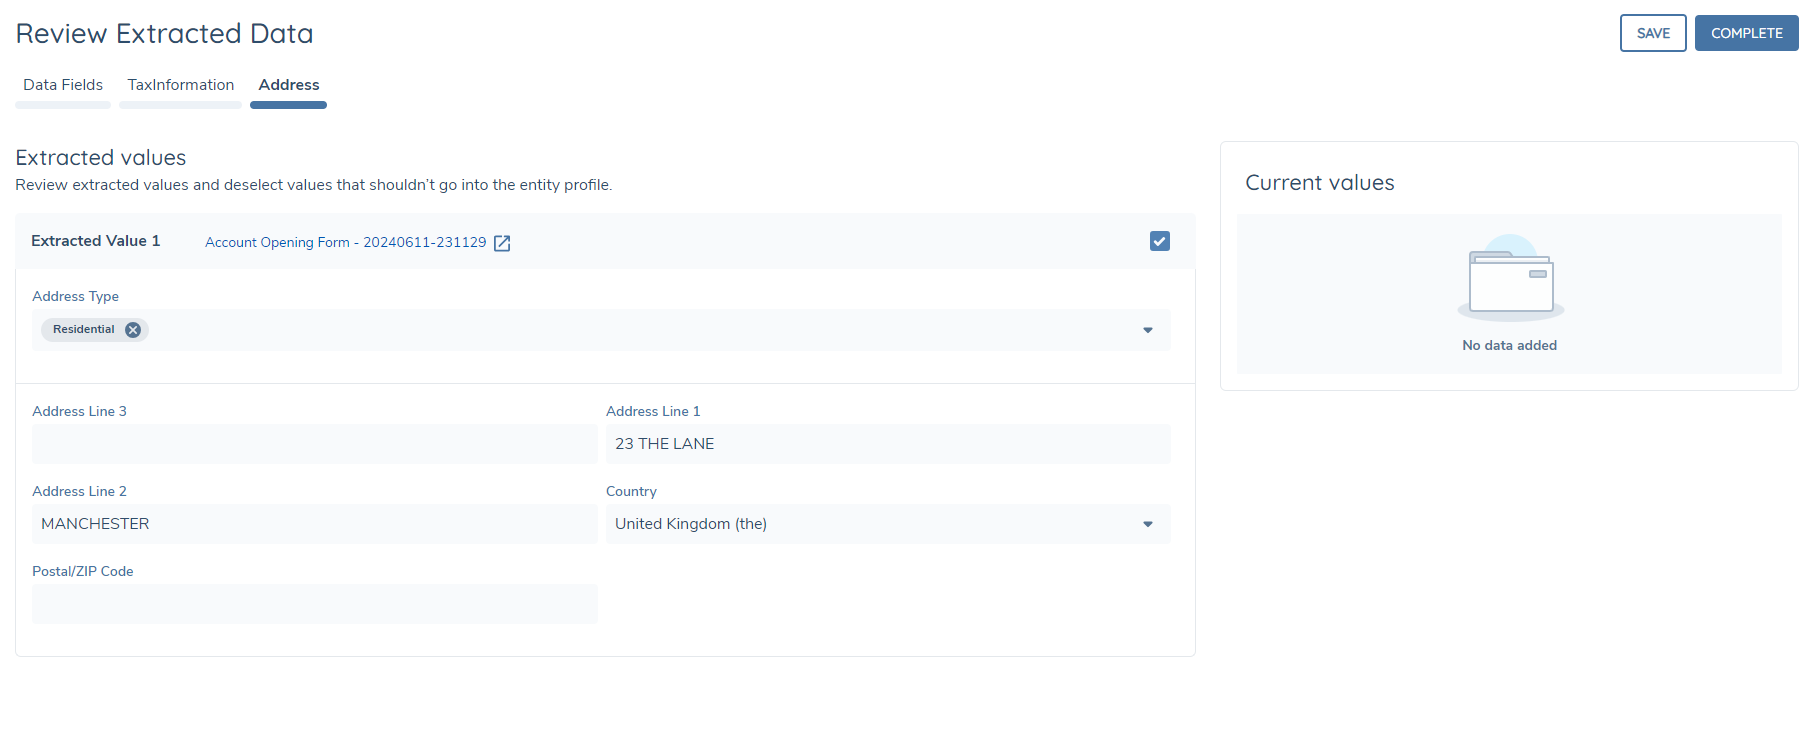
A separate tab appears on the page for each data group e.g. Addresses, Tax Identifiers, etc. If no data group values are extracted, then no tab will be displayed. Within each data group tab, the extracted values appear on the left-hand side in an editable format - each row or collection will be displayed in a separate block of fields, for example, if two sets of addresses were extracted from the eligible documents, there will be two separate blocks presented, displaying all the data group fields including those for which no data was extracted. You may update any of the existing values in the same way as the standard data fields, and you may also populate any other fields for which no data was extracted.
On the right-hand side of the page, a separate panel will display the existing values for the data group. Again, each row or collection is displayed in a separate block within this panel, which is non-editable. Only populated fields are displayed in this section.
In the header of each extracted data group collection, there will be a link to the source document from which the data was extracted. Clicking this will open the document in a separate tab so that it can be referenced. Each extracted collection is selected by default - unchecking the selection box will collapse the block and the data group collection will not be saved against the record on completing the task.
Task Validation
On page load or on clicking either Save or Complete, any invalid fields will be highlighted along with the corresponding error message. For standard data fields we do not enforce mandatory validation i.e. you may complete the task even with null values against mandatory fields - this is because the task is designed to accelerate data enrichment, but standard data tasks should be configured in the journey to enforce data capture. However other validation as configured in policy will be applied to prevent an invalid value from being stored against a field.
For data groups however, it is only possible to accept and store the data group collection if all mandatory fields are populated.
Saving and Completing the Task
Clicking Save on the task will store any selections made along with any edits to extracted values. If there are any validation errors these will also be surfaced.
Clicking Complete will save and store the selections made, but will also then write the selected values to the entity record and complete the task, unless there are any validation errors. When the task is complete, you may still navigate to it if you have access, and see the selections made along with the ability to view the source documents from which data was extracted.
Hierarchy Extraction
IDP can now ingest and build related party hierarchies directly from uploaded documents. This includes analysing the document and then linking individuals and companies referenced within uploaded documents as related parties (e.g. directors, shareholders, UBOs) to the primary entity being onboarded.
The addition and updating of related party hierarchies has historically been a time-consuming, manual process that requires users to cross-reference multiple documents and create each relationship one-by-one. Hierarchy Extraction automates this process, significantly reducing user effort and streamlining the creation of building out rich, complex hierarchies.
Hierarchy Extraction Flow
Similar to Entity Data Extraction, Hierarchy Extraction will be initiated only after the Documents V2 task has been completed. The system will first determine which of the uploaded documents are eligible for Hierarchy Extraction based on the type of document uploaded, and how that now-classified document type has been configured within the Document Types set. For each eligible document, it will then be analysed and the identification of the related parties contained within will begin.
Once initiated, Hierarchy Extraction will:
- Detect and extract references to related parties within uploaded documents.
- Classify the relationship type (e.g. Director, Shareholder, Ultimate Beneficial Owner etc) for each identified association.
- Establishes that there is a clearly defined connection between the mentioned related party and the primary entity of the journey.
- Determine whether the referenced party already exists in the system, or if a new entity needs to be created.
- Automatically create and/or link the relationship to the primary entity within the journey.
This occurs within the same flow as the existing intelligent document processing. If configured, and once the requisite documents are uploaded, the system will trigger the hierarchy ingestion process automatically and display results once complete.
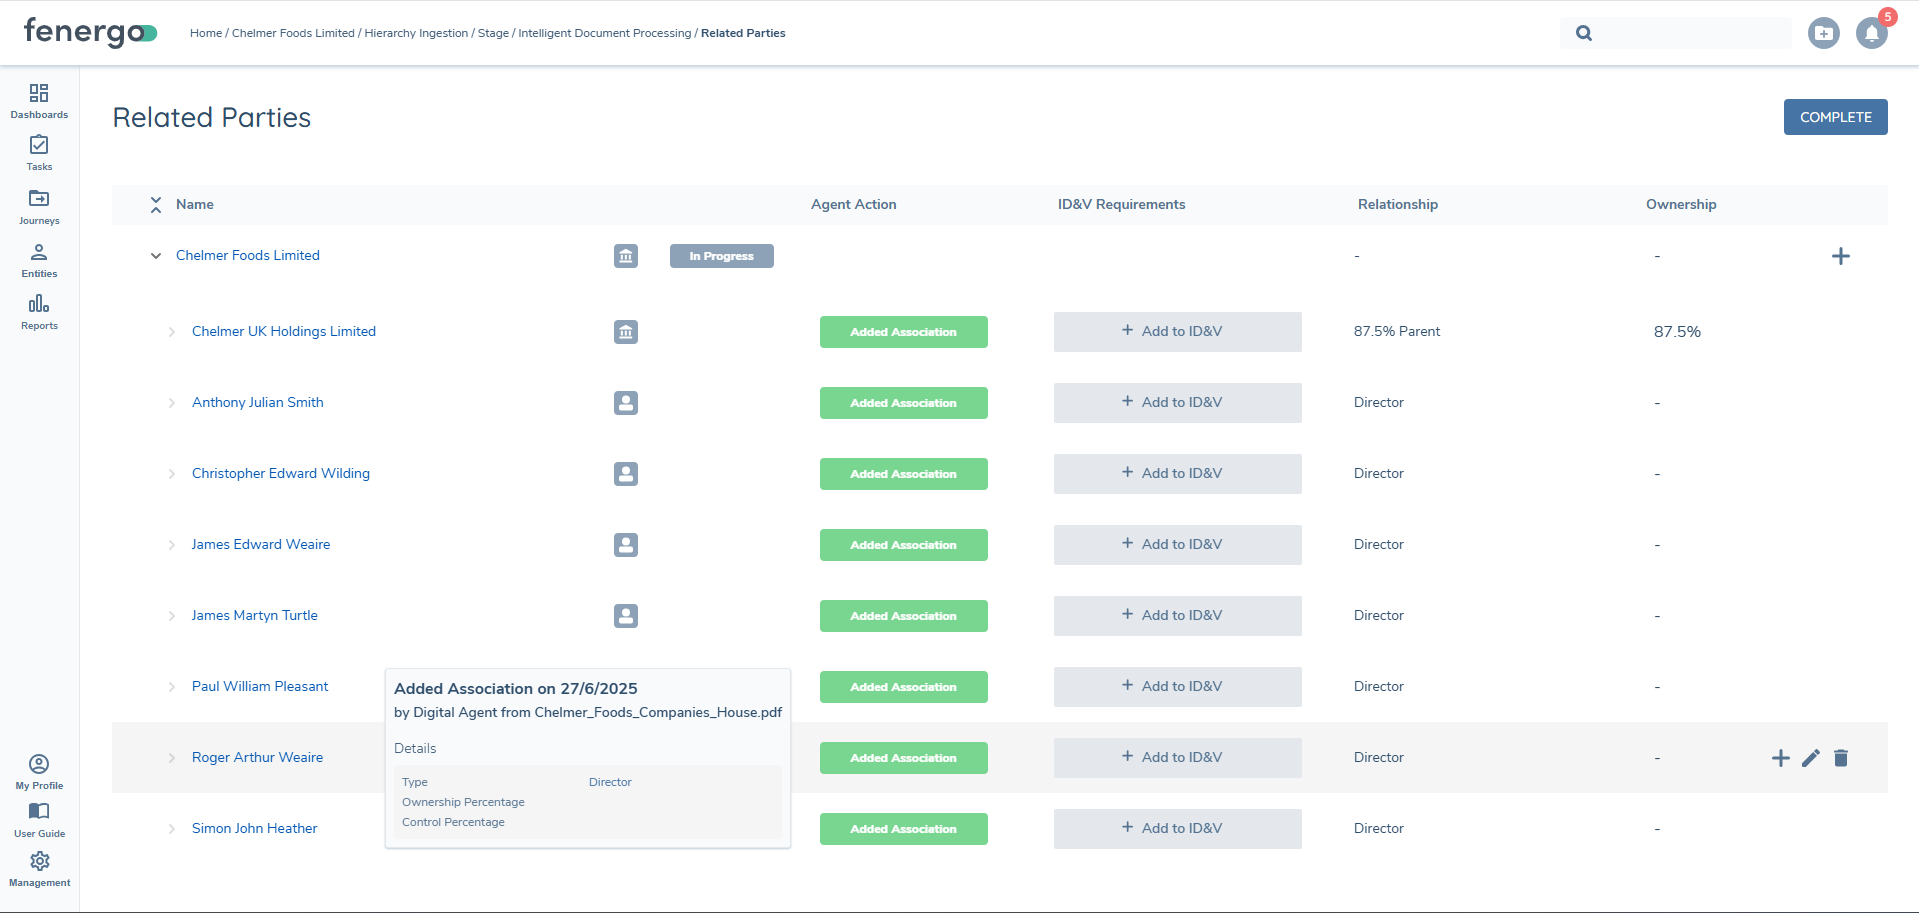
Agent Actions & Related Parties Grid
The outcome of the hierarchy Extraction process can be reviewed directly within the Related Parties task. A new column titled Agent Action provides a clear summary of the actions taken by the Document Agent.
Agent actions may include:
- Added Association: A new related party was created and linked.
- Updated Association: An existing related party was updated with new data.
- No Change: No action was required for that association.
Users can drill down into each association to see information like:
- The type of relationship assigned
- The date of extraction
- The source document from which the relationship was extracted from
- Any policy specific data extracted, like a 'Date of Birth' or 'Ownership Percentage'
This transparent audit trail makes it easy to verify or amend changes as required. Please note that this column will only display when the specific Related Party task has been opted into Hierarchy Extraction.
Example Use Case
As an example, imagine a "Certificate of Incorporation" or "Share Register" lists three directors and one shareholder. Hierarchy Extraction will:
- Identify the directors and shareholder mentioned within the document
- Extract their relationship types, and details pertaining to their association to the main entity
- Create these associations in the entity hierarchy automatically
- Present the results in the Related Parties task for user review
This removes the need for manual data entry and ensures that hierarchies are complete and accurate as per the provided documents.
Managed Knowledge Base Integration
Like Document Classification, Document Metadata Extraction and Entity Data Extraction, Hierarchy Extraction can be bolstered by the IDP Managed Knowledge Base. Configurators can define specific rules that pertain to how IDP should extract related parties within the uploaded documents. This helps ensure accurate extraction, even when documents deviate from common formats; enhancing the flexibility and effectiveness of Hierarchy Extraction.
For instance, a configurator may create a rule that instructs IDP on how it should interpret a “Trust Deed” by looking for related party definitions on a specific page or section within the document. This allows for fine-tuned hierarchy Extraction across bespoke document types or client-specific processes.
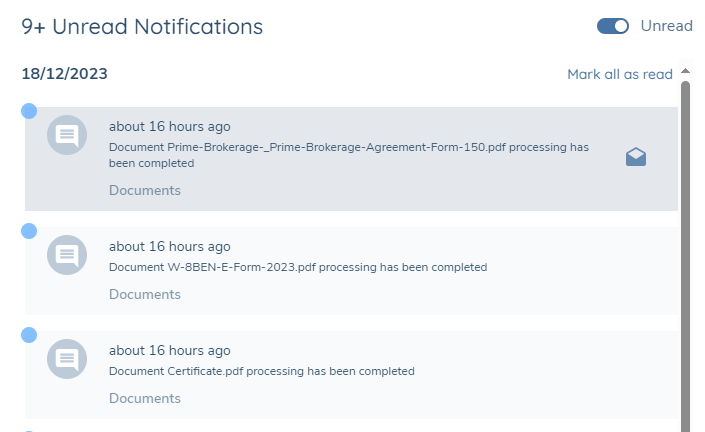
Notifications
Once the hierarchy extraction process is complete, a notification will appear alongside any classification or extraction alerts. This provides confirmation that the entity’s hierarchy has been processed and is ready for review.
Notes on Hierarchy Extraction
Hierarchy Extraction will not create new entities if there is not a clearly defined connection between the found related party, and the "main entity" of the Journey (i.e. the entity for which the journey was launched for). This is so that unrelated associations are not inadvertently created just because they were mentioned in an uploaded document. Therefore, it is important to ensure that in the documents being uploaded within your journeys that there is a clearly tenable and established connection between a named related party and the main entity.
Similarly, if a related party is mentioned in a document but there is insufficient data to create that related party within Fen-X, Hierarchy Extraction will avoid creating this entity. This is so that we mitigate the creation of entities and related parties that have minimal or sparse data against them. As an example, if an Individual was to-be-created, but the only information provided in the uploaded document is that the related party's name is "John", we will not create this entity. It is imperative that uploaded documents and the related parties that should be extracted from them align to your tenant's policy configuration - especially with regards to the minimum data needed to create a related party ("Related Party Basic Details").
Hierarchy Extraction primarily targets direct associations. Some multi-level hierarchy extraction may occur, but the context of the exact hierarchy needs to be very clear within the provided document to achieve this. Further work is planned on the Product Team's roadmap to address multi-level hierarchies in the future.
Finally, please note that the following items are being targeted for future release. Please see our Product Roadmap for more granular dates:
- Ability to Update Existing Associations
- Ability to Update Existing Entities (in terms of updating their entity-data)
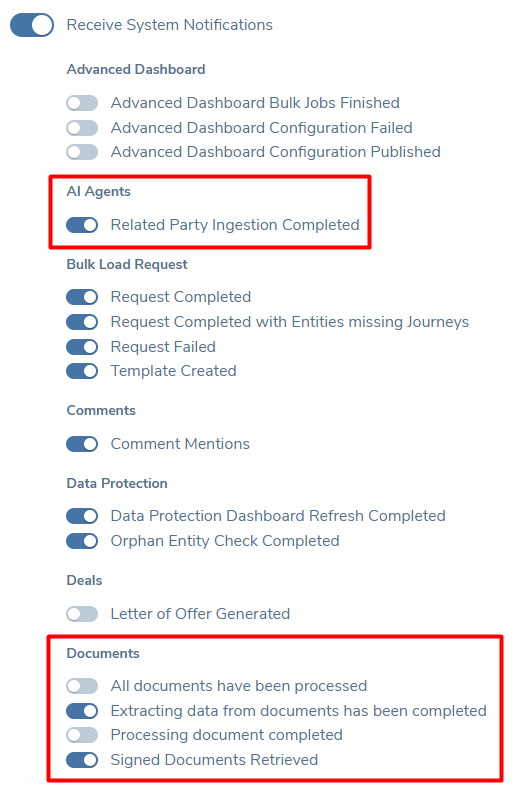
User Notifications
System and/or E-mail notifications can be sent for when:
- each document is processed and metadata extraction is complete.
- all documents are processed and the task autocompletes.
- data extraction is completed.
- hierarchy extraction is completed.
These can be enabled or disabled from the My Profile page as normal.
These notifications are relevant to the task specifically, and are not tied to specific user who may have uploaded a document. To receive the above notifications, you must be either the assigned user to the task, or belong to the assigned team to the task.
Configuring Intelligent Document Processing
Journey Configuration
To enable IDP in the Documents v2 task, in Journey Builder simply toggle the 'Intelligent Document Processing' switch on in your Journey Schema.

If you also wish to extract entity data in the task, then you can also toggle the 'Data Extraction Enabled' switch on too. It is only possible to toggle on entity data extraction if the Documents v2 task is also enabled for IDP.
You must also configure a Document Data Extraction task in the journey at any point following the Documents v2 task that is enabled for data extraction. Without this task in the journey it is not possible to apply the extracted data to the entity record.
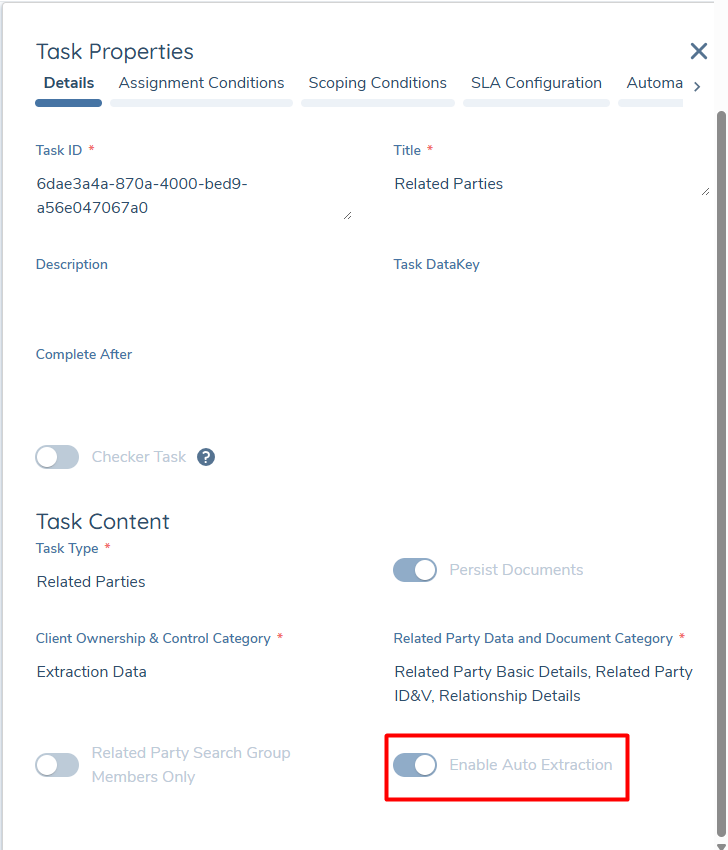
If you wish to use Hierarchy Extraction, you must also enable the "Enable Auto Extraction" switch on a Related Parties Task within your Journey. Please ensure that you have a Documents v2 task in your journey that is enabled for IDP as well.
Document Type Configuration
Configuration users can determine the types of documents that entity data should be extracted from, and which categories of fields (based on Policy configuration) should be extracted from each document type that is enabled for extraction.
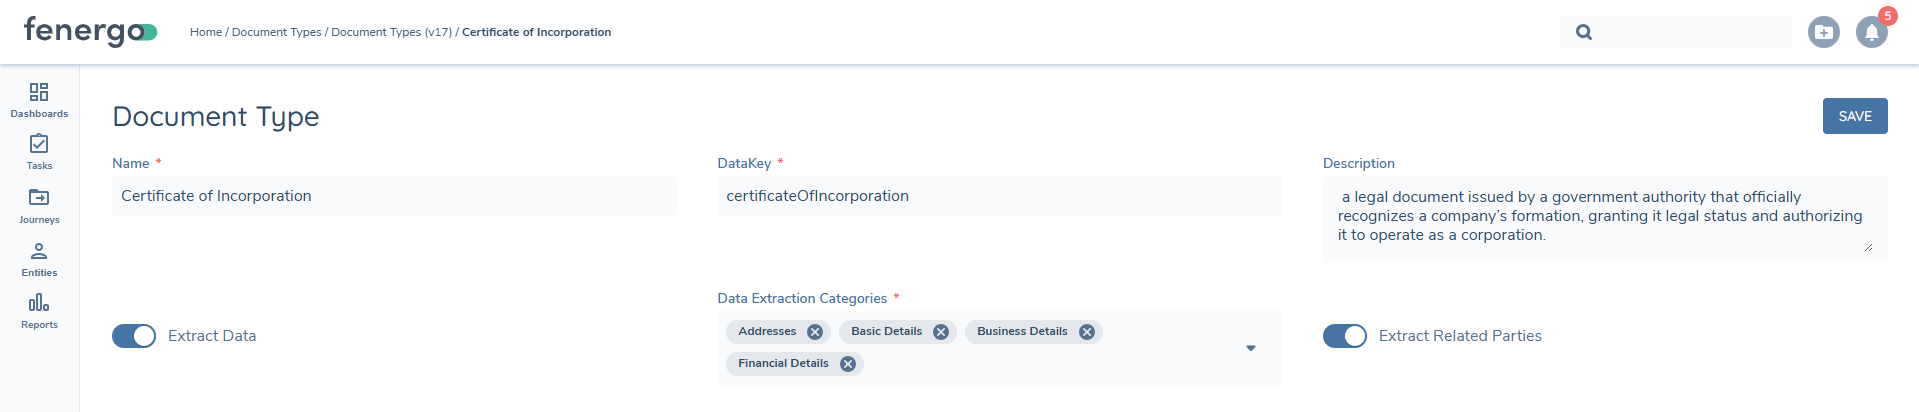
This can be done by updating a draft set of Document Types and toggling on the Extract Data switch and then selecting the policy categories from the dropdown list. When extracting data, the system will try to extract data for all supported fields within the selected categories across all in-scope policies in the journey.
When extracting related parties, it will only do so on Document Types that have been marked as such, via the "Extract Related Parties" switch seen above.
IDP Managed Knowledge Base
On some occasions, users may experience unexpected results when IDP is running in their tenant. This will be contextually specific to variables within your tenant, such as (but not limited to) the Document Types, Acceptable Types, Document Metadata, Entity Data fields and Documents that are being uploaded. In these scenarios of unexpected results, IDP can be aided by the utilisation of IDP Managed Knowledge Base Configuration, which act as configuration that can be fed into the LLM to help reach the expected outcomes of the User when utilising IDP.
It is strongly recommended that the IDP Managed Knowledge Base is used after some testing of the Intelligent Document Processing in your tenant. It acts as a supplementary feature towards the overall IDP experience. For best results, the Managed Knowledge Base entries should only be created to retroactively resolve previously tested scenarios, so that users can experience the expected results going forward.
IDP Managed Knowledge Configuration Permissions
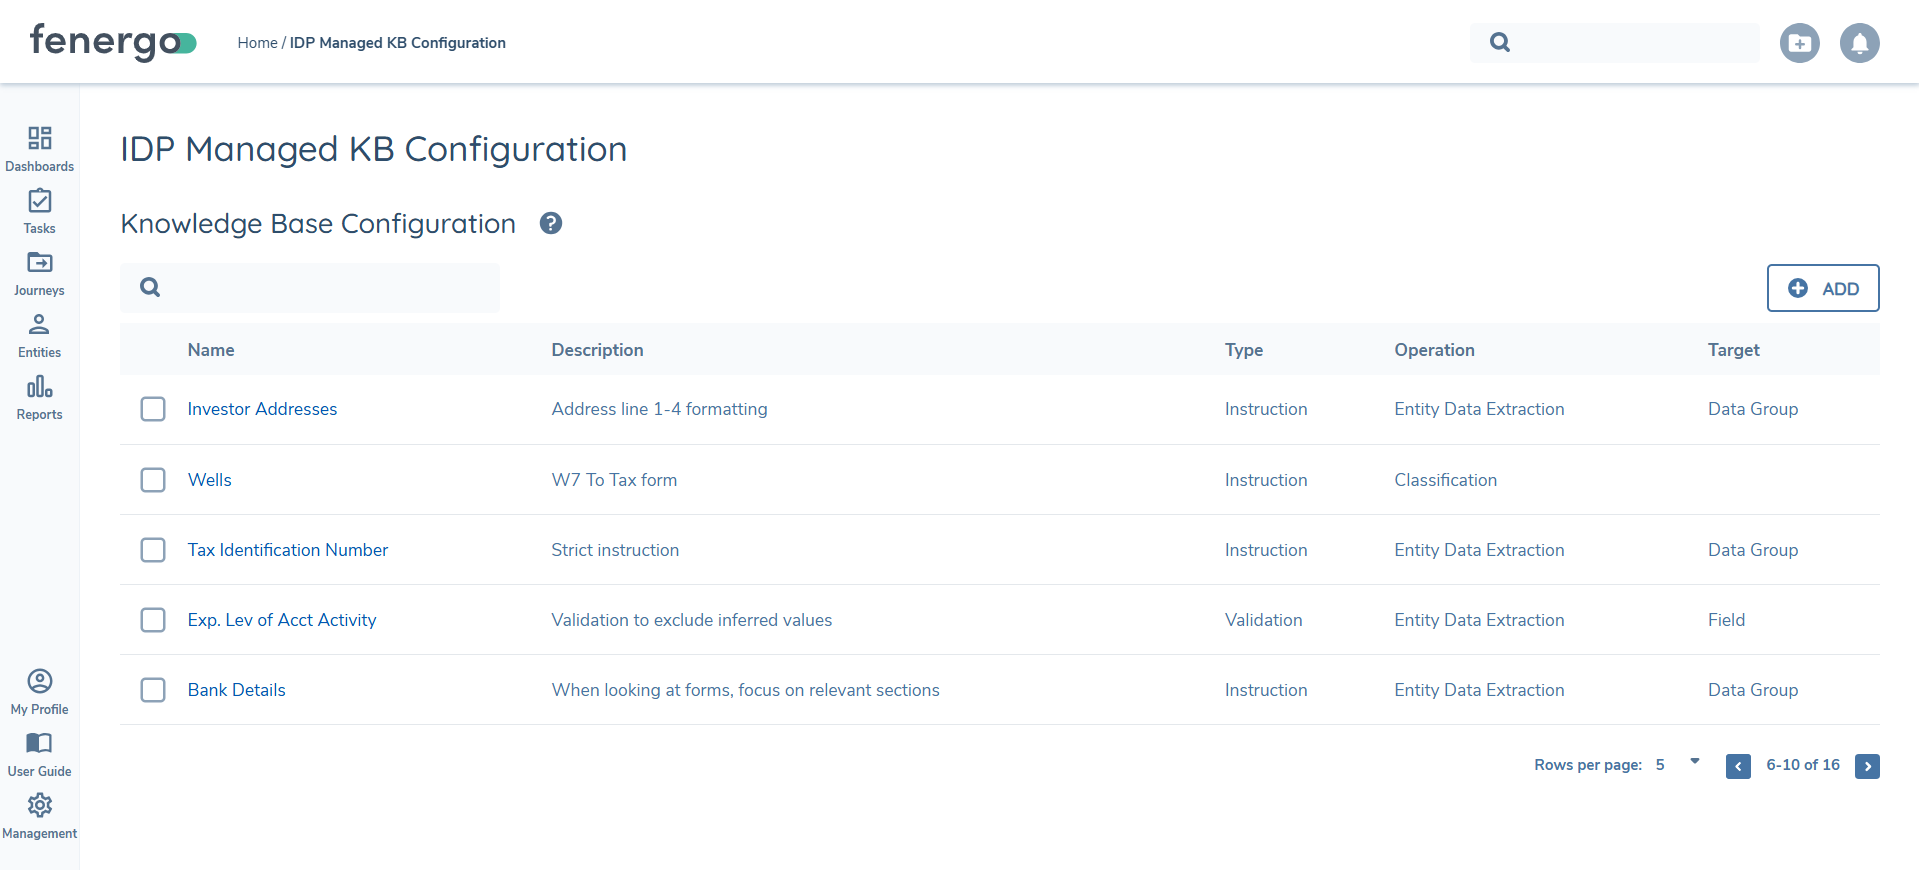
Managed Knowledge Base Configuration (referred to as "IDP Managed KB Configuration" in the application) can be found under the "Reference Data" section within the configuration menu. There are three permissions attached to this new functionality, which can be found under the "Intelligent Document Processing" section of the permissions:
- RAG Resource Access: this governs access to the IDP Managed Knowledge Base Configuration.
- RAG Resource Edit: this allows users to add new Knowledge Base entries, or edit existing entries.
- RAG Resource Delete: this allows users to delete existing Knowledge Base entries.
"Instruction" vs "Validation" Entries
Assuming the user has the requisite permissions, they can begin configuring their Knowledge Base entries.
After specifying the "Name" and "Description", a user must specify the between "Validation" or "Instruction" with regards to the "Type" of Knowledge Base entry being configured. The differentiation between these two "Types" of Knowledge Base entries is as follows:
- Instruction: This provides context before IDP has started processing. These entries guide the LLM upfront by including context upfront, before any processing via IDP has occurred.
- Validation: This provides context in the post-processing that is applied to extract results. These are applied against the extracted outputs post IDP running, where the outputs are checked and evaluated against "Validation" type entries. These can then potentially modify the contextual end-result returned to a User, based on the "Validation" entries configured.
"Instructions" allows for the providing of additional context prior to the IDP processing being ran, whereas "Validation" fine-tunes the extracted outputs before showing them to a User. These two "Types" can sometimes overlap, or even be used interchangeably dependent on the use-case. They work of one another independently as they are applied at different points of the IDP functionality, but both can achieve a similar outcome in some scenarios. It is recommended that configurators experiment with these different types of Knowledge Base entries in their testing to see the desired outcomes.
Operations and Subsequent Fields
After selecting the "Type" outlined above, a configurator will then select the context in which this entry should be applied against. The context under which this entry should be applied against is called the "Operation". These are applicable against three areas relevant to IDP:
- Classification: referring an uploaded document to then be classified as a specific Document Type.
- Metadata Extraction: referring to document metadata being extracted from the document, set against a specific Document Type.
- Entity Data Extraction: referring to data about the entity being extracted from the document, set against a specific Data Group or Field.
- Hierarchy Extraction: referring to related parties that will be extracted from the document.
Dependent on the "Type" and "Operation" combination selected, different fields will be required of the User to populate:
| Type | Operation | Target | Object |
|---|---|---|---|
| Instruction | Classification | n/a | n/a |
| Instruction | Metadata Extraction | Document Type | List of all Document Types |
| Instruction | Entity Data Extraction | Data Group OR Field | List of all Data Groups OR user-defined datakeys |
| Instruction | Related Party Extraction | Document Type | List of all Document Types |
| Validation | Classification | Document Type | List of all Document Types |
| Validation | Entity Data Extraction | Data Group OR Field | List of all Data Groups OR user-defined datakeys |
| Validation | Related Party Extraction | Document Type | List of all Document Types |
For the "Field" property, users must provide the exact datakey that they wish to apply this Knowledge Base entry against. If a datakey is incorrectly populated, as per the Policy configuration, the Knowledge Base entry will not be applied. As such, please ensure that the datakey provided in your "Field" is an exact match with something in your Policy configuration when utilising Knowledge Base entries for Entity Data Extraction.
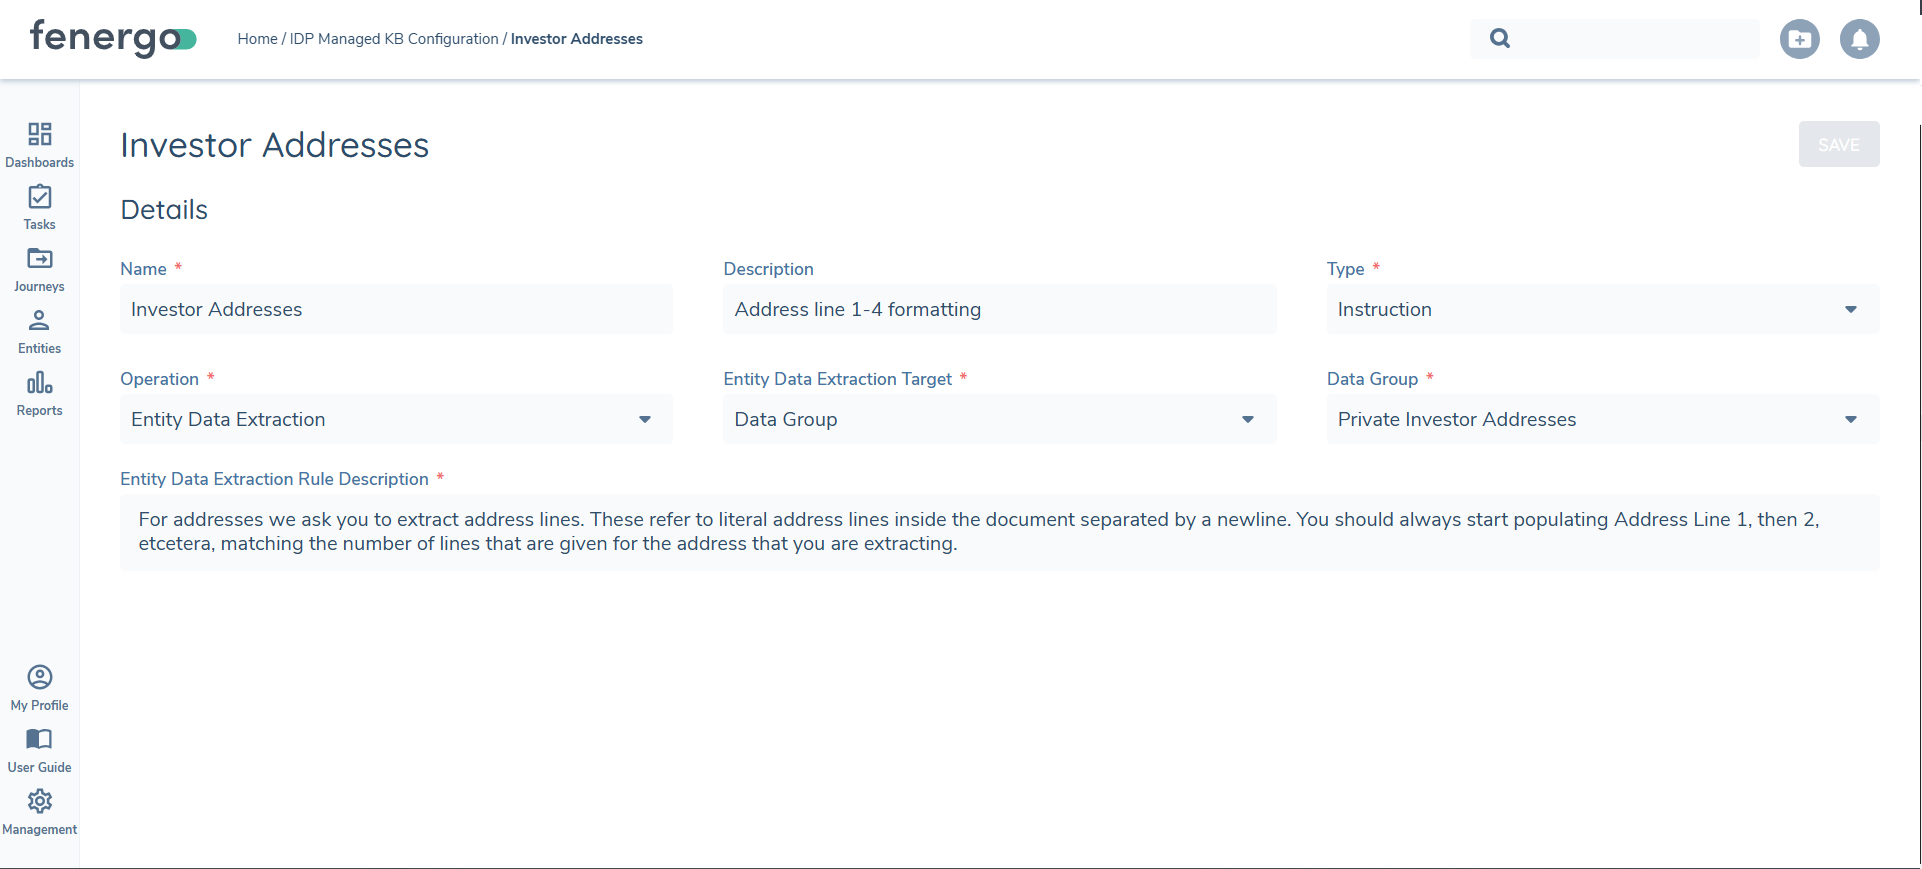
Dependent on the combination of "Type" and Operation" selected, users will be presented a "Description" field at the bottom of the page, where the label will be amended based on the combination (example: "Entity Data Extraction Field Description") This "Description" field is where the user provides the Natural Language Prompt that the LLM will use to achieve the desired results from IDP. Please see the "Example Knowledge Base Entries" section below for some guidance on writing these NLPs.
Managed Knowledge Base entries can be imported into different tenants via Configuration Exchange. Please ensure that you have the correct permissions in your source and target tenant when looking to import this configuration.
Example Knowledge Base Entries
The below are example Knowledge Base entries that can be amended slightly, dependent on your tenant's configuration, and then utilised. They are provided to act as a reference point for the configuration of your Knowledge Base.
As a general rule when writing descriptions (i.e. the natural language prompt at the end of your entry), ensure that:
- Descriptions are clearly written, and to be specific to avoid misinterpretation of the business ask in your description.
- Ensure that descriptions are not contradictory with other Knowledge Base entries.
- Utilise multi-line descriptions, where necessary, if configuring against the same object. Feel free to create multiple entries against the same object if this is preferred.
- Understand that the IDP Knowledge Base Configuration is liable to "trial and error" style testing. Reword and update your entries during your testing to achieve the desired outcomes you are looking for.
National ID Number
- Type = Instruction
- Operation = Entity Data Extraction
- Entity Data Extraction Target = Field
- Field Name = nationalIdNumber
Be very strict on sourcing the information for national ID numbers (e.g. don't pick this number from tax number or any other number that might be similar in a broad context).
Guidance: replace the nationalIdNumber input above with the desired extracted field's datakey. This description details that the LLM should be highly confident that the extracted value directly relates to "nationalIdNumber". If there is uncertainty, the extracted value should not be shown to the user.
Tax Identification
- Type = Validation
- Operation = Entity Data Extraction
- Entity Data Extraction Target = Data Group
- Field Name = Tax Identifier
Inspect each extracted instance as a whole: If the instance only contains information on taxResident and taxIdentifierProvided, but the other fields are empty, these two fields should also be removed.
Guidance: replace the Tax Identifer input above with the Data Group you wish to extract. This description details that the LLM only show the end-user an extracted Tax Identifier Data Group, if there is enough information referenced about the particular Data Group Record (instance) detailed. In this case, if only "taxResident" and "taxIdentifierProvided" are extracted, the Data Group Record should not be displayed to an end-user. Here, the "taxResident" and "taxIdentifierProvided" are Data Group Fields. Substitute these values with your Data Group's Fields as required.
Expected Level of Activity
- Type = Instruction
- Operation = Entity Data Extraction
- Entity Data Extraction Target = Field
- Field Name = expectedLevelOfAccountActivity
If the relevant section in the document instructs the user to tick or circle a possible option, and none of the options are ticked or circled, do not infer any value for this field and instead ignore it. Only pick a value that is ticked or circled.
Guidance: replace the expectedLevelOfAccountActivity input above with the desired extracted field's datakey. This description details that the LLM should ensure that the user who interacted with a Document adhered to the format in which that Document should have been filled out. In this case, specifying that a user must have circled or ticked the correct option when it comes to "expectedLevelOfAccountActivity". The LLM is notified to not infer this particular value in this case.
Classification via an Official Logo
- Type = Instruction
- Operation = Classification
In the top left-hand of the first page, if you see a white text mentioning 'Fenergo', and/or a logo with a toggle depicted, this is likely a Document Type of "Fenergo Official Document"
Guidance: this prompt informs the LLM that Documents of the Document Type "Fenergo Official Document" always have a certain image and text combination in their format. This can be used the LLM to ensure that when this is detected, to infer that it is a Document Type of "Fenergo Official Document".
Type of Account - Strict Sourcing Logic without Inference
- Type = Validation
- Operation = Entity Data Extraction
- Entity Data Extraction Target = Field
- Field Name = typeOfAccount
If the explanation for this extracted value references that it has been inferred rather than explicitly having been stated in the document, or that it references that no option is ticked, then the value should be removed.
Guidance: replace the typeOfAccount input above with the desired extracted field's datakey. This description details that the LLM should be strict when extracting a data point ("typeOfAccount"). There should be zero inferring of this field's value, but instead ensuring that the value for "typeOfAccount" is clearly stated. If the value for this field has been implied rather than directly stated, no value should be extracted.
Bank Details
- Type = Validation
- Operation = Entity Data Extraction
- Entity Data Extraction Target = Data Group
- Field Name = Bank Details
If the field "accountNumber" contains what looks to be an IBAN number, remove the "accountNumber" field
If the field "iban" contains a reference to something else than what looks to be an IBAN number, remove the "iban" field
Guidance: replace the Bank Details input above with the Data Group you wish to extract. This description details that the LLM only should be strict on when the "iban" and "accountNumber" Data Group Fields are extracted. Here, the "taxResident" and "taxIdentifierProvided" are Data Group Fields. Substitute these values with your Data Group's Fields as required.
Appendix
Supported Document Types
Currently the following file formats are supported for IDP:
- JPG
- PNG
Any files uploaded with other generally supported formats as per the Document Management v2 User Guide can still be uploaded, however the system will not classify these or extract the metadata.
Please note Document Splitting is only possible for PDF files.
Language Support
Regarding LLM capabilities, while the system is primarily optimized for English, it has some level of understanding in roughly 14 languages. For typed, printed or hand-written text, the best results will be found against English, but the system supports a high quality end-result against French, Spanish, Portugese, Italian, German, Chinese, Indonesian, Japanese, Korean and Arabic documents. Hindi, Bengali and Swahili are also supported, but the results may be not as strongly performing as the previously listed languages.
Note that the LLM being utilised is capable in many languages beyond those mentioned above. We encourage testing with any languages relevant to your specific use cases.
Additional Considerations
To safeguard performance and prevent external rate limits being hit, currently the following guardrails are in place. However these are constantly in the process of being tested and subject to being either loosened or reduced as and when we are able to safely do so.
Any documents exceeding 150 pages will not processed by IDP, meaning they will not be auto-classified, be automatically split or have document metadata or entity data extracted.
Any documents 150 pages or fewer will be processed by IDP. Document classification and document metadata extraction are performed independently and use separate page limits. Document classification is performed using the first 5 pages of the document. Document metadata extraction is performed using the first 10 pages of the document, allowing metadata values such as signatures, certification dates, and expiry dates that appear beyond page 5 to be correctly extracted. Document splitting and Entity Data extraction applies up to 150 pages.