Document Generation
The Document Generation feature allows documents to be natively generated within FenX and compliments our current document management capabilities. Data that is captured and stored within the application can be structured and stylised onto a document.
Document Generation Data Sources
The Document Generation feature can generate documents with data from:
- Entity Data
- Related Parties
- Associations
- Products
- Product Related Parties
- Deals
- Collateral
The following sources are available to tenants with Accounts enabled:
- Related Bank Accounts
- Related Investment Accounts
- Investment Account Related Parties
- Bank Accounts linked to Investment Accounts
- Funds
- Share Class
Document Generation Configuration
Ensure you have the required Document Generation permissions assigned to your profile before configuring. To configure the Document Generation feature the following process is recommended:
Reference Editor:
Create a Reference Data List with the name "Document Generation Template Category" and add in your chosen categories. This will become the list of categories that can be selected from the category dropdown in Template Configuration.

Naming Convention:
NOTE: The Naming Convention is now only applicable to historical templates prior to Document Generation Enhancements. The Component Library is the primary configuration space for datakey mappings for document generation now.
The naming convention is a global naming convention set that controls how datakeys appear as the display label seen on all generated documents. An example of this can be seen below. On the left the "firstName" datakey does not have a naming convention applied to it, whereas on the right it does, with the chosen label being "Given Name".

To begin configuring naming conventions, click on the Naming Convention link under Document Generation, which will direct you to the below page which will allow you to setup an initial draft of naming conventions.

Click on the "Create Naming Convention" button to create the initial version 1 Naming Convention Set and begin adding naming conventions. Click on the "Add" button to add your first naming convention.
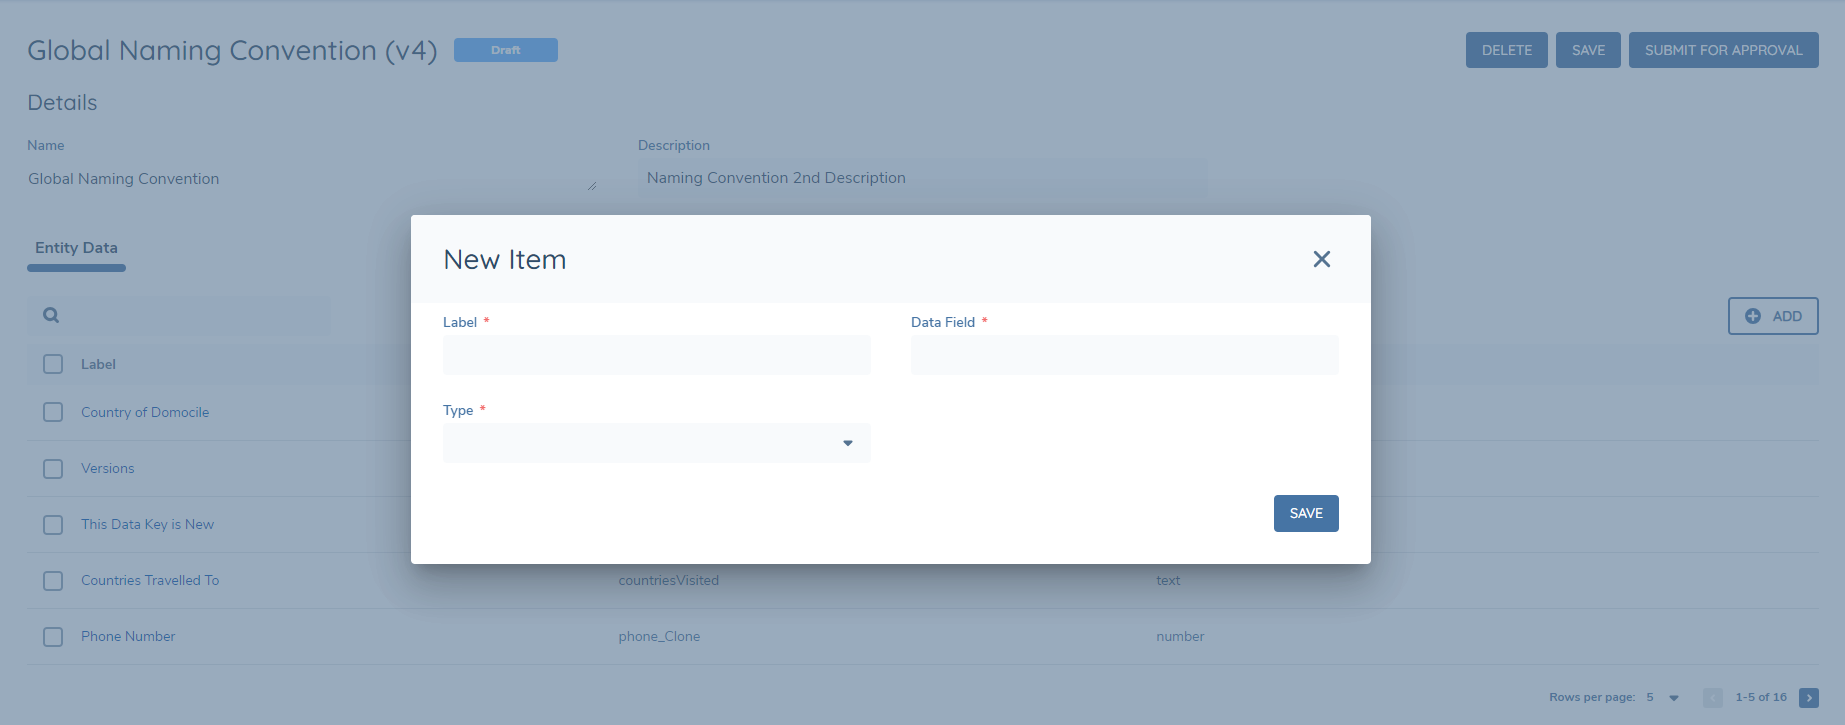
Choose the Label Name you would like to appear on a generated document, and then select the datakey for the label. Additionally, select the Type of field for the naming convention. If the type is Date or Number, then localisation formatting will be applicable on the field. For number fields this is the number separator and for date fields this is the date format.
The grid should now be updated to reflect the added naming convention. Click the Add button to add additional naming conventions and continue this process until the Set of naming conventions is completed.

Component Library:
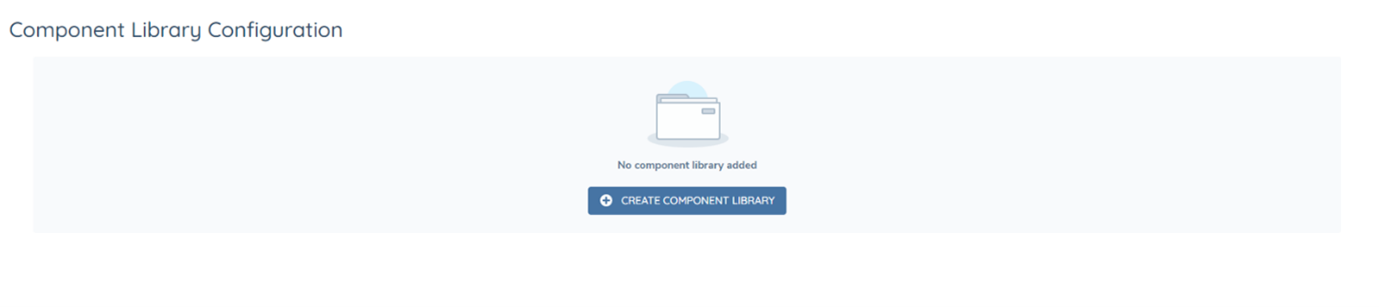
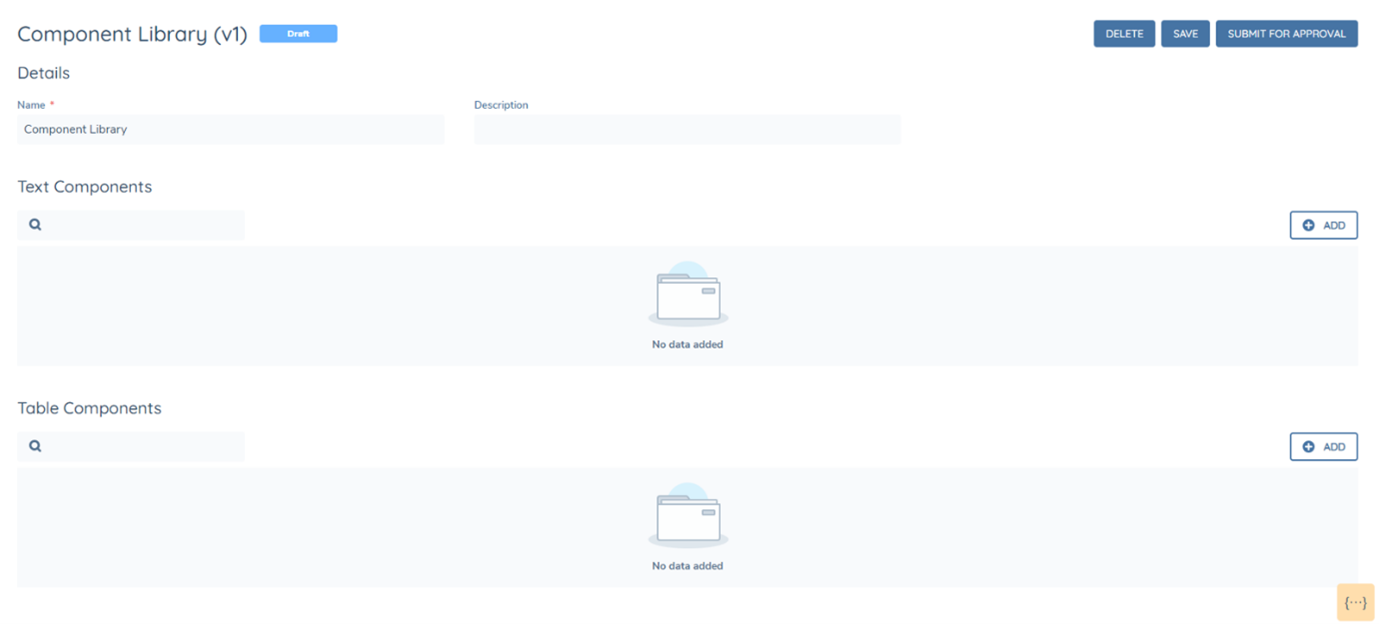
The component library is a collection of all the configured text and table components that can then be used as mappings within templates. To begin configuring components, click on the Component Library link under Document Generation, which will direct you to the below page which will allow you to setup an initial draft Component Library.
Once setup, it will be possible to add either text or table components. A text component should be used for mapping a single field, for example mapping "firstName". Whereas a table component should be used for repeating instances of data. For example, an "address" data group or to see all products related to the main entity.
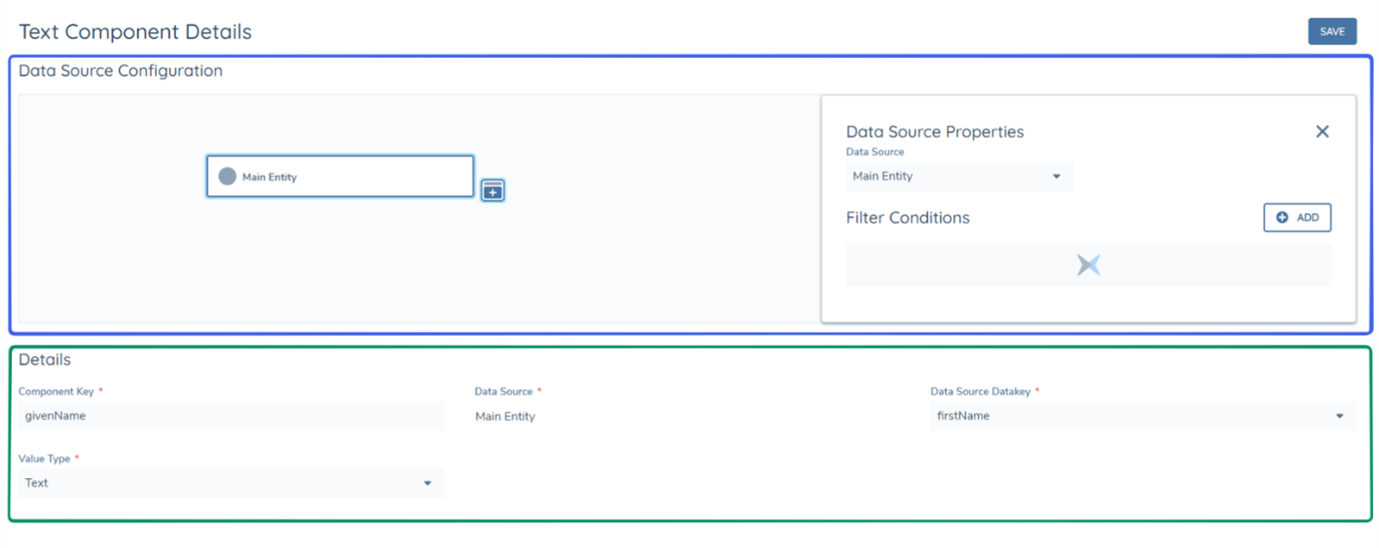
When creating a component, the first required step is selecting the data source that the component comes from. This is configured under the data source configuration section of the component (as seen below in Blue). After this, the datakey can be selected from the "Data Source Datakey" dropdown, the Component Key can be written and the Value Type can be selected (as seen in Green). The component key is the final mapping that needs to be inserted into the HTML Override file or into the Template Designer, for the mapping to be successful. The component key can be different to the datakey and does not have to be the same, as exampled below (givenName and firstName).
Text Components:
Text components are recommended to be configured primarily with the "Main Entity" data source, as only one value can be retrieved. To explain further, if a text component is configured with the data source "Related Products" using the data key "productType" but there are two related products of the main entity, the two values for "productType" cannot be retrieved in a single text component, due to this, it is recommended that in most circumstances, "Related" data sources are configured as Table components.
Text components can also have filter conditions applied to them IN the instance the datakey selected is from within a datagroup. For example, if there are multiple addresses in a datagroup, but only the postcode of a single address was desired to be mapped from the text component, it could be configured as shown below.
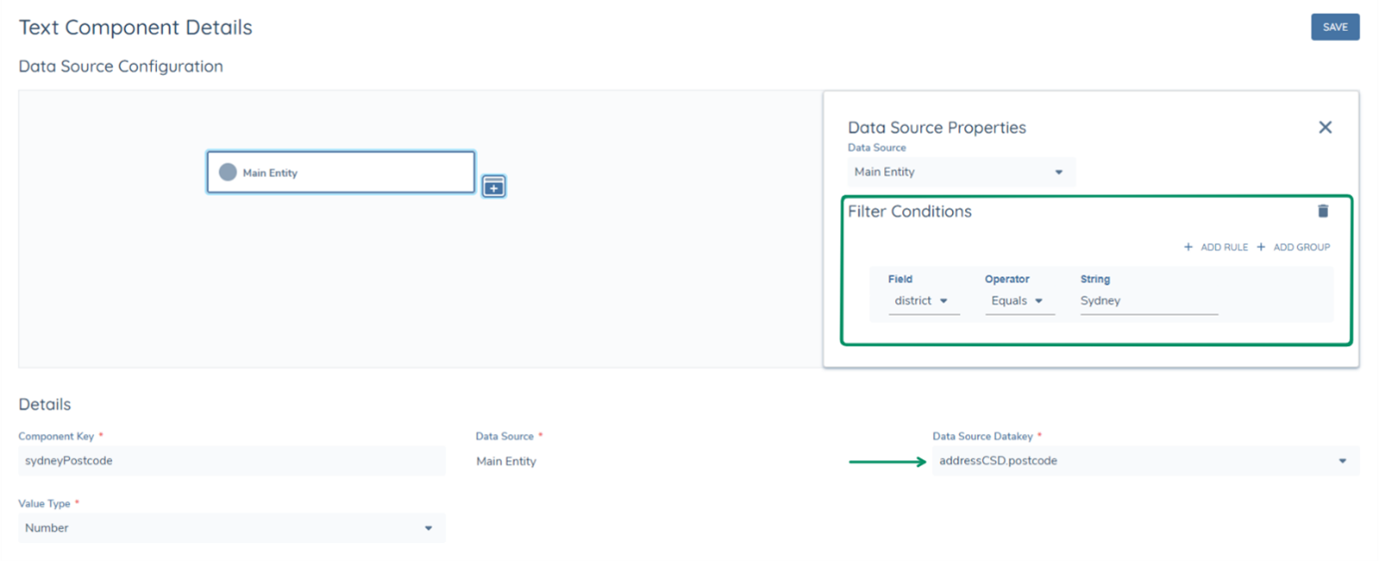
Datakeys within datagroups are available in the dropdown in the following format "datagroupdatakey.datakey". The datakey "postcode" of the datagroup "addressCSD" is seen in the format "addressCSD.postcode". This datakey can then be filtered with the condition, only give me the "addressCSD.postcode" datakey, when the district (addressCSD.district) is "Sydney".
Thus the text component will be able to retrieve the specific field. It is important to note that if the filtering condition returns 0 or more than 1 value, the text component will fail. This is why text components are recommended to be used when it can be guaranteed that only 1 instance of the datakey will be retrieved from the data source.
Text Components can also have the value type "Rich Text Editor" this is an enhancement to the Document Generation Feature which allows RTE field types in policy to be generated onto a PDF.
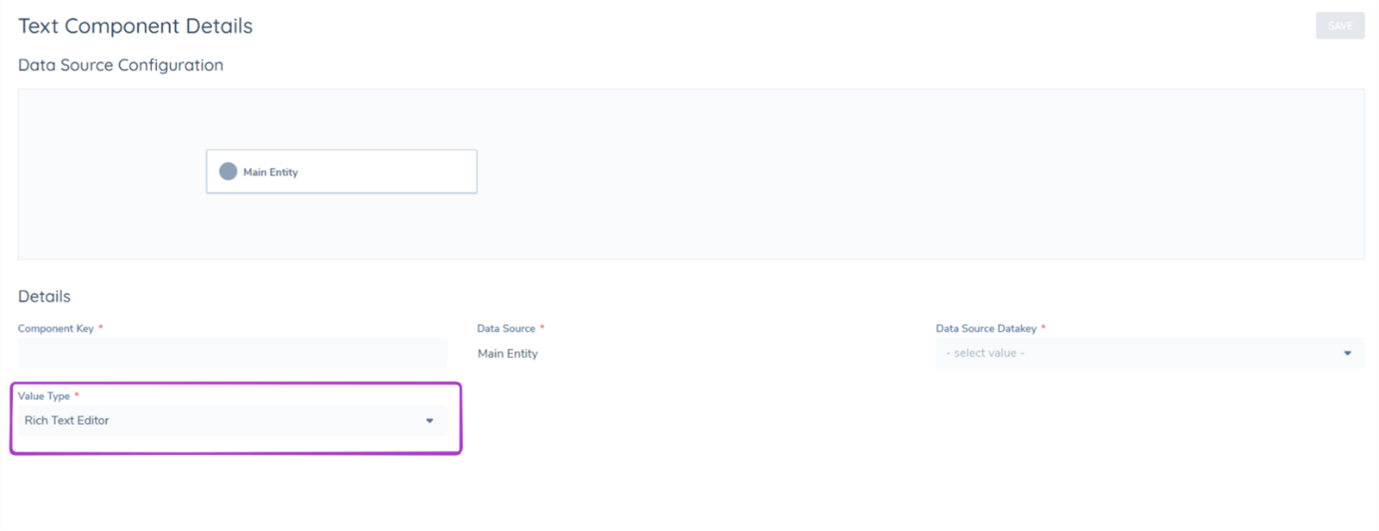
Table Components:
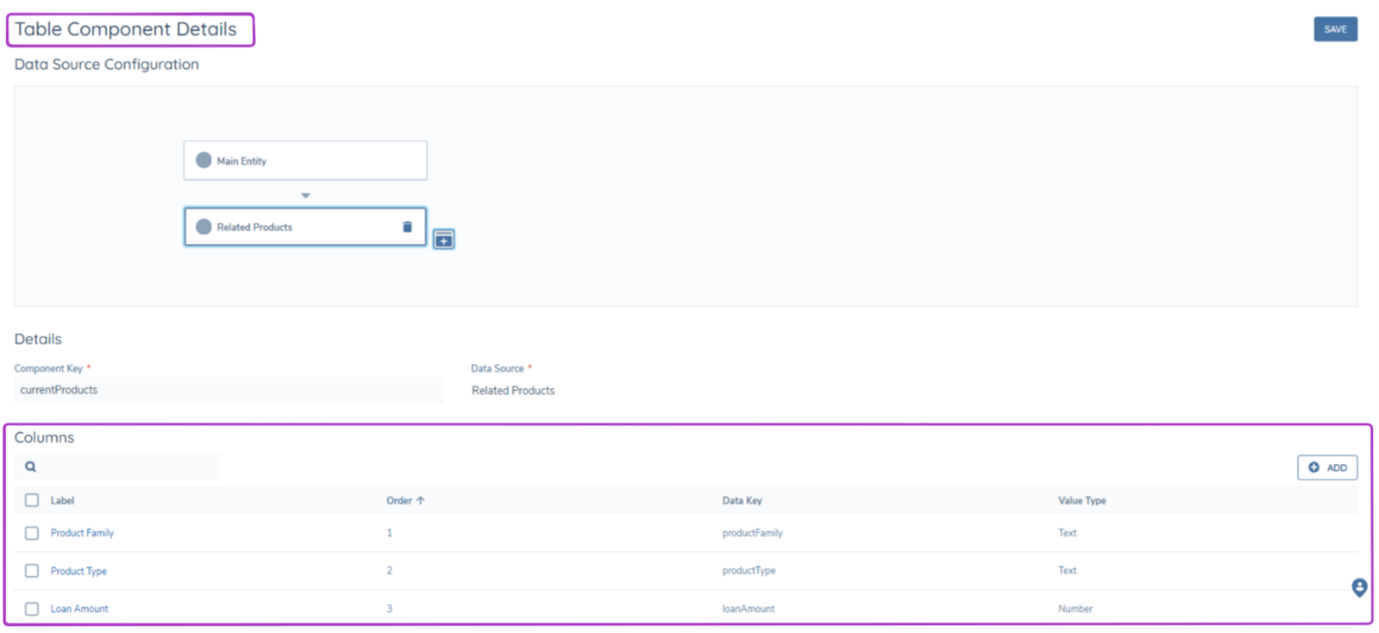
As mentioned above, table components are recommended to be used to display multiple datakeys in a table view. When creating a Table Component, Data Source configuration should be completed before adding the intended columns.
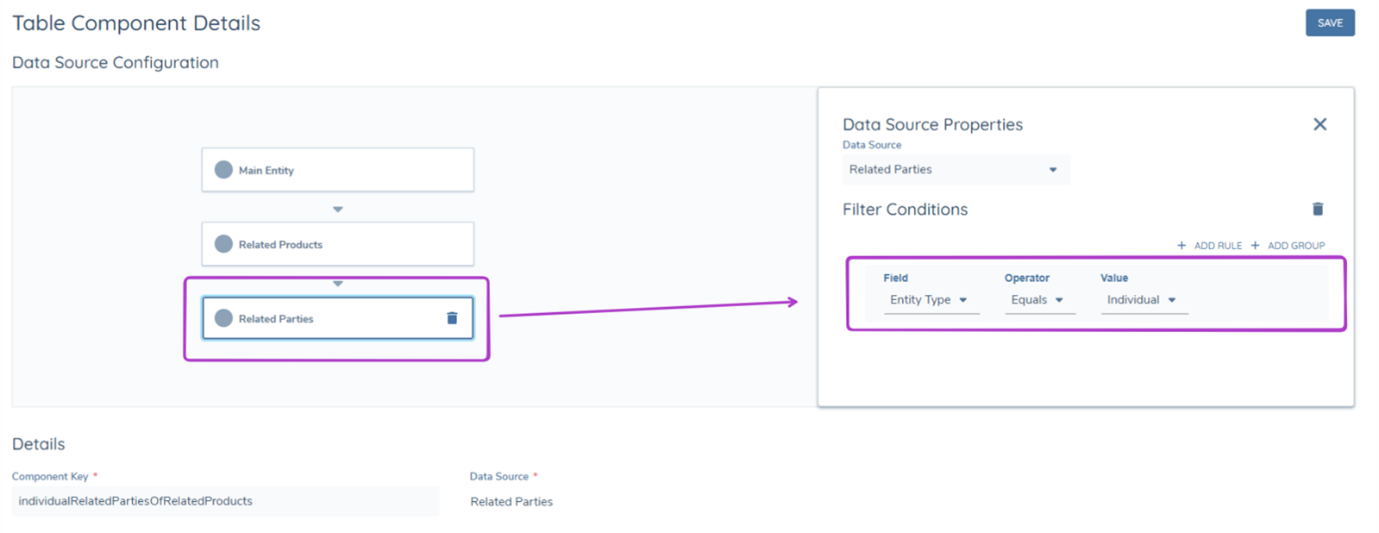
It is important to note that nested data sources are available for both component types. For example, a table can be made to display the Related Parties of Related Products, which would be configured as shown below. Additionally, filtering logic can be applied at different levels of a nested data source.
Filter on the 1st Nested Data Source Layer
This will make sure that only Products with the productType "Home Loan" are in scope for this table.
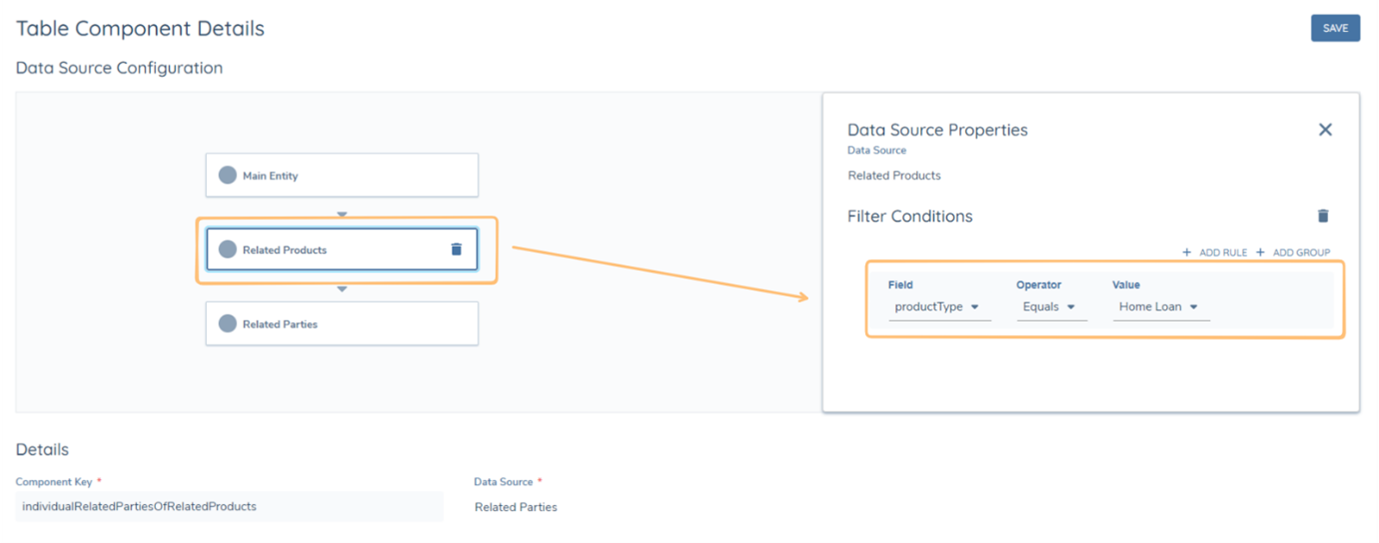
Filter on the 2nd Nested Data Source Layer
This will make sure that only Related Parties with the Entity Type of "Individual" of Home Loans with the productType "Home Loan" will be filtered into this table.
Once a datasource has been selected, simply add the desired datakeys as columns, whilst also selecting their Label, Order and Value Type. Datakeys within datagroups are also available to be added as columns in table components, they follow the same format "datagroupdatakey.datakey" as seen in text components. A Component Key is also required for all table components.
Loop Components:
To display data fields from nested data sources in the same format as entity data data fields, the user can leverage a loop component. The loop component is a collation of text and/or table components from a specific nested data source.
To explain further, using the previous example, if the user places the "productType" data key, as a text component, inside a looped component which has the data source "Related Products" then the looped component will generate the "productType" data key for as many products as there are linked to the main entity. This allows for the final appearance of nested component data in the generated document to present the same as entity data, rather than in a table.
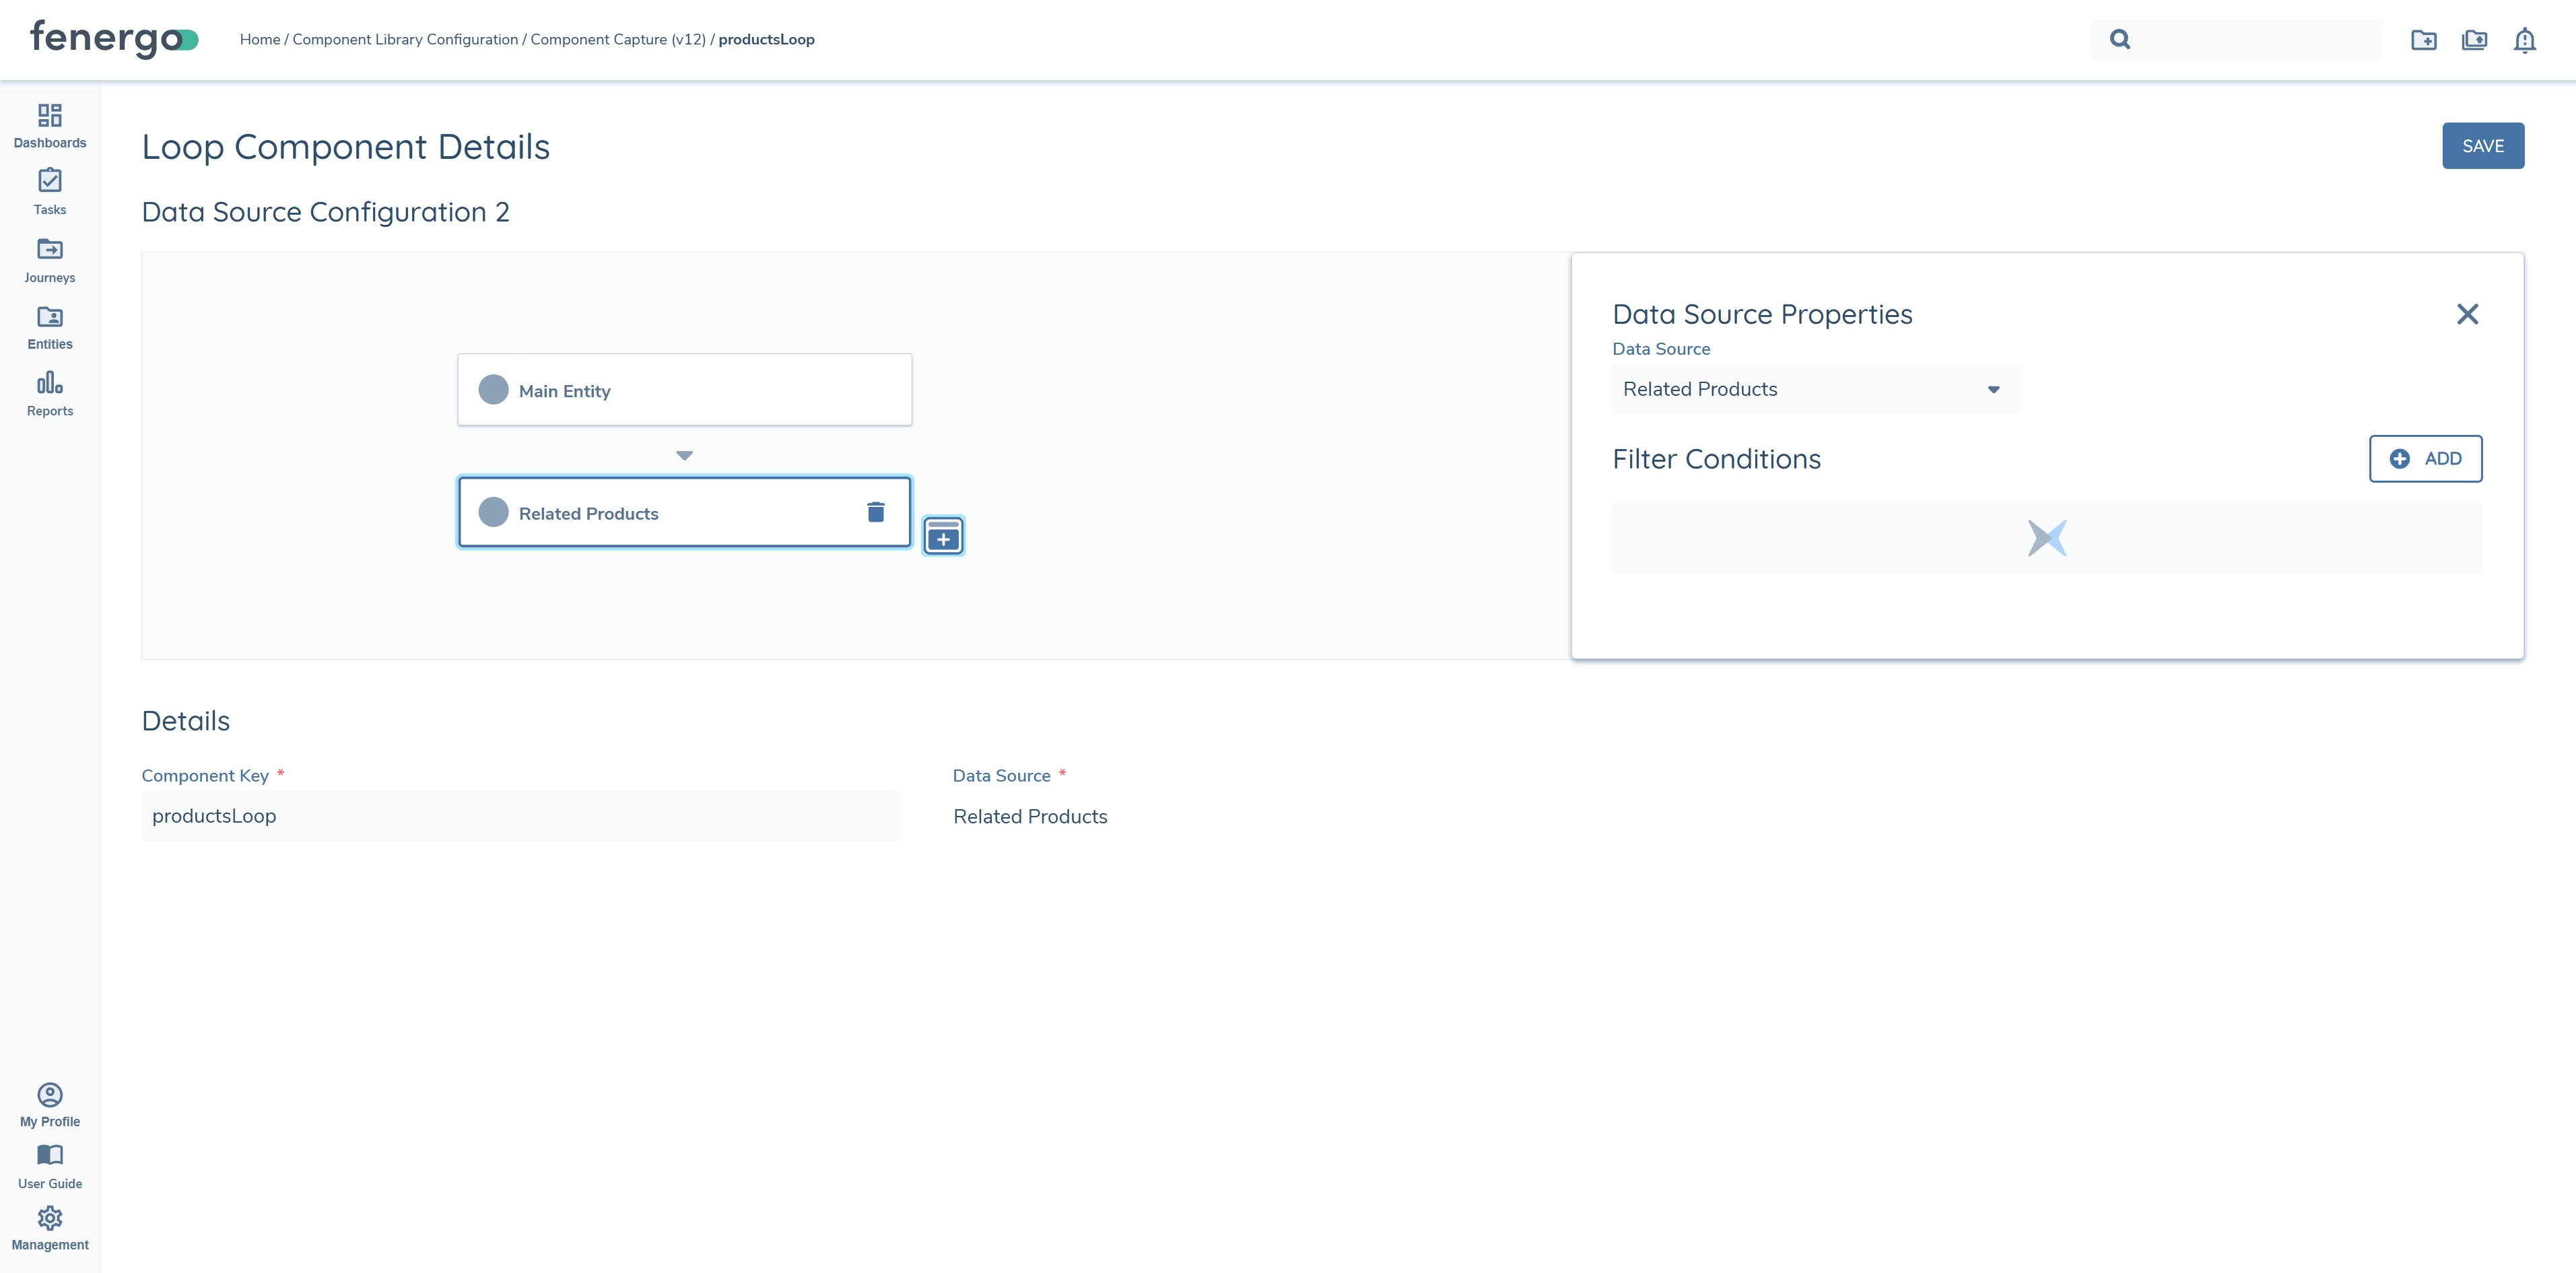
To configure a loop component, follow these steps:
- Create a draft in the component library, or create new if one does not already exist.
- Click the ADD button next to Loop Components.
- Choose the data source, in this example "Related Products" is the chosen data source.
- Name the component key, in this example the component is called "productsLoop".
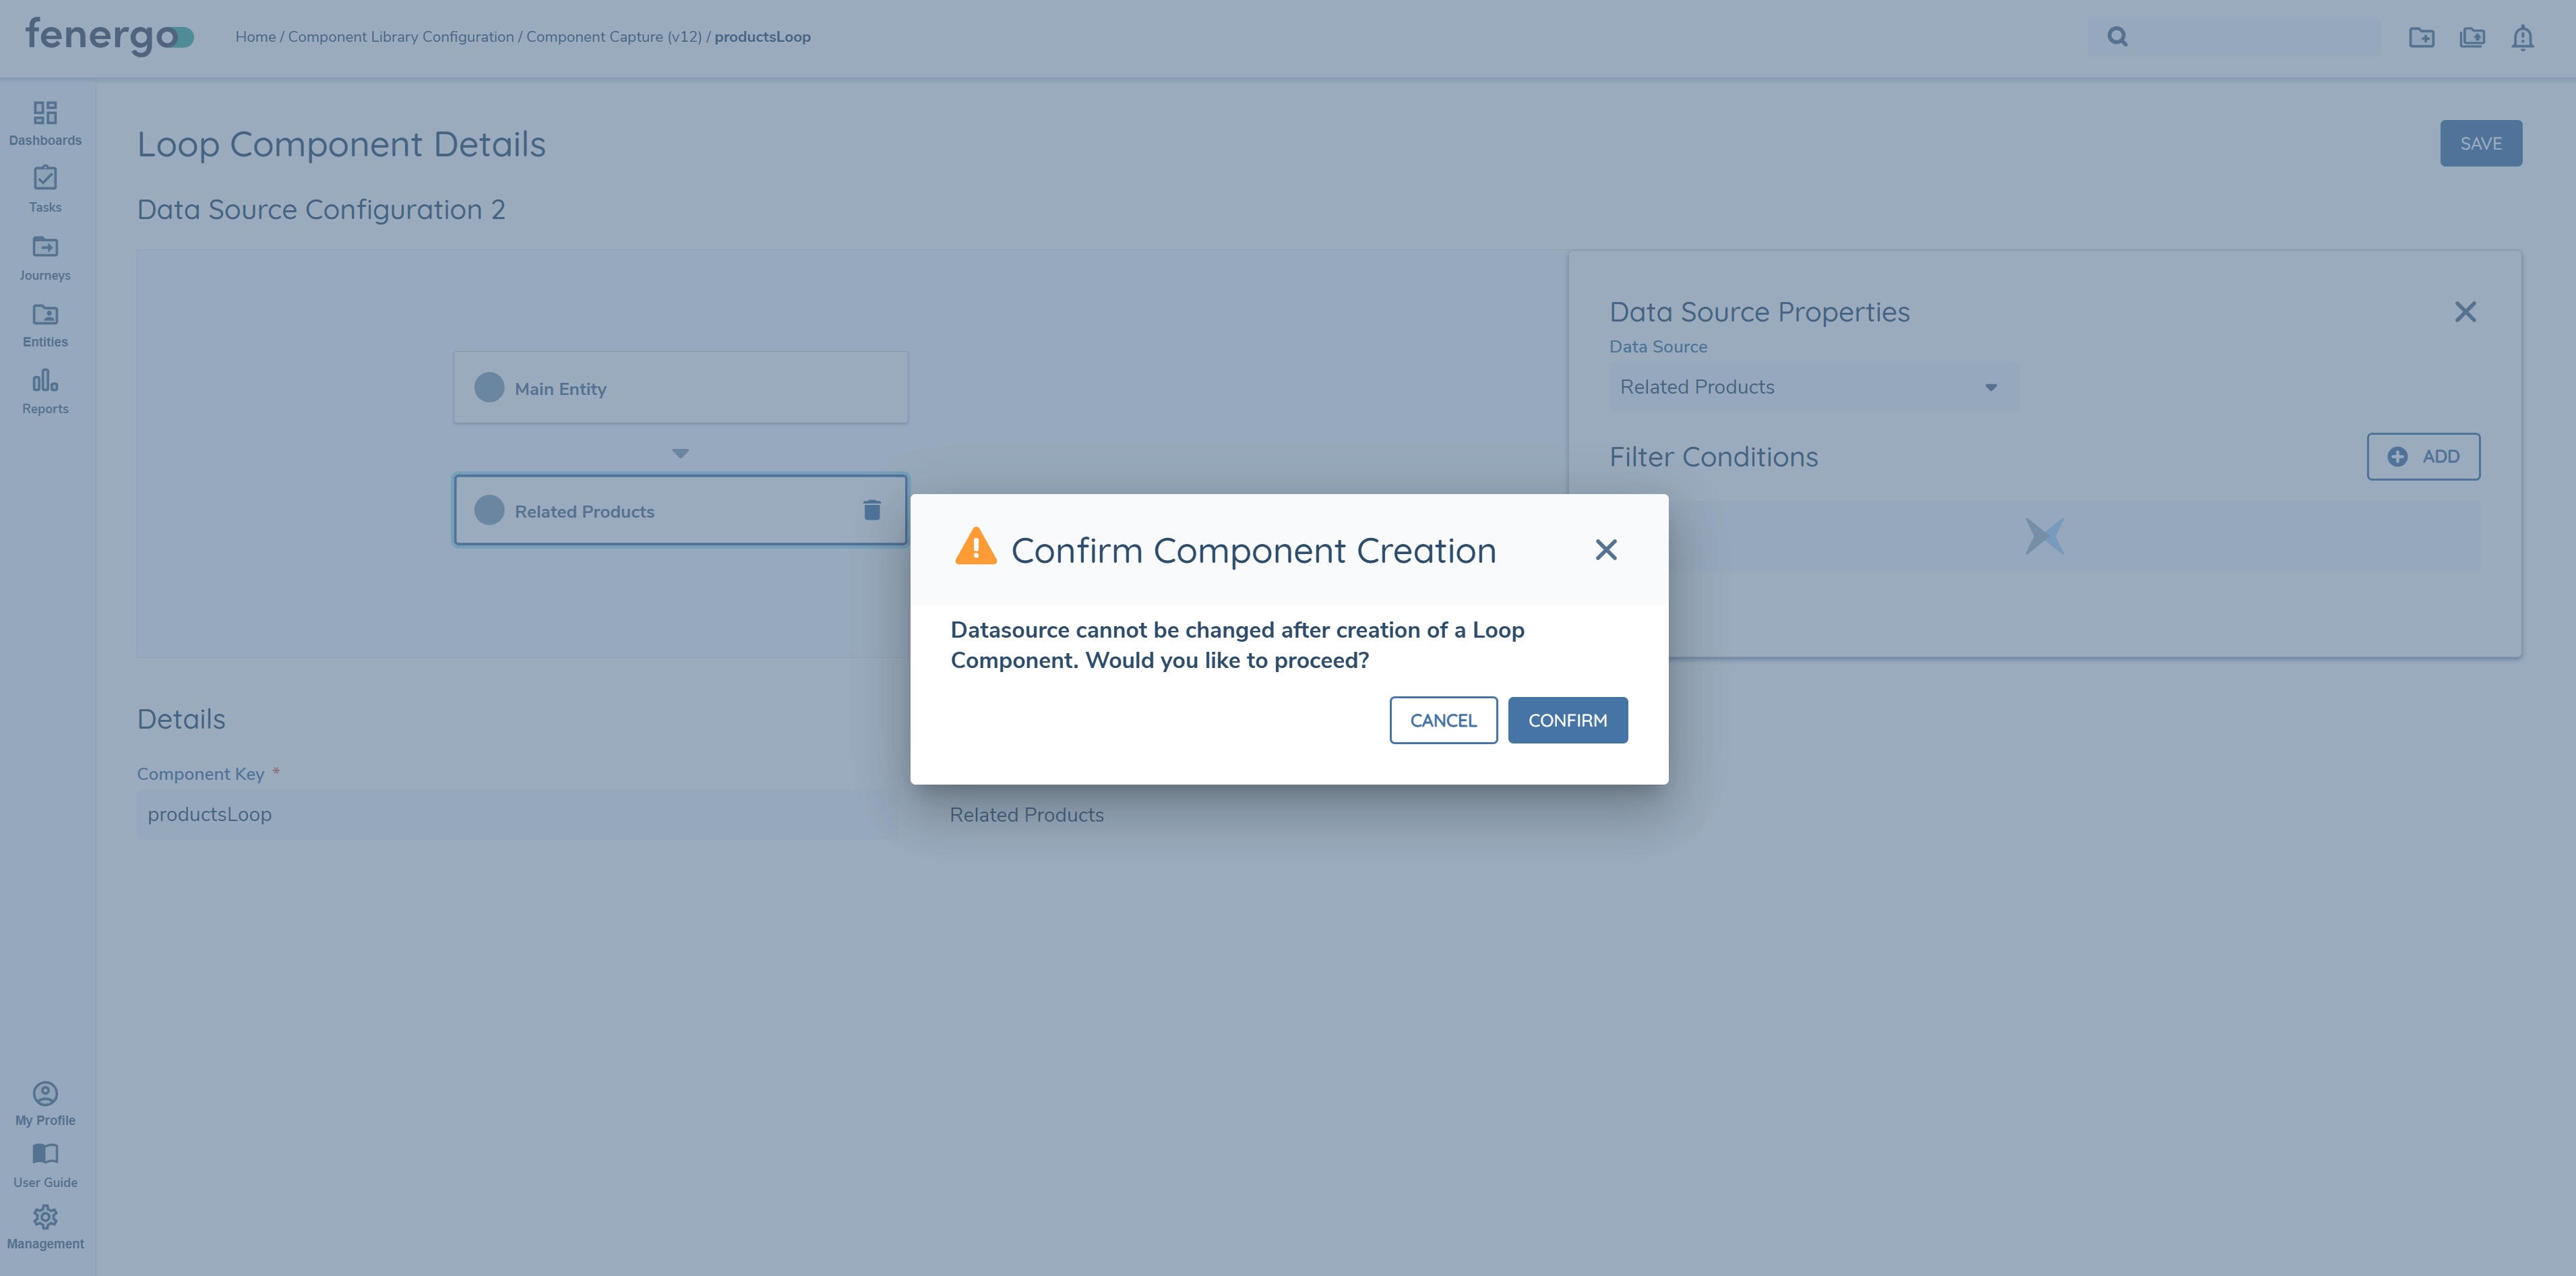
- Click save.
- When prompted, confirm component creation by clicking Confirm in the pop-up.
Once the steps above have been completed, the user can now configure both text and table components for the selected data source. If the data is required to be surfaced as text components only, configure each data key as a text component. In this example both text components and table components will be configured for demonstration purposes.
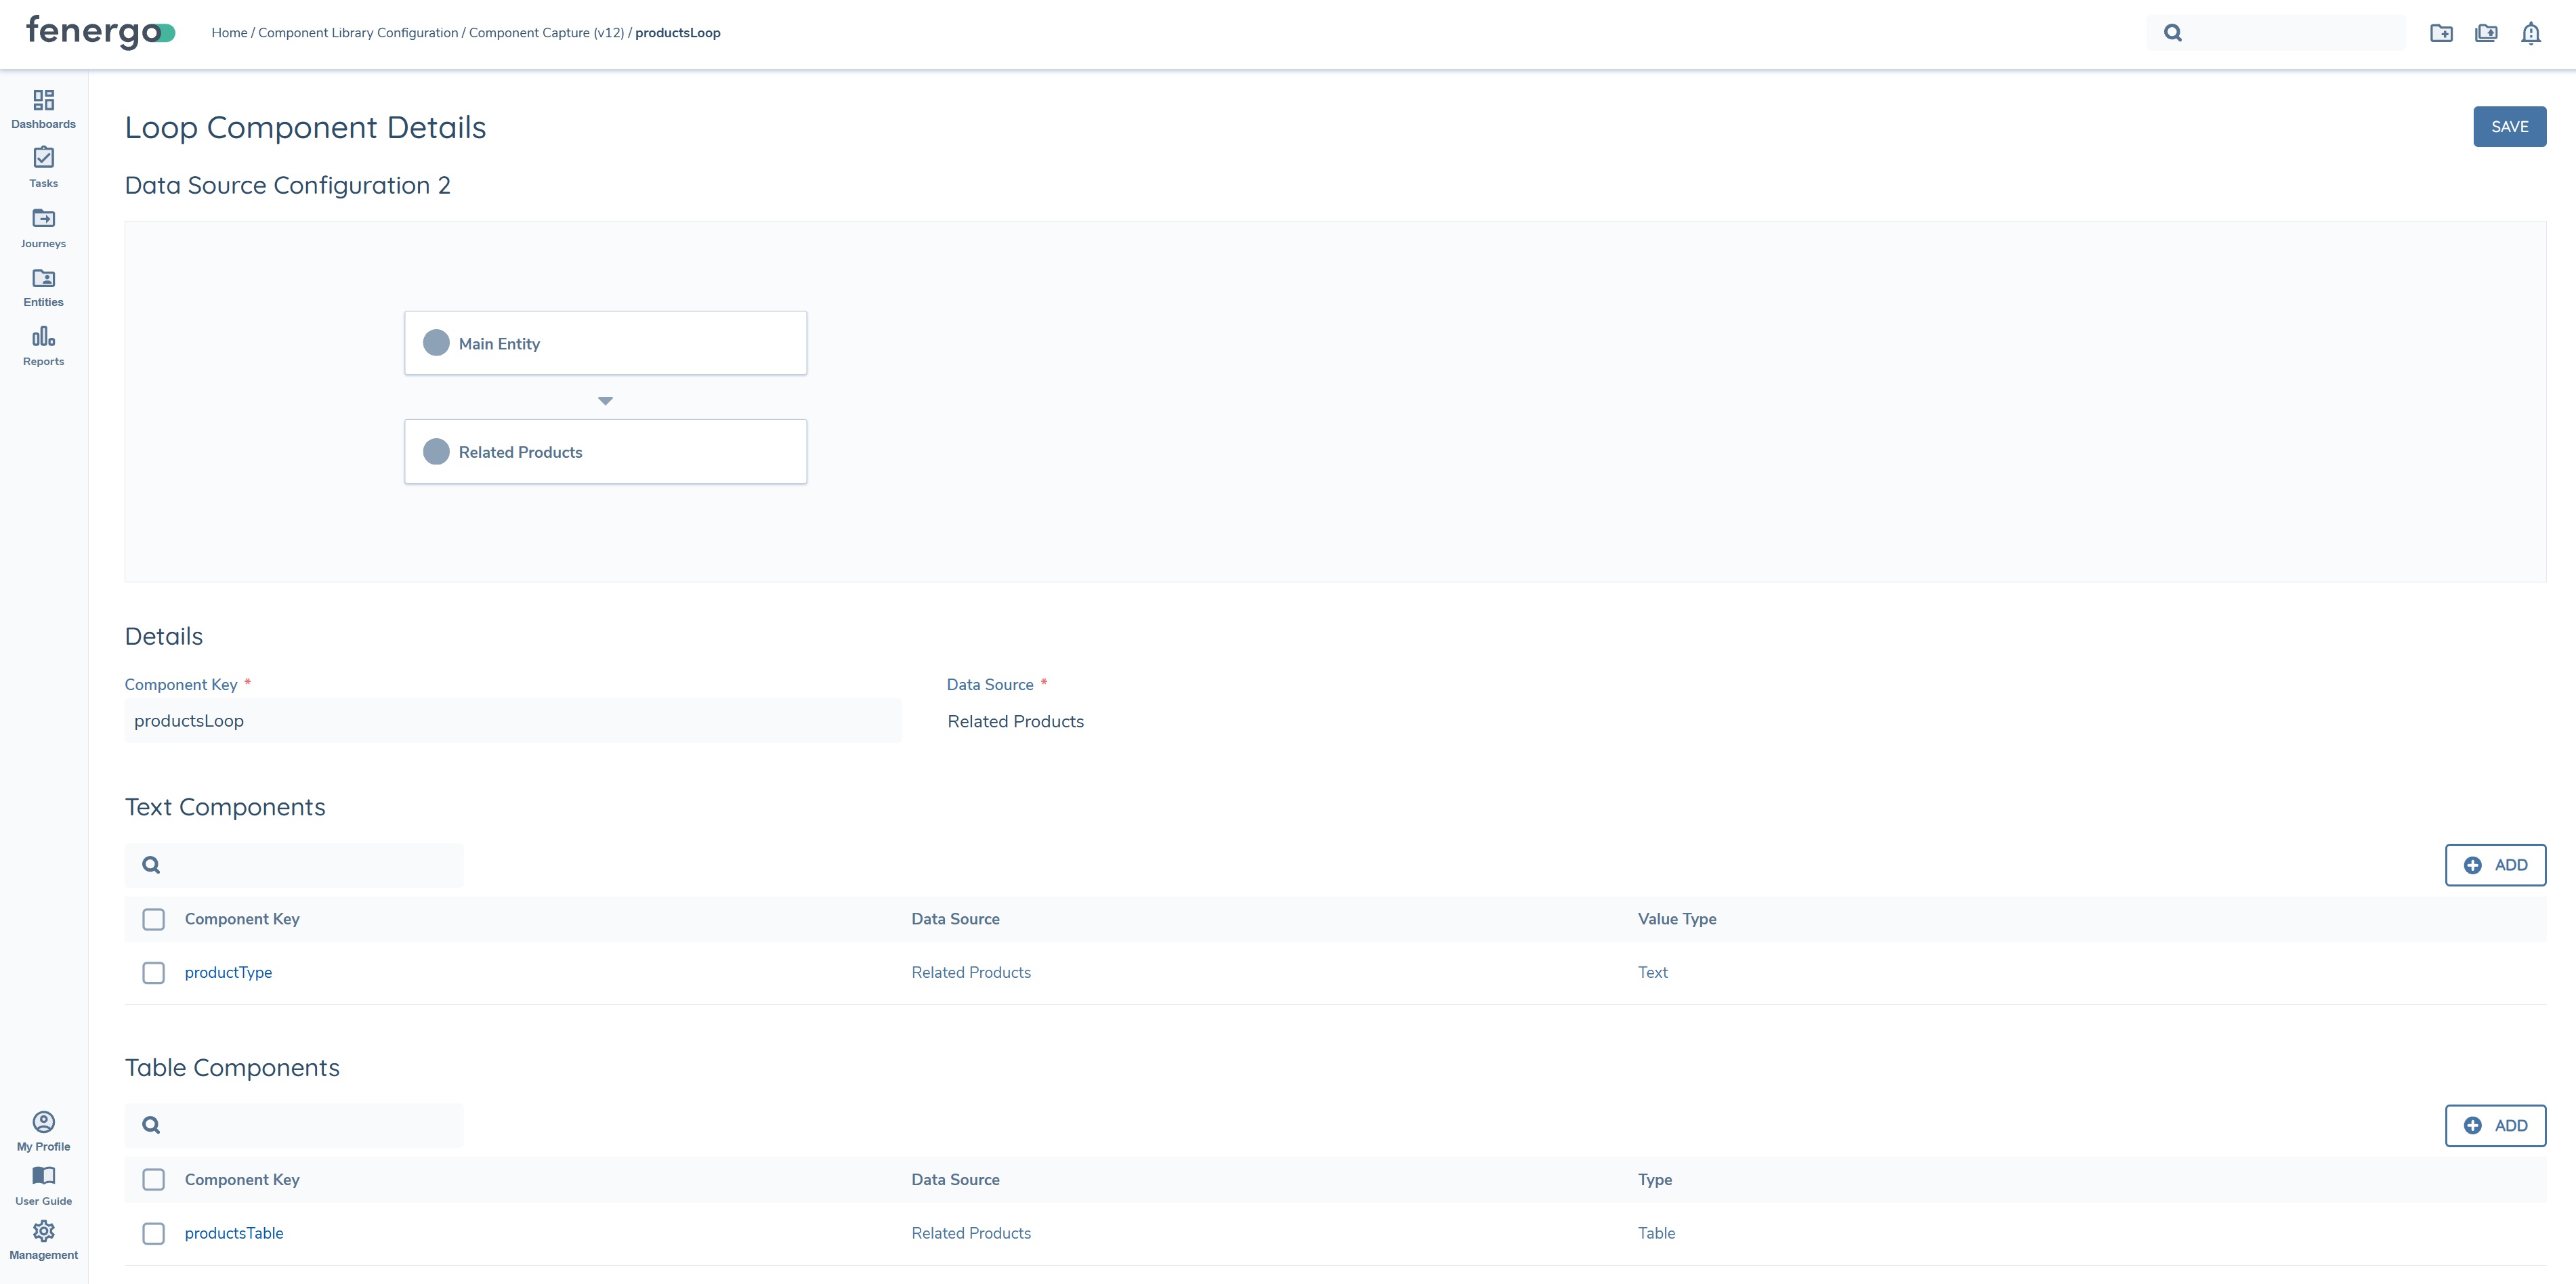
In the above example, one text component "productType" has been configured, along with one table component, "productsTable". Text and table components are configured within loop components as they are in standalone text/table components. To see the loop component in the generated document, add it to the document template.
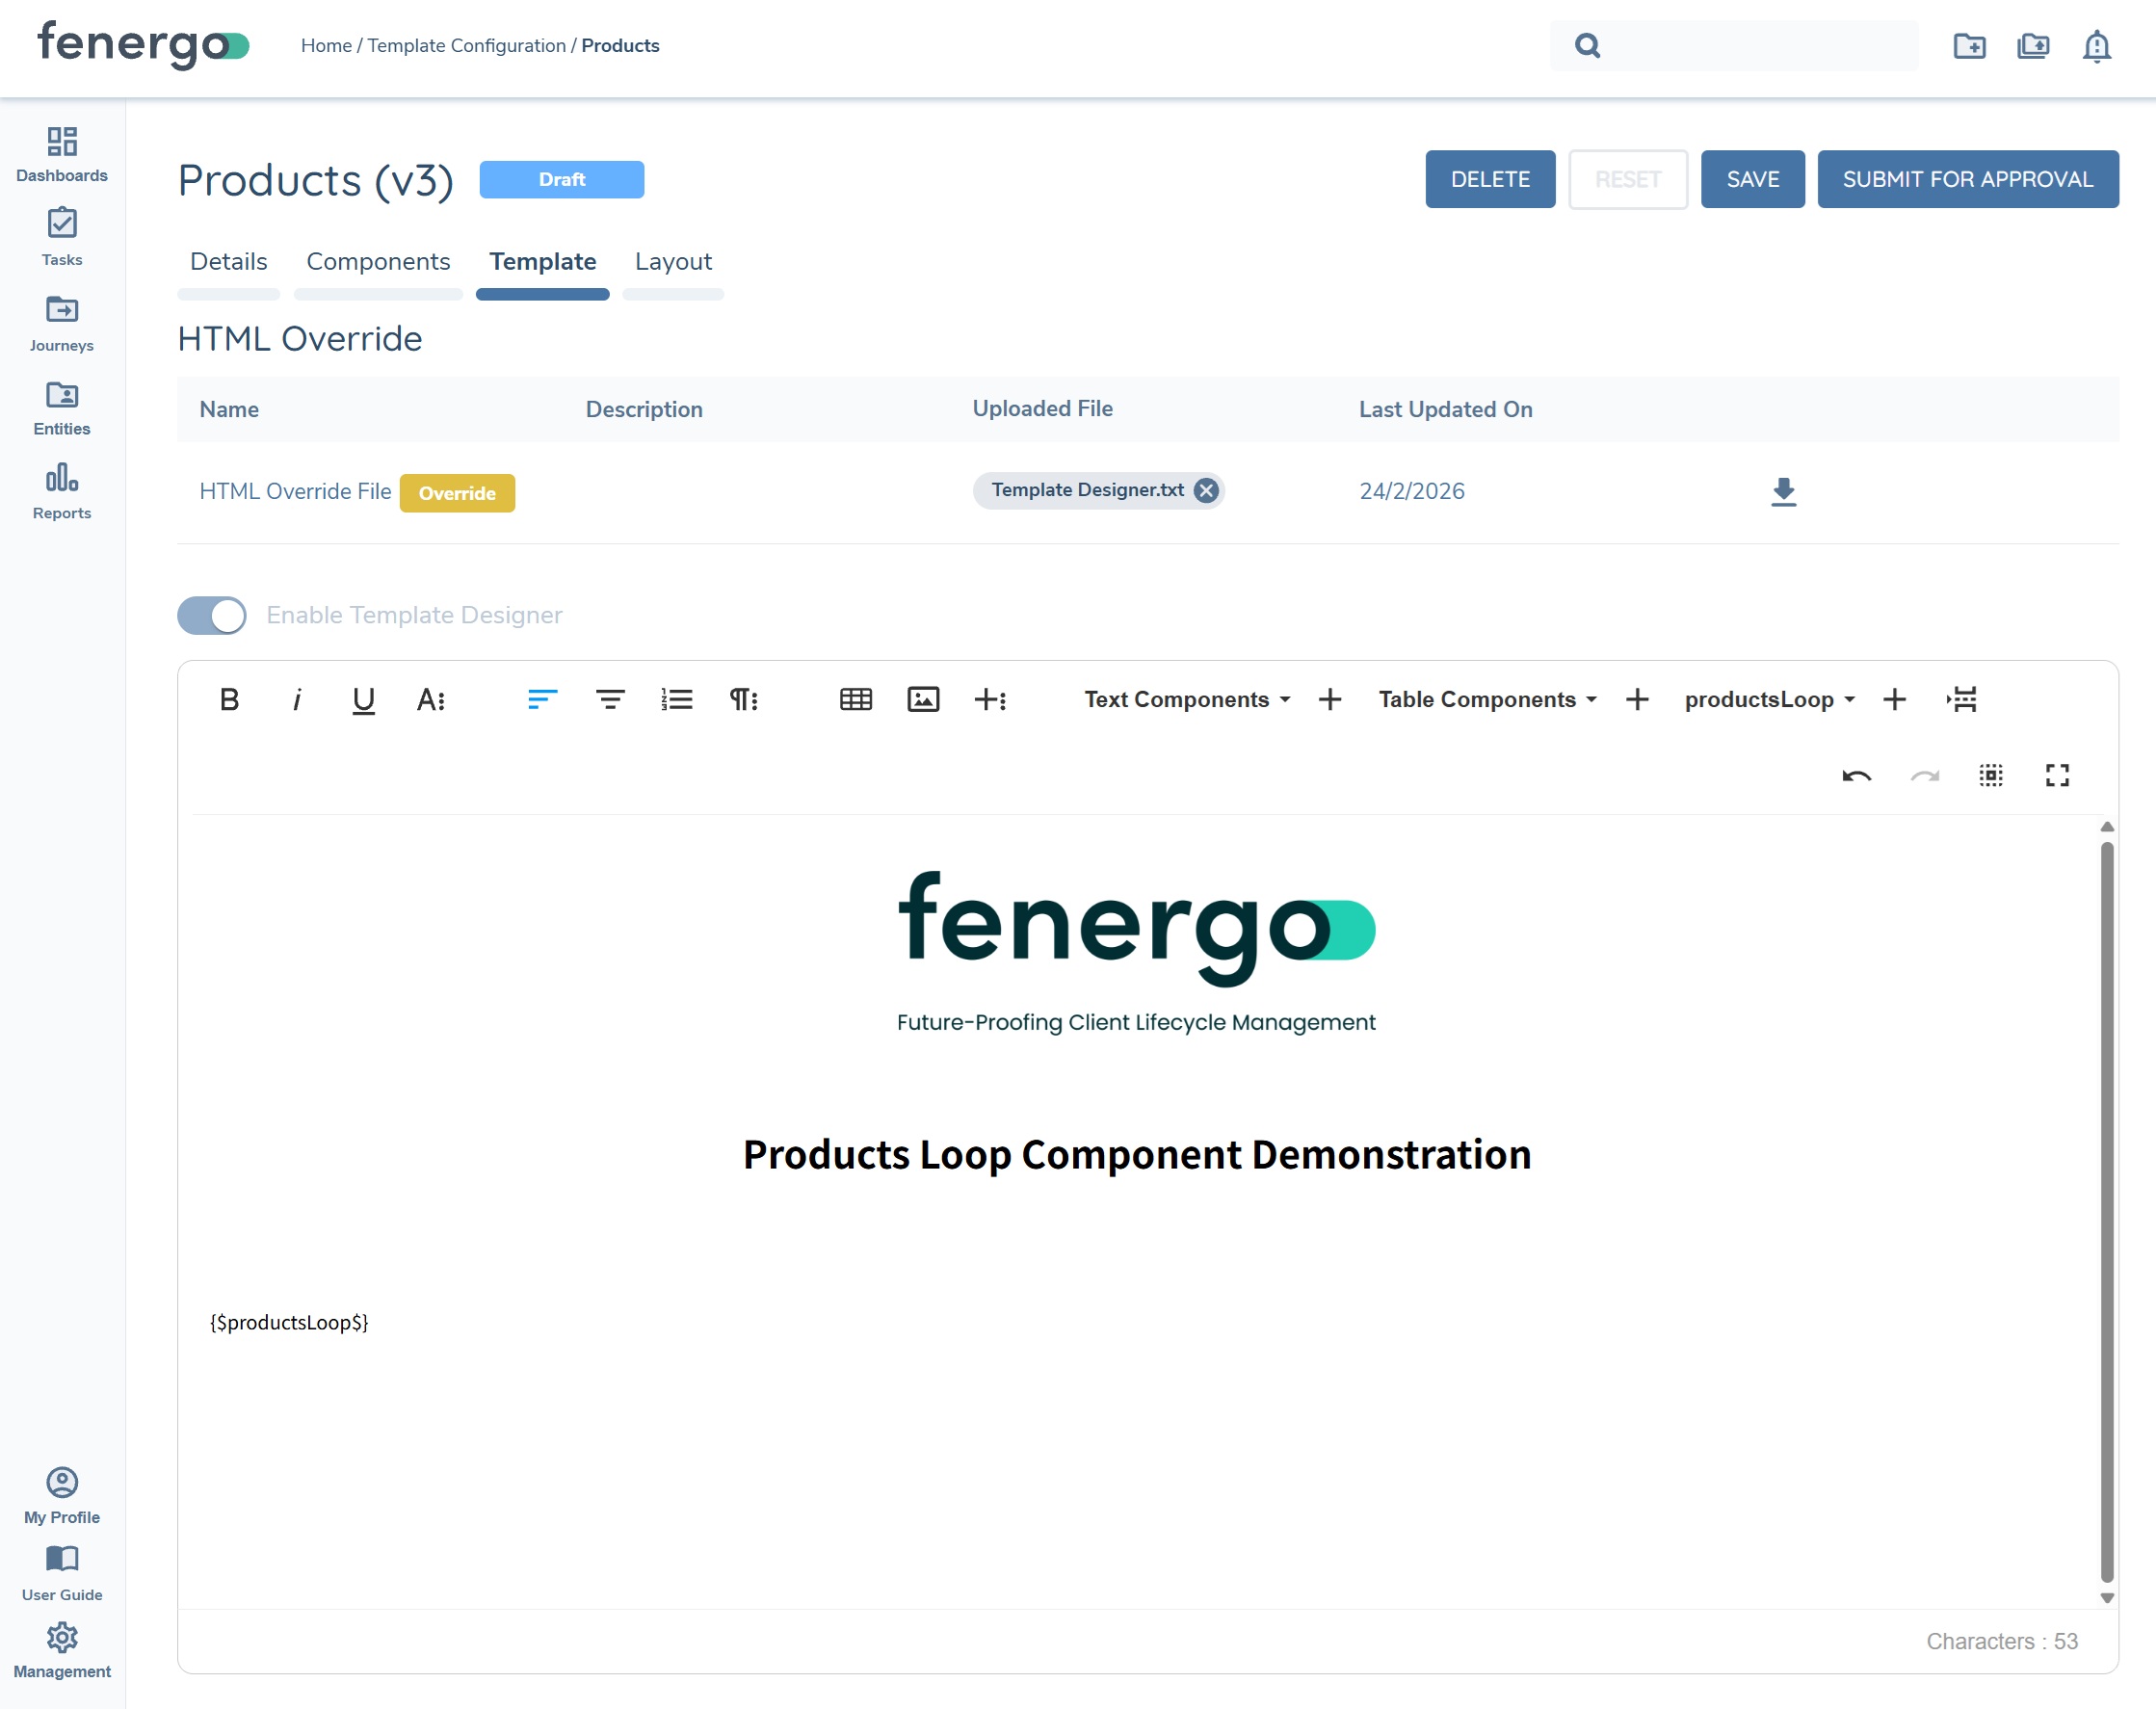
The resulting generated document surfaces "productType" as a text component along with the "productsTable" table component for each product captured against the entity, as you can see below.
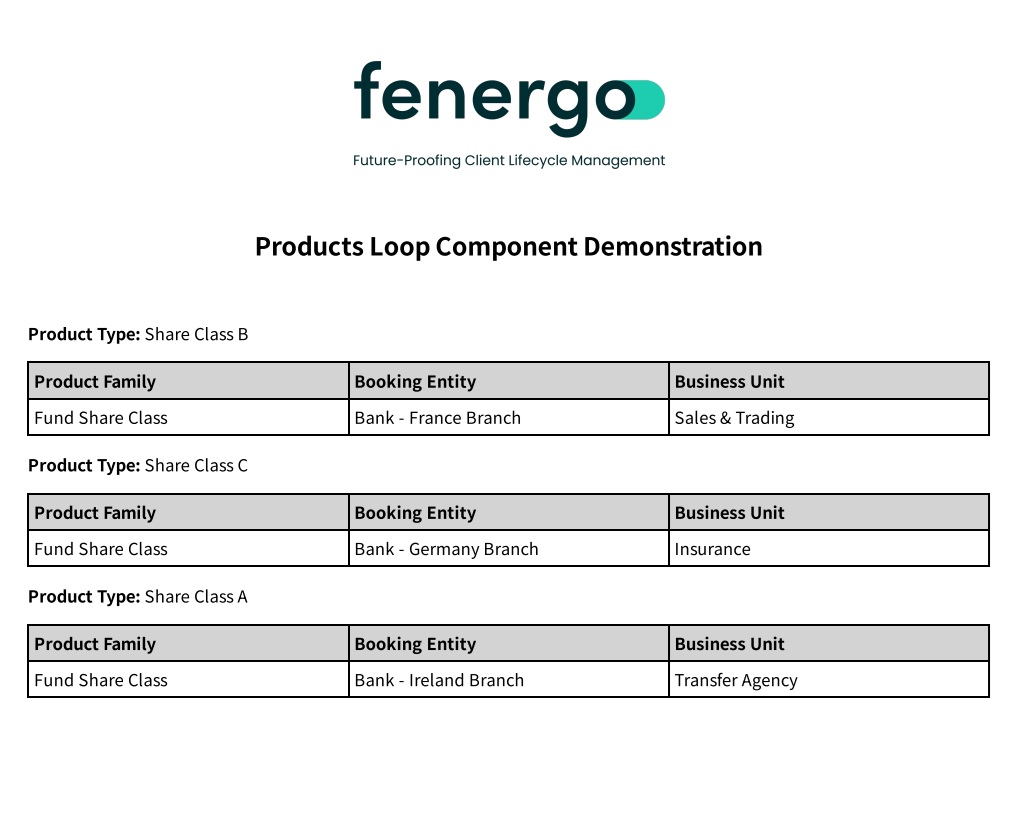
Looped components can only have one data source. Once this datasource is chosen it cannot be changed. All subsidiary data sources within a data source can be included inside a looped component. For example a "Related Products" Loop Component can have fields with the data source of "Related Parties of Related Products".
Template Configuration:
This is where multiple different templates can be created and configured, each template can be used to meet different document generation use cases.
To begin, click on the Template Configuration link under Document Generation and create a new template, which will direct you to the below page.
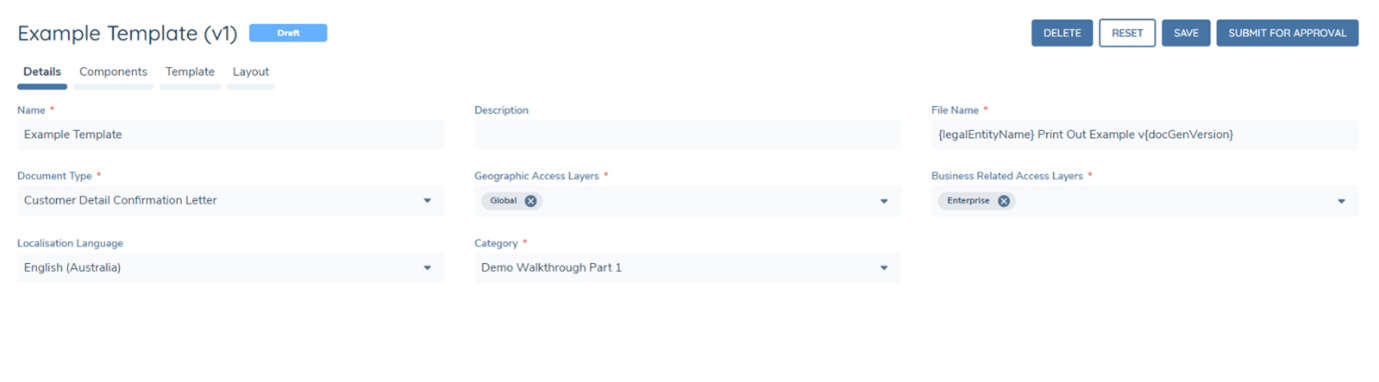
- Set the Template Name, this is the name of the configuration template.
- Set a description for the template if desired.
- Set the File Name for documents generated by the template. See File Naming & Document Versioning for More information.
- Set the Document Type (For more information refer to Document Type Configuration).
- Set the Business Related and Geographic Access Layers for all documents generated by the template.
- Set the Localisation Code to apply number separator and date format preferences for all Number and Date fields generated by the template.
- Select the category. This will read from the previously configured Reference Data List with the name "Document Generation Template Category"
Layout:
The Layout tab in Template Configuration includes a Page Border toggle. When enabled, the PDF renderer wraps each page of the generated document with a solid border.
Dynamic File Naming & Document Versioning:
Datakeys from Entity Data can be used within the File Name field of a template. Add in the desired datakey inbetween an opening and closing brace, multiple datakeys can be used.
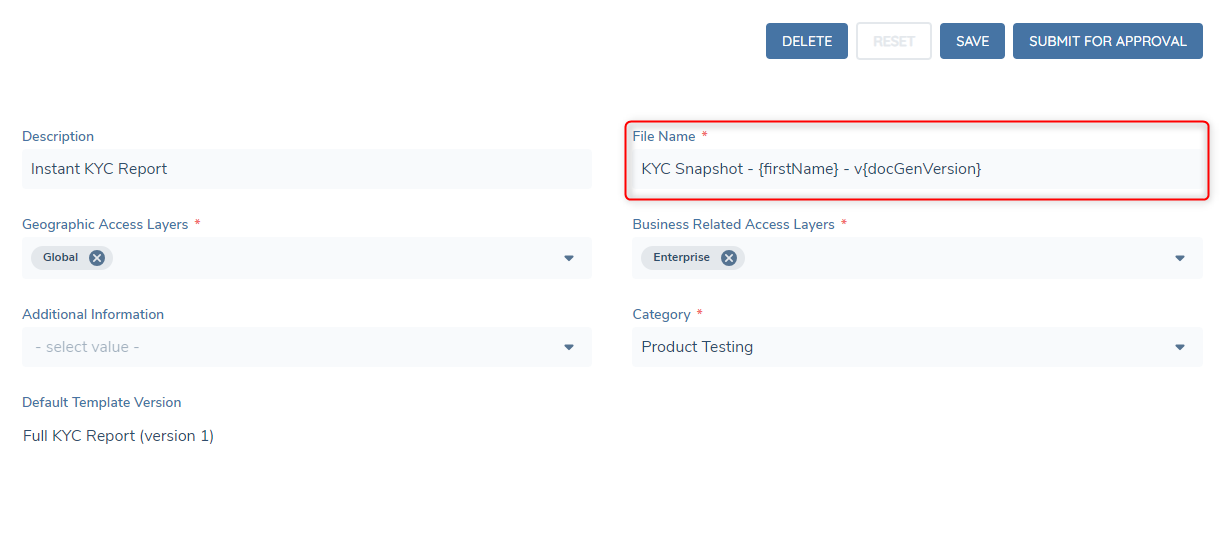
There is a reserved datakey "docGenVersion" this datakey is a number that will increase every time the template generates a document within the context of a journey. Below is an example of the final result of the above configuration.

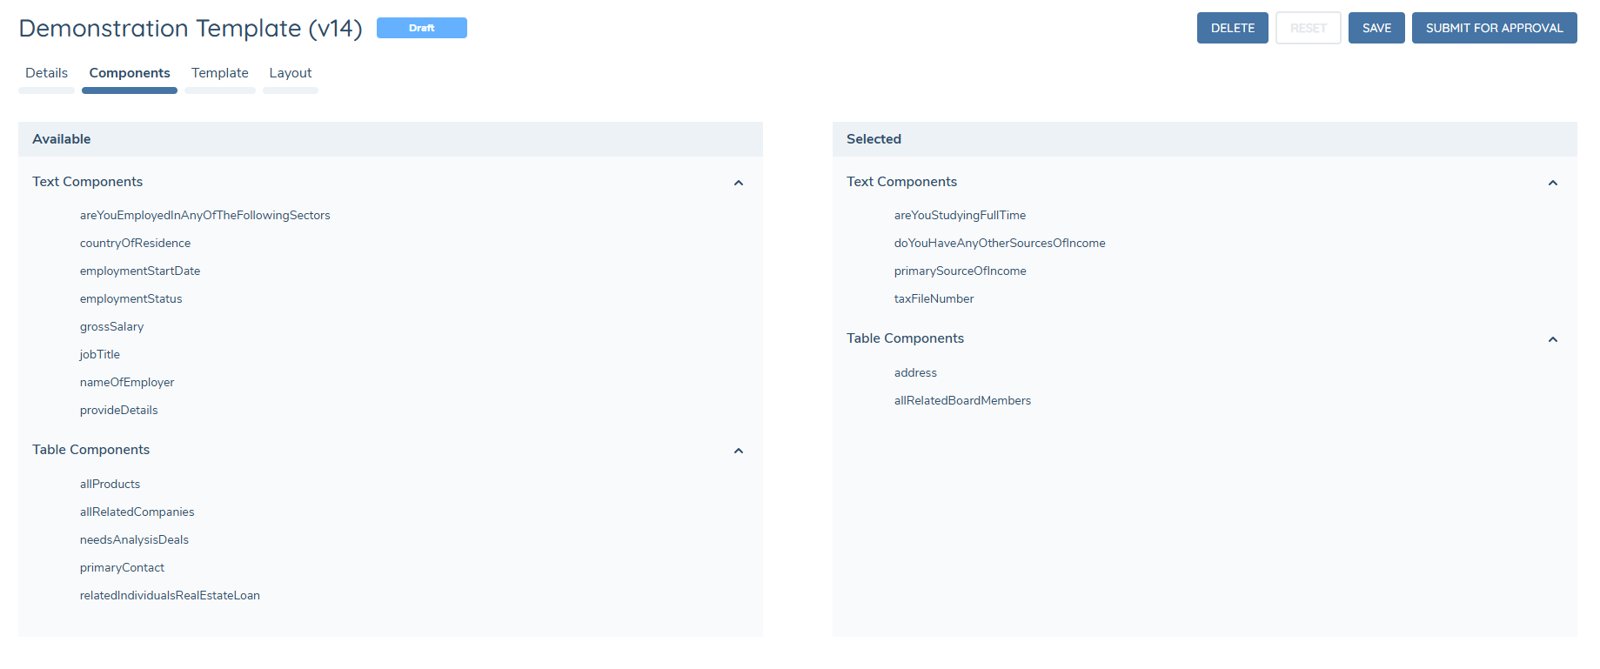
Components:
- Select components published in the component library (left-hand "Available" side) to be used in the template (right-hand "Selected" side).
- Published components will always be available on the left-hand side for all templates, and can be added in and out of various templates as desired.
- If a component is updated and republished with changed configuration, the component MUST be removed and readded to any existing templates to update that components configuration.
- Once the desired components have been added into the template, progress to the next tab.
Template:
There are two available configuration options available to apply the styling, branding and mappings into the generated PDF.
- HTML Override
- Template Designer.
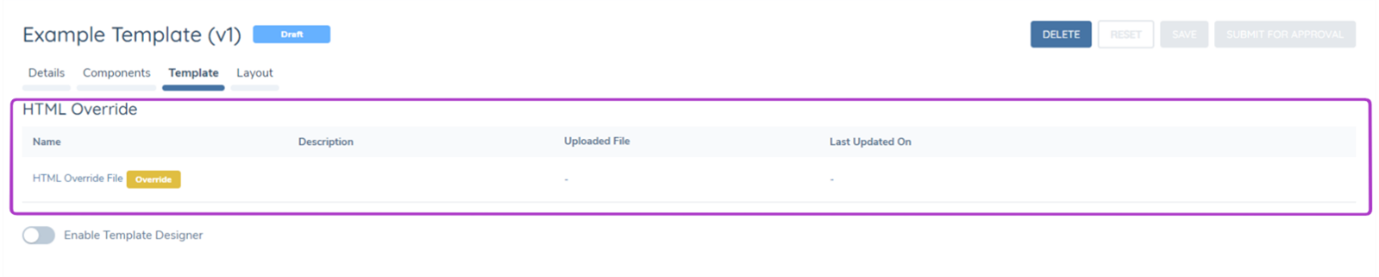
HTML Override:
HTML Override: The HTML override upload allows for a custom HTML file to be uploaded to a template. This allows for custom styling and branding of a template, datakeys can also be mapped into the HTML to create highly customised templates for specific business purposes. The HTML file uploaded must be a .txt file, and the supported syntax is Razor or basic HTML syntax.
Template Designer:
The Template Designer is a no-code sandbox style tool to generate templates for document generation. Once the "Enable Template Designer" switch has been turned on. The components that have been added to the template on the previous tab, will appear available as mappings that can be inserted into the template.
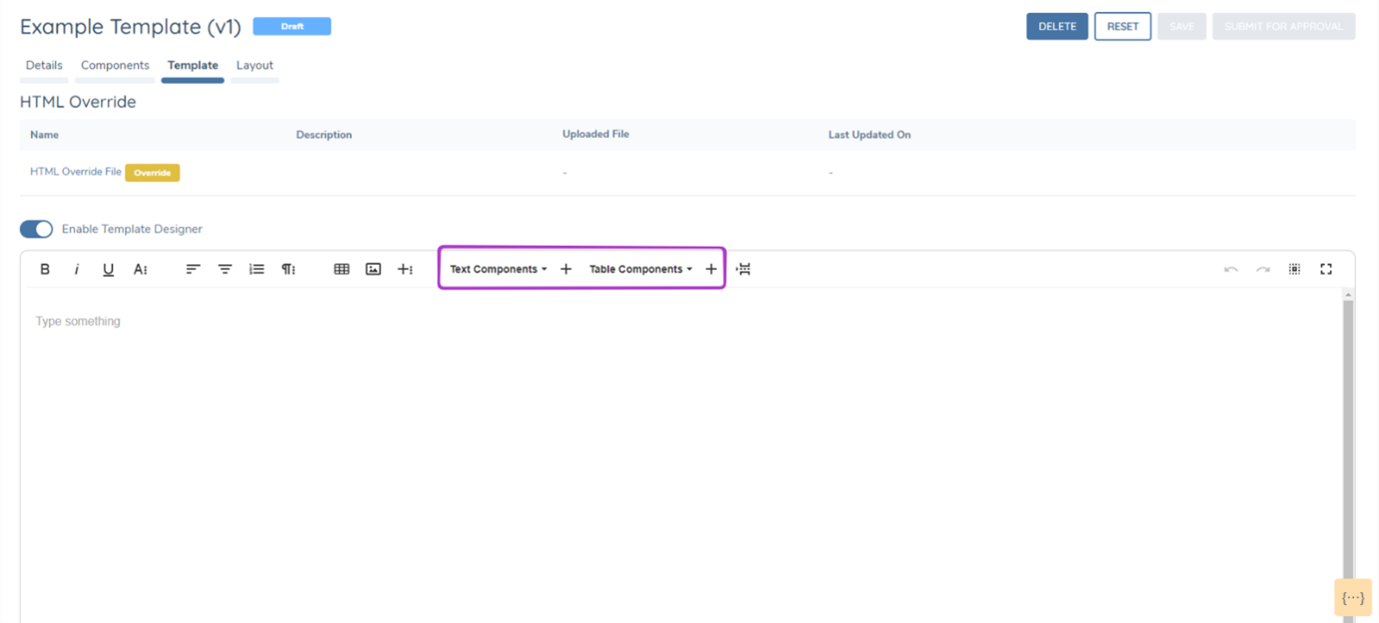
Static text, static tables and images can all be added into the template designer to create a custom template design, without the need to write the code for a HTML override file.
Once editing within the template designer has been completed, simply press save, which will save the content of the Template Designer into the HTML Override file. This file can then be downloaded, edited if desired and reuploaded.

When an HTML override file is in use, the Template Designer will automatically deactivate. To reactivate the Template Designer, you must remove the uploaded HTML override file.

To revert to an HTML override file from the Template Designer, first delete the Template Designer.txt file. Then, disable the Template Designer.

Template Designer — Enhanced Editing Capabilities:
The Template Designer includes a set of enhanced editing capabilities designed to reduce configuration effort during template authoring:
- Inline token insertion — type
{{anywhere in the editor to trigger a searchable autocomplete dropdown of available data keys. Select the desired key to insert it at the cursor position. Type{%to insert a loop component using the same autocomplete mechanism. This allows token and loop insertion directly from the keyboard without navigating the toolbar. - Auto-save — the editor automatically saves a draft of the template every 60 seconds in the background. Auto-save does not change the template's state and does not trigger the approval workflow — it operates silently to preserve work between explicit saves.
- Drag-and-drop reordering — supported block content elements can be repositioned within the editor by dragging them to a new location, removing the need for cut-and-paste when restructuring templates.
- Alphabetical component sorting — text, table, and loop component dropdowns are sorted alphabetically by component key, making lookup predictable regardless of the size of the component library.
- Code beautifier — when switching to code view, the editor formats the HTML with consistent indentation and line breaks, making code view a practical inspection and editing surface.
- Extended toolbar — the editor toolbar now includes find and replace, special character insertion, a live word and character count, print preview, and an inline keyboard shortcuts reference panel.
- Quick Insert — a contextual
+button appears in the editor left margin when the cursor is on an empty line. Clicking it provides a shortcut for inserting block elements without scrolling to the toolbar.
Syntax:
Syntax across both HTML Override and Template Designer template types have a new and simplified syntax. The syntax comes in three formats, depending on the component type

HTML Specific Syntax***
In the instance that specific use cases would like to be achieved by the PDF output such as:
- Hiding content relative to a field when a field is returned blank.
- Repeating instances of content.
HTML specific syntax can be written into the HTML override file. It is important to note that once HTML specific syntax is written into an override file it WILL NOT be compatible with the template designer. Examples are included below.
Hiding HTML Content:
    @if(Model.TextComponents["componentKey"] != null &&
    Model.TextComponents["componentKey"] != "") { Label Heading {{componentKey}} }
Repeating HTML:
Content @foreach(var row in Model.TableComponents["componentKey"].Rows) {
    Label Heading @row.Cells["componentKey"].FirstValue
    Label Heading  @row.Cells["componentKey"].FirstValue
}
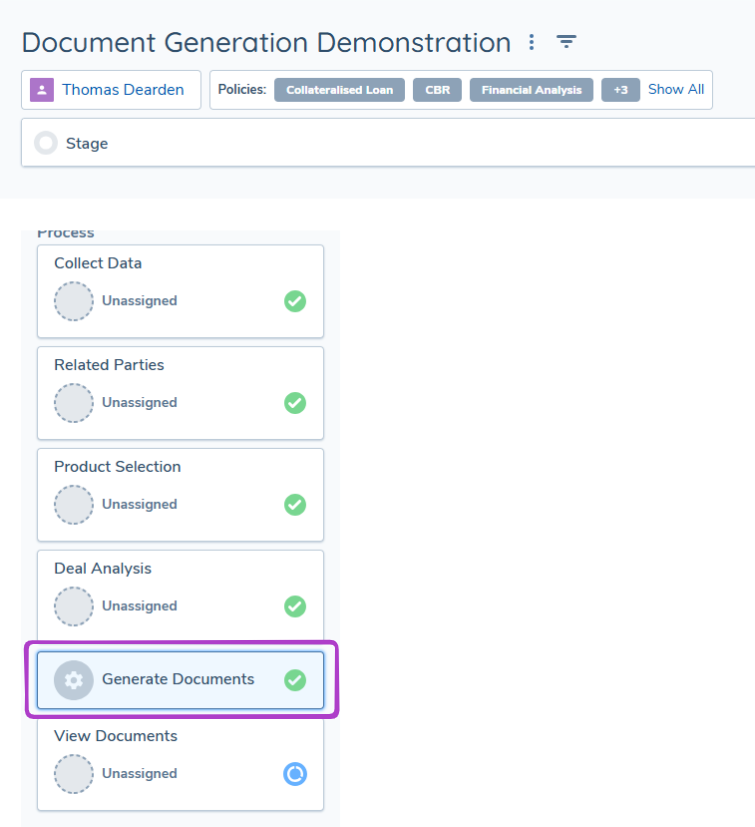
Journey Configuration:
Configure the Automated Document Generation task into a Journey Schema using Journey Builder.

You may configure many instances of the Automated Document Generation task in your journey. Configuration of each instance of the task requires template(s) to be selected in the Template Category dropdown.
The Automated Document Generation Task now has a UI, and the task can be clicked on within a journey to see if template(s) have successfully or unsuccessfully generated a PDF.
This enhancement has been introduced to ensure in the instance templates are unsuccessful in generating a PDF, troubleshooting is much easier.

After an Automated Document Generation task has completed, the file(s) generated are stored in Amazon S3. From there the documents are then retrieved to be visible on the UI in the following areas:
- Under Journey Documents within a DocumentsV2 Task.
- On the Entity Profile Page on the Documents Component.
- On the Entity Profile Page under the Documents Tab.
Generated Documents & Document Management
All generated documents that appear in a DocumentsV2 Task will state they have been uploaded by "System Generated".
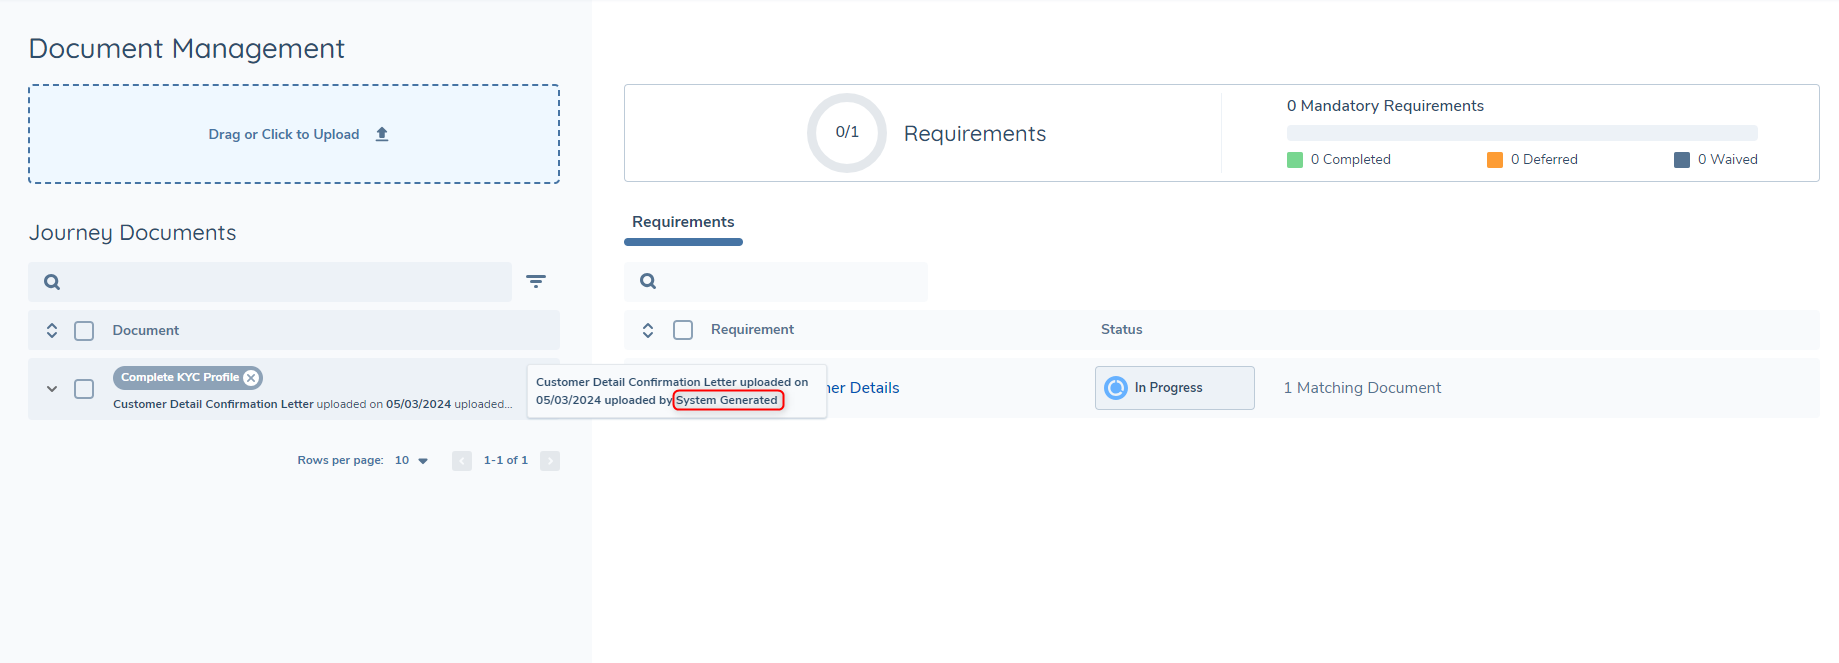
From the Journey Documents section, generated documents can be used in the same way an uploaded document would be.
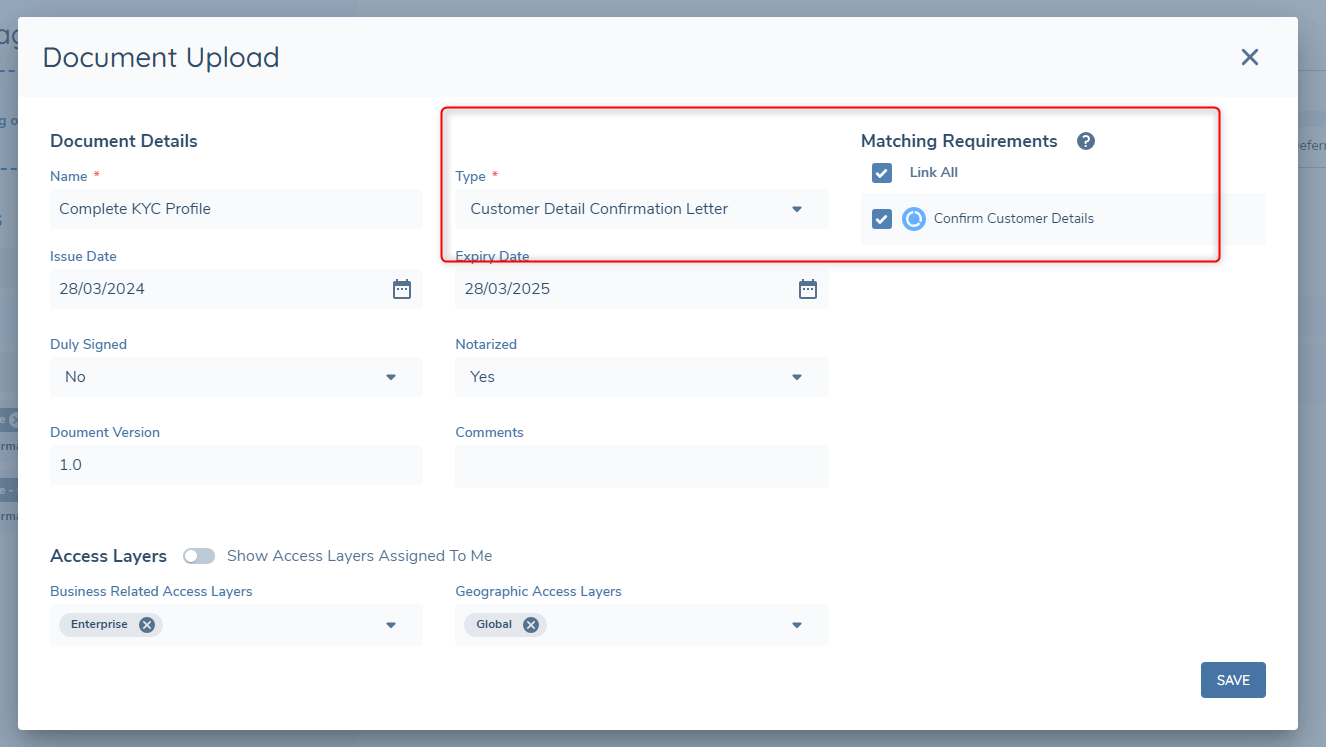
If the Document Type that was configured in the template for the generated document can be used as an Acceptable Document for a Document Requirement, then generated documents can also fulfill document requirements.
Considerations
- Any public link to an image or logo will work in a Custom HTML file and will generate the image onto the PDF.
- When using the Template Designer, only SVG file formats are accepted when uploading an image into the template.
- Currently Document Generation can only generate direct related parties to the main entity, not second and third connections etc.
- The Automated Document Generation Task supports Related Party Data for entities with up to 500 direct related party associations. When the association count exceeds 500, the task continues and generates a document using the first 500 direct associations. A warning is displayed indicating the actual count and the applied limit.
- The Automated Document Generation Task supports Related Products Data for entities with up to 500 related products. When the count exceeds 500, the task continues and generates a document using the first 500 related products. A warning is displayed indicating the actual count and the applied limit.