Document Management V2
This user guide covers the functionality which is applicable to and introduced by the DocumentsV2 task as well as the new Document Types Configuration to support the Acceptable Documents functionality in the new task.
Permissions
Within the DocumentsV2 task, the following Document Management Permissions apply:
- Document Management Access: This Permission allows a user to interact with and navigate into the DocumentsV2 task, view documents and document metadata.
- Document Management Create: This Permission allows a user to upload documents, set the initial document metadata and link the document to requirements in the Documents V2 task.
- Document Management Edit: This Permission allows a user to edit the document metadata of already uploaded documents, and to reset the status of "Waived" or "Deferred" requirements.
- Document Management Delete: This Permission allows a user to delete and unlink documents which have been uploaded.
- Document Management Defer or Waive: This Permission allows a user to set a document requirement to be "Deferred" or "Waived".
- Document Management Apply To All: This Permission allows a user to apply document details such as Type, linking and other document metadata entered in the modal, to all subsequent documents when multiple documents are uploaded at once.
DocumentsV2 Task
The latest version of the Documents task type features a new UI and a difference in how mandatory document requirements are validated as being complete.
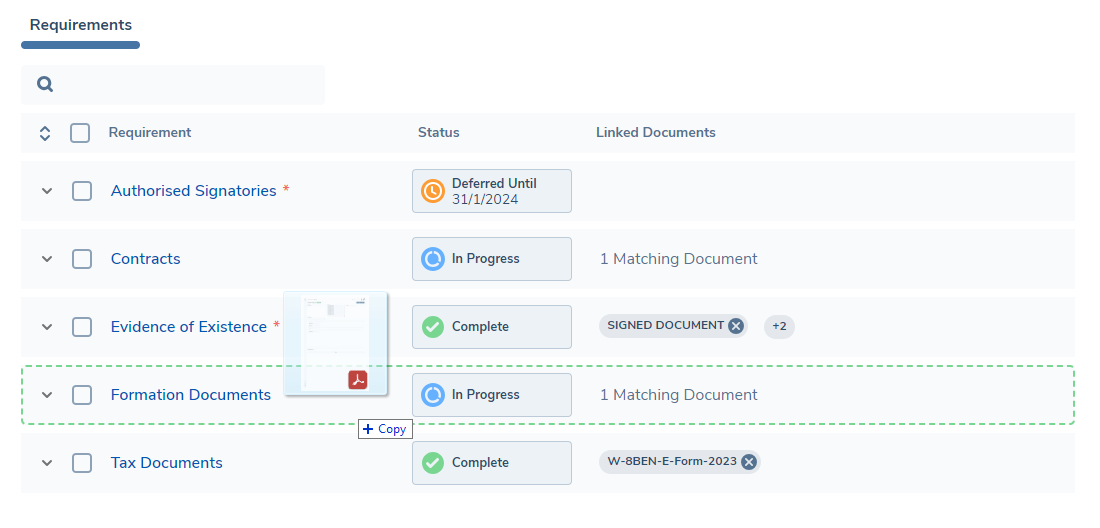
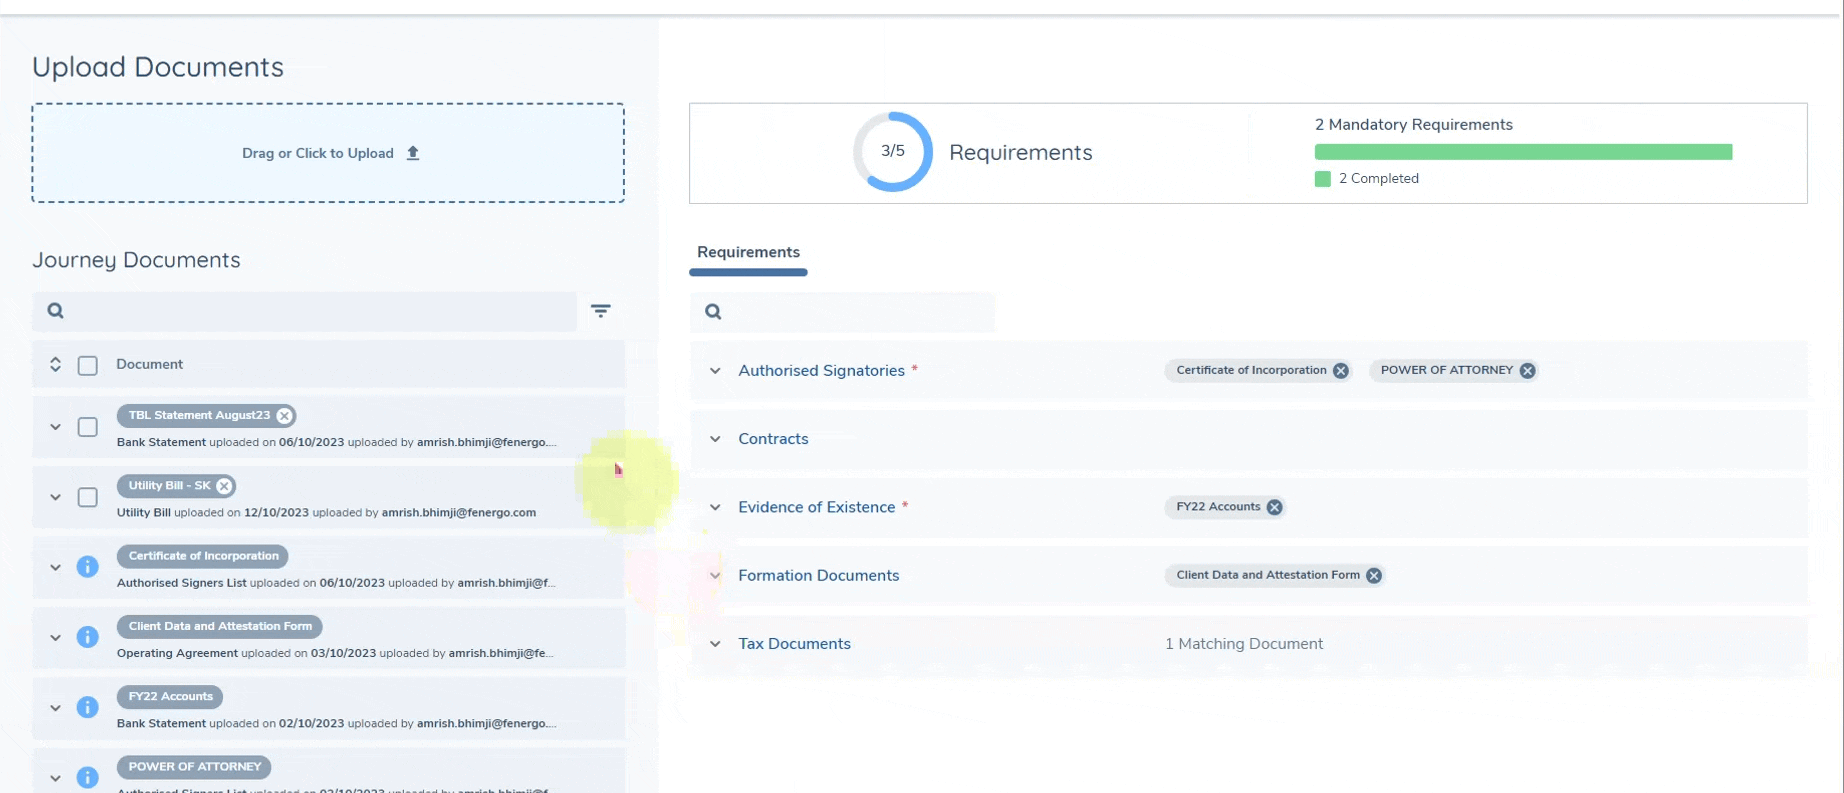
Requirements Grid
The Requirements Grid will present the document requirements which are in scope for this task based on the requirement categories set against the task in the Journey Schema configuration and the corresponding document requirements which are configured in Policy.
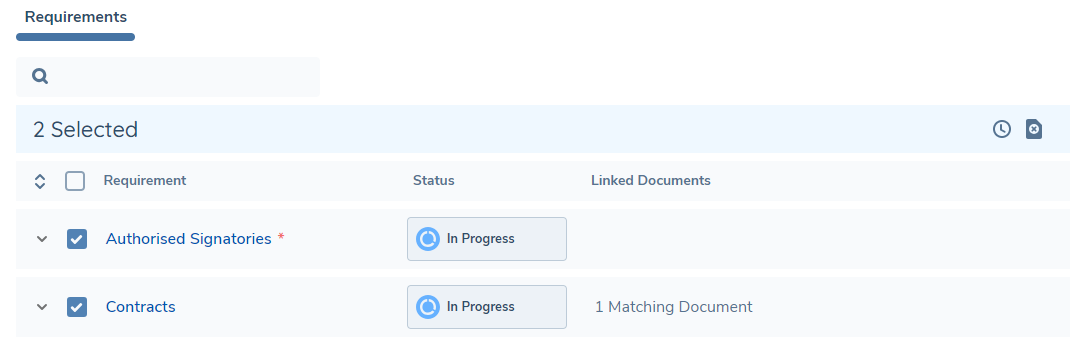
Document requirements are listed on the grid in alphabetical order by default and mandatory document requirements are indicated with a red asterisk following the requirement name.
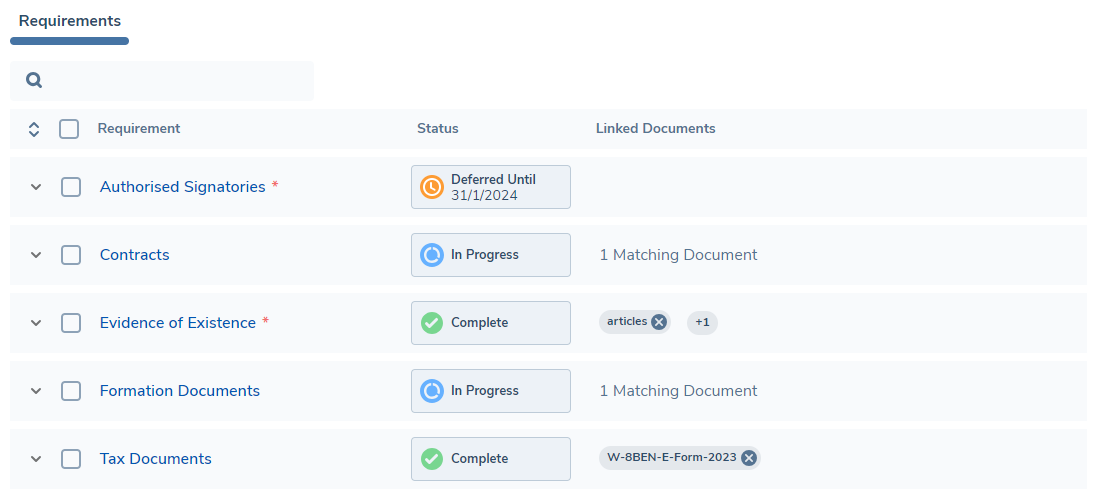
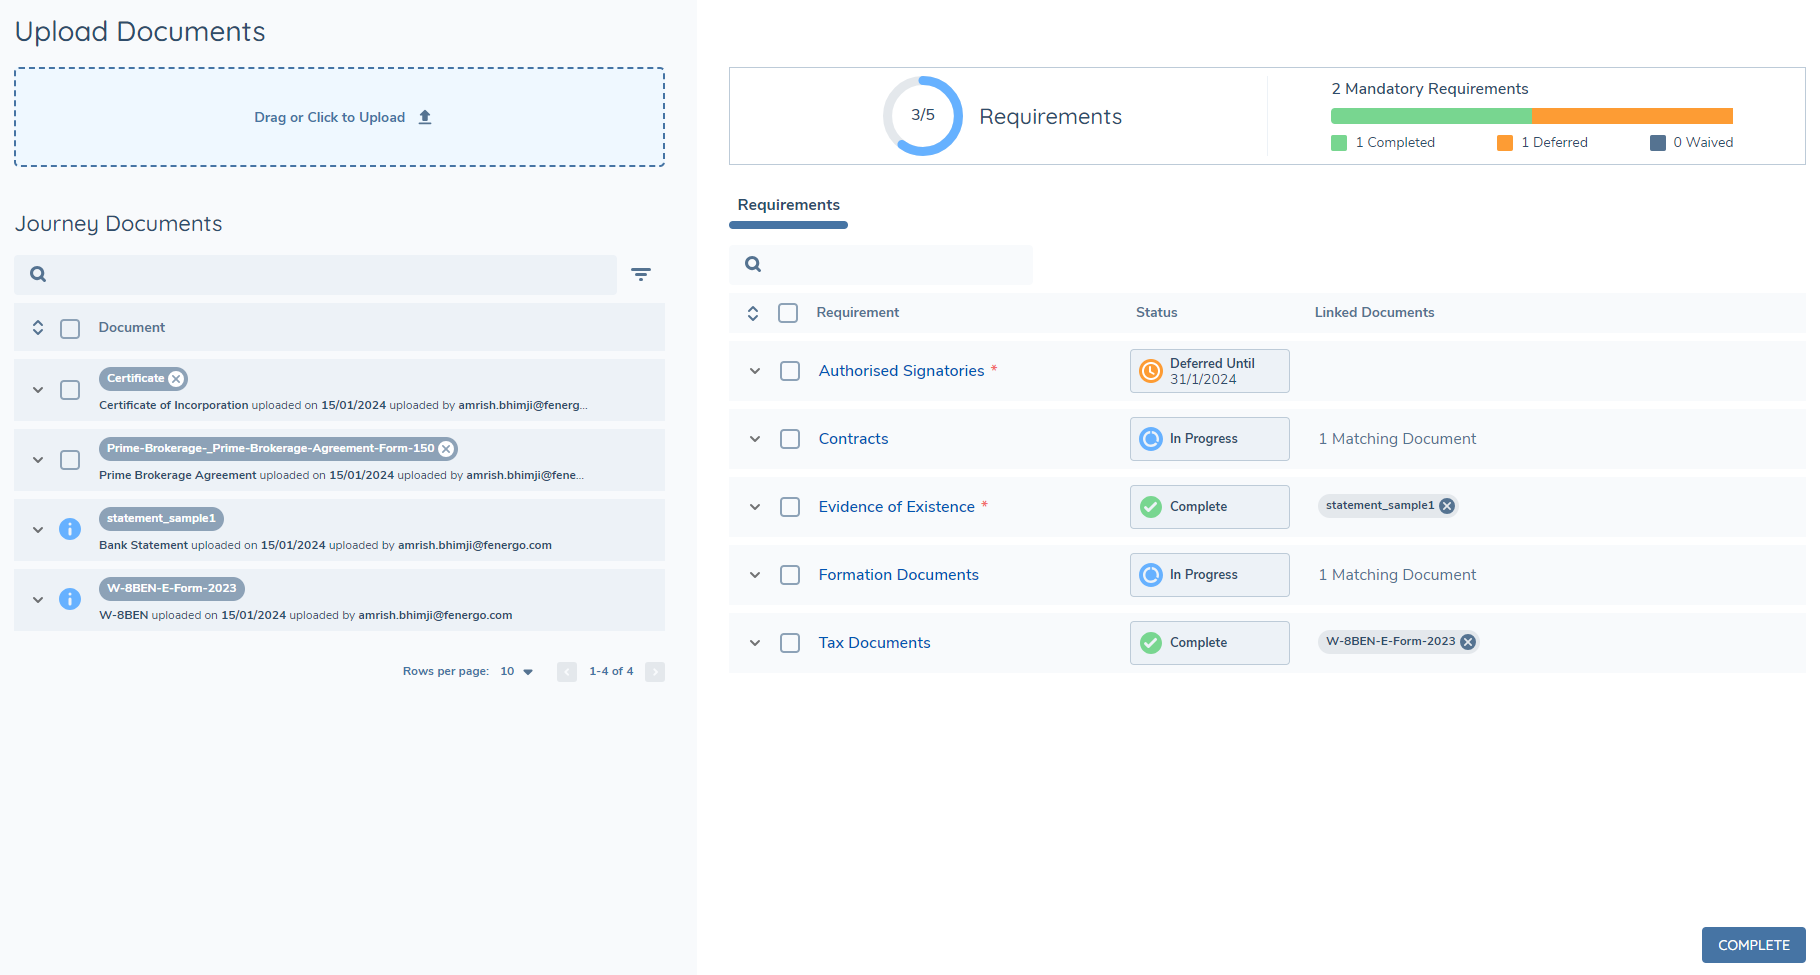
Document Requirement Status:
Most of the legacy statuses at the document requirement level are no longer relevant in the v2 task, however a requirement is deemed to be completed if there is at least one document linked to it. This is now reflected in the Status column in the grid. Below is a list of all of the statuses that are reflected in this grid along with a description:
- In Progress - The document requirement is neither waived nor deferred and there are no documents linked to it
- Complete - The document requirement is neither waived nor deferred and has at least one document linked to it
- Deferred - The document requirement has been deferred.
- Waived - The document requirement has been waived.
Deferring and Waiving document requirements is covered in detail later on in this user guide.
Linked Document Chips:
When documents are uploaded and linked to the requirements, the corresponding documents are presented in the form of chips with the friendly name of the document displayed as a label. When there are multiple documents linked to a single requirement, by default the chips will appear in alphabetical order by document friendly name. If there are multiple documents and the chips do not fit in the column, an overflow chip will appear with the number of additional documents linked to the requirement. Hovering over this will display a popover which allows you to see these additional linked documents.

If the document fails to pass the anti-virus scan which automatically takes place on upload, the chip will be presented in an error state and it must be deleted before you will be able to complete the task.
Depending on the type of document and browser configuration, clicking on a document chip will either open a separate window which previews the document, or it will download the document to the users drive. Clicking the delete icon on the chip will unlink the document from the requirement.
When a document requirement has no documents linked to it, if there are any documents already linked to the entity that are of an acceptable type, a note will appear against the requirement informing you of how many possible matching documents are available. Clicking on this note will navigate you directly to the Matching tab beneath the document requirement.

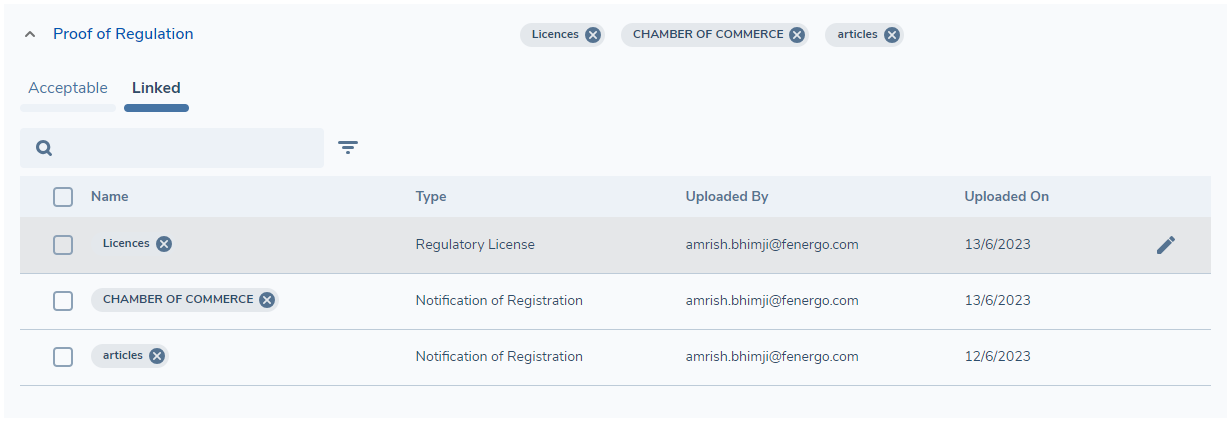
Each document requirement can be expanded to reveal three additional tabs – Acceptable, Matching and Linked.
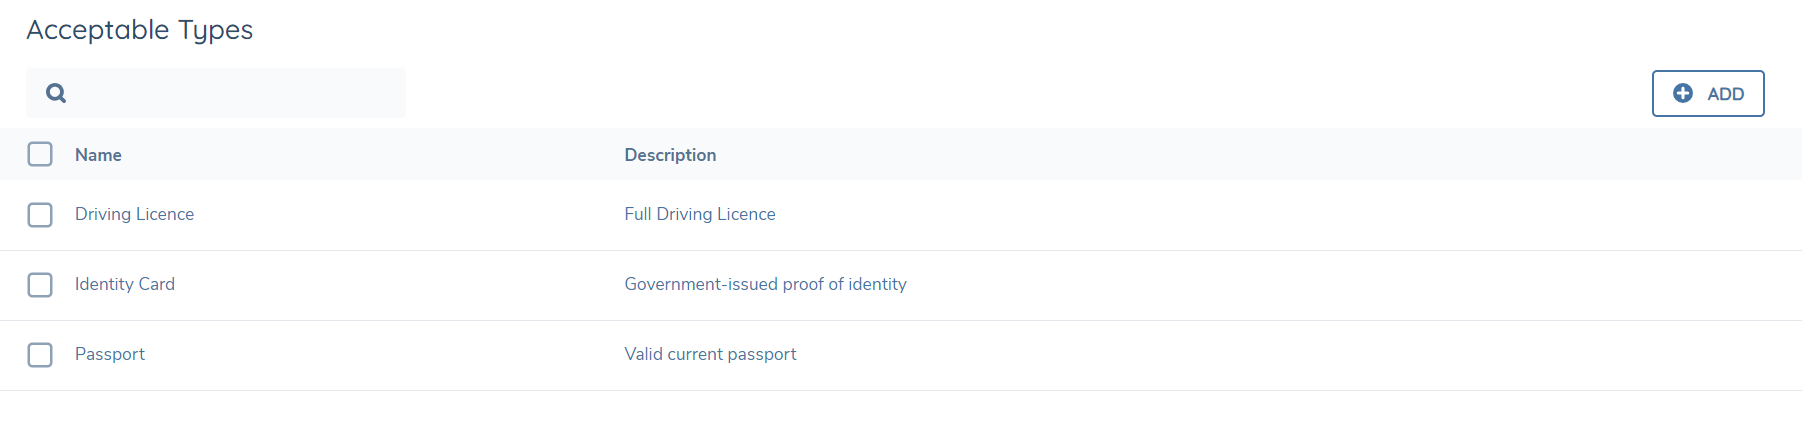
Acceptable Tab:
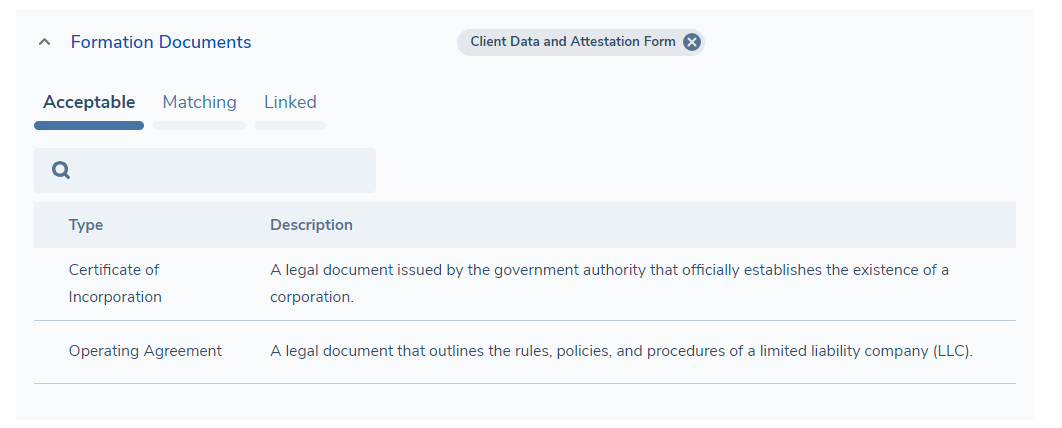
The Acceptable tab presents the document types which have been configured as acceptable for the requirement in Policy, along with the description of the document which is configured in the set of Document Types.
If a document requirement has not been configured with any acceptable types, an empty state replace this grid, however a user can upload any type of document against such a requirement.
Matching Tab:

The Matching tab presents a grid of existing documents which are already linked to the entity (e.g. in previous journeys or the current journey) AND of a type which is acceptable for the current document requirement.
You may link one of these matching documents to the requirement by clicking on the arrow on the document chip. You can also select multiple documents from this grid and link these to the requirement in bulk.
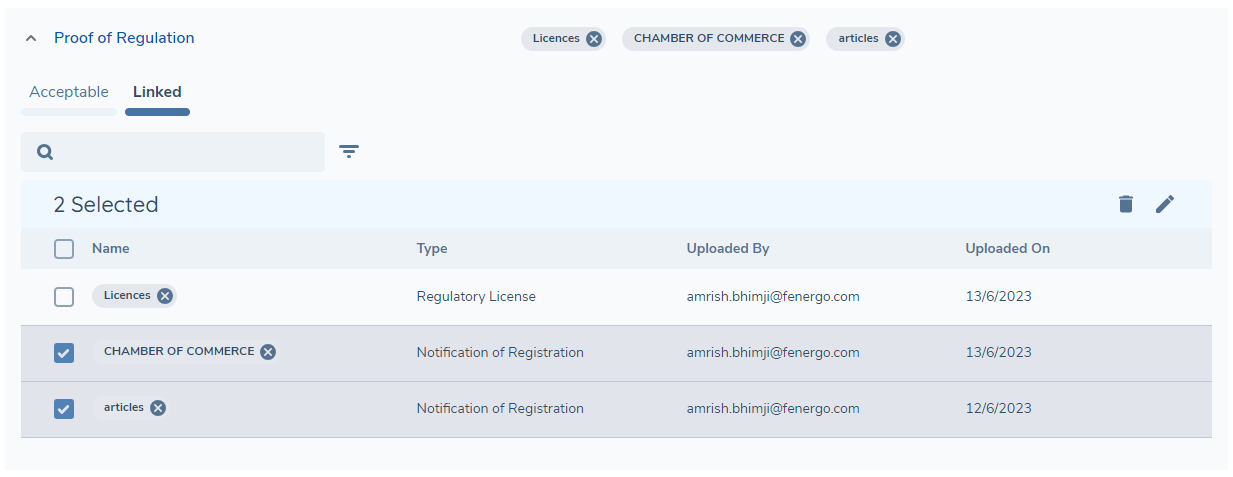
Linked Tab:
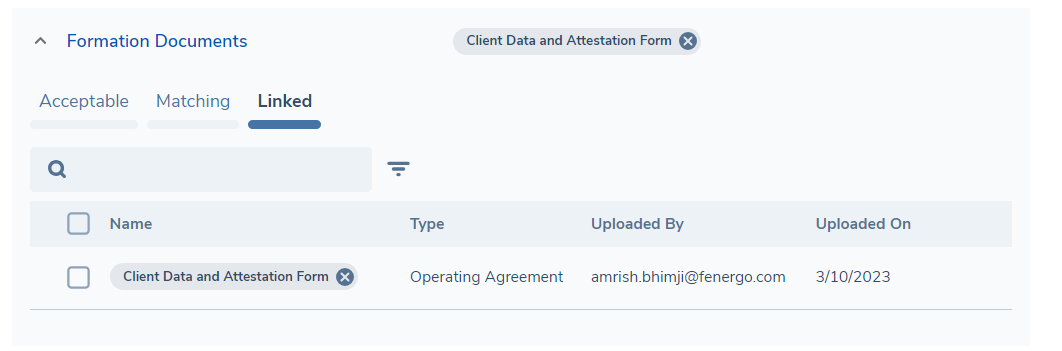
The Linked tab presents a grid displaying some additional details about the documents which are linked to the requirement and allows a user to perform simple actions such as unlinking or editing the metadata for these linked documents, either individually or in bulk.
Configurable Metadata Columns in Document Requirements Grid
The Document Requirements Grid now supports the display of additional metadata fields, providing greater flexibility and visibility for clients who wish to surface key document-level information directly within the grid. This enhancement allows administrators to select up to two additional metadata fields, which will appear as extra columns alongside the standard requirement information.
The configuration is managed through the Document Requirement Metadata Configuration screen. A new panel is available on the right-hand side, where administrators can select the fields they wish to display. All fields in the document data group will be shown in this selector, with the exception of rich text fields, which are not supported in the grid. The fields selected will be ordered according to their defined position in the metadata group, and this order will be reflected in the grid display.
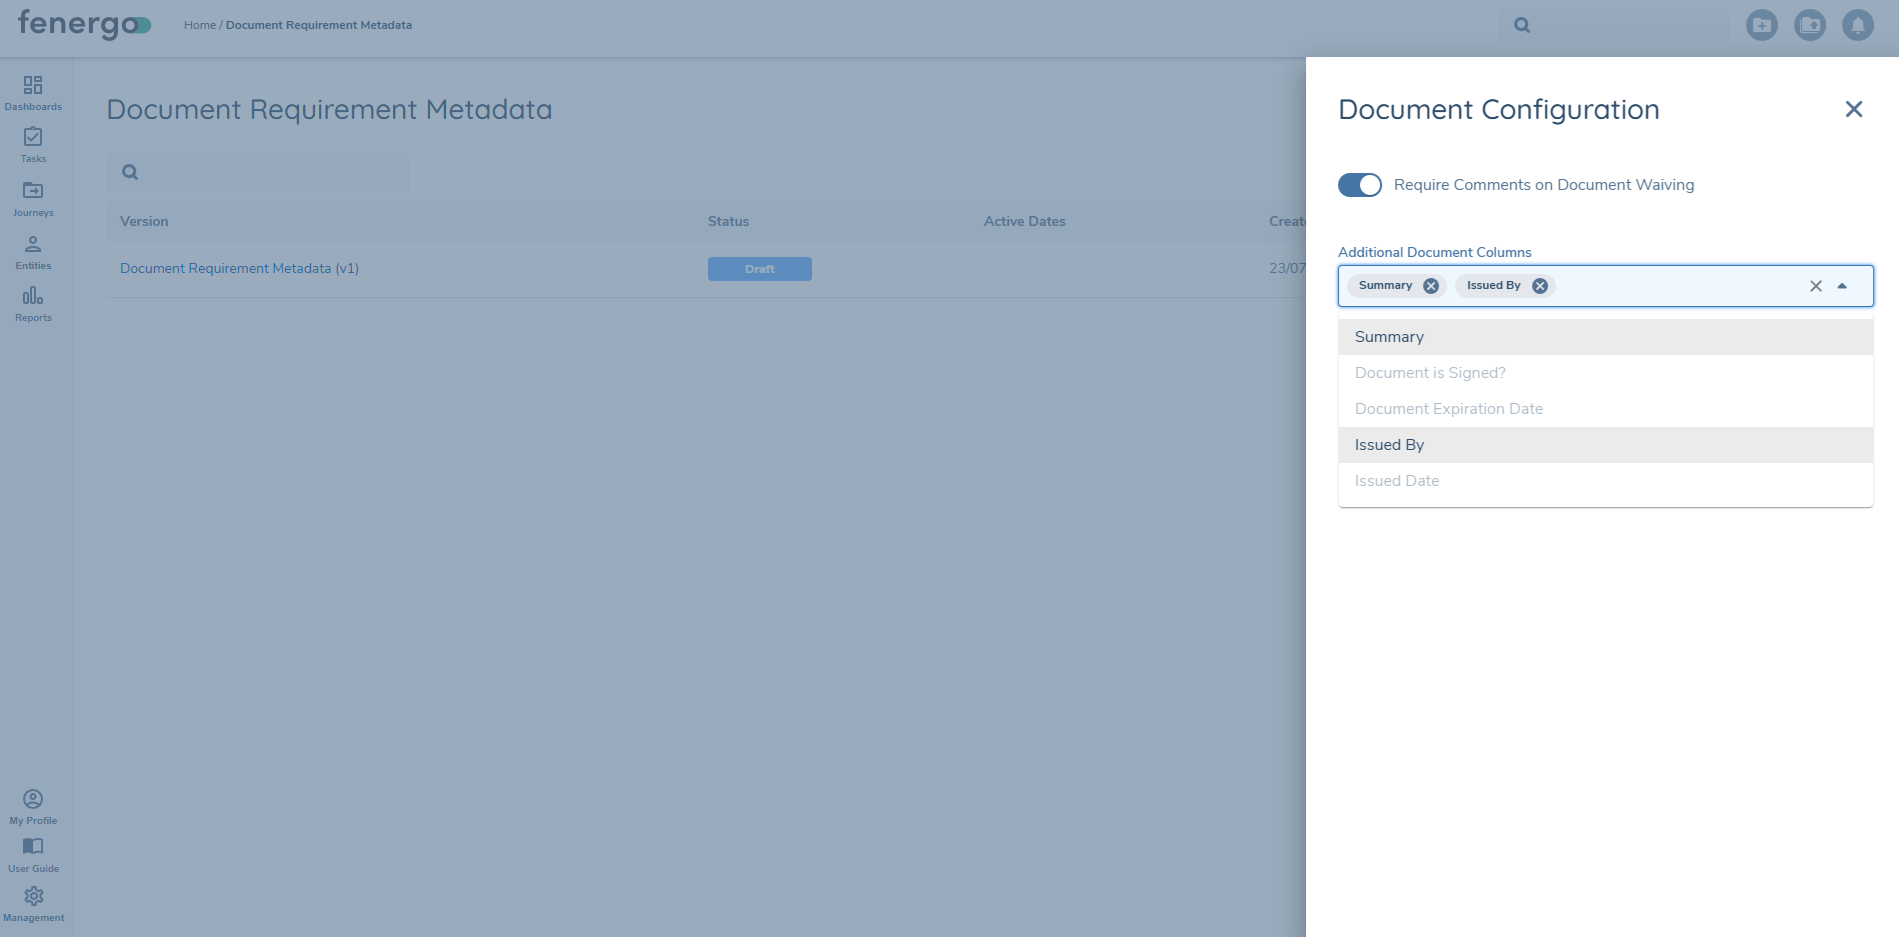
Once configured, the additional metadata columns will be shown consistently in both the Linked Documents and Matching Documents grids. The values in these fields are truncated to a single line to preserve the structure of the grid. If a value exceeds the visible space, users can hover over the field to reveal the full content in a tooltip. If no fields are selected, the grid will display only its standard columns and will remain unchanged.

This configuration applies to all tasks using Document V2. The change is effective immediately upon saving the configuration and applies to all inflight and future journeys.
Uploading and Managing Documents
You may upload documents in the task in two similar but distinct ways.
Uploading documents generically
A document drop-zone area is included in the top-left of the screen, and this is always visible. You may click this to open the standard file explorer and select one or more documents to upload, or you may drag one or more documents to the drop-zone.

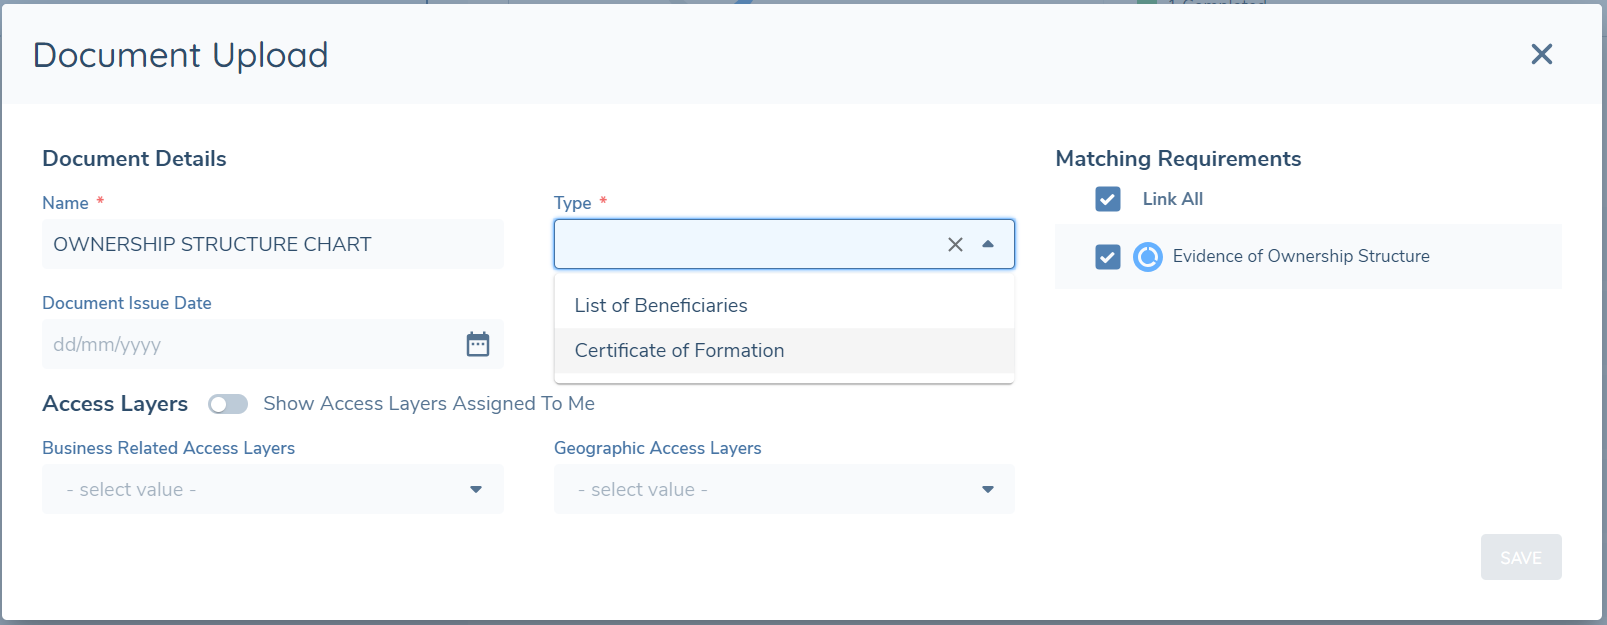
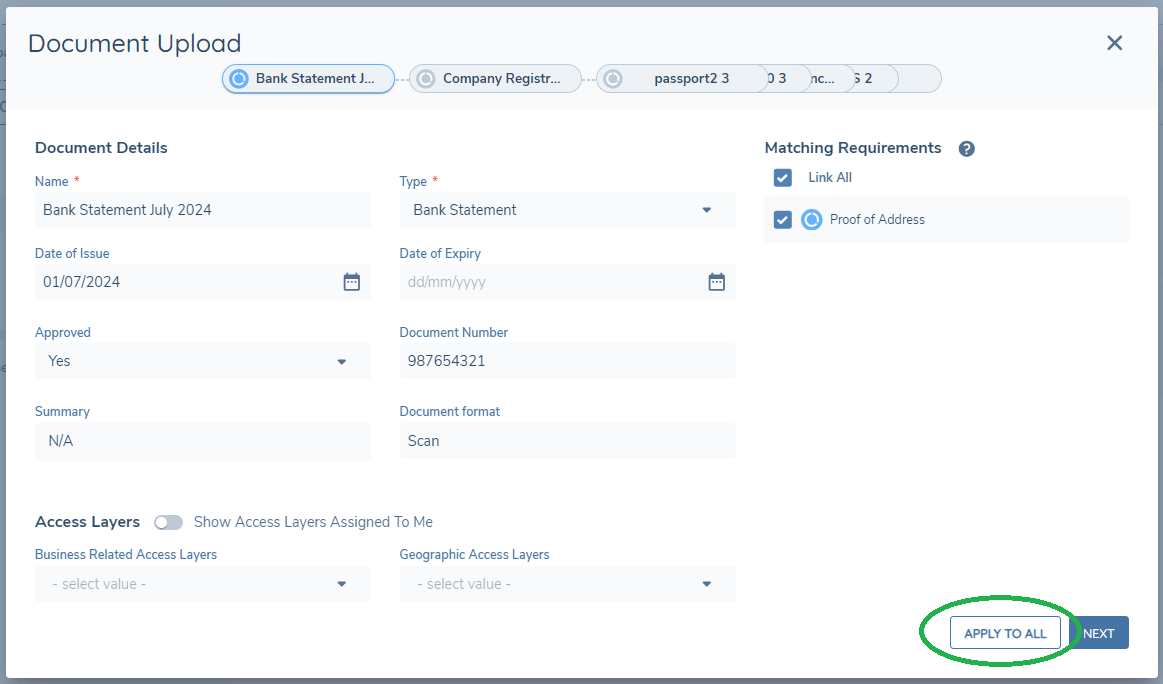
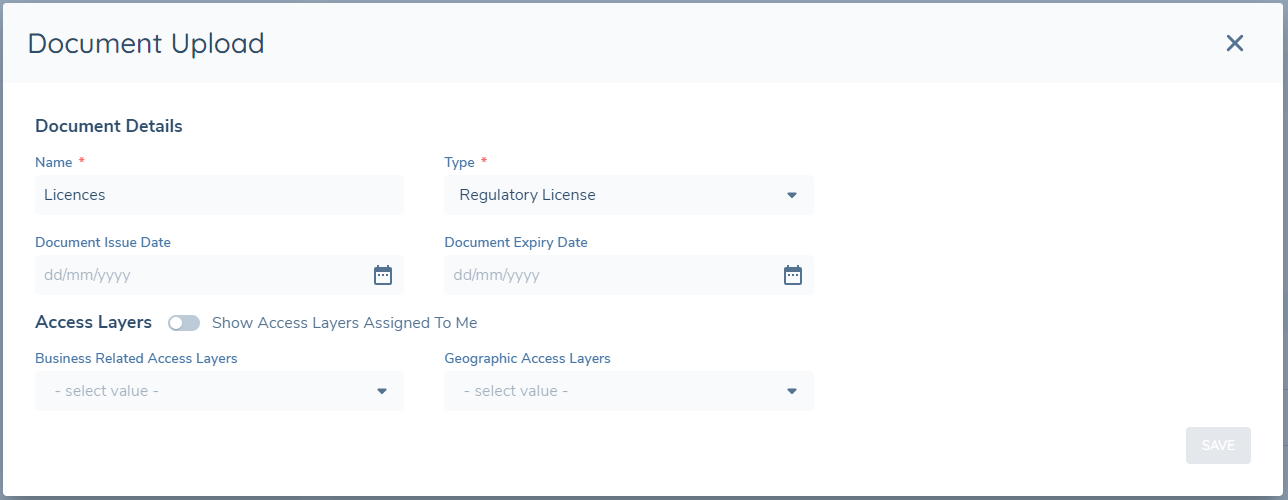
After files have been selected or dropped, the document upload modal will open. You will then take each selected document in turn in a guided process to complete the upload process, update metadata and link the documents to applicable requirements.
When more than one document has been selected or dragged to the drop-zone, the document modal will display chips at the top of the page, each of which represents one of the selected documents.
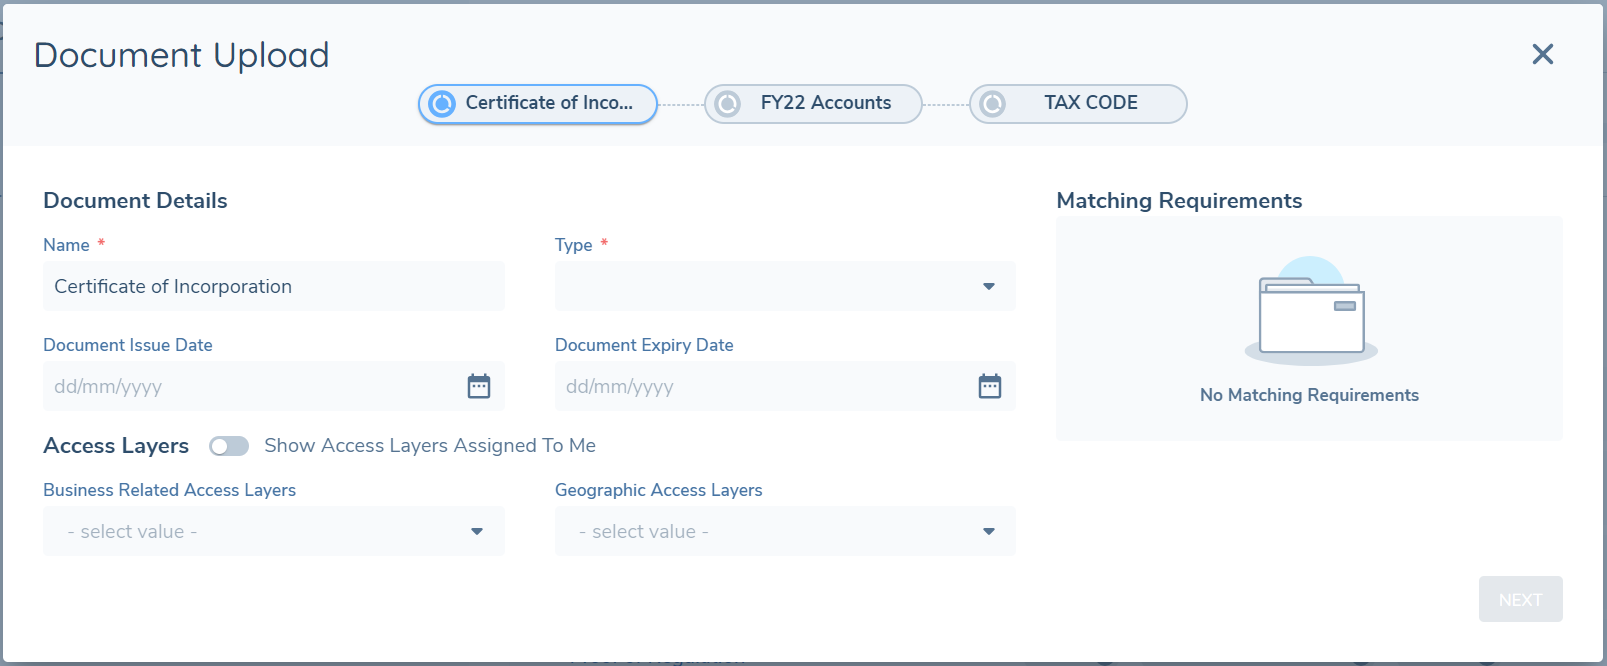
The label on the chip is the document friendly name and this will update if you edit the Name of the document in the modal. The blue icon on the chip represents the document which is actively being processed by you, whereas the grey icons on the remaining chips represent the documents which are yet to be processed by you.
The Document Details section in the modal will always display a Name and Type field as mandatory, and the remaining fields will be based on what is configured in the Document Metadata data group in Policy Configuration.
The Type field will display the full list of document types that have been configured in the current active version of the set of document types.
The Access Layers section allows you to select the Business Related and/or Geographic Access Layers which will be set against the uploaded document and these will govern which users will be able to access the document once uploaded.
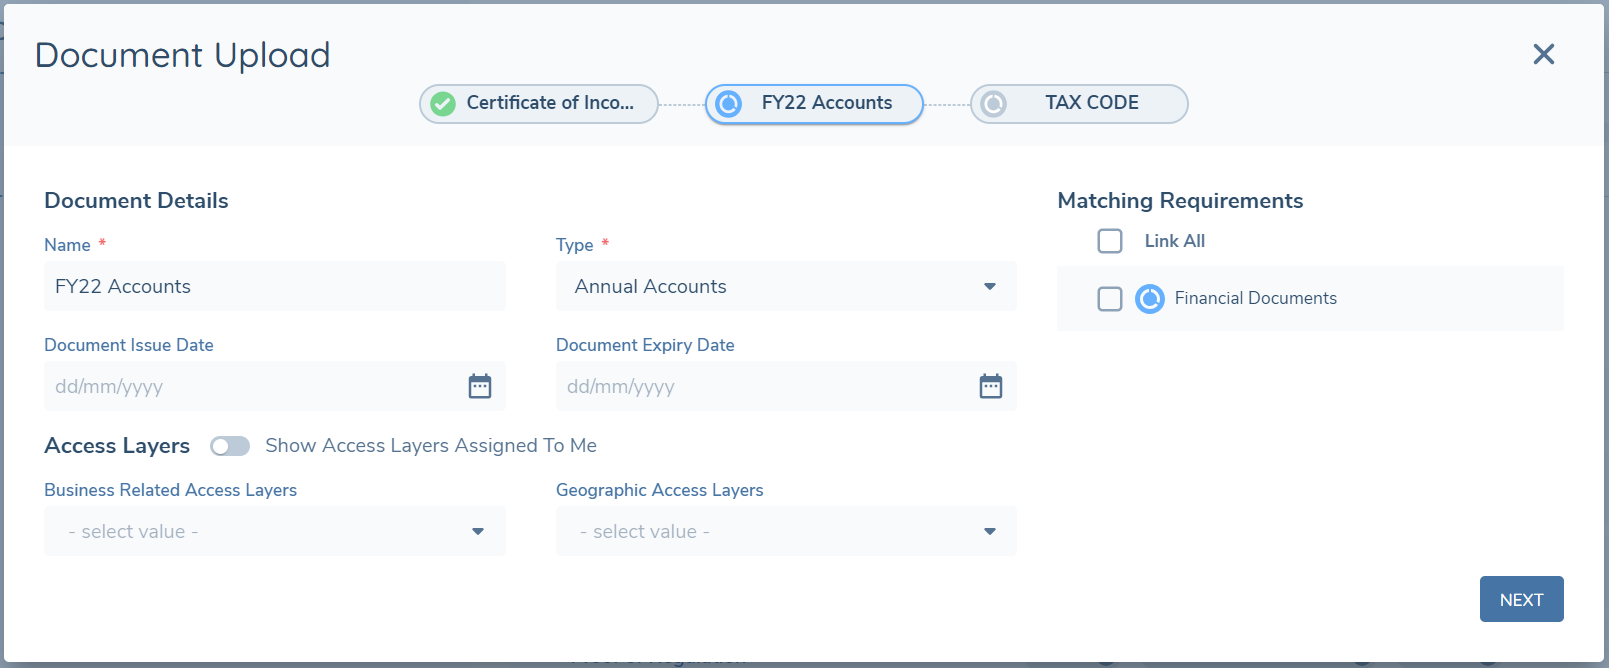
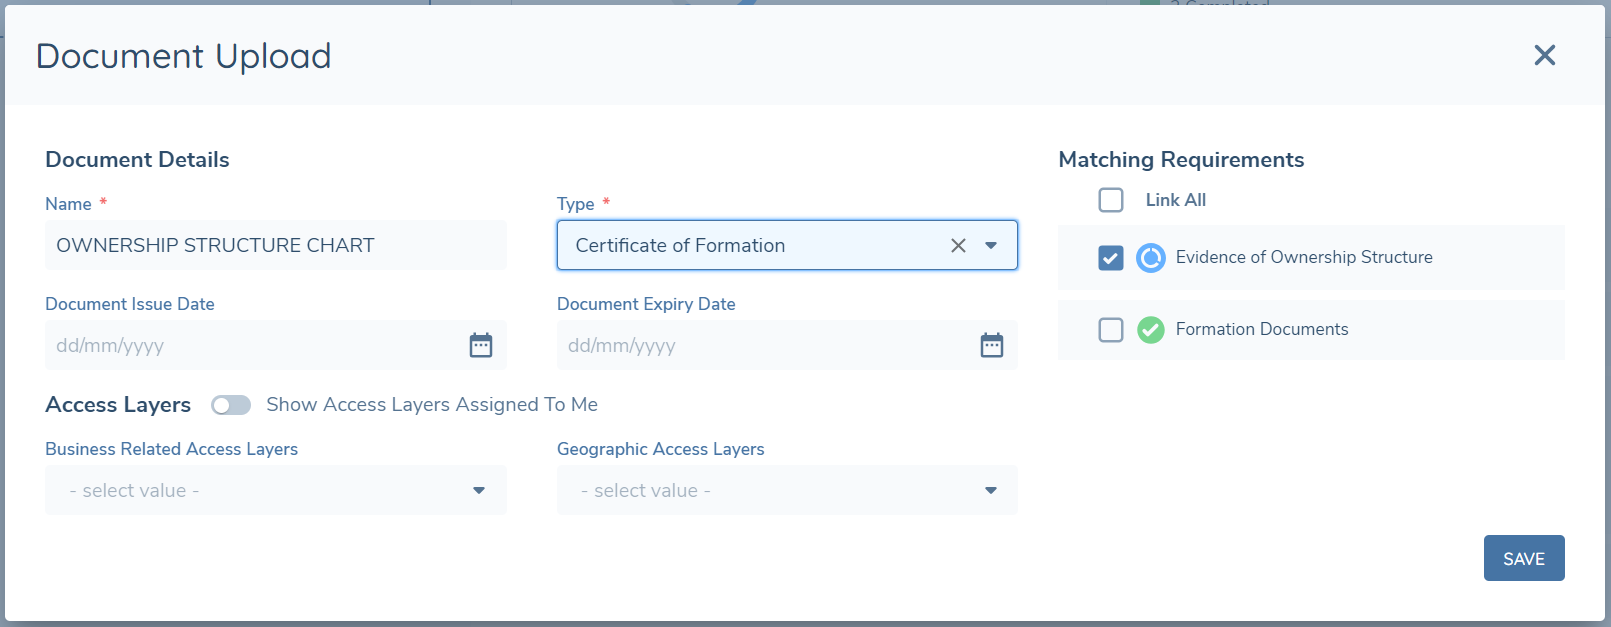
Once a Type is selected, the Matching Requirements grid will update to reflect the in-scope document requirements for which the selected type of document is acceptable. This is based on the configuration of document requirements and acceptable documents in Policy. If a document requirement is configured without any acceptable types set against it, then it will always appear as a matching requirement regardless of the type selected.

You may click on the requirement(s) you wish to link the document to or leave all requirements unselected to still upload the document and link it to the entity and the journey, without linking it to any requirements.
Requirements in the Matching Requirements grid which have no documents already linked to them will appear with a blue icon against them, whereas requirements which have at least one document already linked will have a green icon against them, but you may still upload and link additional documents against them. If a requirement has been waived, deferred or if the deferral has expired, the corresponding icon will appear against it, in place of the in progress or complete icons.
When choosing to link to requirements which are configured with Policy-defined access layers, the corresponding access layers will automatically be set against the document. You may choose to add more access layers but the policy-defined access layers are immutable. For this reason, if the document type uploaded matches multiple requirements which have different Policy-defined access layers or a mix of requirements with and without Policy-defined access layers, you will not be able to multi-select across this range. Based on your initial selection, other requirements with the same Policy-defined access layers will be available for selection but other requirements will not be selectable.
Once all mandatory fields have been populated, the NEXT button will be available to click. Clicking this will trigger the upload of the document which was processed, the indicator on the chip will turn green and the subsequent document chip will turn blue.
The above steps can be repeated until all the selected documents have been processed and click SAVE to upload the last document and exit the modal.
At any point in time you may click the X to exit the modal - any documents which have already been processed and uploaded will be visible in the Requirements Grid and no action will be taken on any unprocessed documents.

When a document is actively being processed, you also have the option to deselect/remove this document and not process it. To do this, click on the bin icon which will appear when you hover of the document chip. If there are still documents to process then you will move onto the next document, however if all other documents have already been processed, the modal will close, and you will see the Requirements grid updated with the linked document chips.
Uploading against a specific requirement
You may also upload one or more documents directly against a specific document requirement in the Requirements grid. To do this you must drag and drop the document(s) over the row of the requirement you wish to upload against or by clicking on the upload icon ![]() that appears when you hover over a document requirement in the grid.
that appears when you hover over a document requirement in the grid.
The document upload modal will open, however in this instance:
- The Type field will display a filtered list of only the document types which were configured as acceptable types for the document requirement that the documents were dropped onto. If only one document type was configured as acceptable, then this value will be pre-selected.
- The requirement that the document(s) were dragged onto will appear as pre-selected in the Matching Requirements grid.
- If the requirement that the documents were dragged onto is configured will policy-enforced access layers, then the relevant access layers will be set by default in the corresponding fields and these cannot be removed by the user, although additional access layers can be selected.
All other behaviour is the same as described when uploading against the generic document drop-zone.
When you select the Type of document from the filtered list, any additional document requirements which can be satisfied by this document will also appear in the Matching Requirements grid, and these may also be selected if you choose.
Bulk Upload using Apply to All
When uploading documents via the generic drop-zone or against a specific requirement as outlined above, users need to iterate through each document within the Document Upload modal and assign a document type, link to matching requirements if applicable and have other document metadata completed. With large numbers of documents being uploaded at once, there is the option to make selections in the modal and have the values applied to the document being addressed, and each subsequent document remaining to be processed. The Document Name will be maintained for each document and therefore not persisted like the other selections. The APPLY TO ALL button will be available within the modal once users have been granted the permission, more than one document has been uploaded and all mandatory detail has been captured. This will provide a fast completion of bulk document upload, and users will see the details for each document updating as the process completes. Details captured can be edited after the creation where required. Note, this option will be available where 'Smart Docs' has not been enabled on the DocumentsV2 task.
Updating Linked Documents
Once documents have been linked to document requirements, you may update the document metadata by navigating to the Linked tab for the relevant requirement and then clicking on the edit icon which appears when you hover over the document you wish to update.
Clicking this will open the document upload modal and the document metadata fields will be editable. The document type can be updated, but the list will be filtered to display only the types that are acceptable for the current document requirement.
It is also possible to bulk-update any of the linked documents – you can select two or more documents and click on the bulk edit icon which appears at the top of the grid. The document upload modal will open once again and you can edit each document in turn, similarly to the bulk upload process.
Journey Documents Grid
On the left side of the page, beneath the generic drop-zone area, is the Journey Documents grid. This grid provides you with a list of all of the documents which have been uploaded or linked for the main entity during the current journey.
As mentioned above, in this task, documents can be uploaded without them having to be linked to a document requirement. The Journey Documents grid allows these to be visible within the journey, rather than only being visible on the entity profile page.

The grid will display a chip for each document, along with some key data such as the document type, the upload date and the username of the person who initially uploaded the document. Each row in the grid can also be expanded to see the document metadata and access layers for the document.
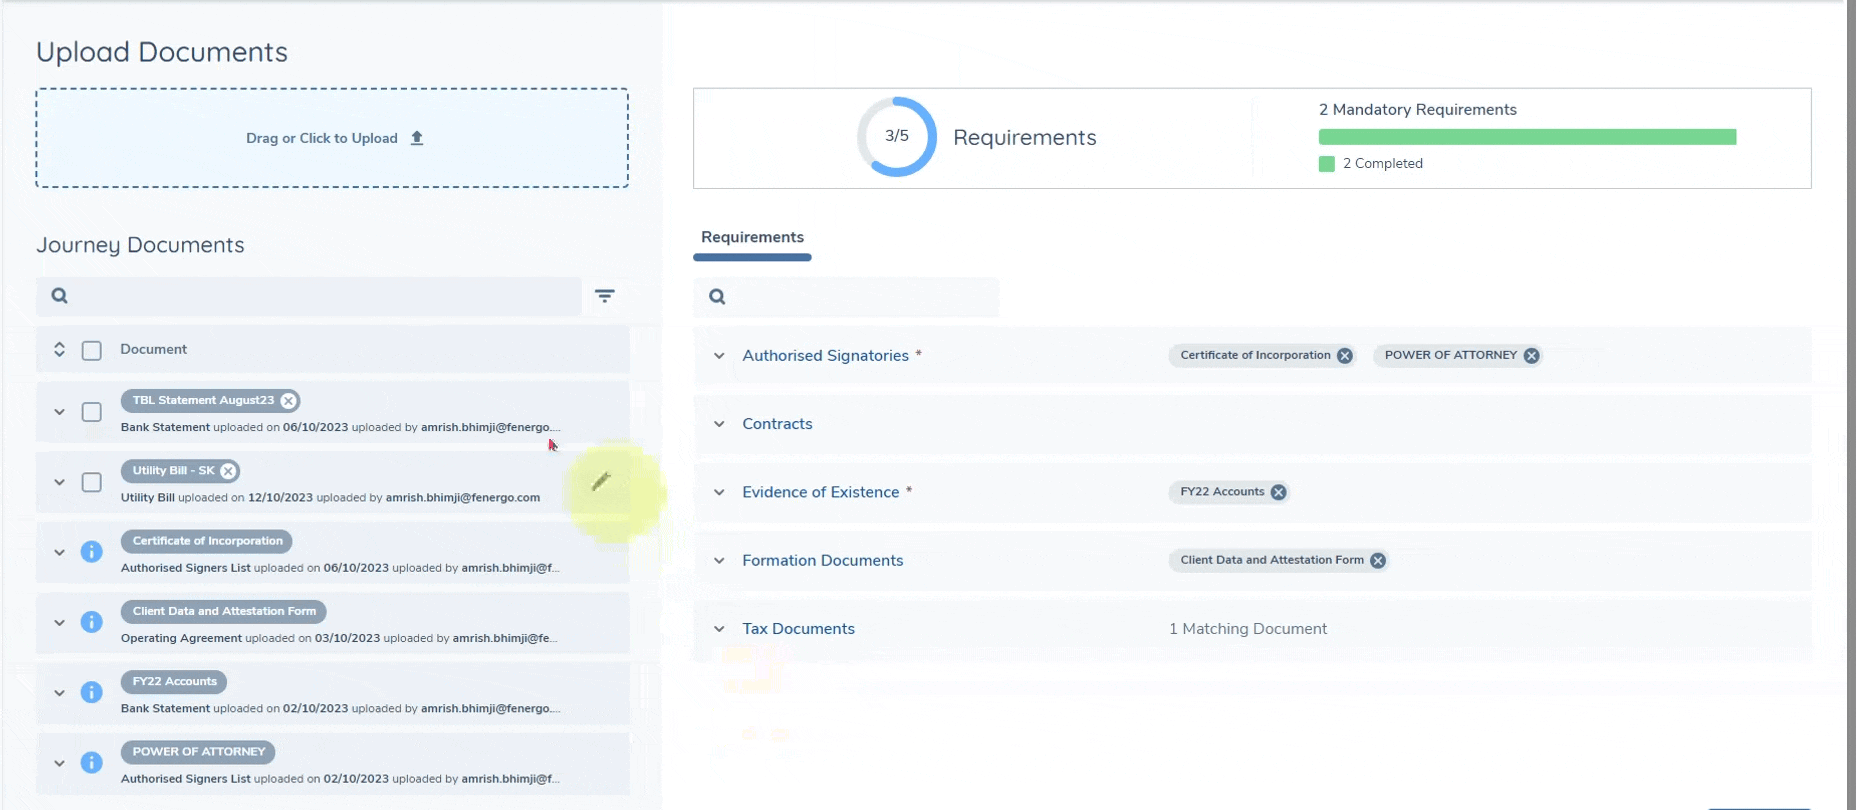
Documents listed in the grid will firstly be ordered to show those which are not linked to any document requirement, then alphabetically ascending by document friendly name.
Unlinked documents can be edited and deleted directly from this grid. To delete a single document, simply click on the x on the document chip, and to edit, a pencil icon will appear on edit.
You may also perform these actions in bulk by selecting multiple unlinked documents and then clicking the bin icon to delete all or the pencil icon to edit all. When editing unlinked documents, you will also have the option to link these to matching requirements if you applicable.
Linked documents which also appear in the Journey Documents grid cannot be edited directly from here. This is to prevent scenarios where you may edit a document which is linked in a different task, thereby potentially affecting a document requirement in a task you are not currently in. Therefore linked documents can only be edited via the linked tab on the corresponding document requirement.
Note: If you link an unlinked document to a requirement via the Journey Documents grid and later decide to unlink the document from the requirement via the Linked tab, the document will reappear as un-linked on the Journey Documents grid, rather than being deleted. You can then delete it from the Journey Documents grid if you wish.
Linking Documents from the Matching Tab
When you link an existing document to a requirement from the Matching tab, the system creates a new linked copy of that document against the requirement. The underlying file is shared with the original, so you're not duplicating storage, but the metadata on the linked copy is independent and can be edited without affecting the original document.
This is important to understand, because it determines how edits, unlinks and relinks behave.
Linking:
- A new linked copy of the document is created against the requirement.
- Metadata values on the linked copy are copied from the original document at the moment of linking.
- The underlying file itself is not duplicated, it is shared with the original document.
Editing metadata on the Linked tab:
- Changes apply only to the linked copy on that requirement.
- The original document is not affected, and neither are any other linked copies of the same document on other requirements.
Unlinking:
- The linked copy is removed from the requirement.
- The original document remains unchanged and is still available in the Matching tab.
- Any metadata edits made on the linked copy are discarded when it is unlinked.
Relinking the same document:
- A fresh linked copy is created, with metadata once again copied from the original document at the moment of relinking.
- Metadata edits made on any prior linked copy are not retained.
Summary:
- Each link operation produces a new, independent linked copy, previous linked copies are not reused.
- Metadata edits on a linked copy never flow back to the original document, and are lost when you unlink.
- Only the metadata is independent; the underlying file is shared across all copies.
Deferring and Waiving Document Requirements
If a document requirement in the task cannot be fulfilled or satisfied with a document, a user with the Document Management Defer or Waive permission has the option to either:
- Defer the requirement i.e. indicate in the system that the document cannot be collected at the moment, but it will be available on a future date. The user must set this future date when setting the requirement to Deferred.
- Waive the requirement i.e. indicate that this document will never be collected.
Typically deferring and waiving document requirements makes sense in the context of mandatory document requirements, however you may still defer or waive non-mandatory requirements if you wish.
Deferring a Document Requirement:
If a document requirement is not already waived or deferred, you may defer a document requirement by clicking the defer icon ![]() which appears when hovering over the relevant document requirement in the grid.
which appears when hovering over the relevant document requirement in the grid.

Clicking this will open a small modal where you must set the Defer Until date and can add a comment if you wish to.
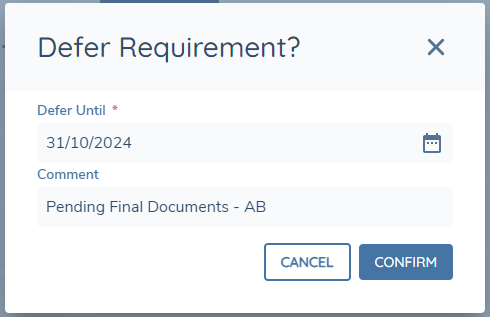
Clicking Confirm will update the status of the requirement to Deferred and this, along with the date, will be reflected on the status chip. If a Comment was set when deferring, this can be seen by hovering over the chip.

If the document requirement is mandatory, then you may complete the task so long as all other mandatory requirements are satisfied.
Once a requirement is deferred, the Defer Until date can be updated by resetting the status and deferring the requirement again.
Once the Defer Until date is in the past, the label and style of the status chip will update to reflect that the Deferral has expired. Whilst the status will still be reflected as "Deferred" in the backend, if the requirement is mandatory, you must reset the status and defer again or reset the status and link a document to the requirement in order to complete the task.

It is possible to collate an entity's deferred documents on journey completion for collection in a journey at a later date by utilising the Review Manager. Please see Document Deferral user guide for more information.
Waiving a Document Requirement:
If a document requirement is not already waived or deferred, you may waive a document requirement by clicking the waive icon ![]() which appears when hovering over the relevant document requirement in the grid.
which appears when hovering over the relevant document requirement in the grid.

Clicking this will open a small modal can add a comment if you wish to.
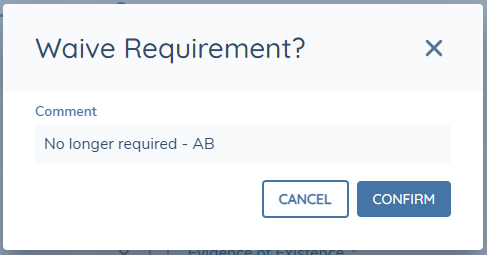
Clicking Confirm will close the modal and update the status of the requirement to Waived and this will be reflected on the status chip. If a Comment was set when waiving, this can be seen by hovering over the chip.
 If the document requirement is mandatory, then you may complete the task so long as all other mandatory requirements are satisfied.
Resetting a Document Requirement:
When a document requirement is either deferred or waived, it is possible to reset its status by clicking on the reset icon ![]() , which appears when hovering over such a document requirement.
, which appears when hovering over such a document requirement.

If the requirement already has a document linked to it, the status chip will reflect a status of "Complete", whereas if there are no linked documents then the status chip will reflect a status of "In Progress".
Note: When a document is uploaded directly against a document requirment which is either waived or deferred, the status will automatically reset and then be set to "Complete". If you edit or delete a document which is already linked to a requirement which is waived or deferred, or if an existing matching document is linked to such a requirment, the status will not automatically update.
Bulk Actions for Defer and Waive:
Document requirements in the grid can be selected, either individually by clicking the checkbox against each row, or altogether by clicking the checkbox in the header row. Depending on the current status of selected requirements, various bulk action icons may or may not be visible on the right hand side above the header row.
- If none of the selected requirements are already waived or deferred, then the waive and defer bulk action icons will be available. Clicking either will open up the defer or waive modal as appropriate, and after populating data in this modal, the status will be updated for all selected requirements
- If ALL of the selected requirements are already either waived OR deferred, then the reset bulk action icon will be available. Clicking this will immediately reset the status of all selected requirements.
- If you have selected a combination of waived or deferred and in progress or complete requirements, then no bulk actions will be available and you must change your selection.
Task Completion Indicators
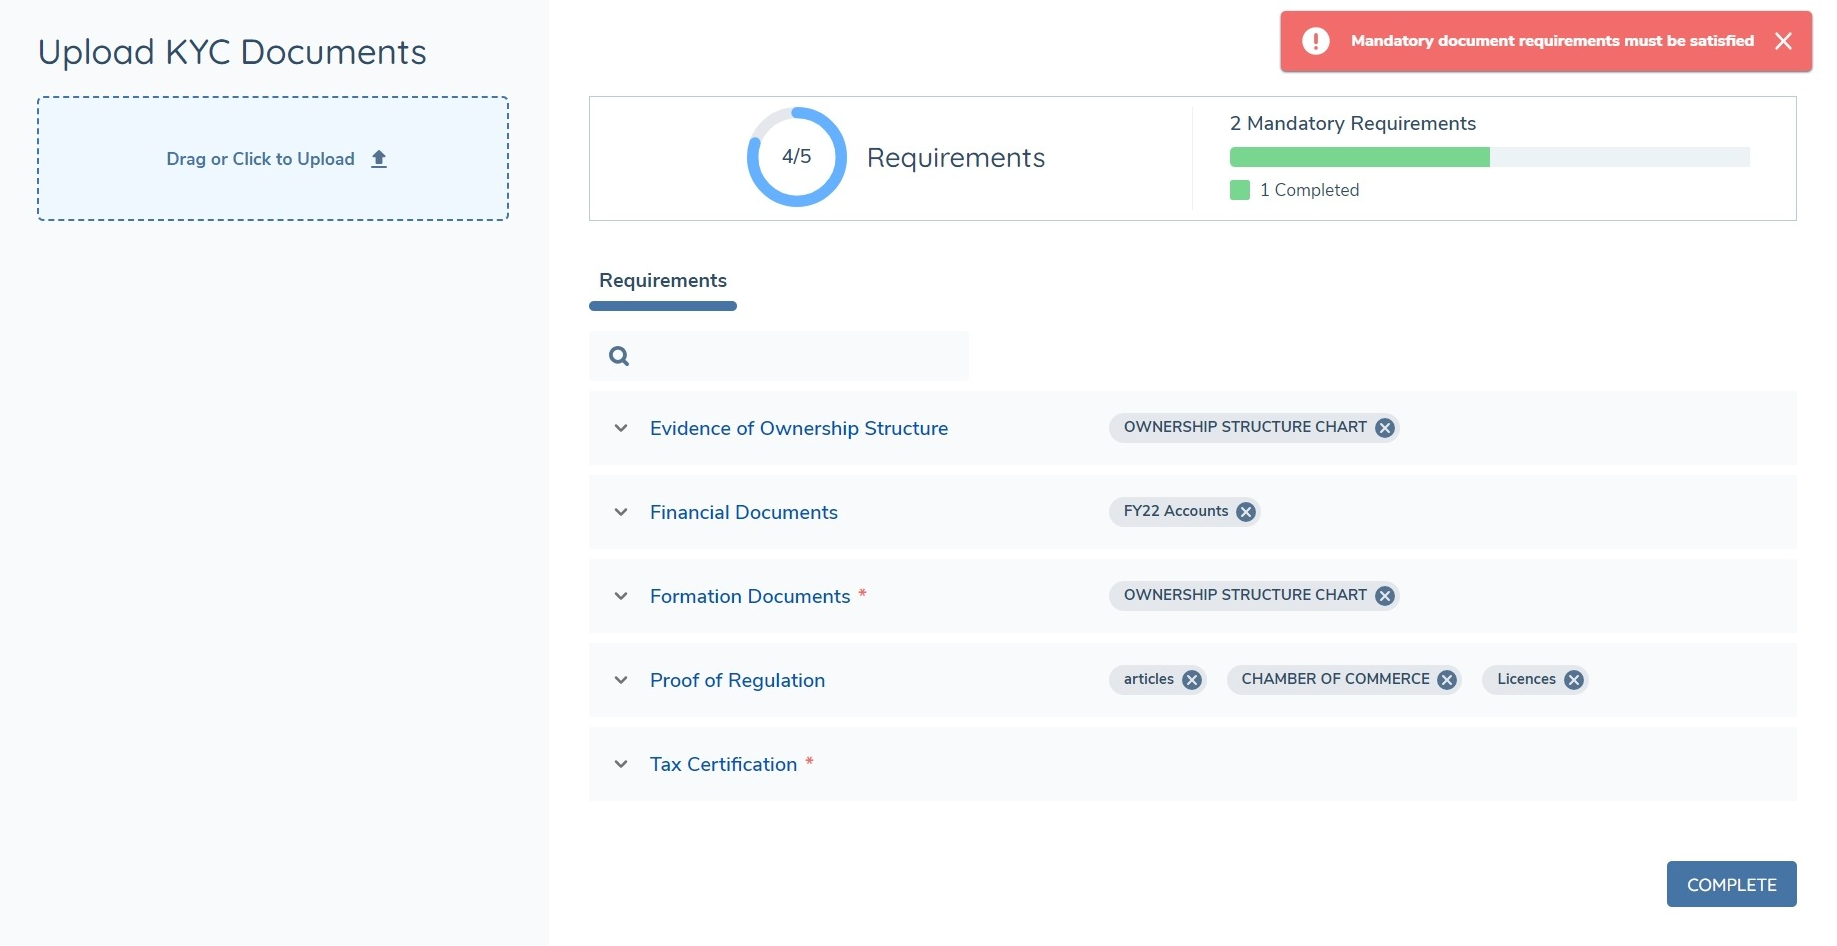
At the top of the page, simple visualisations summarise the progress the user has made in satisfying the document requirements in this task.

The first indicator represents the total number of document requirements that are presented in the task, and the circle is filled in blue as those requirements are satisfied i.e. once a document is uploaded against them or if the requirement is either waived or deferred.

The second indicator specifically represents the mandatory document requirements, and the bar fills in green as those document requirements are satisfied, amber as those document requirements are deferred and dark grey as those document requirements are waived.
If all requirements are satisfied, including mandatory document requirements, then the circle will be filled in green and the bar will display the context of how those mandatory requirements are satisified.

Task Completion Validation
The COMPLETE button on the task will always be enabled, however it will not be possible to complete the task if any of the mandatory document requirements have not been satisfied. To satisfy a document requirement, at least one document must be linked to it, or it must be Deferred or Waived.
If a mandatory requirement was Deferred but the defer until date is now in the past, then it will not allow a user to complete the task without resetting the status and either waiving, deferring again or linking at least one document to it.
Document Persistence
Document Persistence applies in the DocumentsV2 task – please refer to the specific user guide which describes document persistence for additional details. Please note however, that when documents are persisted in the new task there is no validation in place to check whether the document being persisted is of a type which is acceptable for the requirement it is being linked to.
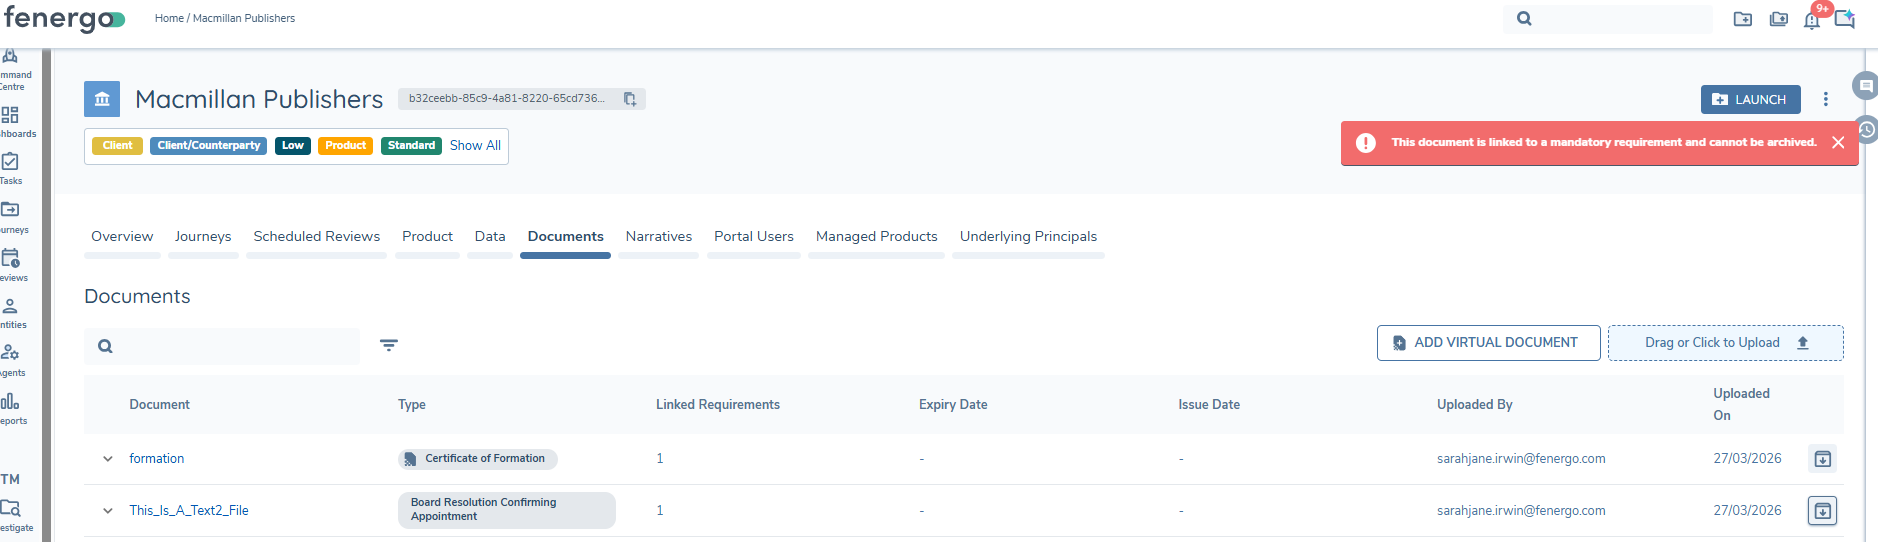
Document Archiving
Document Archiving enables users to manage the lifecycle of documents directly from the Legal Entity Profile page by allowing documents to be archived or unarchived through a UI action.
Only users with the permission "Archive Document" will be able to archive any documents on the Legal Entity.
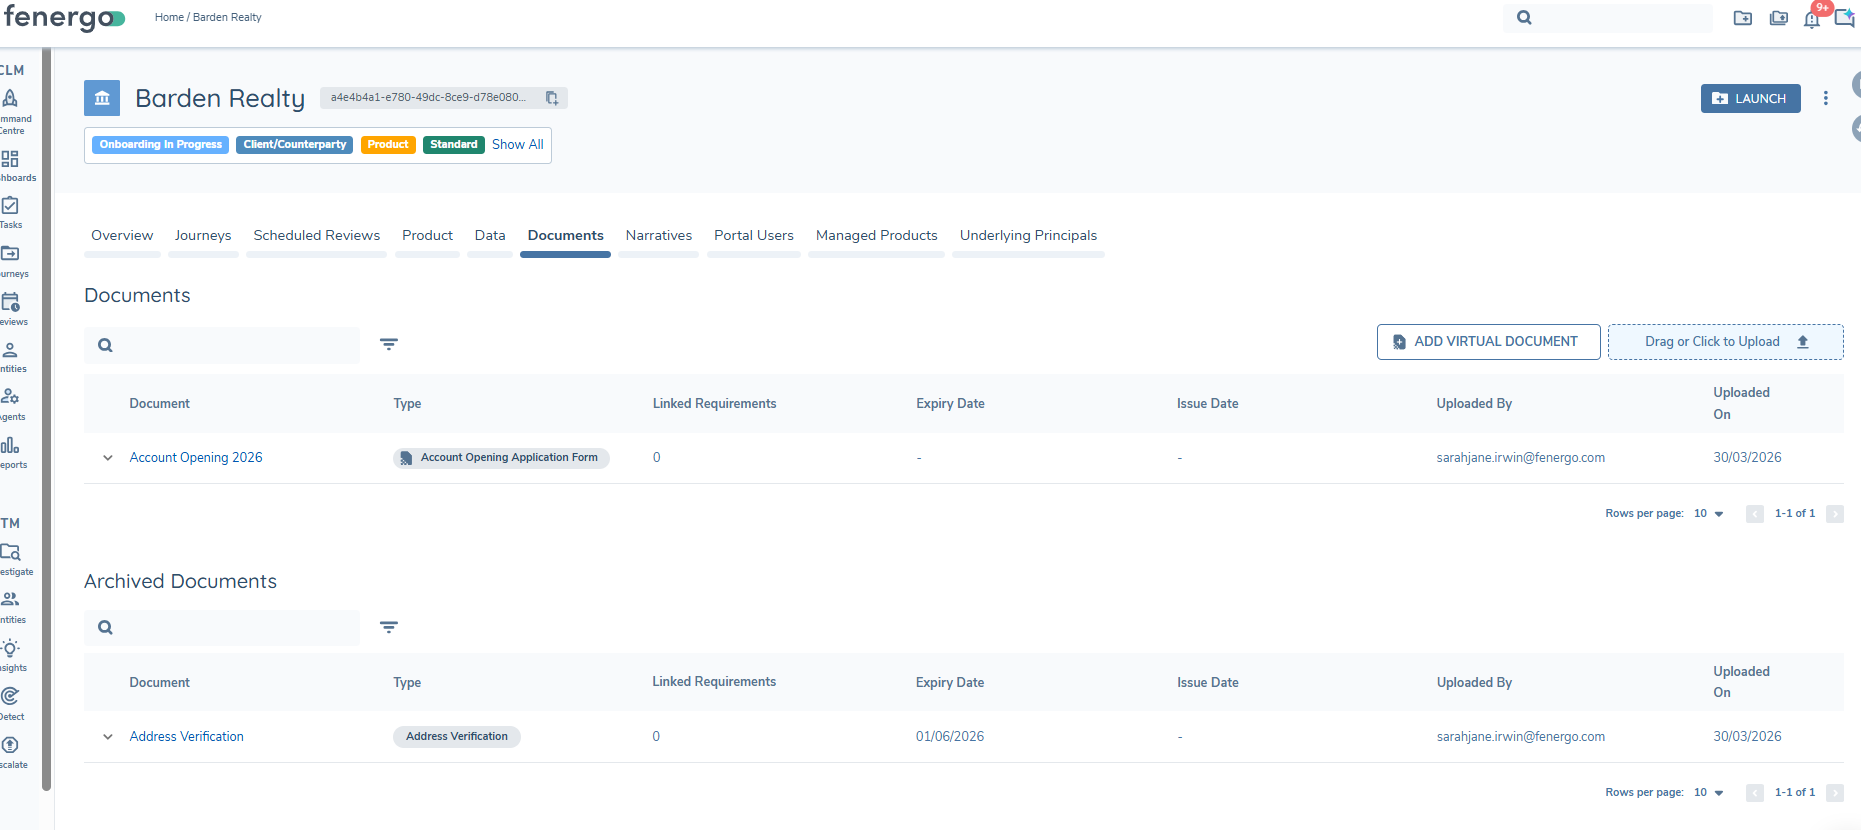
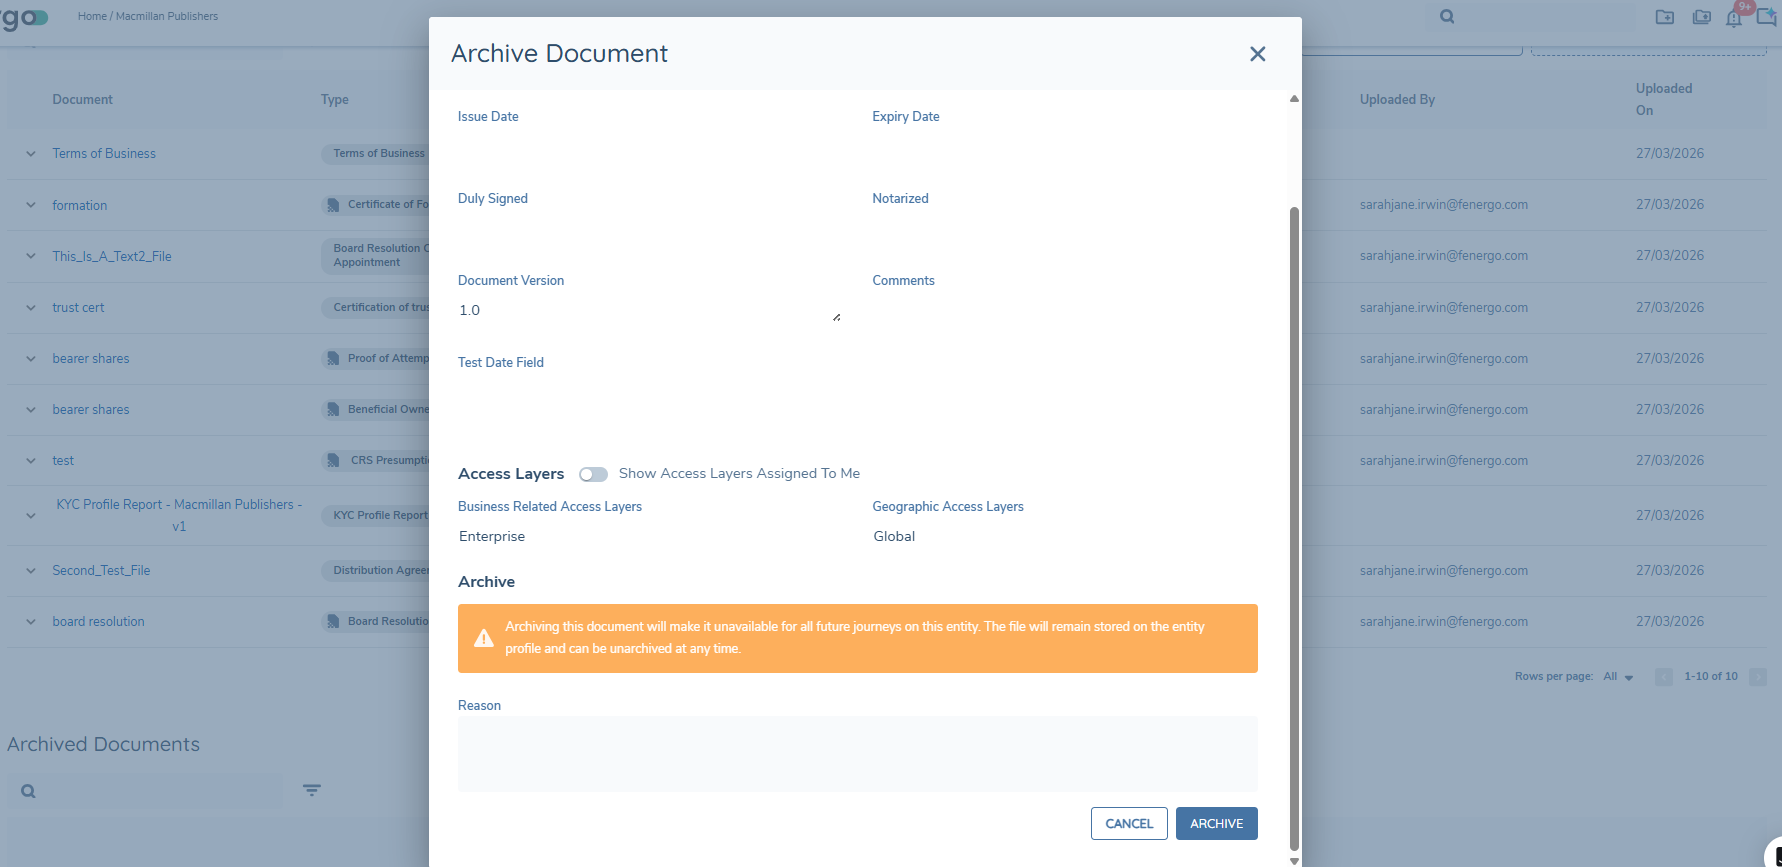
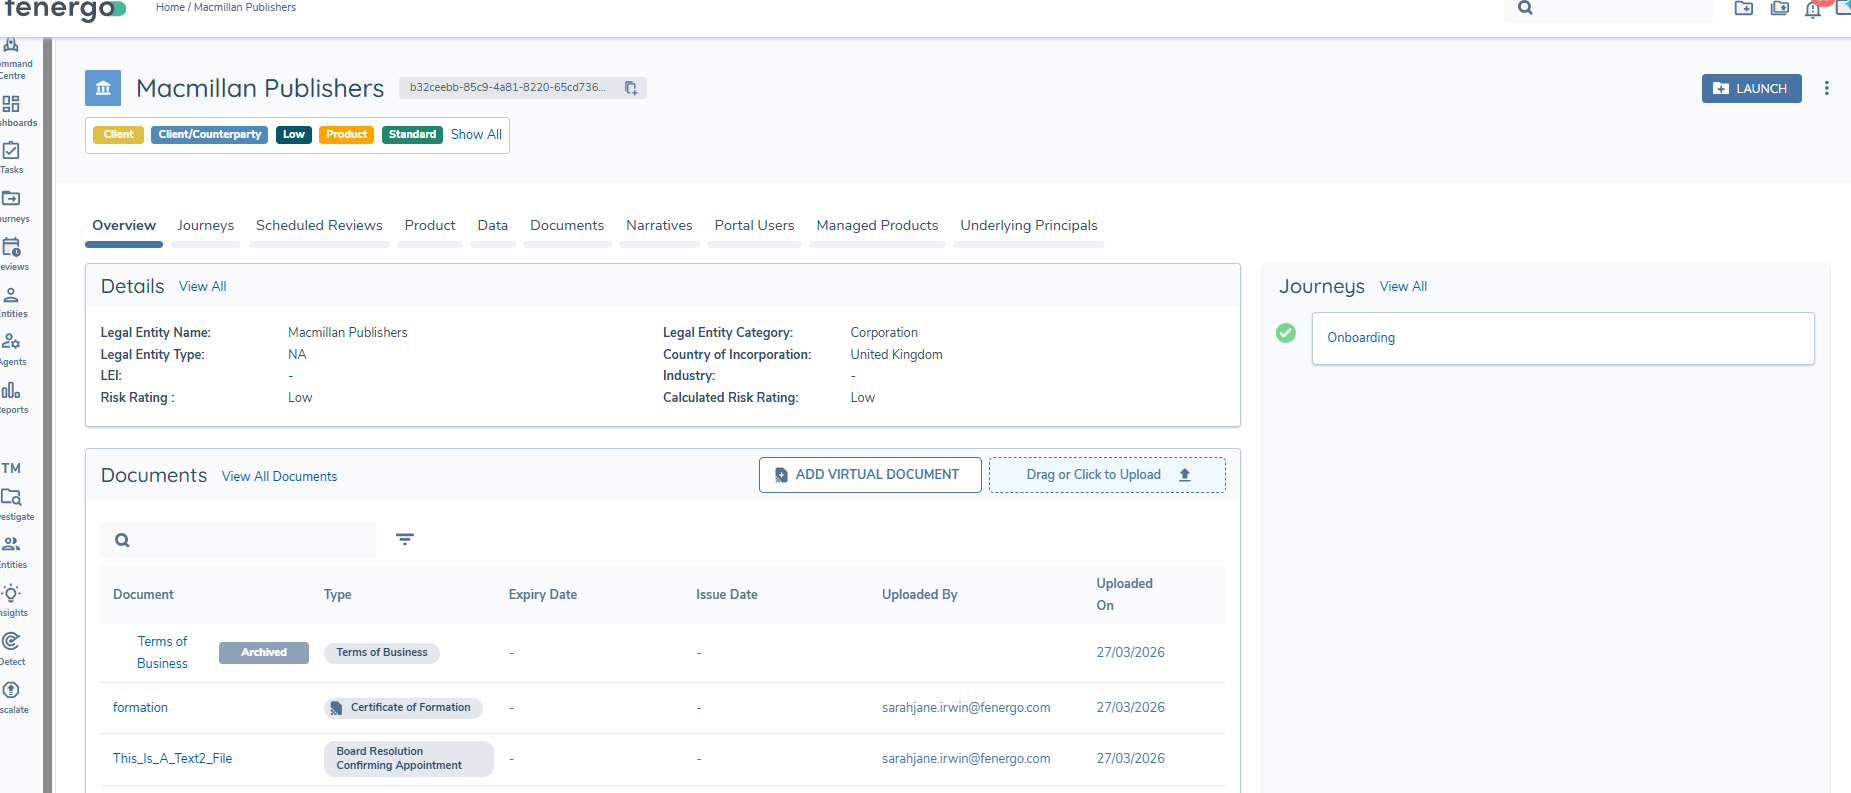
On the Documents tab of the Entity Profile Page, users will see a section for archived documents underneath their entity level documents. To archive documents, user's must click the archive button on the right hand side of each document they wish to archive. This will bring up the Document Metadata modal with a section for Archiving. The user can enter a reason for archiving and then click archive. This will move the document to the Archived Documents section on the screen. A green toast message will display to inform the user that the document has been archived.
Users can unarchive documents by selecting the unarchive button on the right hand side of the archived document. This will bring the document back to the top section and make it available to be re-linked to document requirements. A green toast message will display to inform the user that the document has been unarchived.

Documents that are archived cannot be linked to document requirements in open journeys. For documents that are already linked to mandatory document requirements, they cannot be archived until the document is unlinked from the document requirement during a journey.
On the Overview tab of the Entity Profile page, user's will be able to see a chip for Archived documents next to the document name.
General Notes for Document Archival
- Documents in a status of archived will not be persisted in journeys as available documents.
- Archiving documents is done one document at a time to allow a reason to be entered per document.
- Archiving does not alter GDPR or retention behaviour. Archived documents remain subject to deletion according to existing schedules.
Appendix
File Types
The file types currently supported are:
- bmp (Bitmap Image)
- csv (Comma-separated values)
- doc (Microsoft Office document)
- docm (Microsoft Word Macro-enabled Document)
- docx (Microsoft Office Open XML Format (OOXML) Document)
- dot (Microsoft Word Document Template)
- eml (E-Mail Message)
- gif (Graphics Interchange Format 87a and 89a)
- htm (Hypertext markup language)
- html (Hypertext markup language)
- jfif (JPEG File Interchange Format)
- jpeg (JPEG Image)
- jpg (JPEG Image)
- log (Log File)
- mht (MHTML Web Archive)
- mp4 (Video file)
- msg (Microsoft Outlook file)
- nsf (Lotus Notes Database Format)
- odt (OpenDocument Text Document)
- oft (Microsoft Outlook file template)
- pdf (Portable Document Format)
- png (Portable Network Graphic)
- ppt (PowerPoint presentation)
- pptx (Microsoft Office Open XML Format (OOXML) Document)
- rtf (Rich Text Format File)
- tif (Tagged Image File)
- tiff (Tagged Image File Format)
- txt (Text)
- xls (Excel spreadsheet)
- xlsm (Microsoft Excel Macro-Enabled Spreadsheet)
- xlsx (Microsoft Office Open XML Format (OOXML) Document)
- xltm (Microsoft Excel Macro-Enabled Spreadsheet Template)
- xml (Extensible Markup Language)
- xps (XML Paper Specification File)
Configuring Document Management V2
Document Configuration Permissions
There are five Document Configuration Permissions:
- Document Configuration Access: This Permission allows a user to interact with and navigate into the Document Types and Document Requirement Metadata Configuration areas under Reference Data.
- Document Configuration Edit: This Permission allows a user to create and update a set of Document Types and/or Document Requirement Metadata.
- Document Configuration Delete: This Permission allows a user to delete versions of a set of Document Types and/or Document Requirement Metadata.
- Document Configuration Archive: This Permission allows a user to archive a version of a set of Document Types and/or Document Requirement Metadata.
- Document Configuration Approve: This Permission allows a user to approve or reject a version of a set of Document Types and/or Document Requirement Metadata which has been submitted for approval.
Document Type Configuration
If you have the Document Configuration Access permission assigned to your profile, clicking on the configuration icon in the left-hand panel will open the menu where you will see the below option available under the Reference Data section.

Click on this to navigate to the below page which will allow you to setup an initial draft set of Document Types.

Click on the Add Document Types button to create the initial version 1 set and begin adding the list of Document Types.
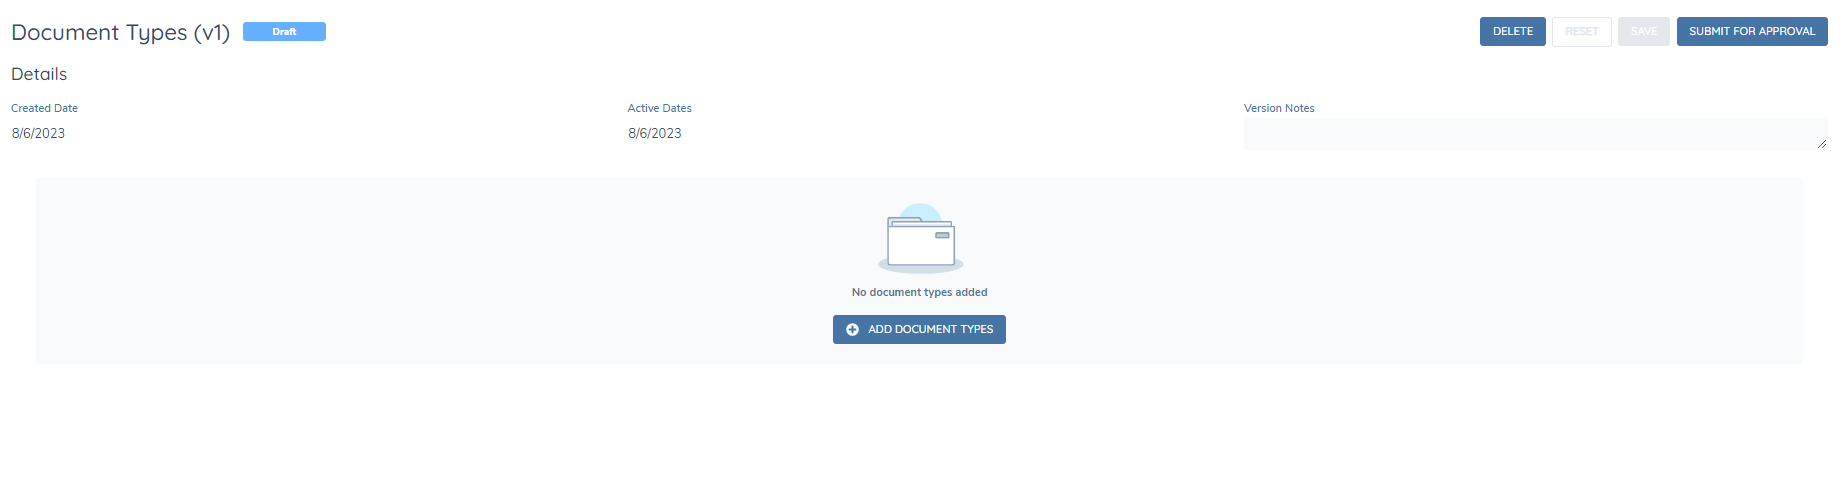
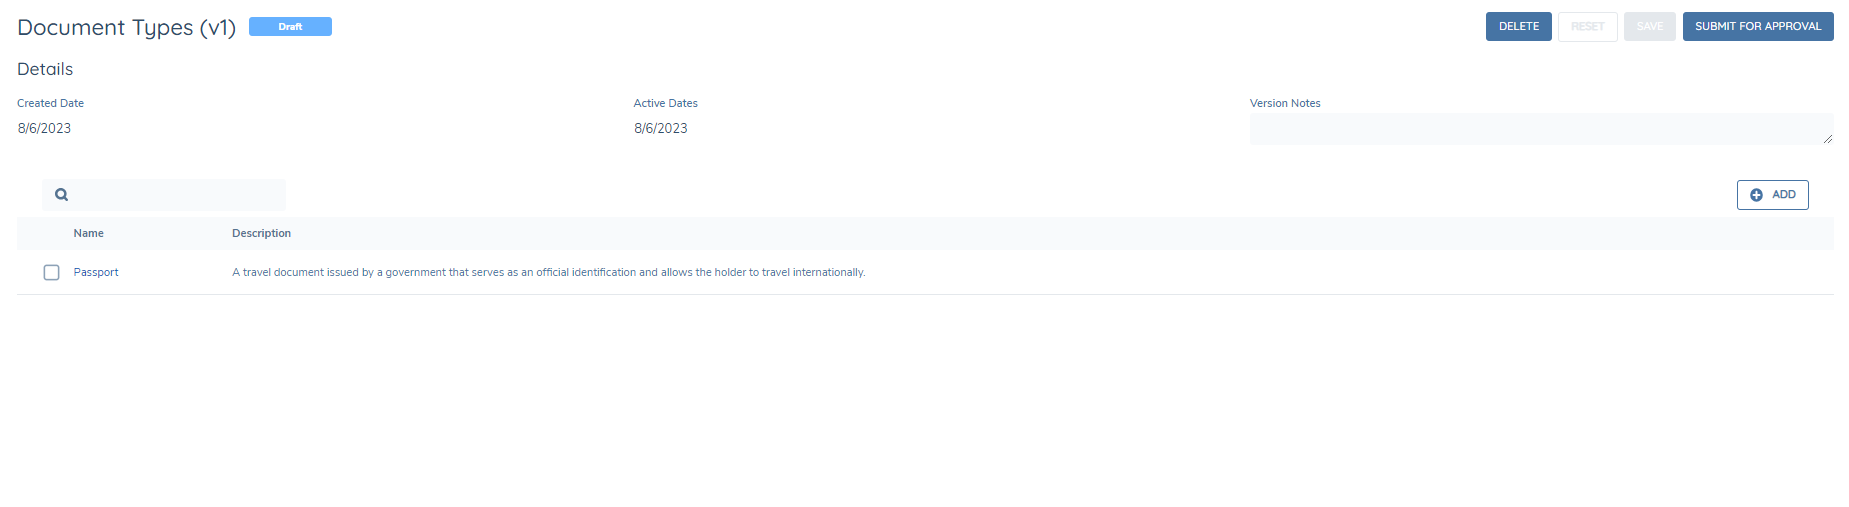
Click on Add Document Types to add your first Document Type to the list.

Populate the Name and DataKey for the Document Type and add a Description (optional), then click Save to add this to the list
The DataKey of the document requirement allows you to make minor updates to the Name without impacting configuration where this Document Type has been referenced. This is similar to how DataKeys are used for data requirements in Policy.
The grid should now be updated to reflect the new document. Click the Add button to add another Document Type and continue this process until the Set of Document Types is complete.
While the version is still in Draft, you may continue to update it or even delete it. Once you are finished editing the draft, you can submit it for approval to be published. Once the set is published, it is ready to use and reference in the application.
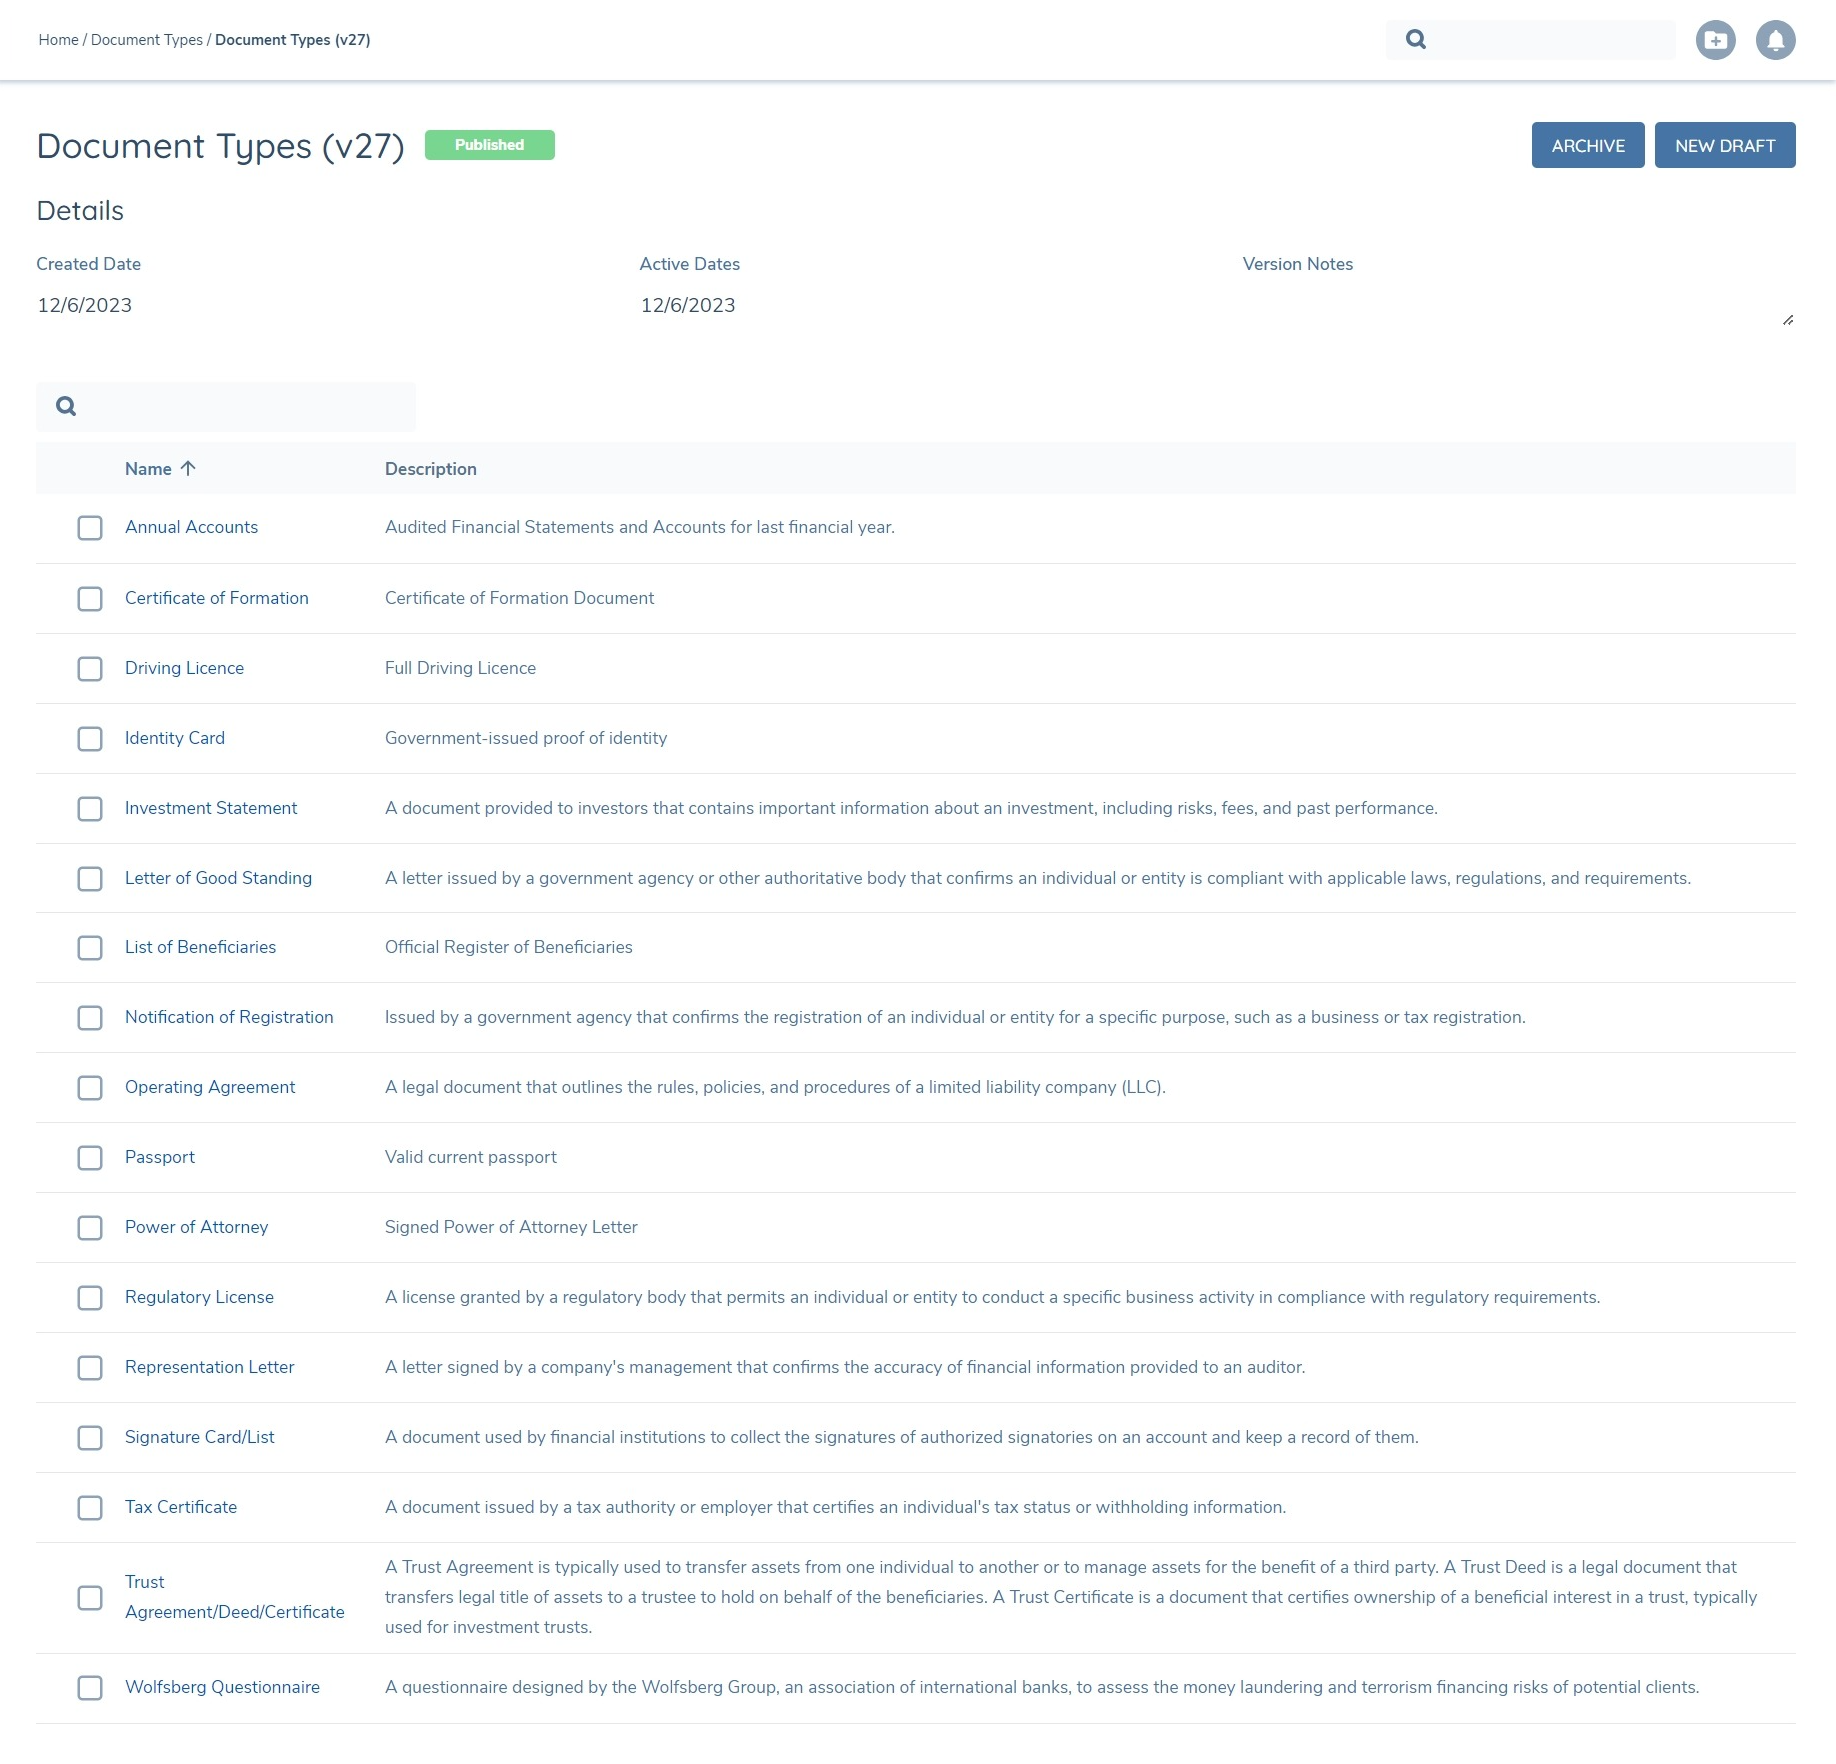
To make changes to a published set of Document Types, you must first create a new draft based on one of the existing versions that are either Published, Archived or Rejected.
Note: When updating a set of Document Types, it is important to take care when deleting Document Types from the list, especially when these have been referenced as Acceptable Types in Policy Configuration.
When a new draft is published, the last-published draft is no longer the active set. A Published version can be Archived, in which case the last-published version will become the active set.
In a Documents task and when configuring document requirements in Policy, the user will be presented the list of Document Types from the latest active version of the Document Types set. Also, it is not possible to configure custom ordering of values for the Document Types list. In tasks, the list will be presented in alphabetically ascending order by default.
Note: When there is at least one active, published set of Document Types, all documents tasks and document components will reference this instead of the Document Types lookup list. Therefore every instance where the old and new documents components are found, the same set of Document Types will be utilised.
Document Requirement Metadata Configuration
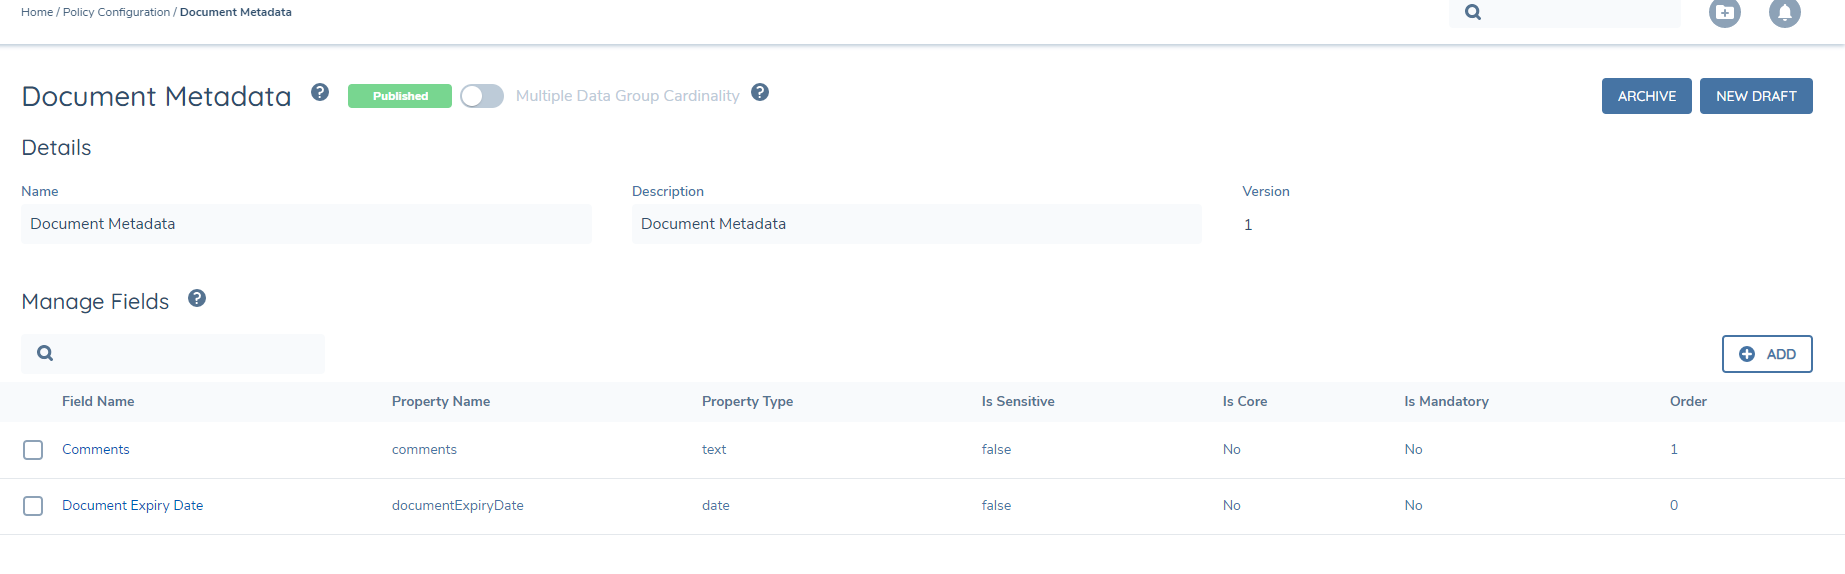
Document Requirement Metadata allows you to define custom properties that are stored against the instance of a document requirement within a journey i.e. the Document Requirement Model. These properties are not visible in the UI - they can be viewed when using the Document Management query APIs to get Document Requirement Models, and once configured these properties can be set using the Document Management Command APIs when creating Document Requirement Models or when using the dedicated endpoint to update these properties for a given Document Requirement Model.
Note: Document Requirement Metadata is NOT the same as Document Metadata. The latter is the properties that are stored against an uploaded document and stored against the Document Model. These fields are currently configured in a data group in the Policy domain. Document Requirement Metadata is an optional configuration - it is not a pre-requisite for any of the other functionality described in this guide.
In the Config Menu under the Reference Data section, click on Document Requirement Metadata Configuration to navigate to the below page which will allow you to setup an initial draft set of Document Requirement Metadata.
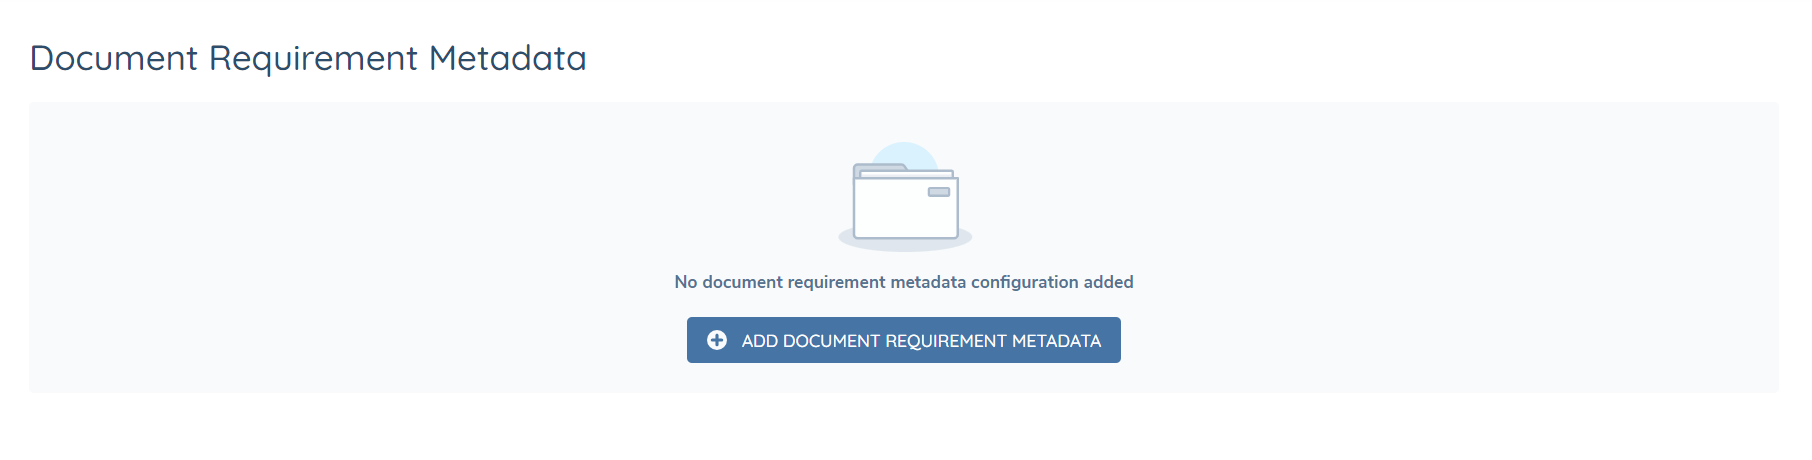
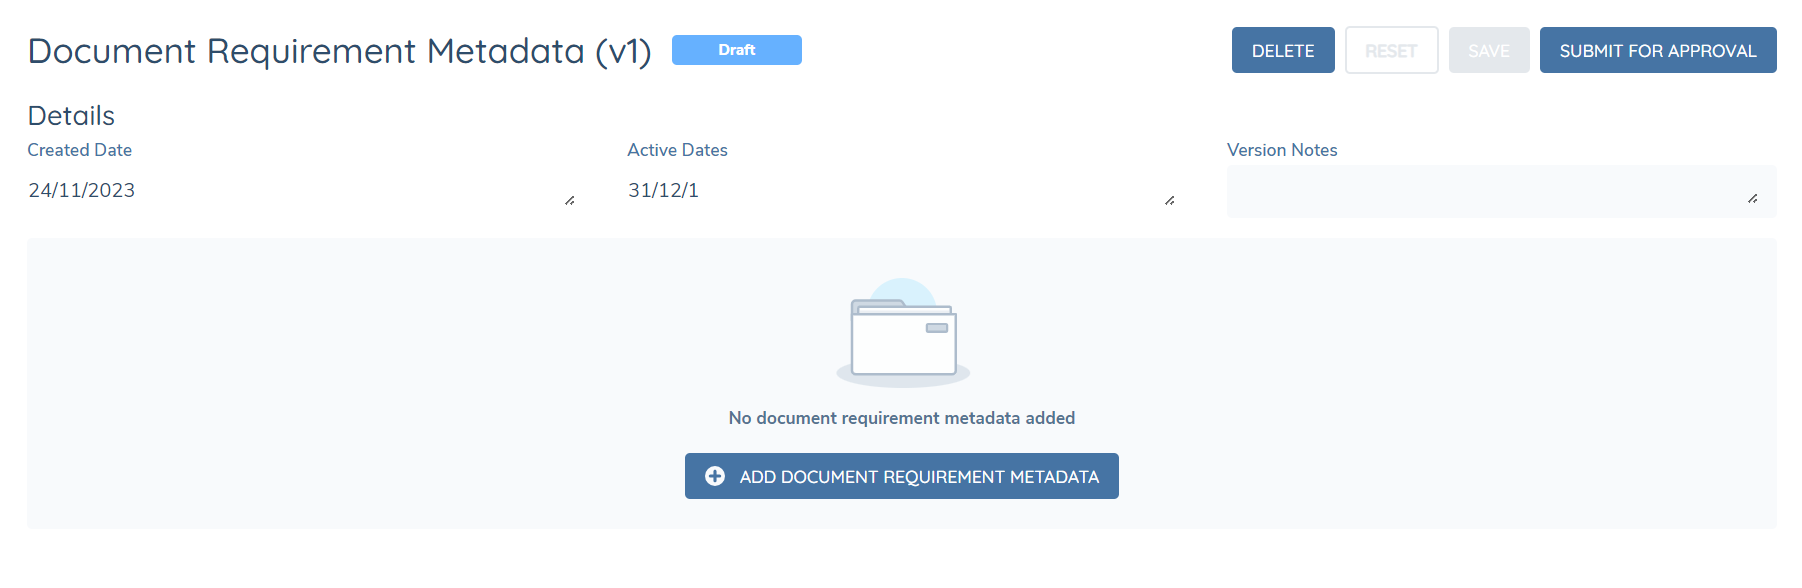
Click on the Add Document Requirement Metadata button to create the initial version 1 set and begin adding the metadata fields.
Click on Add Document Requirement Metadata to add your first metadata field to the set.
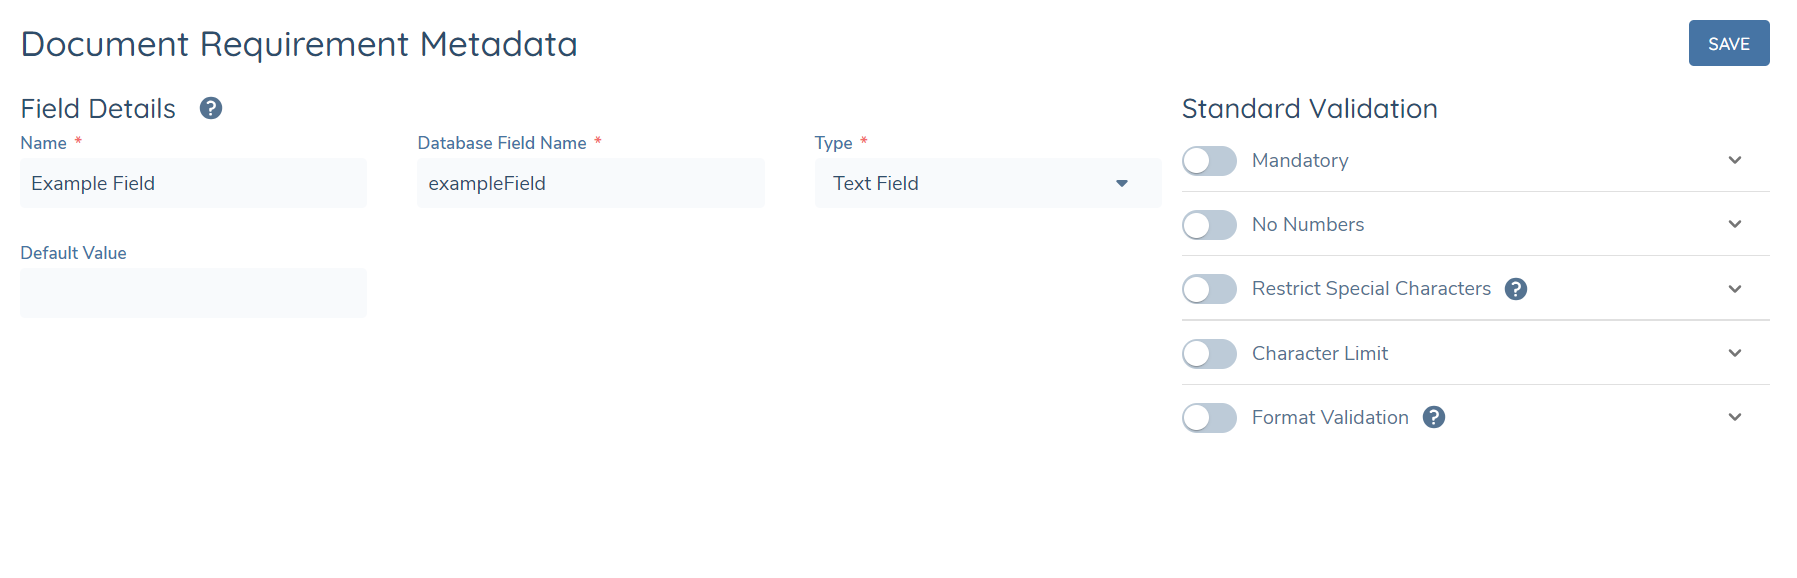
Populate the Name and DataKey (auto-generated), along with the field type from the available list. Based on the type selected, there may be additional fields to populate or different standard validation configuration options.
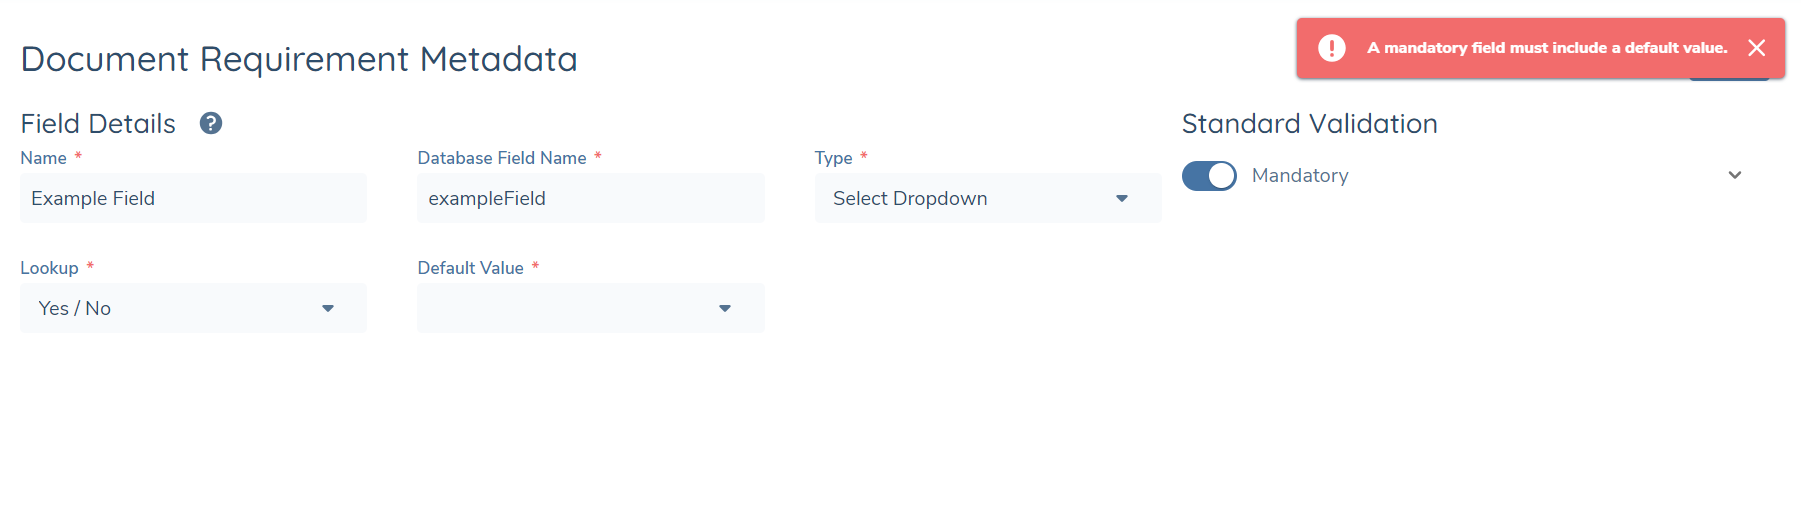
If a field is configured as mandatory, a default value is also required. This is because when creating document requirement models, mandatory metadata fields must be included else the creation will be rejected. There are a number of system-initiated instances where document requirement models are created and so the default value will always be set for these properties on create.
Once you are happy with the configuration, click Save to complete the process and navigate back to the Document Requirement Metadata set.
The grid should now be updated to reflect the new document. Click the Add button to add another field and continue this process until the set of Document Requirement Metadata is complete.
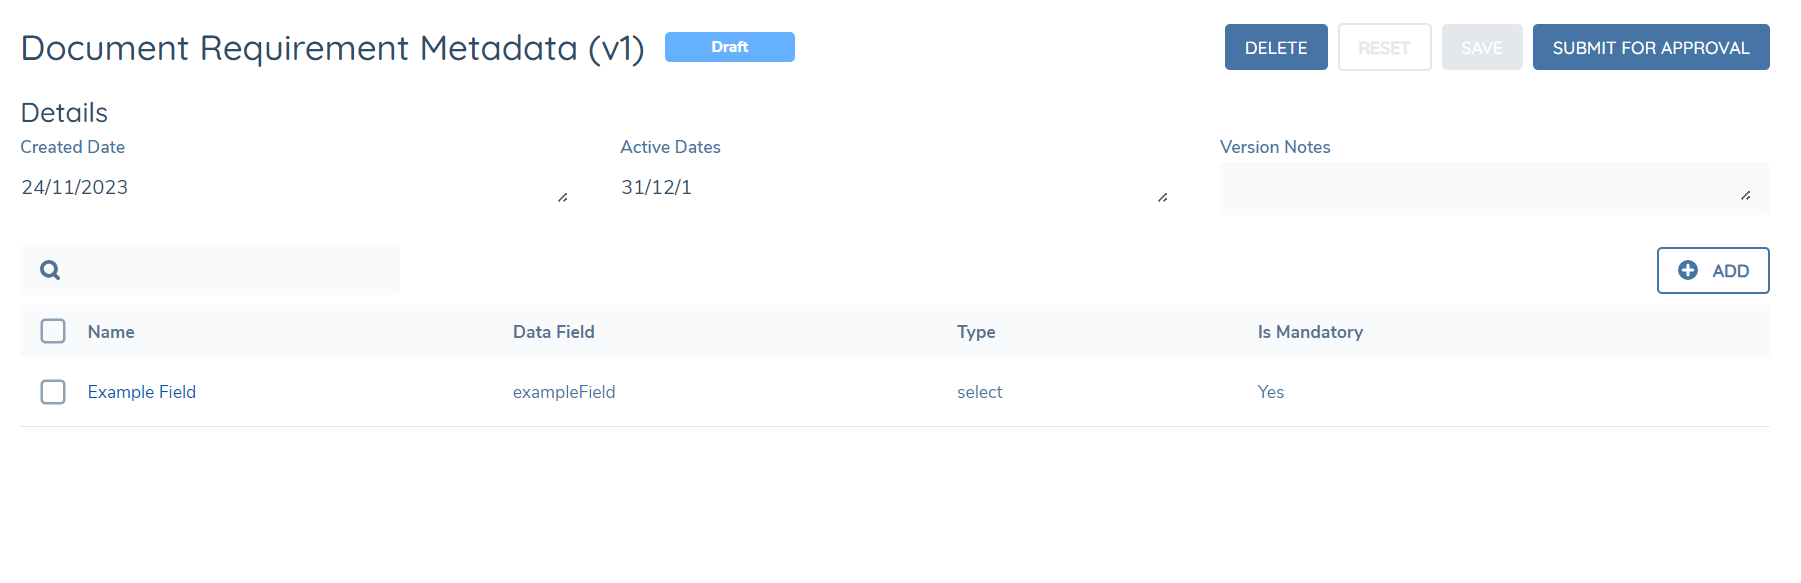
While the version is still in Draft, you may continue to update it or even delete it. Once you are finished editing the draft, you can submit it for approval to be published. Once the set is published, it is ready to use and reference in the application.

To make changes to a published set, you must first create a new draft based on one of the existing versions that are either Published, Archived or Rejected.
When a new draft is published, the last-published draft is no longer the active set. A Published version can be Archived, in which case the last-published version will become the active set.
Mandatory Comments on Document Waiving
A new configuration option has been introduced to enforce mandatory comment capture when waiving a document. This provides enhanced flexibility for organisations that require users to explain why a document is being waived.
Enabling the Setting
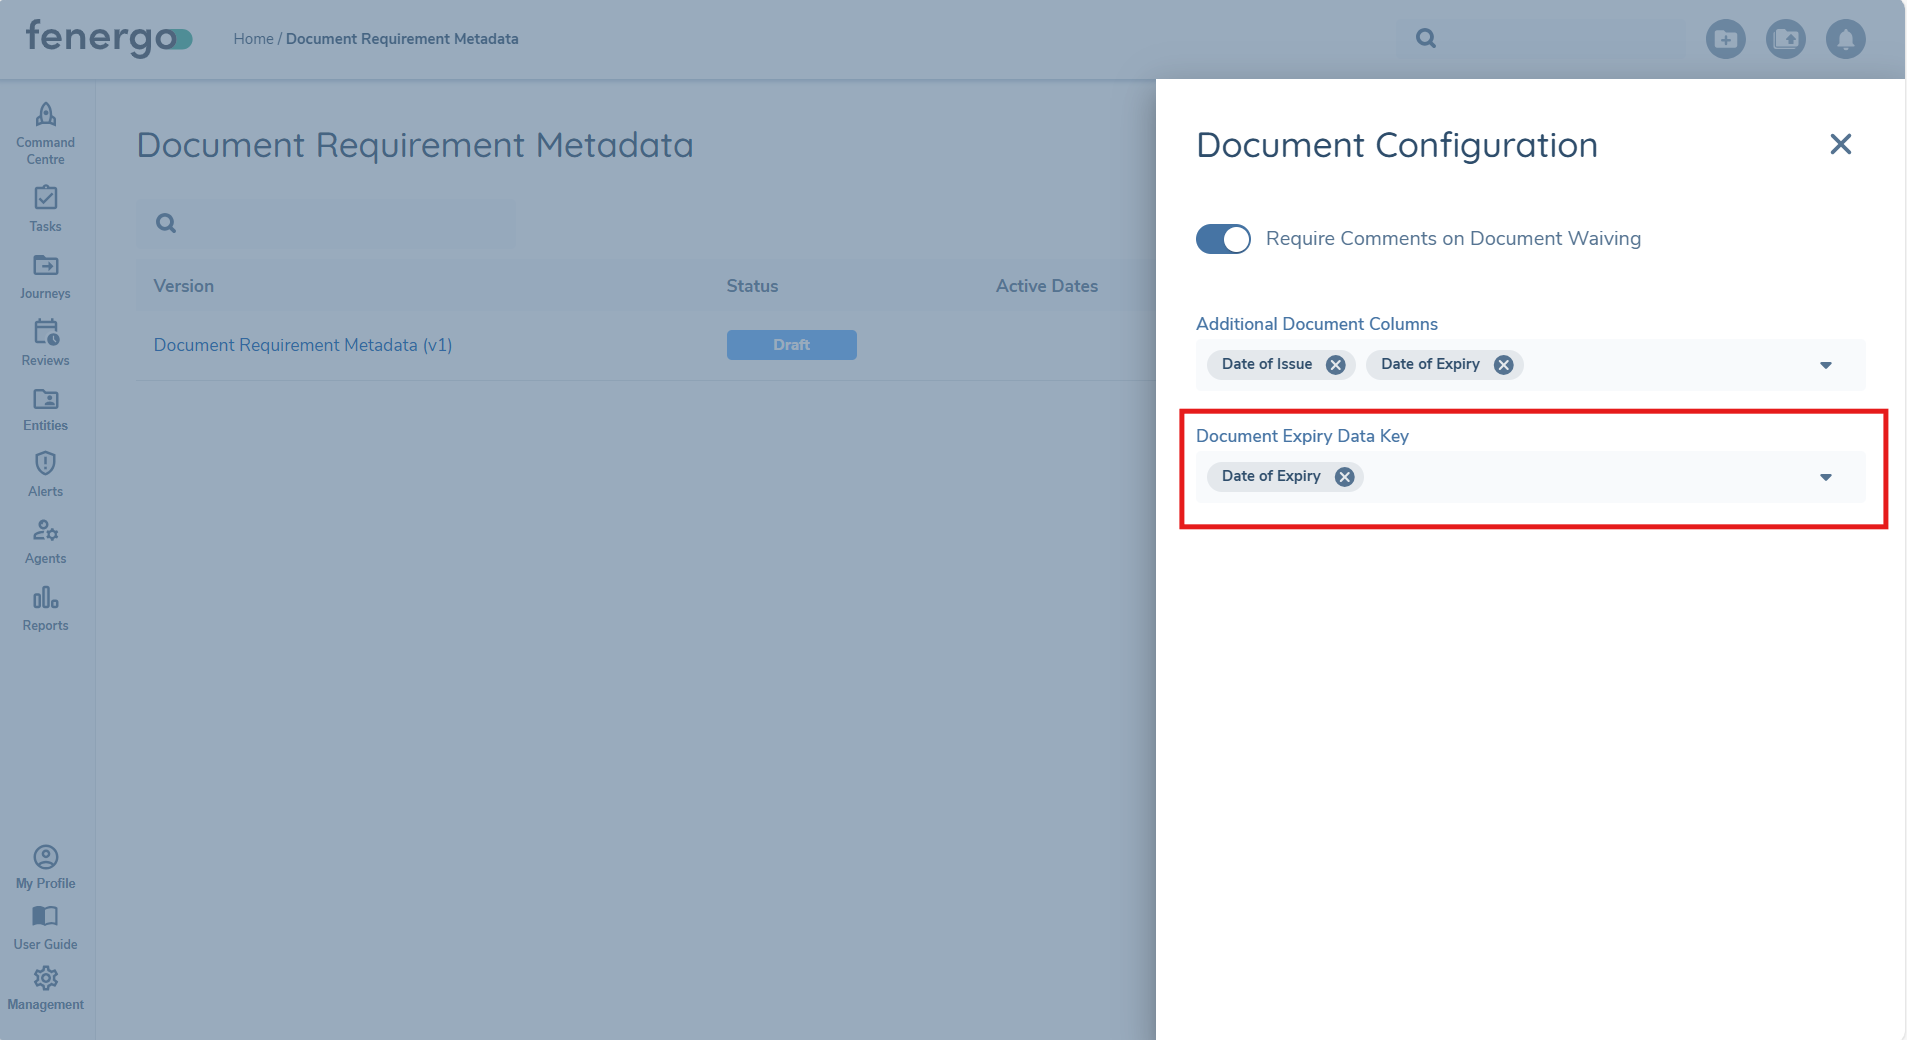
In the Document Requirement Metadata configuration screen, a side panel is available where users can enable or disable the setting "Require comments when waiving a document".
When enabled:
- Users attempting to waive a document during a journey will be presented with a mandatory comment field.
- The system will validate that the comment field is not empty before allowing the waive action to complete.
- If a comment is not entered, the waive action cannot be completed.
- Once enabled, it will apply to all document tasks that are open/not started.
When disabled:
- The user can waive the document without being required to provide a comment (default behavior).
This configuration is applied at the document metadata requirement level. It does not retroactively impact previously waived documents.

Preventing persistence of Expired Documents
A configuration option exists to prevent the saving or submission of expired documents. This ensures that only valid, in-date documents are accepted as part of a journey, supporting compliance and data integrity.
Enabling the Setting:
In the Document Requirement Metadata configuration screen, a side panel is available where users can enable or disable the setting to prevent persisting expired documents.
When enabled:
- The system will validate the expiry date of a document when persisting documents within a task
- To configure this option a selection should be made from the associated Document Metadata Data Group configured in a tenant.
- Only those fields from this data group that are of Property Type: Date will be available for selection.
- Only one value can be selected.
- Once configured this will ensure that expired documents are not persisted in a task where document persistence is applied.
When disabled:
- Documents will persist where configured regardless of their expiry date to satisfy document requirements (default behaviour).
This functionality is applied on a go forward basis, so will only apply from this configuration point forward.
For further information, refer to the Document Management Datakeys and Document Persistence documentation.
Policy Configuration – Acceptable Documents
Once a set of Document Types has been published, in Policy you can configure document requirements to have acceptable documents.
For example, if your document requirement is “Proof of Identity” you may want to configure “Passport”, “Driving Licence” and “ID Card” as acceptable types of documents which can be uploaded against the requirement to satisfy it.
To establish the acceptable types for a document requirement, in Policy Configuration, navigate to or create a draft version of the policy you would like to update. Then select or create a document requirement and scroll towards the bottom of the page where a new grid for “Acceptable Types” has been added:

To select the acceptable types, click the ADD button in the top-right corner of the grid, which will open the below modal window. On the left side you will be presented with the full set of Document Types from the current active version of the set of document types. Click on the add icon against any of these document types to move them over to the right side which presents the document types you have selected to be acceptable for this document requirement.
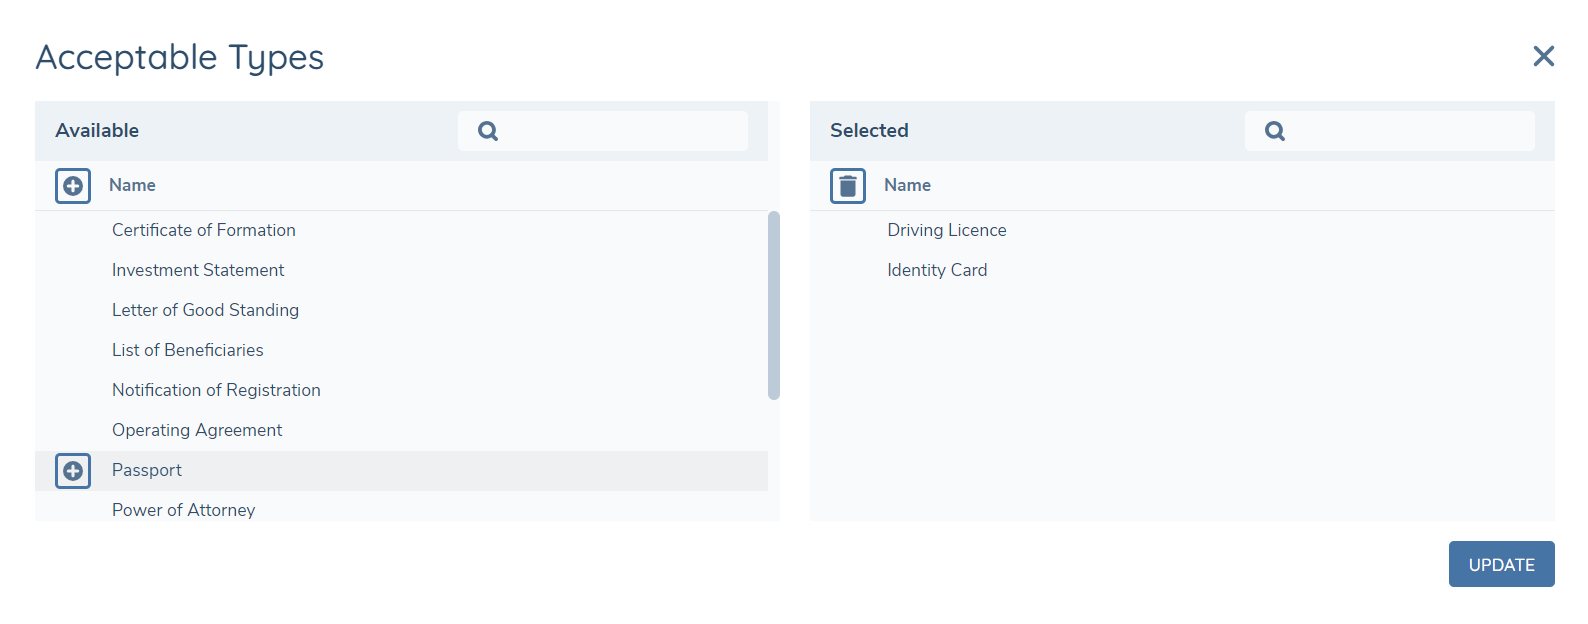
Similarly, to remove one of the selected document types click on the bin icon on the right side, which will appear when you hover over one of the items, or to remove all selected items click on the bin icon at the top of the grid.
When you are happy with the selection, click UPDATE to apply the acceptable types against the requirement and see these reflected in the grid.
Note: These will only be saved and set against the requirement when you save the requirement itself.
It is not possible to apply conditions as to when a specific document type is acceptable or not. To achieve a similar outcome, you must configure the document requirement multiple times with the same document data key but with different acceptable types and different trigger conditions at the document requirement level.
Policy Configuration - Document Metadata
The new DocumentsV2 task sources Document Metadata configuration in the same way as the legacy Documents task.
In order to configure this, navigate to Policy Configuration, and then to the Data Groups panel. Here, there should be a data group called "Document Metadata". If no data group exists, you can create one.
Edit this data group to add additional fields.
Journey Configuration
DocumentsV2 Task Journey Configuration
A new task type called DocumentsV2 has been created and this must be configured into a Journey Schema using Journey Builder to use the new functionality in your journeys.
Configuration of the new task is largely identical to that of the legacy Documents task type, the only difference being the option to toggle on "Intelligent Document Processing" in the v2 task, which enables the Intelligent Document Processing capabilities. Refer to Using Intelligent Document Processing for full details regarding this functionality.

You may configure many instances of the DocumentsV2 task in your journey, e.g. initially for a user to upload documents and then in a later stage for a reviewer to check documents. It is also possible to configure a journey to have the legacy Documents task type and the DocumentsV2 task type configured in the same journey, however this is not recommended due to the differences is task validation as well as the behavior of document requirement statuses in the legacy Documents task.
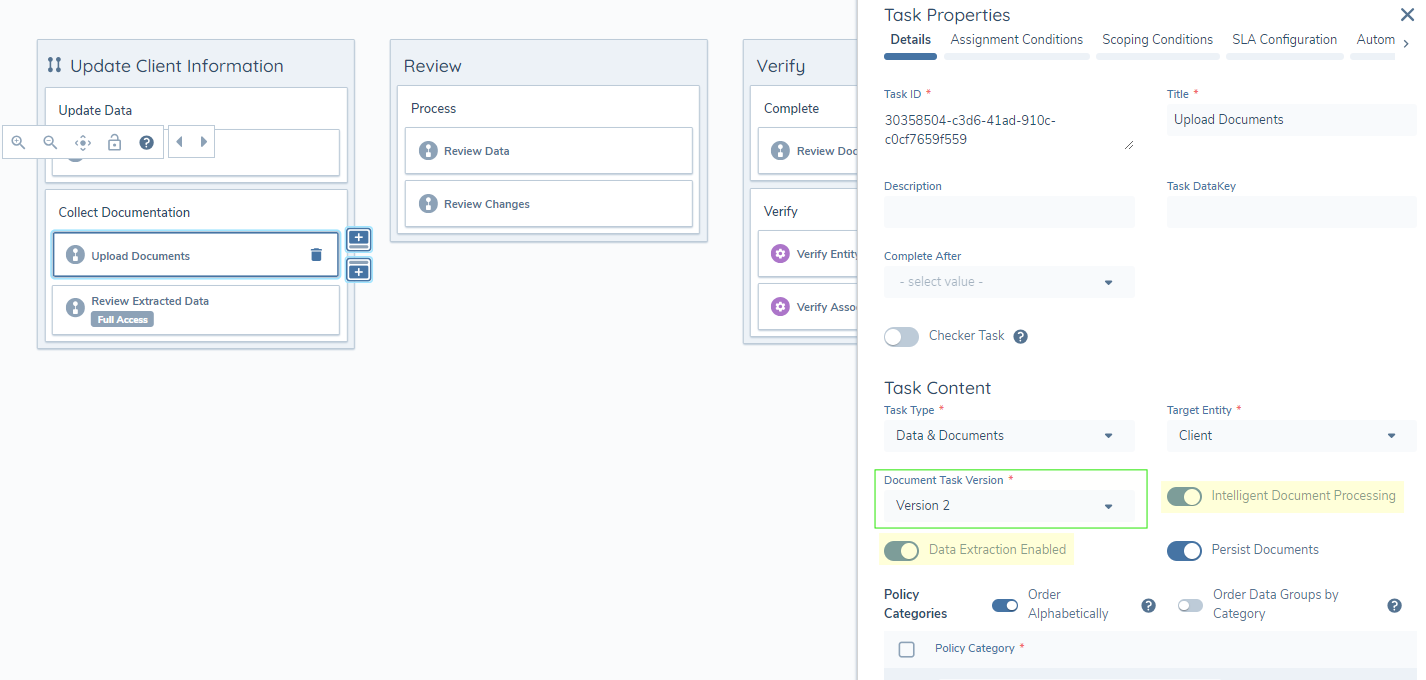
Data & Documents Task
The v2 functionality is also available in the Data & Documents task. A new configuration option 'Document Task Version' is now included and there are two options available here - 'Version 1' and 'Version 2'. Existing journeys where this task is configured will default to 'Version 1' when selected in Journey Builder, which will persist the existing document functionality. Where journeys are in draft in Journey Builder, the new V2 functionality will be enabled when 'Version 2' is configured in this field. Selecting 'Version 2' will display additional configuration toggles linked to this version of the document functionality - 'Intelligent Document Processing' and 'Data Extraction Enabled'. Refer to Using Intelligent Document Processing for full details regarding this functionality.