eSignature
The eSignature feature in Fenergo SaaS allows you to send documents to e-mail recipients by creating DocuSign envelopes and then retrieving the signed documents directly into the system once the signing process has been completed.
eSignature Feature
You can configure a journey whereby at any point in time, documents can be sent to recipients via the DocuSign flow and then retrieved for further review and approval.
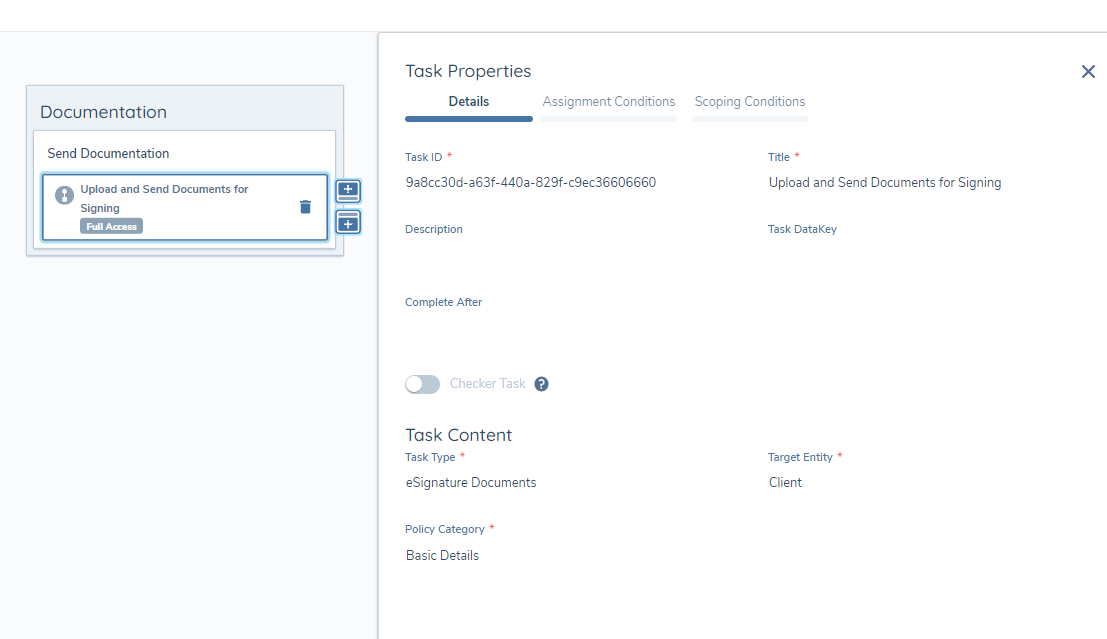
eSignature Documents Task
In appearance and basic functionality the eSignature Documents task is very similar to the standard Documents Task, but with the additional option to send any uploaded documents to existing or adhoc recipients for signing via a DocuSign envelope.
Once the signing process is complete, the notification bell will inform you of this and the signed document will be automatically retrieved and uploaded against the document requirement.
There is no mandatory enforcement in this task, which means you can simply send docs for signing but continue to progress the journey without waiting for the signed documents to be retrieved.
Sending Documents
There are two steps required in order to send documents for signing:
-
Upload document(s) against an eSignature document requirement
Documents can be uploaded by hovering over a document requirement which will display the Upload Documents dropzone/button. Click on this button to select documents or drag and drop documents in order to upload documents against a requirement.

Once documents are selected or dropped, a document upload modal will appear where you will be able to select the name of the document, the document type, document access layers and any other document metadata as configured in the Document Metadata data group in Policy.
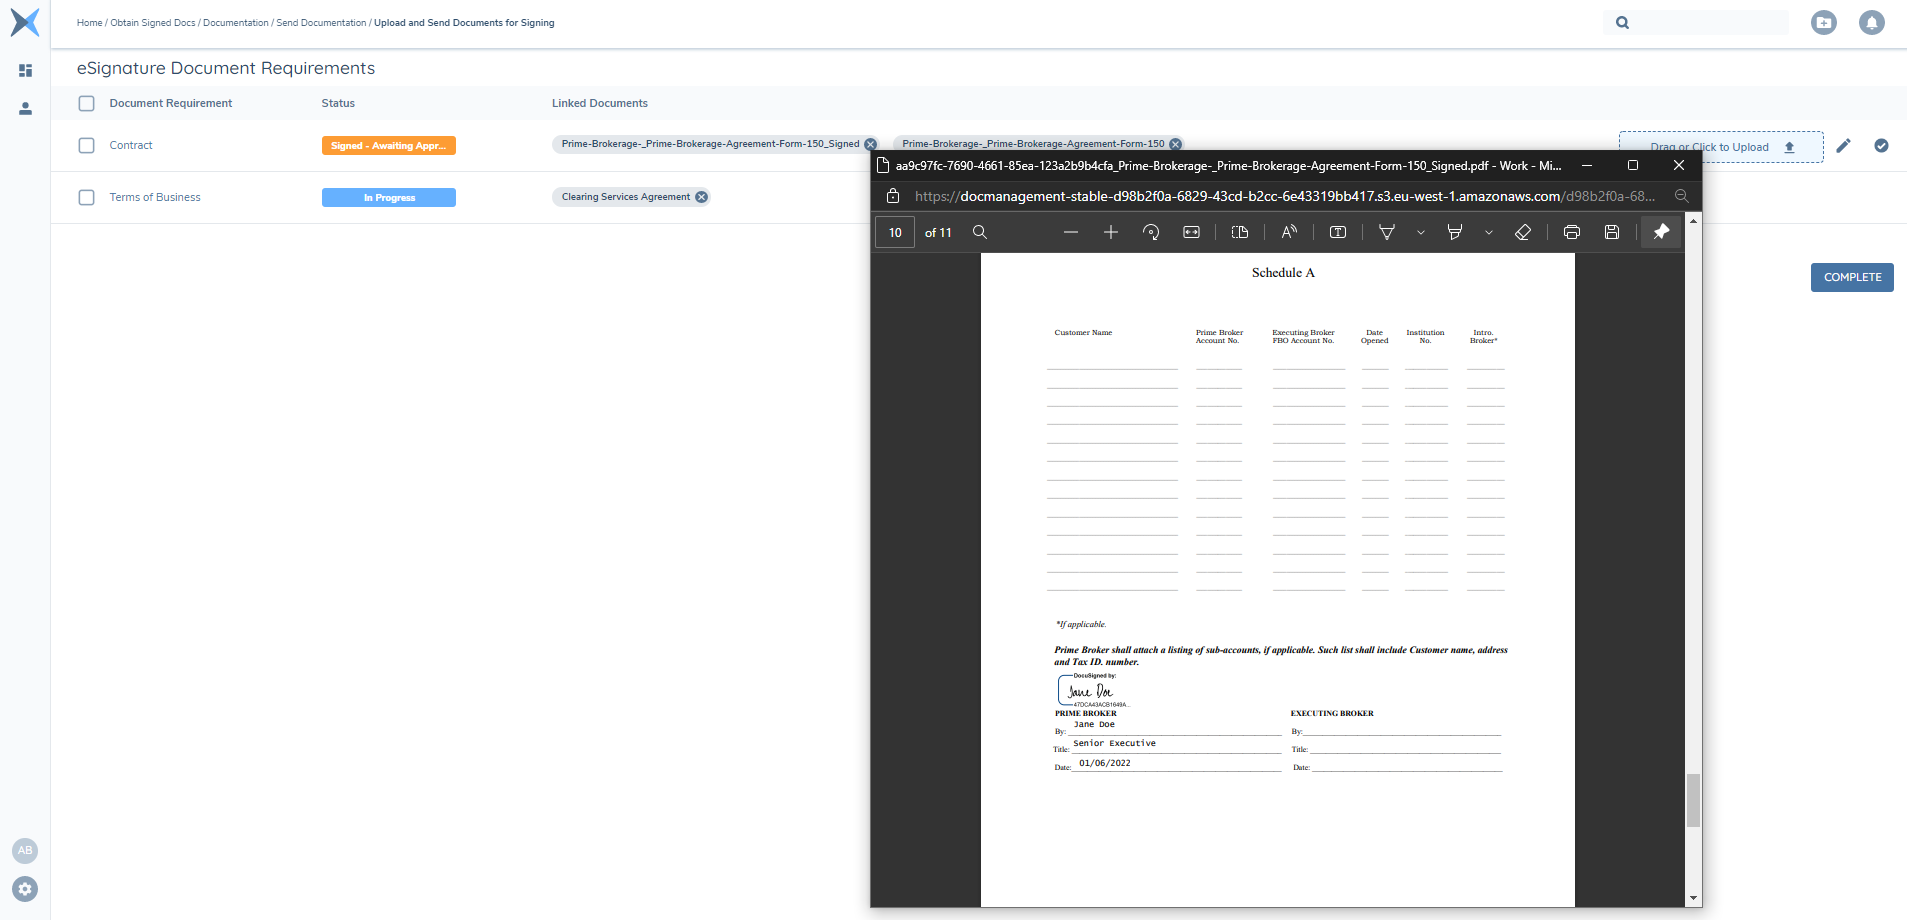
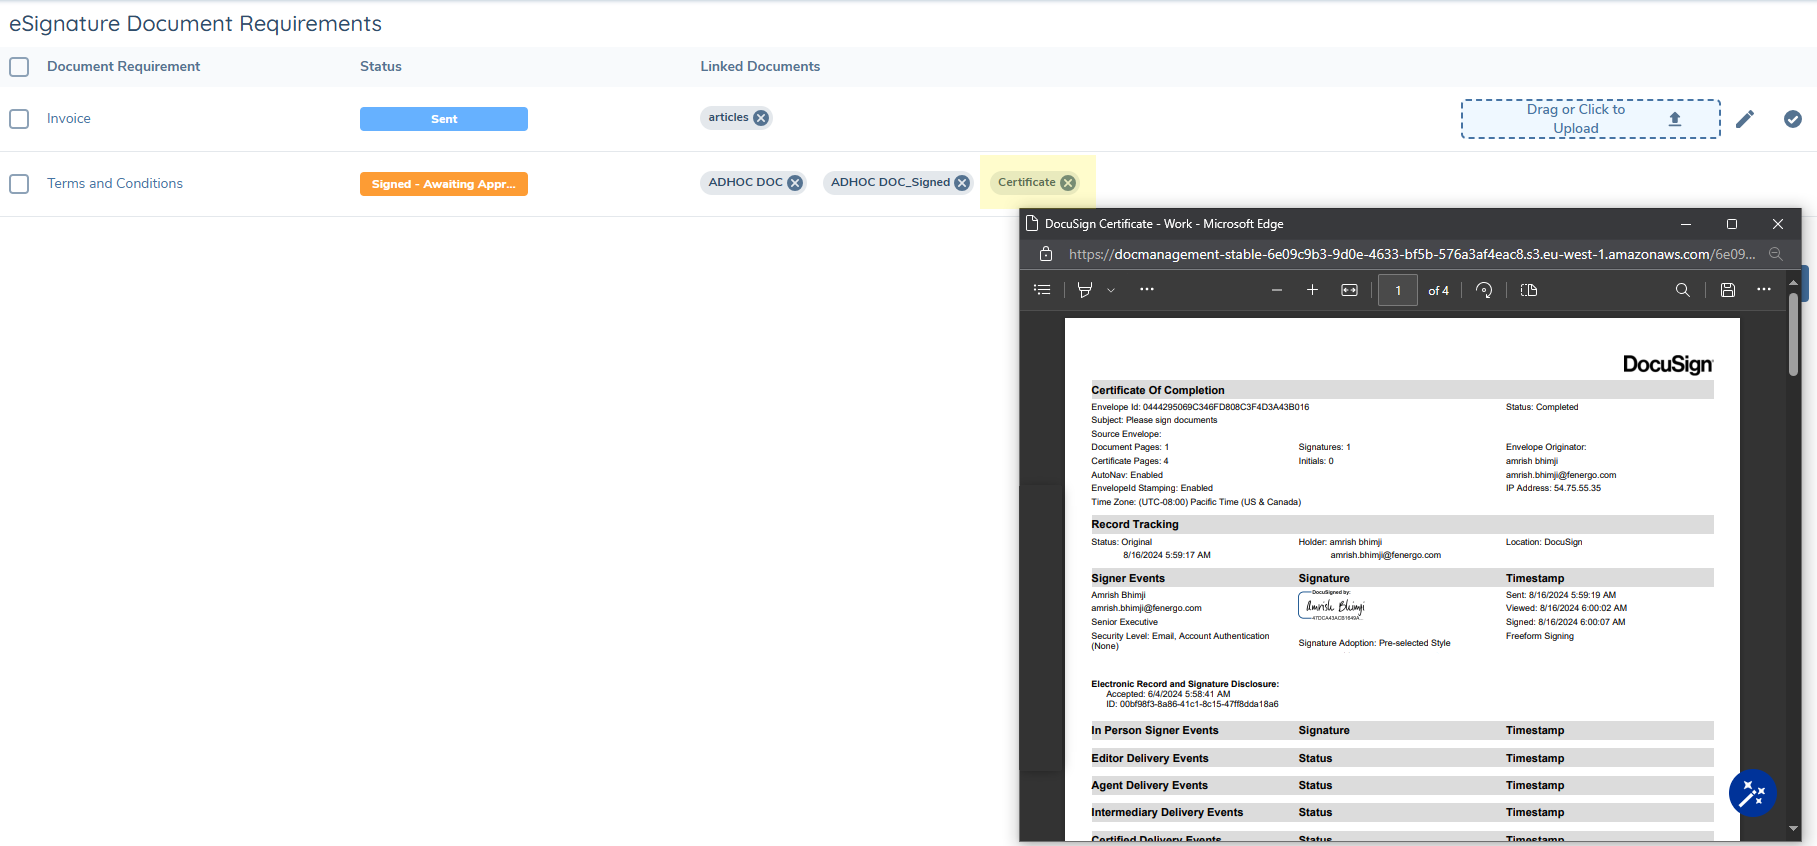
An antivirus scan runs in the background and the document is available to view once that is complete. The eSignature document requirement status remains ‘In Progress’ but the eSign icon will become visible at this point:

Clicking this will open a new modal in which you will be able to select recipients and send the documents for signing. ALL documents uploaded against that eSignature document requirement will be included in the DocuSign envelope that is sent to recipients.
-
Select recipients and send
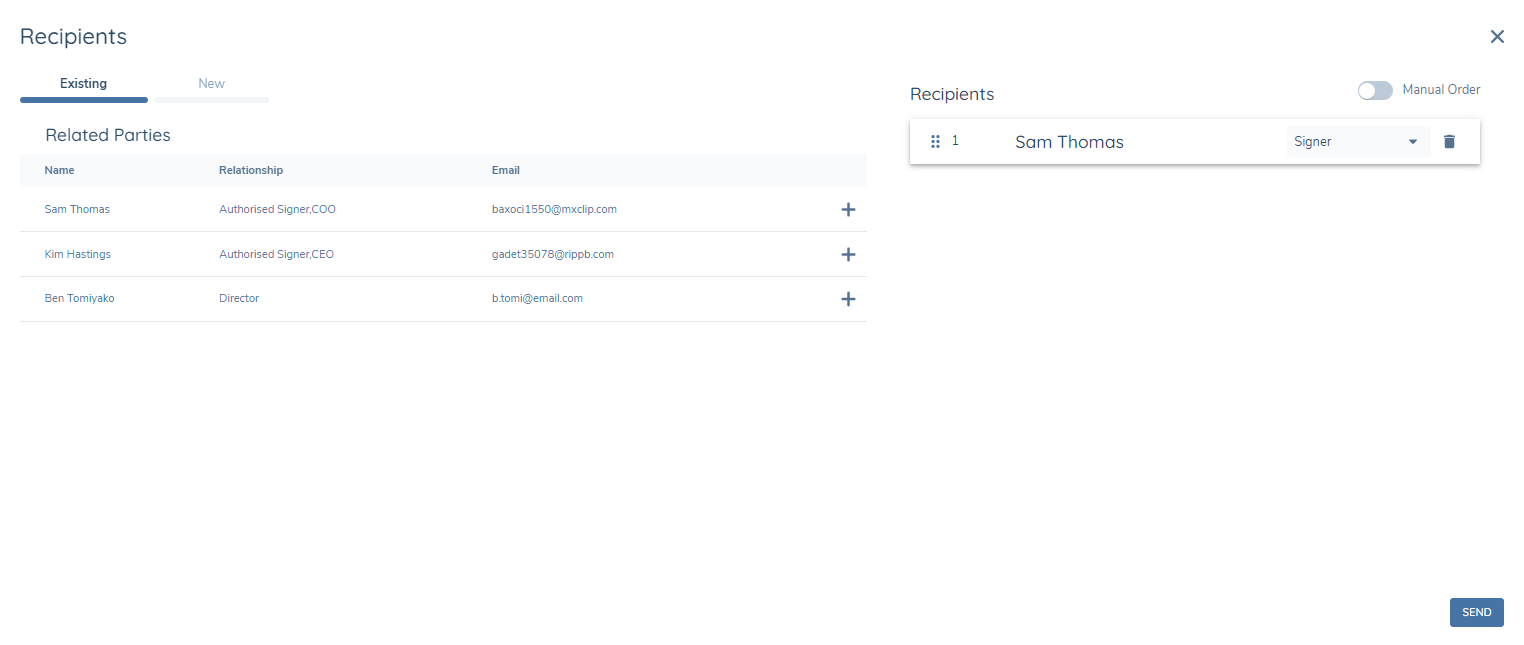
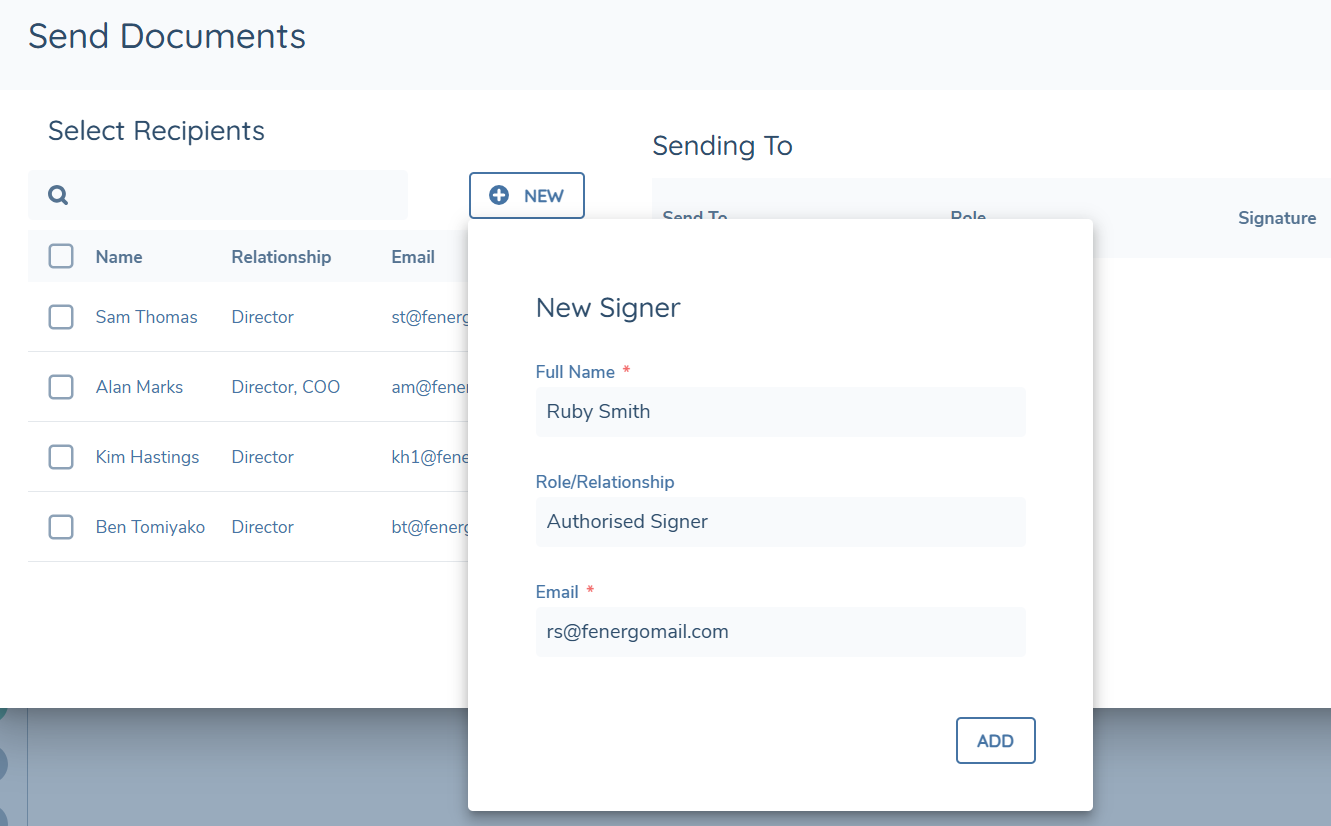
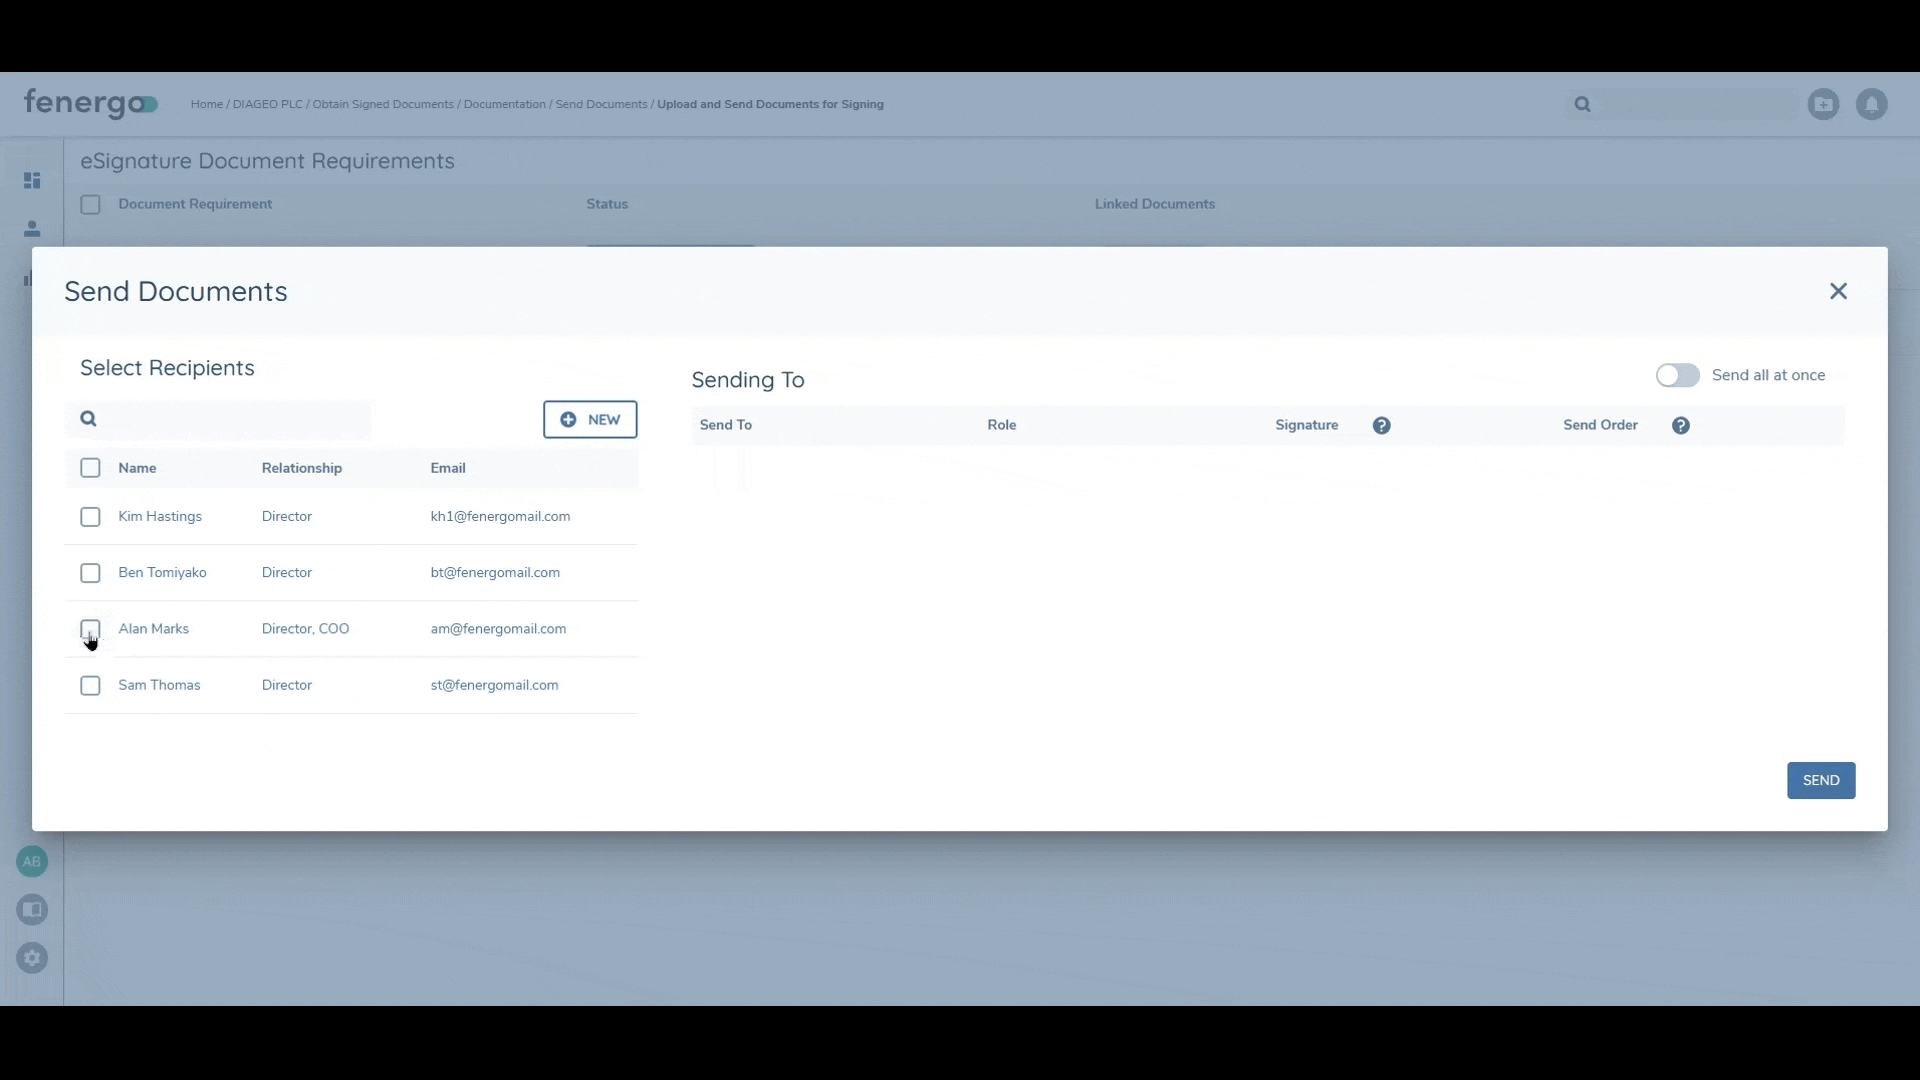
When the Send Documents modal opens, you can choose the recipients of the document(s). A recipient can be:
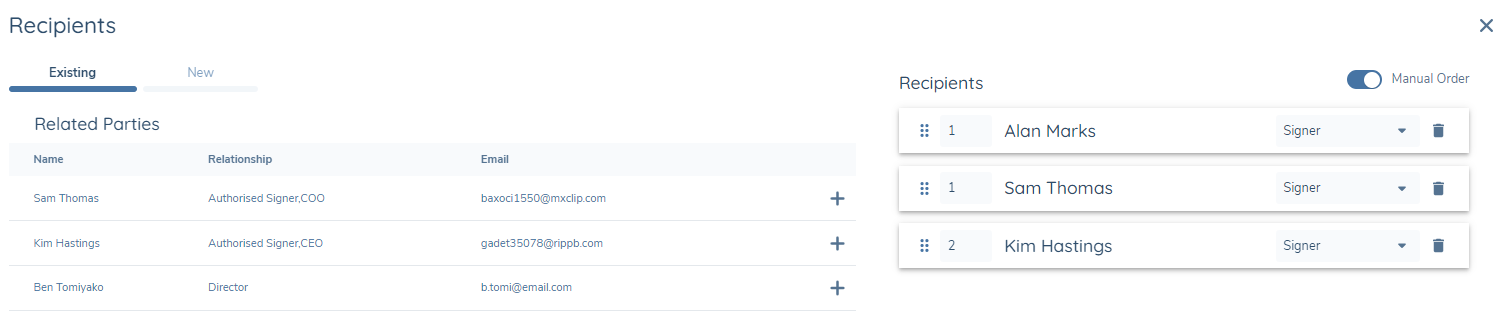
- An existing related party who has a value set against the "email" property (Related Parties or even the primary entity in the journey will not appear in this grid if they do not have an email saved). These will already appear in the Select Recipients grid available for selection:
- An adhoc recipient, which you can create by clicking the NEW button and populating at least a name and e-mail address and then clicking Save. Once saved, ad hoc recipients will be added to the Select Recipients grid. An ad-hoc recipient will apply only to this request – it is not stored or available for selection again.
Recipients are selected by clicking the corresponding checkbox against their name and they will then appear in the Sending To grid.
This grid displays the name of the selected recipient and then their role in regards to this envelope. This is an editable value which can either be set to:
- Signer – a recipient who must sign the document(s), which is the default selection OR
- Recipient – a recipient who simply receives a copy of the completed signed documents at the end of the signing process but does NOT need to sign
All Signers also receive a copy of the signed documents by default.
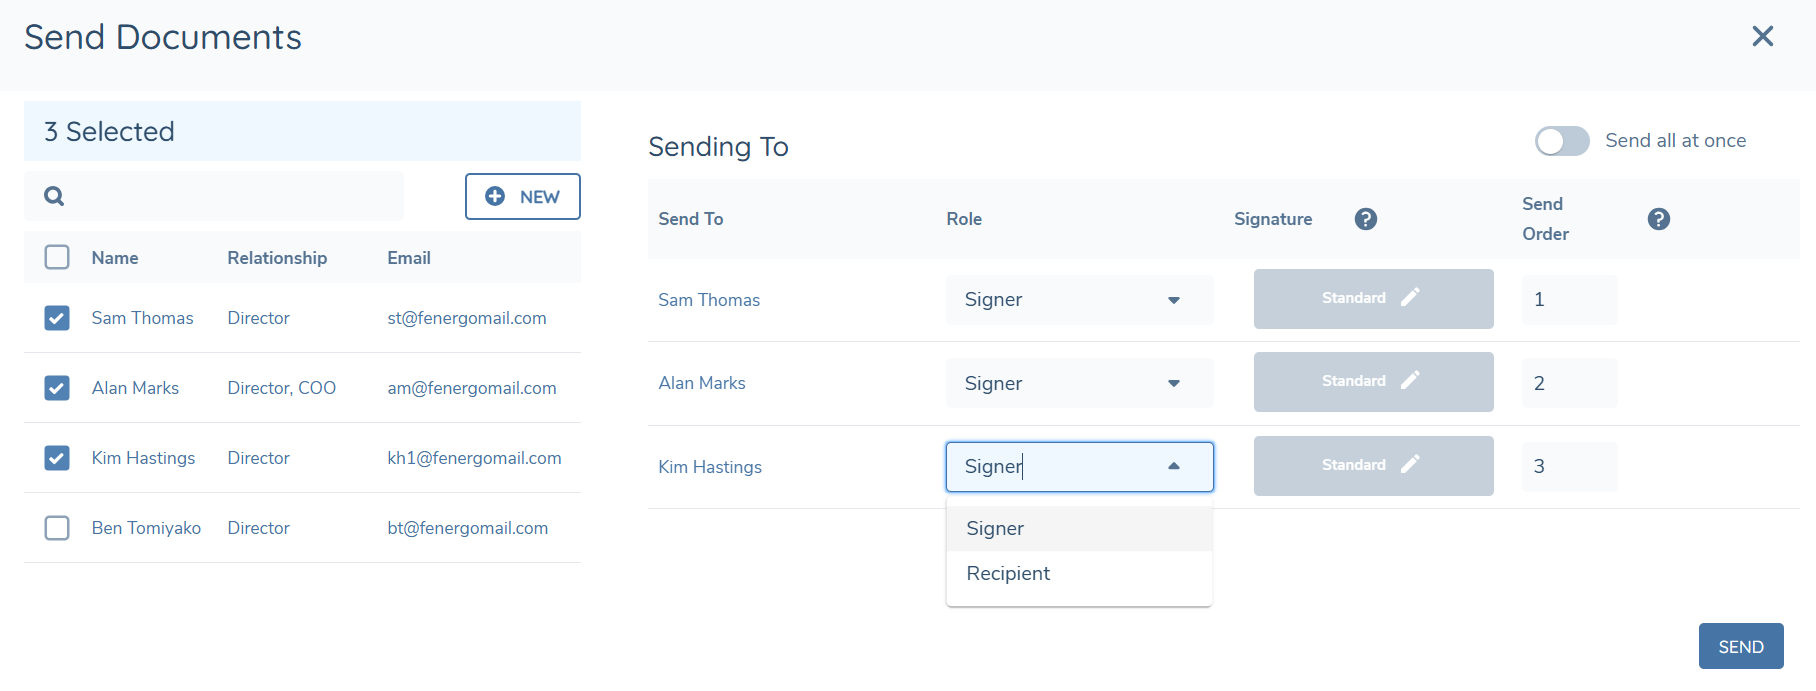
The next column displays the signature type, which by default in 'Standard'. If you have additional signature types enabled on your account and toggled on in eSignature configuration, this will be editable - see Using Additional Signature Types section in this guide for details.
Finally, the Send Order column lists the numerical order in which recipients will receive the envelope and the grid is dynamically ordered by this value. By default, recipients will receive the documents sequentially in the order of the Send Order value against each recipient.
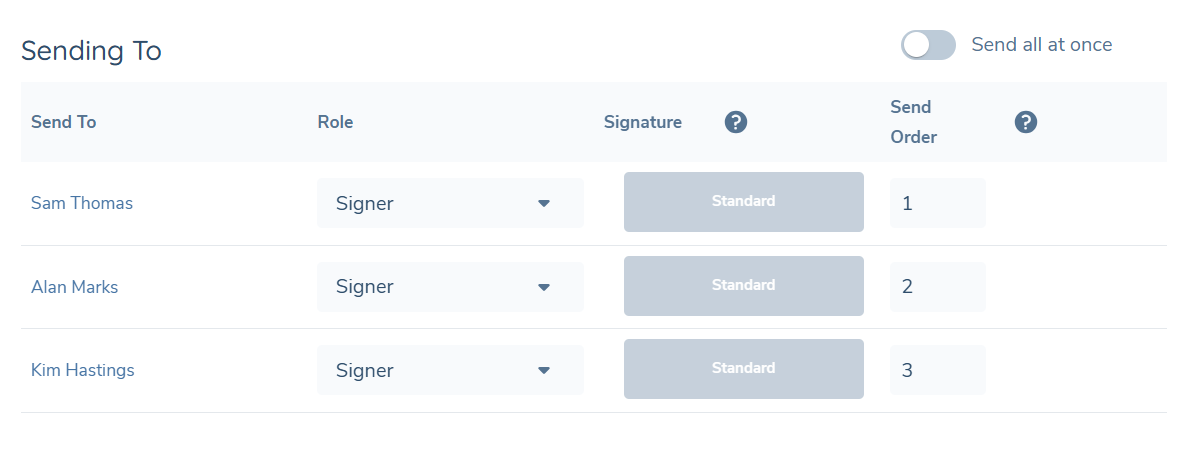
You can edit this order by updating the Send Order number so that you can also send the envelope to some recipients simultaneously and then sequentially (or vice versa) – in the below example, Alan and Sam will receive the envelope initially, and once they have both signed they will be sent to Kim for signing.
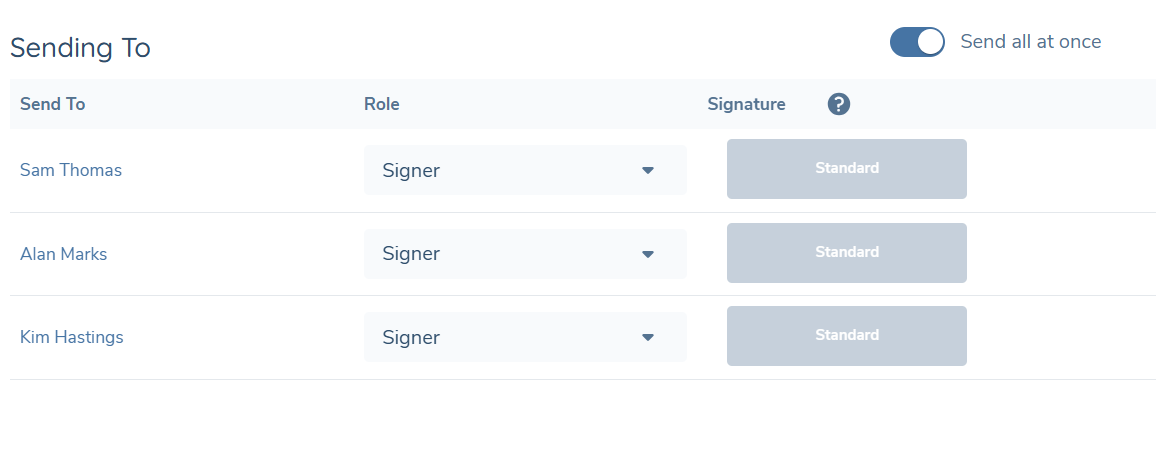
If you simply wish to send the envelope to all recipients simultaneously, simply toggle the "Send all at once" switch on, which will remove the Send Order column and ensure all recipients receive the envelope at the same time once sent.
Once you are happy with the recipients, clicking Send will initiate the request to DocuSign to create an envelope to send the selected document(s) to the selected recipients and the status of the document requirement will be updated to ‘Sent’.
Using Additional Signature Types
If your DocuSign account is enabled for Standards Based Signatures (SBS) such as Advanced Electronic Signature (AES) or Qualified Electronic Signature (QES), these can be available for use in the eSignature task when enabled in eSignature configuration - see the eSignature Configuration section in this guide for details.
When enabled, users will be able to edit the signature type from the default option of 'Standard' and instead select one of the other available options. Clicking the edit icon on the chip will display a popover which includes the editable Signature Type dropdown field. Only the types that are enabled on the account will appear in the list. To require a recipient to sign based on the AES standard, select "DocuSign EU Advanced". When selected additional mandatory fields will appear that must be populated before you are able to save. For DocuSign EU Advanced, an authentication method must be selected, either an Access Code which the recipient must input in order to access the document, or number to which an SMS message will be sent. If you select Access Code, the system will generate a 4-digit number but this can be updated as you wish. Please take note of this code so that you can inform the recipient to allow them access to the document.
The same process must be repeated for each recipient as required. QES standard signatures typically involve an element of identity verification - these have optional fields that can be selected.
When the envelope is sent to recipients when one of these SBS options is selected, when the recipient clicks on the link to open the envelope, the DocuSign interaction will reflect the corresponding flow and outcome.
Retrieving Signed Documents
Fenergo SaaS uses DocuSign’s Connect service in order to be notified of the envelope-completed event which will trigger the callback request to retrieve the signed document(s) from the envelope.

This will occur when ALL signers have completed the DocuSign process and the envelope status is ‘Complete’. At this point, the user in Fenergo SaaS who initiated the request will receive a notification which they will see in the bell icon, and clicking this will navigate them to the relevant task to view the signed documents that have been retrieved. The document requirement status will be updated from ‘Sent’ to ‘Signed- Awaiting Approval’.

Documents that are retrieved will have the same details as the original outgoing document, i.e. same document type and access layers assigned. The document name will be the same too but with a suffix of ‘_Signed’.
You may click on the ![]() icon to update the status of the document to Approved if you are happy with the signed agreement that has been returned.
icon to update the status of the document to Approved if you are happy with the signed agreement that has been returned.
Retrieving Completion Certificates
It is now possible to also retrieve the Certificate of Completion which DocuSign provides along with the signed documents. This can be enabled in the eSignature Configuration area - please see the eSignature Configuration section in this guide for details.
Once enabled, the system will automatically retrieve the certificate and link it to the corresponding document requirement. If multiple document requirements were combined in the envelope, the certificate will be linked to one of the requirements. The certificate will have a friendly name of "Certificate" by default and will be of type "eSignature Certificate". These details can be edited as per the standard approach of editing document metadata in this task.
Bulk Sending Documents
You have the option to send documents from multiple eSignature document requirements together in one envelope. This can be done by using the checkboxes on the left to select the eSignature document requirements and then clicking on the eSignature icon which appears at the top of the grid once multiple selections have been made.

This will open up the same Recipients modal you would see for single-requirement sending, and clicking Send here will result in an envelope containing ALL uploaded documents for ALL selected eSignature document requirements being sent to the selected recipients.
Resending Documents
There may be occasions in which you have sent documents for signing already for an eSignature document requirement and then realize you need to send additional documents or replace the existing documents with other documents. This is possible to do, however there are nuances to the behavior depending on the scenario.
Cancelling an envelope
It is possible to cancel an envelope prior to all recipients signing the document(s) in the envelope. You may need to do this if you realise you are missing a recipient, or sent the envelope to the wrong recipient. To do this, click the cancel button in the requirement row. Clicking the cancel button voids the envelope. This means that the previously sent envelope is no longer valid and you must send the document(s) for signing again.
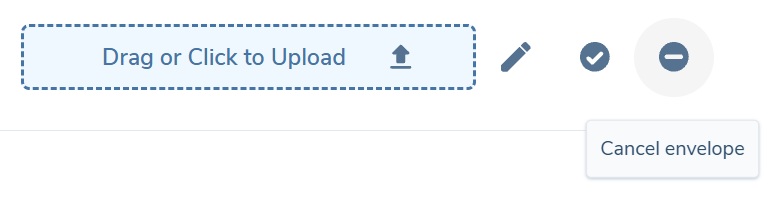
Cancelling an envelope will not remove the document(s) attached to the requirement. The attached documents will remain, but the eSignature icon will return, allowing you to select recipients and send the envelope again. If any recipients had already signed the documents in the previous envelope, they must sign again.
Cancellation is not possible when all recipients have signed.
Resending documents when documents have been sent but not signed yet
If you have already sent documents for an eSignature document requirement but the status is still ‘Sent’, when you either upload new documents against that requirement or delete the existing document against that requirement, the status will revert to ‘In progress’.
At this point, as long as there are documents assigned to the requirement, the eSignature icon will become available again and you can select recipients and send a new envelope containing the current set of documents assigned to the selected requirement(s). Resending in this way results in the original envelope being voided, so all previous recipients will receive an automatic e-mail notification informing them that the envelope has been voided and that no further action can be taken on that.
Important Note: If the original envelope was a bulk sending of documents for multiple requirements, if a new request is sent for any one of those requirements, then the whole envelope is voided, including any documents related to eSignature document requirements which have not been resent. You can resend these again separately if they wish.
Resending documents when documents have been signed already
If documents have already been sent and signed for an eSignature document requirement, and the status is ‘Signed – Awaiting Approval’ or Approved, etc. it is possible to upload new documents against the same requirement, or remove the existing documents (including or excluding the retrieved signed document(s)) and revert the status of the requirement to ‘In Progress’ and allow you to select recipients and send once more.
Similarly to the previous scenario, this will result in a new envelope request being created and sent, and it will contain ALL of the documents that are assigned to the requirement(s) including any previously sent documents but excluding any of the signed documents that were retrieved already.
Configuring eSignature
This section of the user guide will cover the some of the perquisite configuration that must be established in order for this feature to operate successfully, as well as some of the configuration options that are available.
eSignature Configuration
If the eSignature service is enabled in your tenant and you have the relevant permissions, clicking on the configuration icon in the left hand panel will open the menu where you will see the below option available.

Clicking on this navigate you to the below page which will allow you to setup and configure the eSignature feature in Fenergo SaaS.
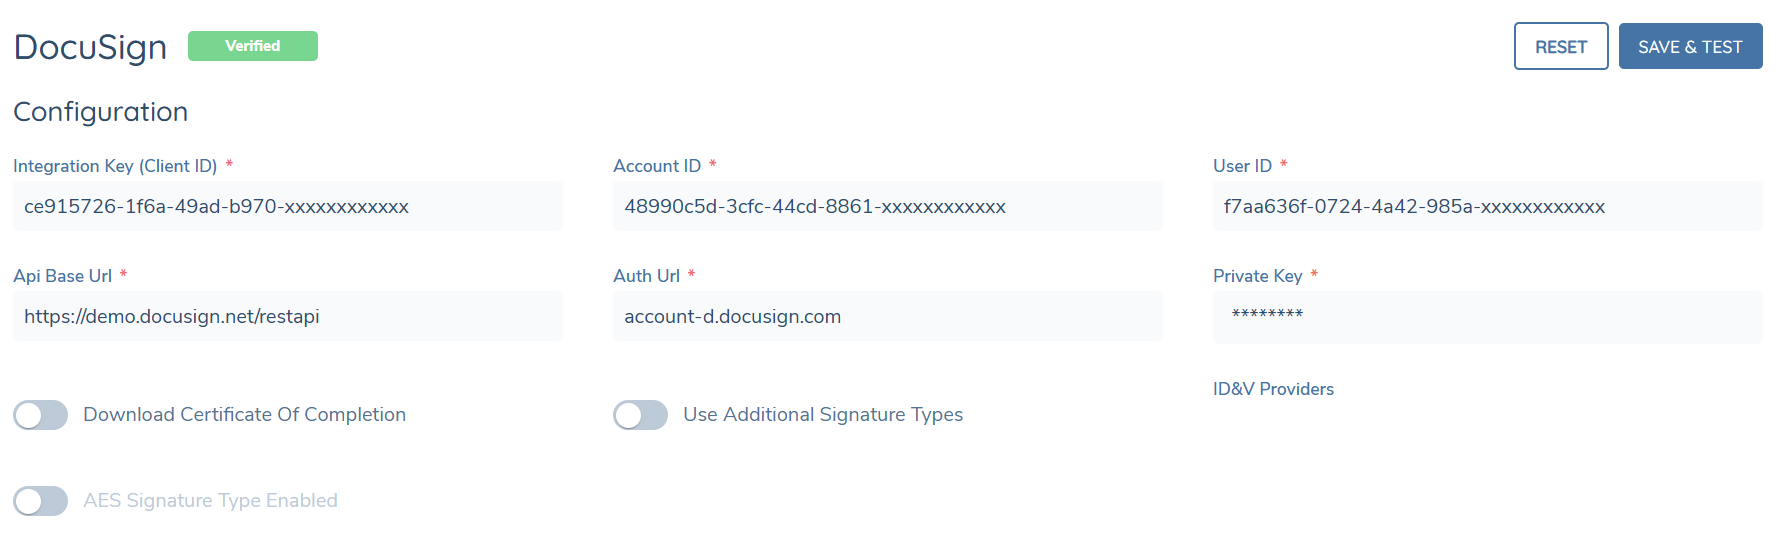
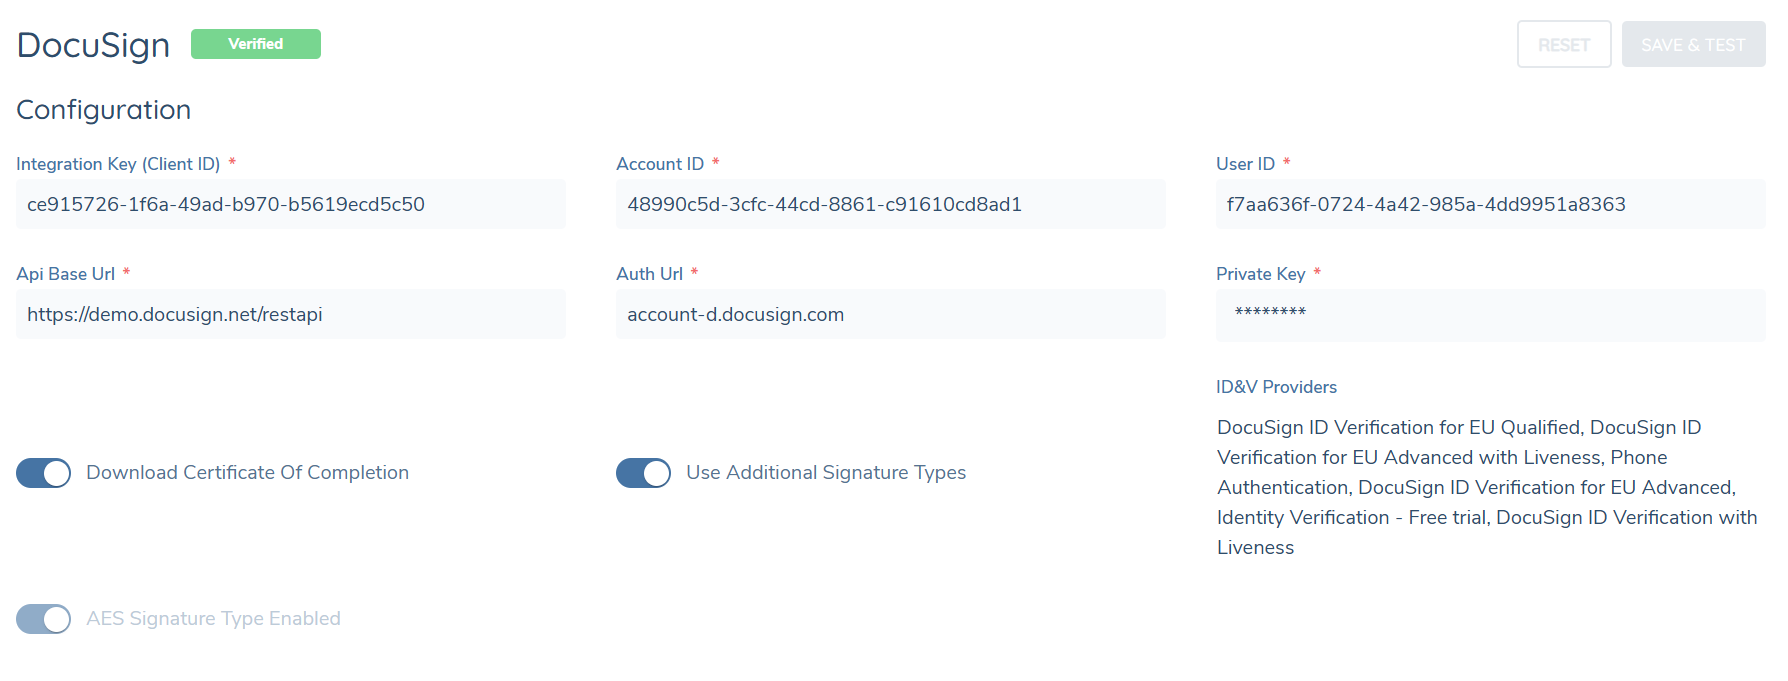
Initially the status of the DocuSign integration will be empty and the service will be disabled but once credentials are entered and tested then the status will become Verified and you will be able to enable the service. Clicking on the DocuSign name will navigate you to the screen where you are able to do this.
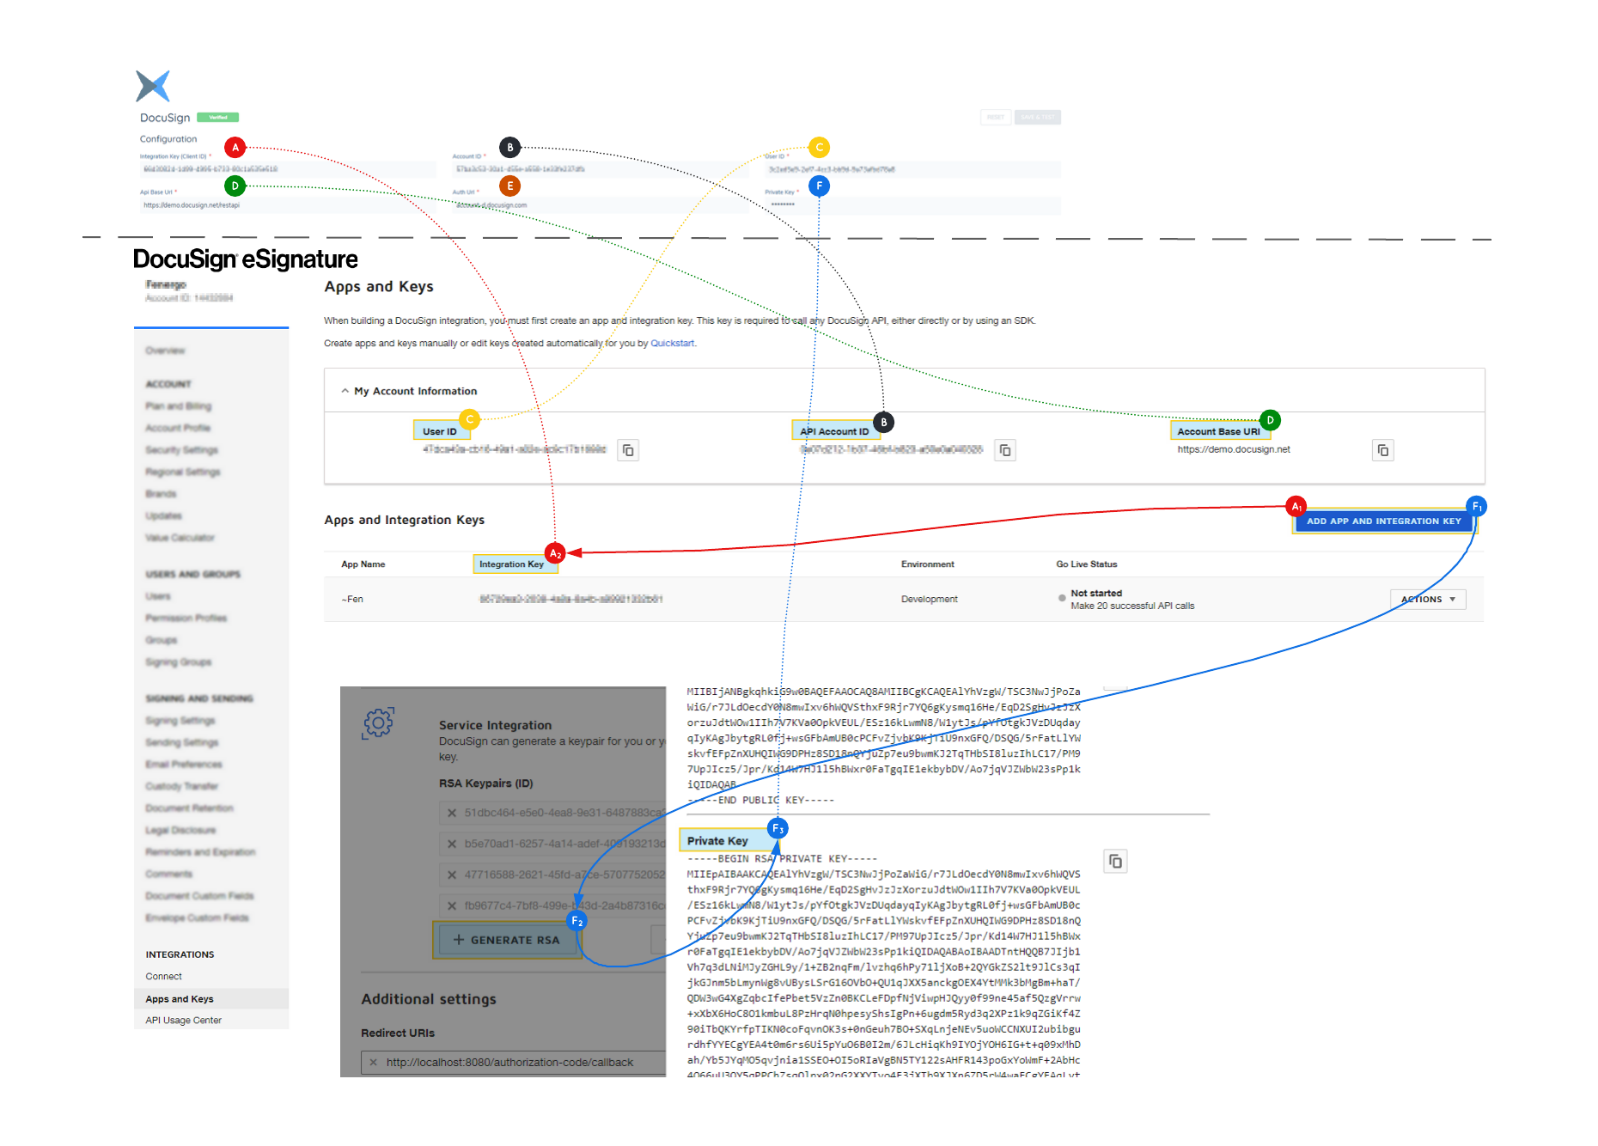
API Credentials

The diagram below provides a mapping between the DocuSign Configuration page in Fenergo SaaS versus the source of the data points in the DocuSign eSignature Settings page.
A – The Integration Key must be generated by clicking on the ‘Add App and Integration Key’ button in the DocuSign portal and then populating the relevant fields in that section. Once you save the Integration Key will be visible in the grid.
A separate Integration Key will be required for each environment/tenant in Fenergo SaaS.
B – The Account ID is available under ‘My Account Information’ in the DocuSign portal.
C – The User ID is available under ‘My Account Information’ in the DocuSign portal.
D – The API Base URL is available under ‘My Account Information’ in the DocuSign portal, make sure to add /restapi suffix.
E – The Auth URL is always ‘account-d.docusign.com’ for the demo environment/account or ‘account.docusign.com’ otherwise.
F – Private Key must be generated by first clicking on the ‘Add App and Integration Key’ button in the DocuSign portal and then generating a RSA Keypair. Once generated you can copy the Private Key into this field in Fenergo SaaS. Ensure trailing newline is removed.
Authentication:
Before finalising setup a one-time step is required to obtain consent that is required for Authentication.
Firstly A URL must be prepared using the below format:
{{SERVER}}/oauth/auth?response_type=code &scope=signature%20impersonation&client_id={{CLIENT_ID}}&redirect_uri={{REDIRECT_URI}}
Where
- SERVER is
https://account.docusign.com(production) orhttps://account-d.docusign.com(developer demo). - CLIENT_ID is your app’s integration key (i.e. the same Integration Key that was referenced in A in the diagram above)
- The REDIRECT_URI is a URI. It must exactly match one of the redirect URIs you defined for the app’s integration key in the DocuSign eSignature Administration tool. The URI value must be encoded.
Once the URL has been prepared, simply navigate to that URL in the browser where you should see a form like below:
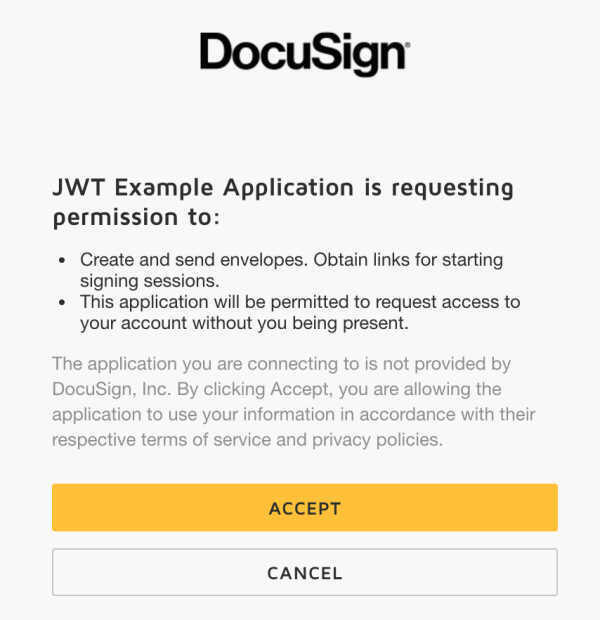
Once you click on ACCEPT you will be navigated to the Redirect URI specified and this consent step is completed.
Additional Settings:
Once the above steps are complete and the connection to the DocuSign account is active and verified, you will be able to enable the use of Additional Signature Types. When this toggle is enabled and you click Save & Test, the system will retrieve the signature types and ID&V providers that are enabled on the account. The ID&V providers will be listed as comma-separated values in the ID&V Providers field and if the DocuSign EU Advanced signature type is available on the account, the AES Signature Type Enabled switch will automatically be toggled on. From this point, users will have the option to edit the signature type for each recipient when sending envelopes.
In this section you you can also toggle on the Download Certificate of Completion switch. This will enable the functionality to automatically retrieve the certificate along with the signed documents.
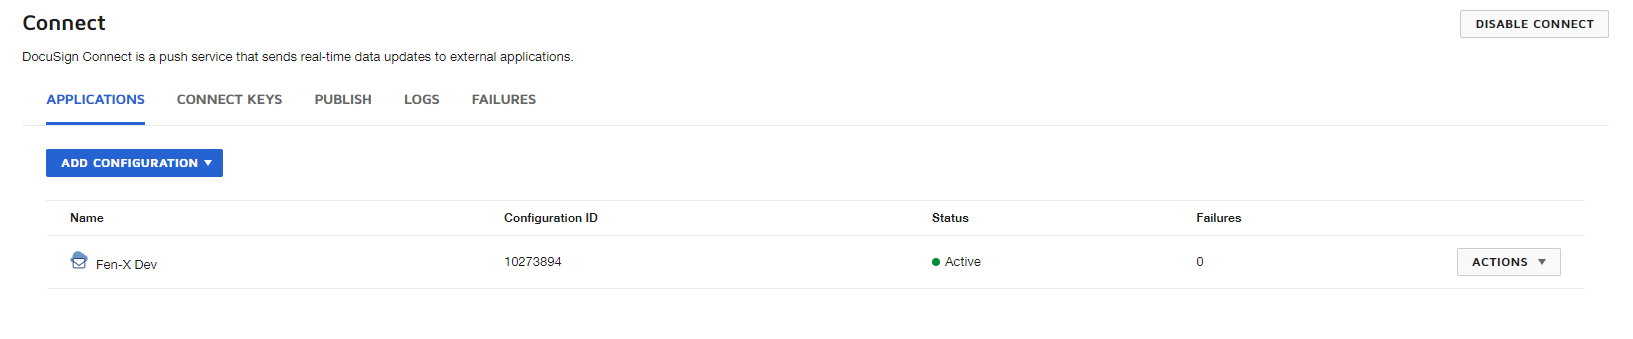
DocuSign Portal Configuration
In order to enable the document retrieval functionality in Fenergo SaaS you will also need to configure the DocuSign portal settings. A Connect configuration will be required per environment.
As a pre-requisite you must have completed the previous steps in the Apps and Keys section of the DocuSign portal and generated an Integration Key. Once this is done:
-
Under the Integrations section on the menu, click on ‘Connect’
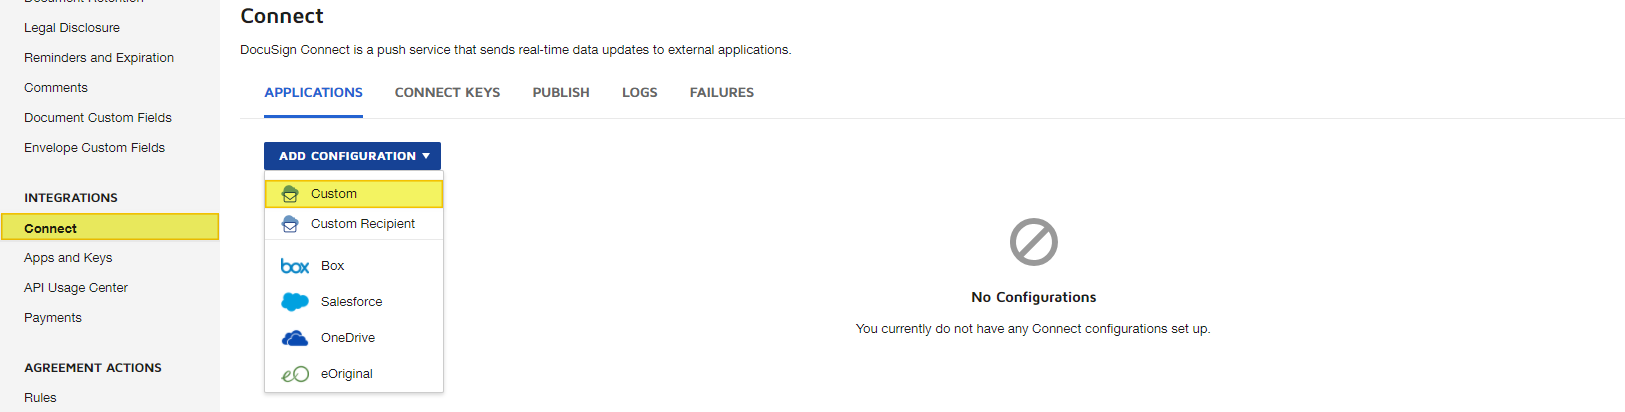
-
Under the APPLICATIONS tab, click on the ADD CONFIGURATION button and select ‘Custom’. This will open in a separate modal window
-
In the Listener Settings section, you must populate the Name field with an appropriate name for this configuration and input the URL to Publish – this is the URL to the Fenergo SaaS callback lambda. Please contact your Fenergo SaaS technical representative for support with this.
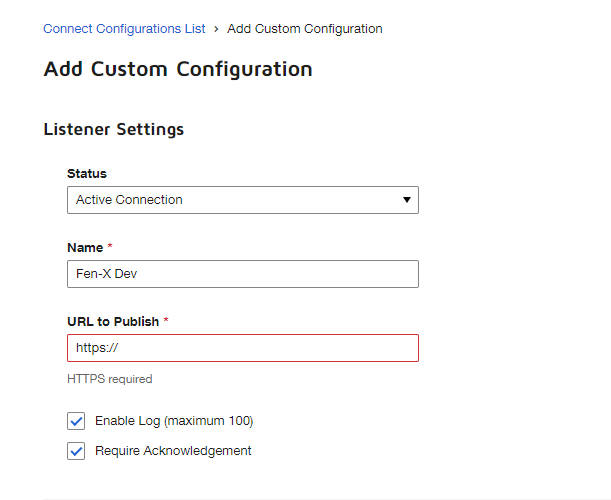
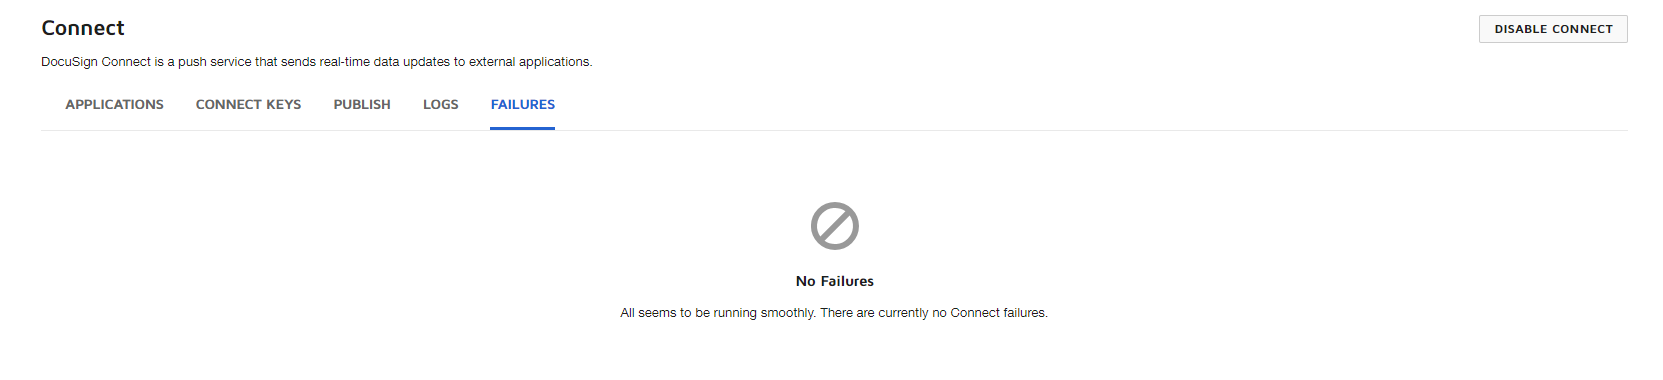
It is helpful to have the ‘Require Acknowledgement’ checkbox checked, especially when first establishing the integration to check that it has been done correctly. When this is checked, DocuSign will wait for a HTTP 200 status as a response. If it does not receive this, any issues will be visible in the Failures tab on the Connect settings page
-
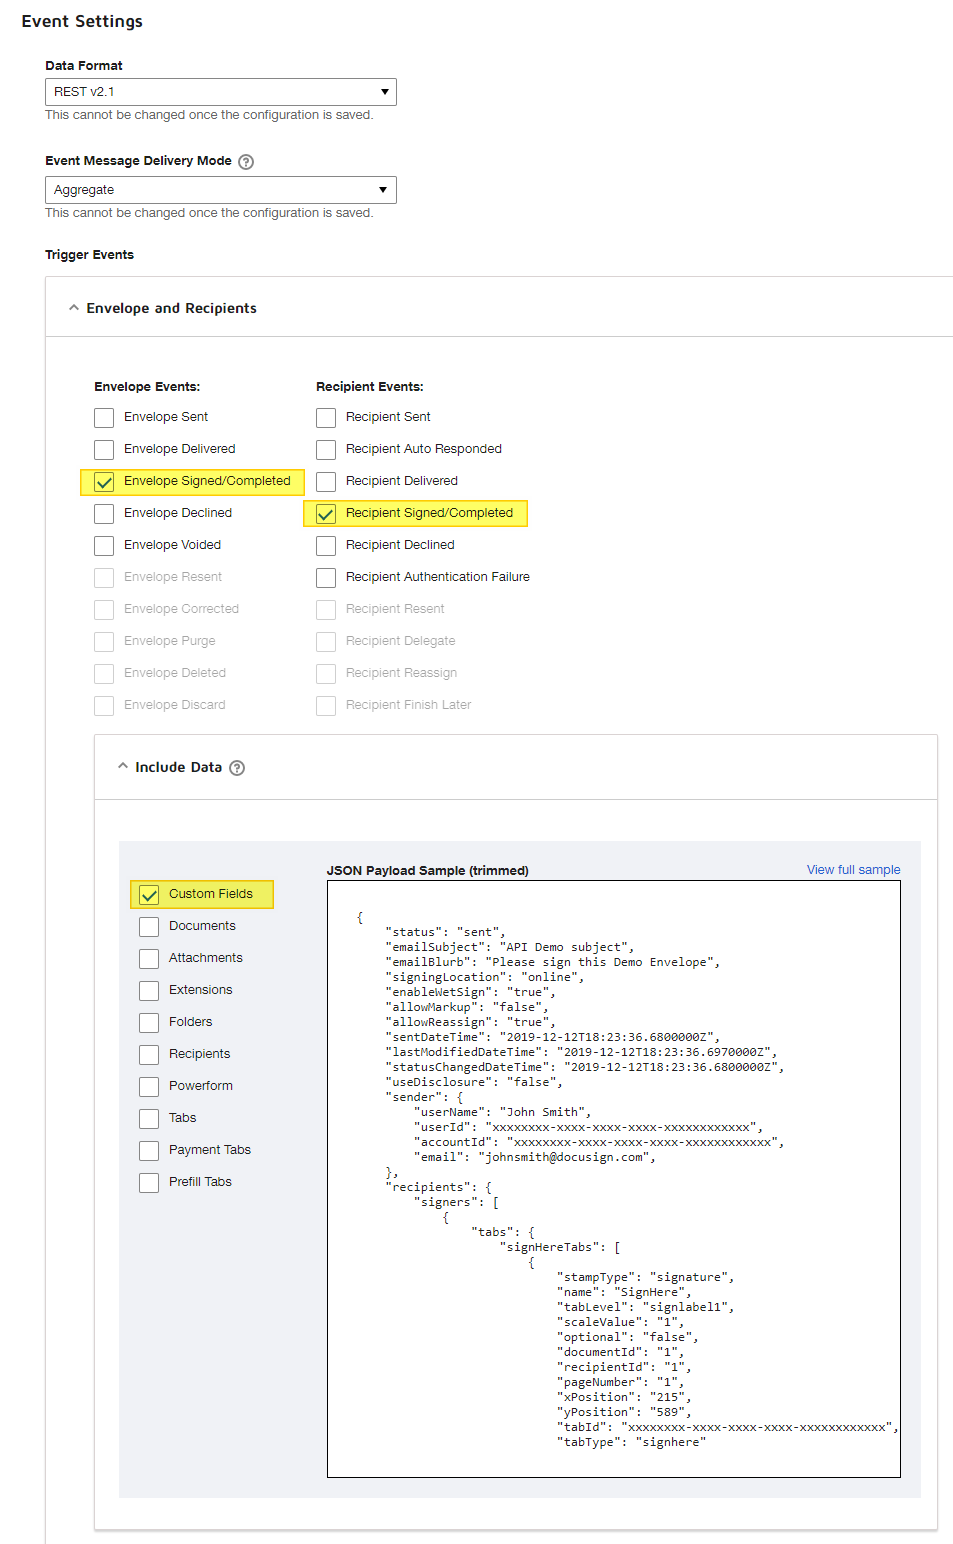
In the Event Settings section, you can maintain any of the default values selected, but under the Trigger Events sub-section, expand the Envelopes and Recipients panel and ensure that ‘Envelope Signed/Completed’ (Envelope Events) and ‘Recipient Signed/Completed’ (Recipient Events) are checked. Currently only the ‘Envelope Signed/Completed’ event is supported in Fenergo SaaS. Then expand the Include Data sub-panel and ensure that ‘Custom Fields’ is checked.
-
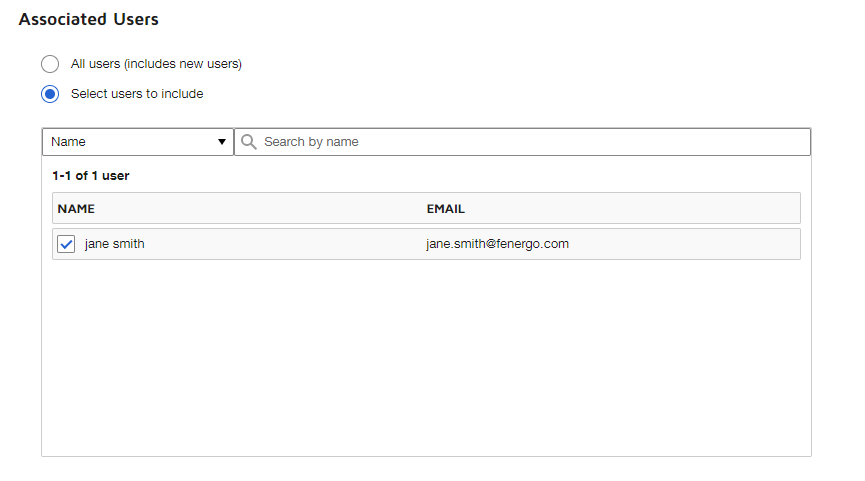
In the Associated Users section, ensure that ‘Select users to include’ is selected and from the grid below you must select the user that corresponds to the credentials that are mapped in the Fenergo SaaS Docusign Configuration page.
-
Finally, click the ADD CONFIGURATION button to save and complete. You will be navigated back to your Connect setting page and the integration will be complete.
Policy Configuration
In Policy you must configure eSignature document requirements so that they appear in the eSignature Documents task in the journey.
eSignature document requirements are configured in exactly the same way as standard document requirements in Policy, however they are kept distinct:
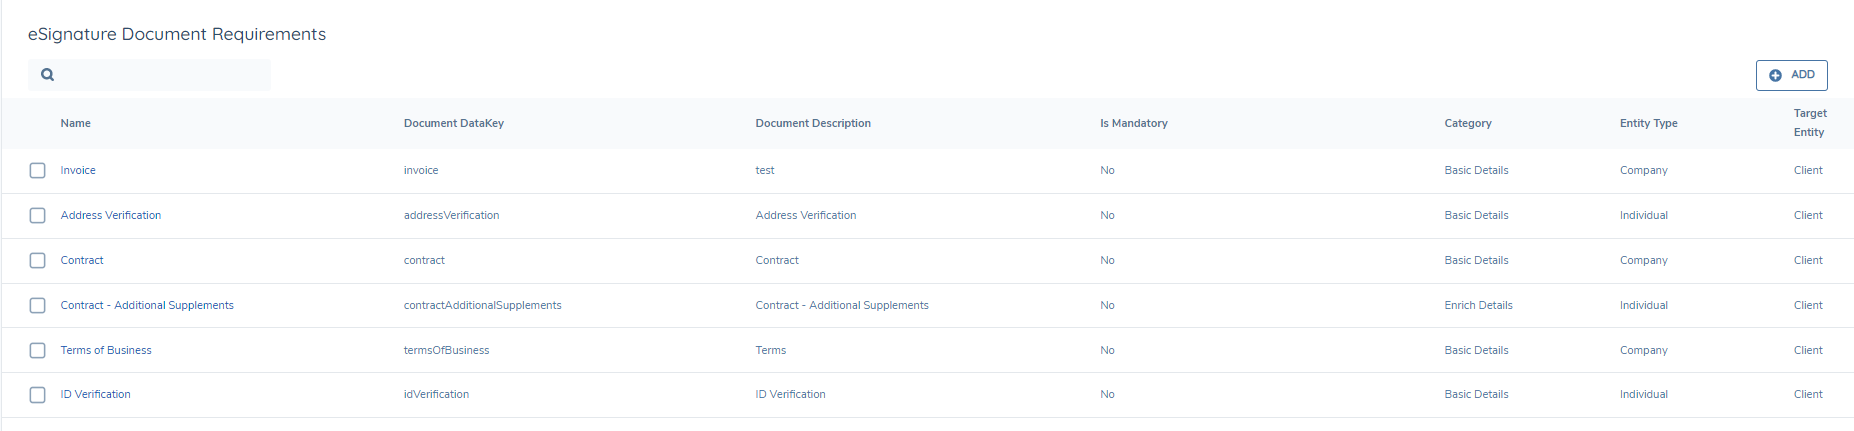
Clicking the ADD button will allow you to configure a new eSignature document requirement, an example of which is below:
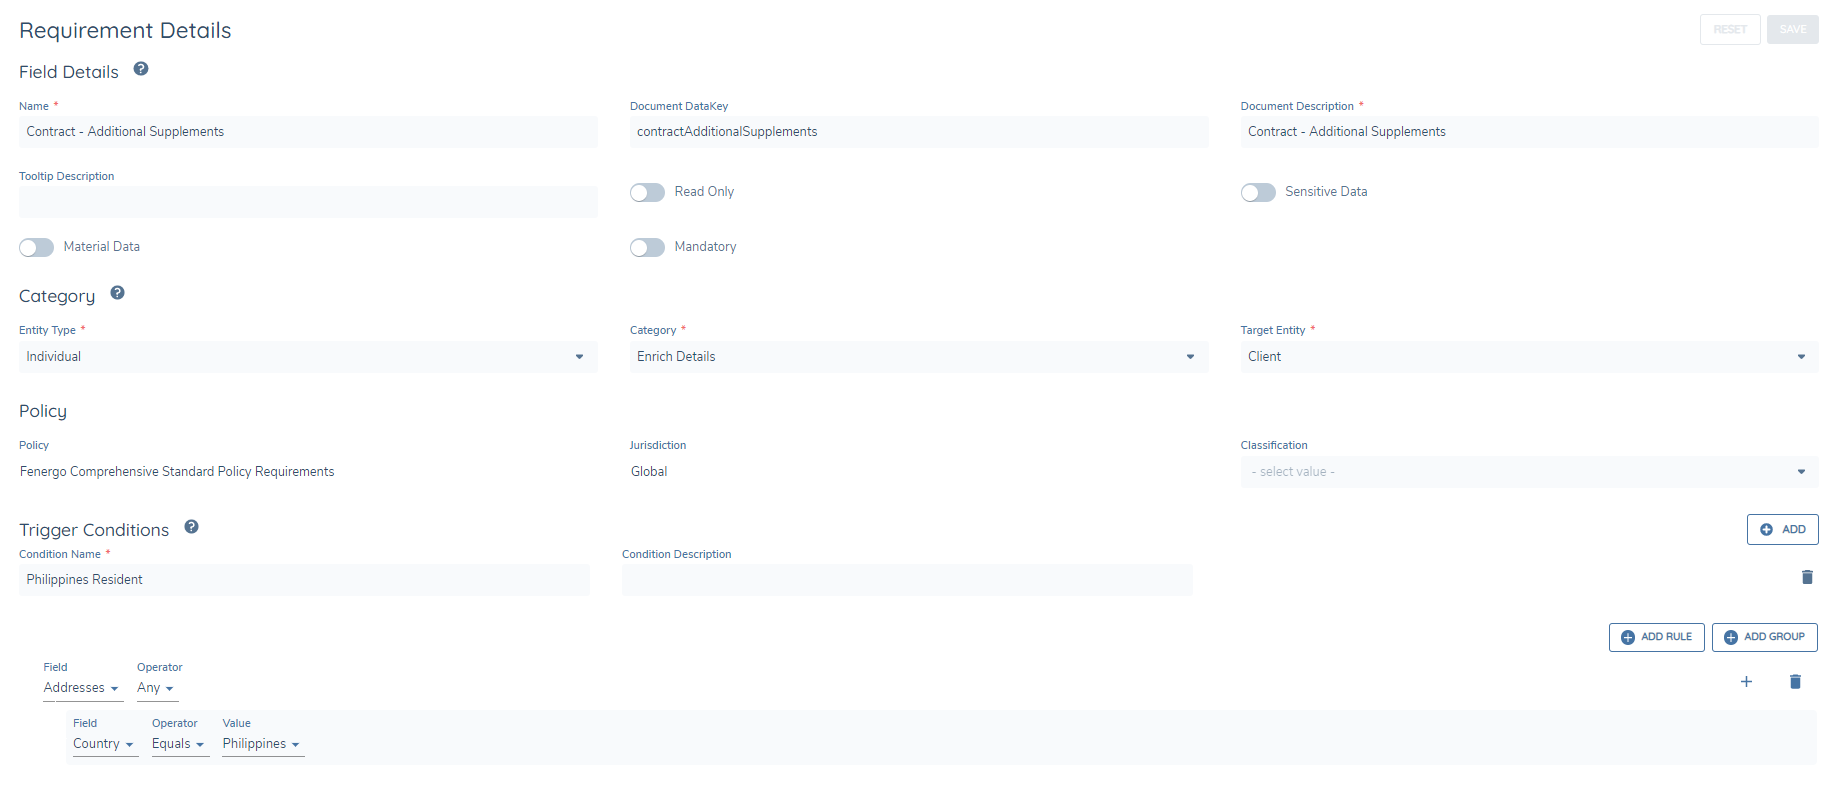
As with other policy requirements, these can be configured with various categories or with trigger conditions.
In addition to eSignature document requirements, it is a prerequisite to have a specific system field that allows you to capture an e-mail address for related parties that can be recipients. This should ideally be configured in the global policy and be mandatory so that it is not missing when you reach the eSignature Documents task in the journey. An example of this field configuration is below:
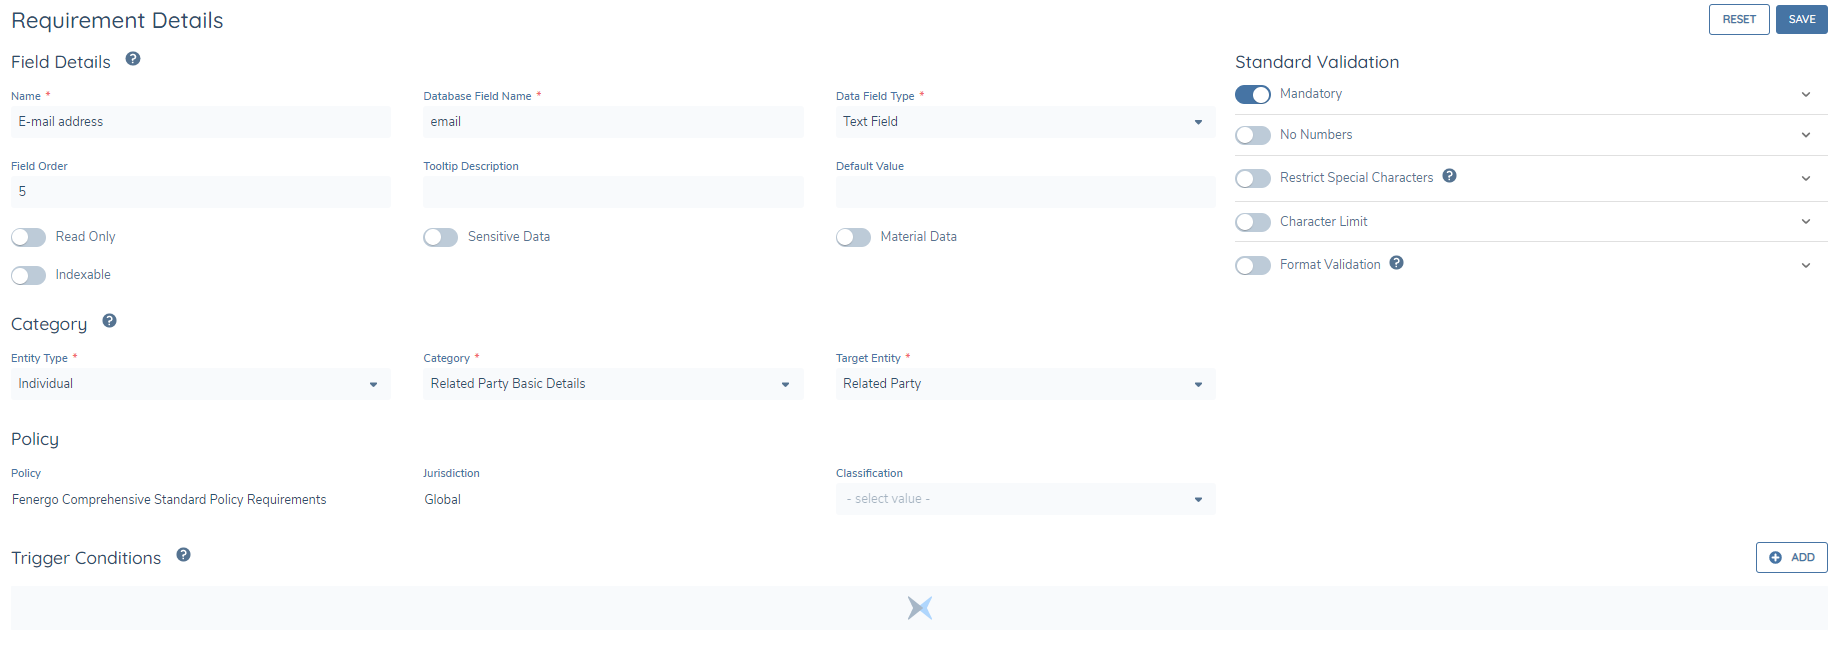
Please note – the Field Name can be anything you wish, however the Database Field Name must specifically be “email” in order for the data to be available to use in the eSignature Documents task.
Journey Configuration
The eSignature Documents task can be configured to appear at any point in a journey and as many times as required. It is not mandatory to have received signed docs back in order to complete the task, so it is possible to configure a task early on in the journey to facilitate sending the documents for signing and progressing with the journey, and then configuring the task again later on in the journey where you will expect to receive the signed docs back.
When configuring the task in Journey Builder, the task type is eSignature Documents, and similarly to the standard Documents task, you must set the Target Entity and Policy Category appropriately in order to trigger the relevant eSignature document requirements in the task.