ETL UI
ETL Dashboard
To support the new ETL functionality, a new ETL Landing page tab has been introduced accessed by selecting ETL under the Tenant section in the left navigation menu.
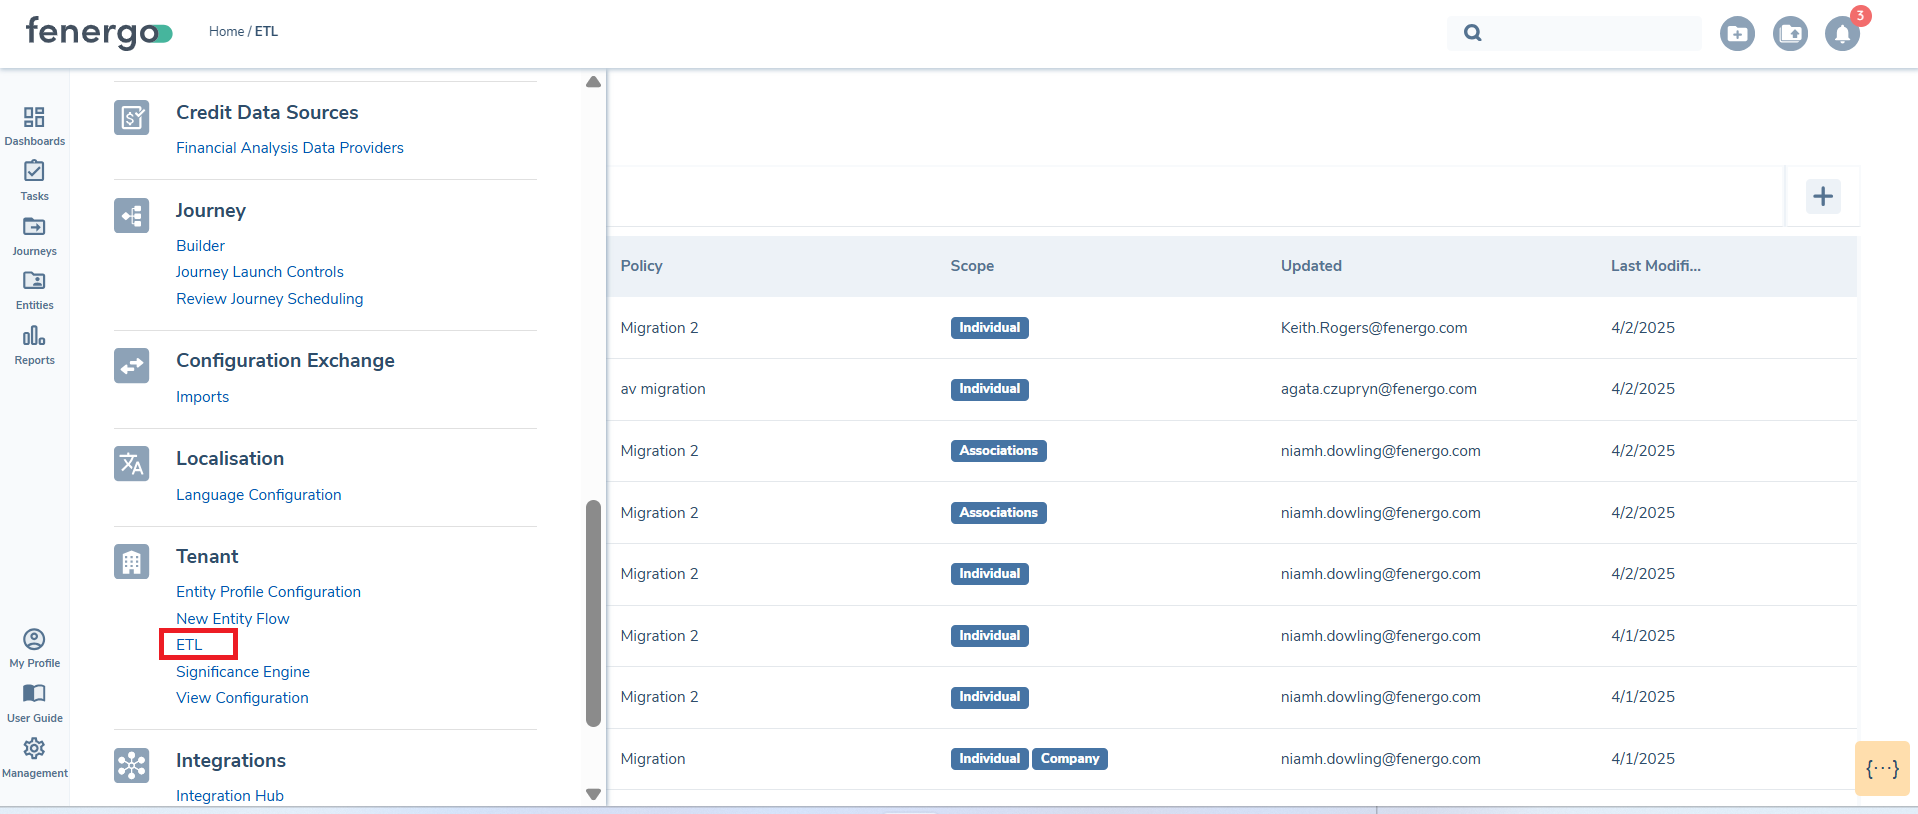
Once there the ETL Projects dashboard can be viewed
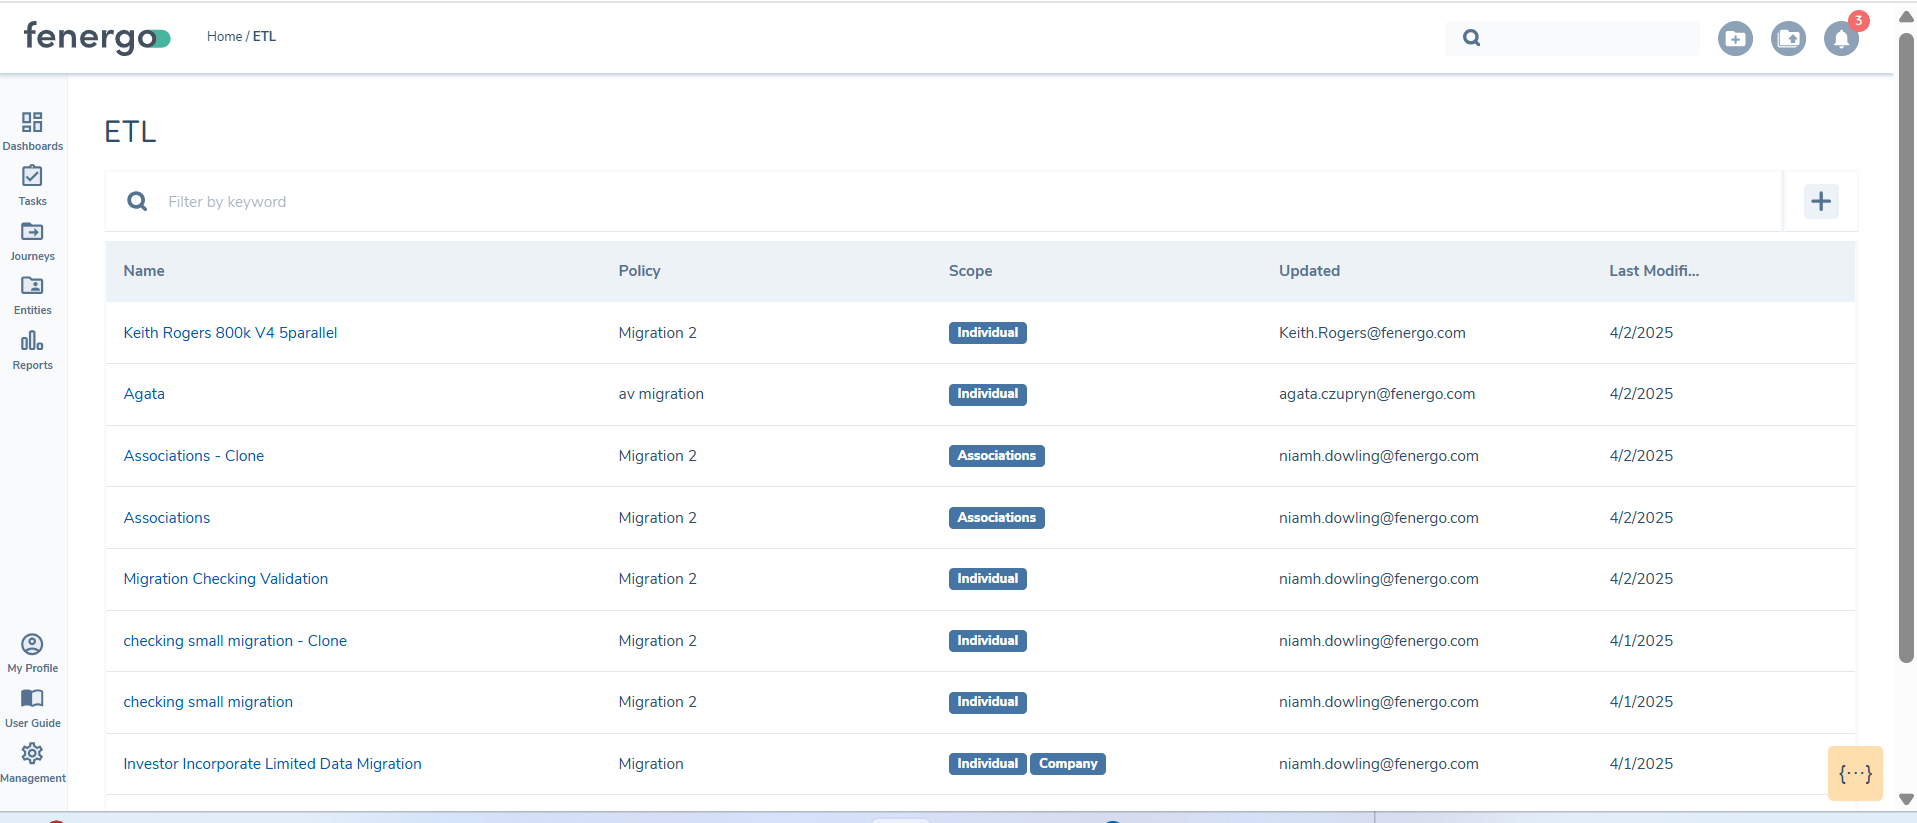
- Name: The given name of the Data Migration.
- Policy: The ETL project policy used to map and validate the data against.
- Scope: The entities that are in scope for the migration
- Updated: The user that last updated the migration project
- Last Modified: The last modified date of the migration project
Create an ETL Project
-
Select ETL: From the left navigation menu, select the ETL option. This will open the ETL Landing page.
-
Create a New ETL Project: Click the + icon and this will open a new modal.

-
Name Your ETL Project: Enter a name for the ETL project. This name will appear on the dashboard.
-
Select a policy and version Any policy can be selected but it is recommeded that a policy is created specifically for the data transfer.
-
Select Data Types: Specify the data types to migrate. The options include 'Individual', 'Company', 'Entity Groups', 'Other', 'Investment Accounts', 'Bank Accounts', 'Associations', 'Product', 'Product To Entity Associations', 'Entity Documents', 'Product Documents', 'Entity Virtual Documents' and 'Product Virtual Documents'.
-
Finalise the ETL Project: Click Confirm to create the ETL project. Once created, the project will be ready for the etl process to begin.
Once the policy version is selected it cannot be changed once the project is created. If attributes need to be changed on the migration policy a new project will need to be created. The clone fucntionality can be used so that mapping, filters and transformations do not need to be rekeyed.
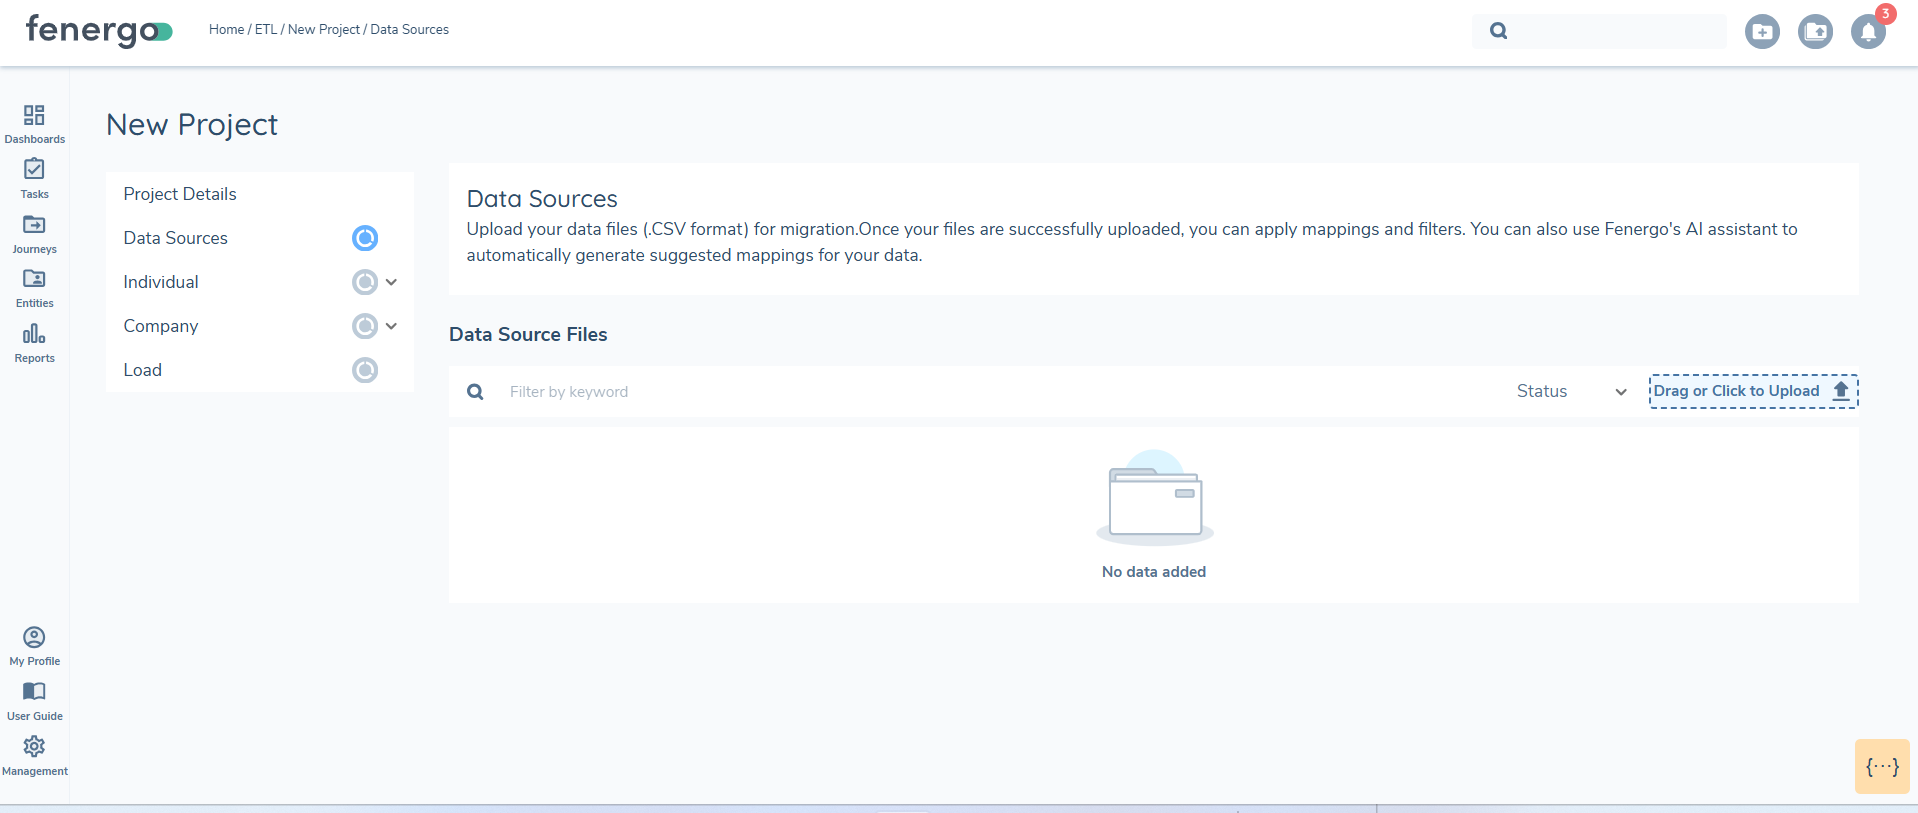
Upload Datasources
When uploading a .CSV, an antivirus scan is performed. During the scan, the document status is displayed as 'Uploading'. If the document passes the antivirus scan, its status updates to 'Uploaded' with a green status indicator.
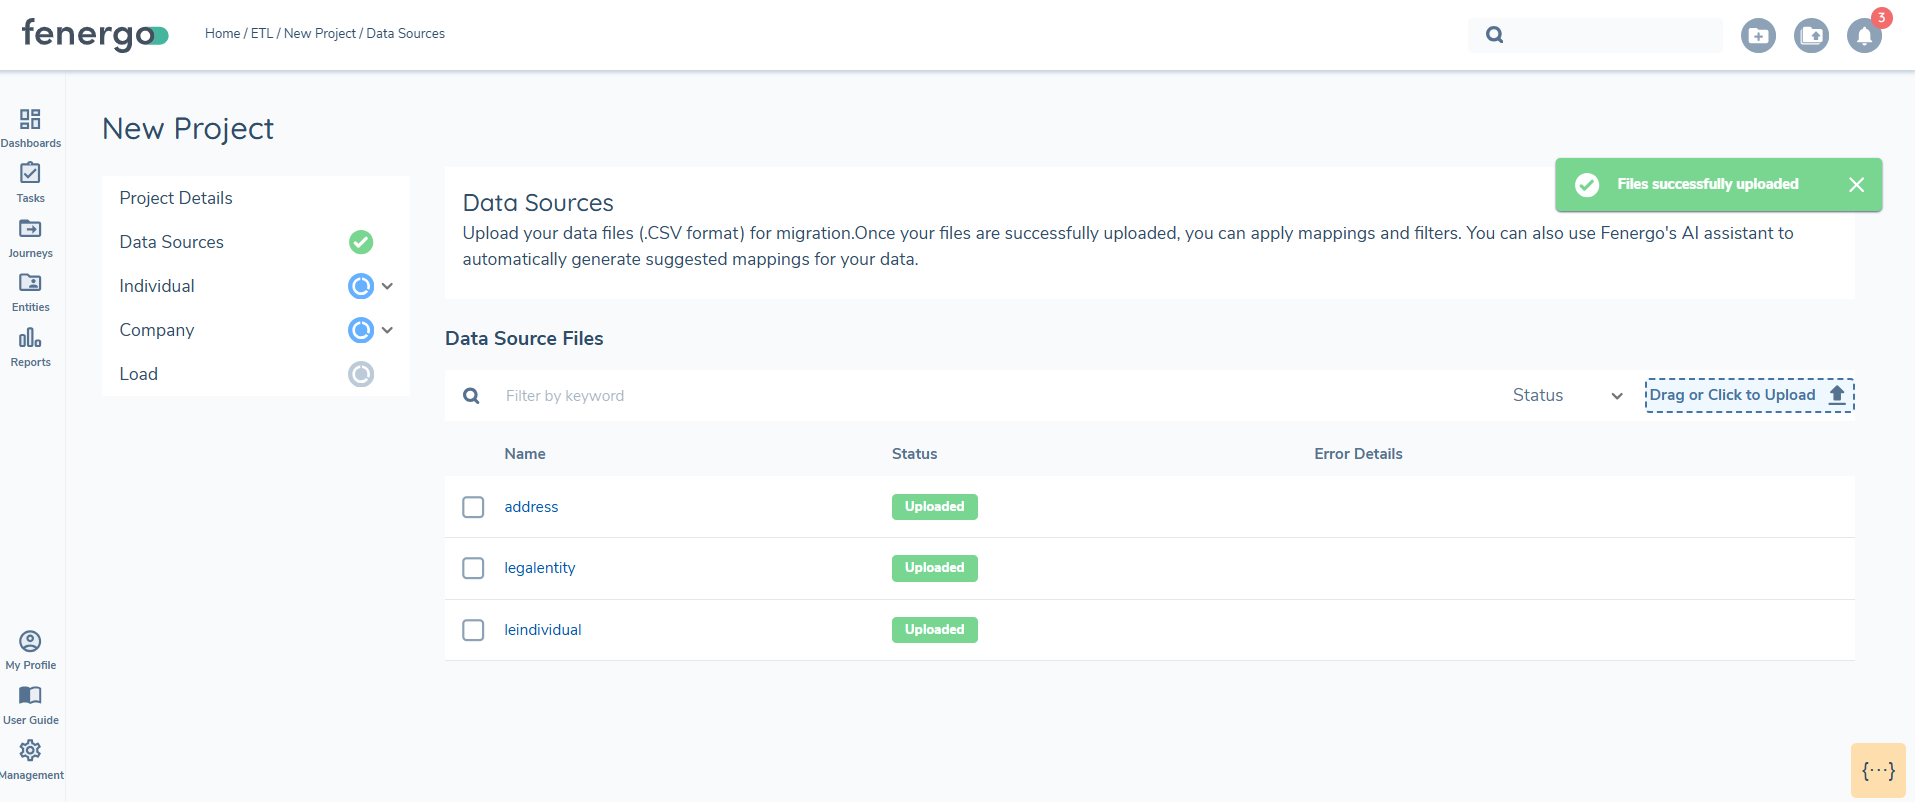
If the scan fails, the status changes to 'Error'. Additionally, the system performs basic file validation checks, such as identifying duplicate headers or missing column headers. If data exists in a column but the header is missing, the status updates to 'Error', and an error message explains the issue. Files with errors must be deleted and re-uploaded.
At least one file must be successfully uploaded before the section status updates to 'Complete', this will allow you to proceed with mapping. You can upload up to five files at a time, with a maximum number of entities in the files limited to 10000. All files must be in UTF format.
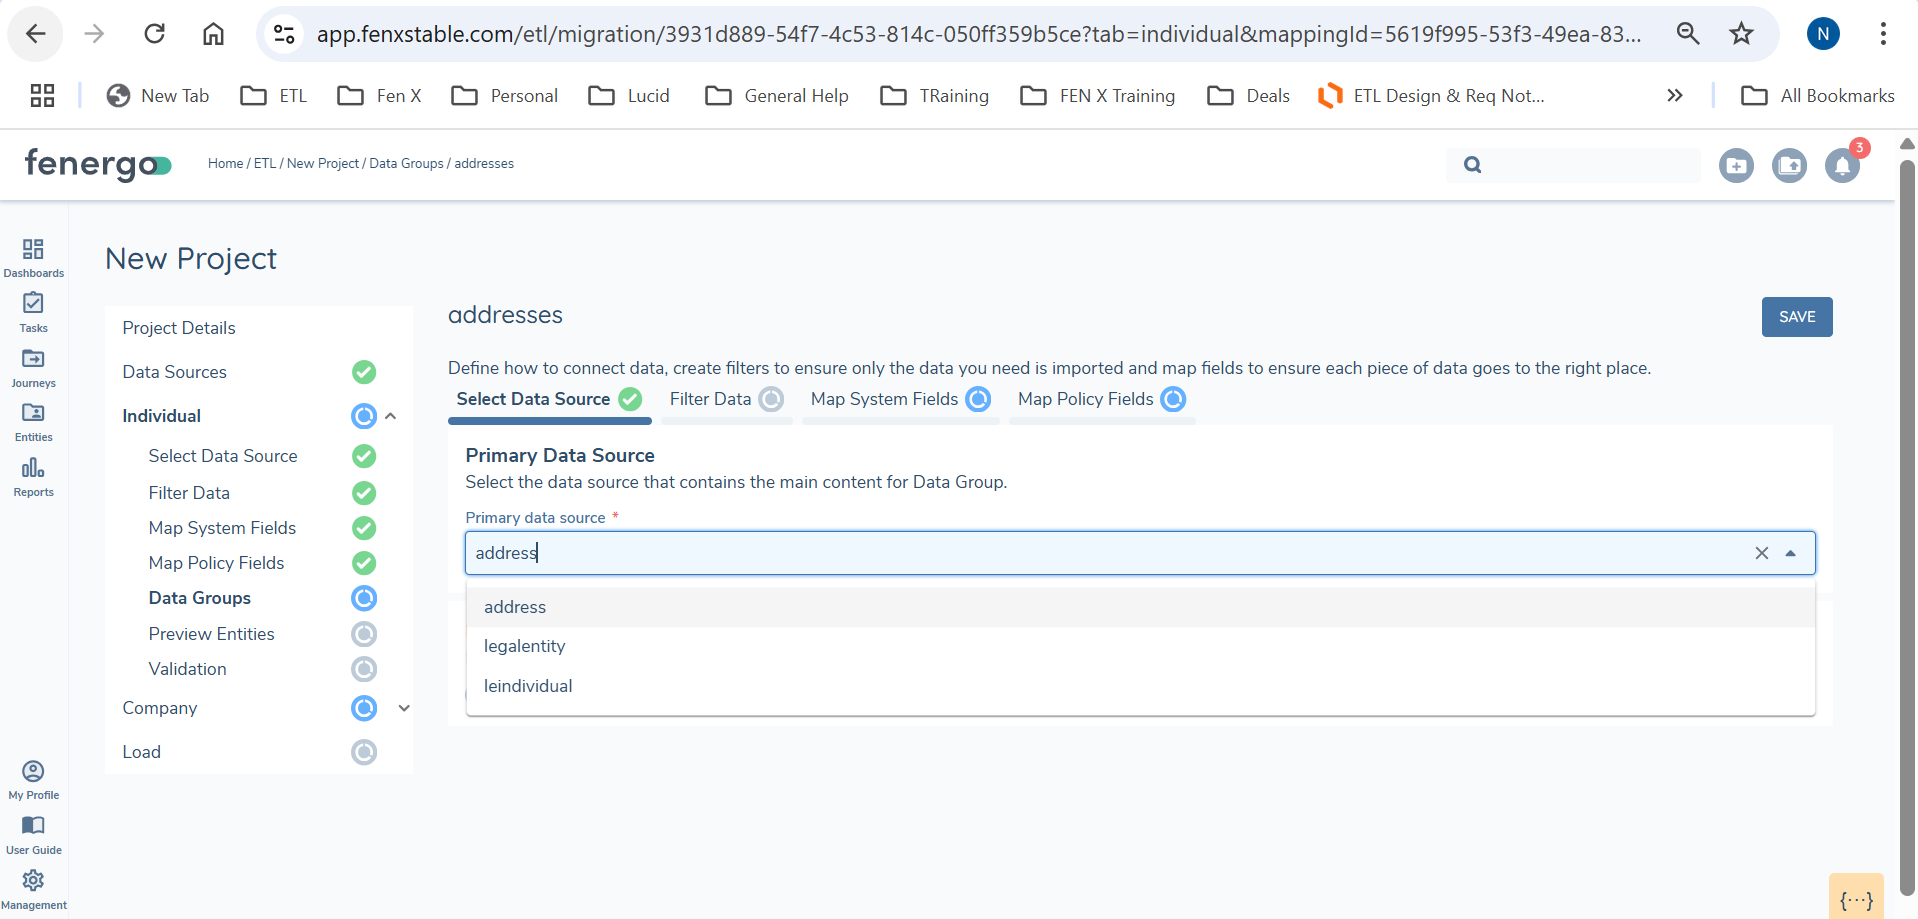
Select Datasources
When preparing to transfer data to FenX, you will often need to extract information from multiple tables from the source database and store them in separate .CSV files. To generate the required JSON output, these data sources must be joined to create a unified dataset. This process involves defining a Primary Data Source and linking additional tables to it using the ETL tool's join functionality.
The Primary Data Source acts as the central table, providing the core dataset for the transfer. All other data sources are linked to this table to form a unified structure. Each entity being migrated requires a designated Primary Data Source, ensuring the integrity and consistency of the data transfer process. The below is a basic example of tables in a client database, these will be used as the datasources during a data migration.
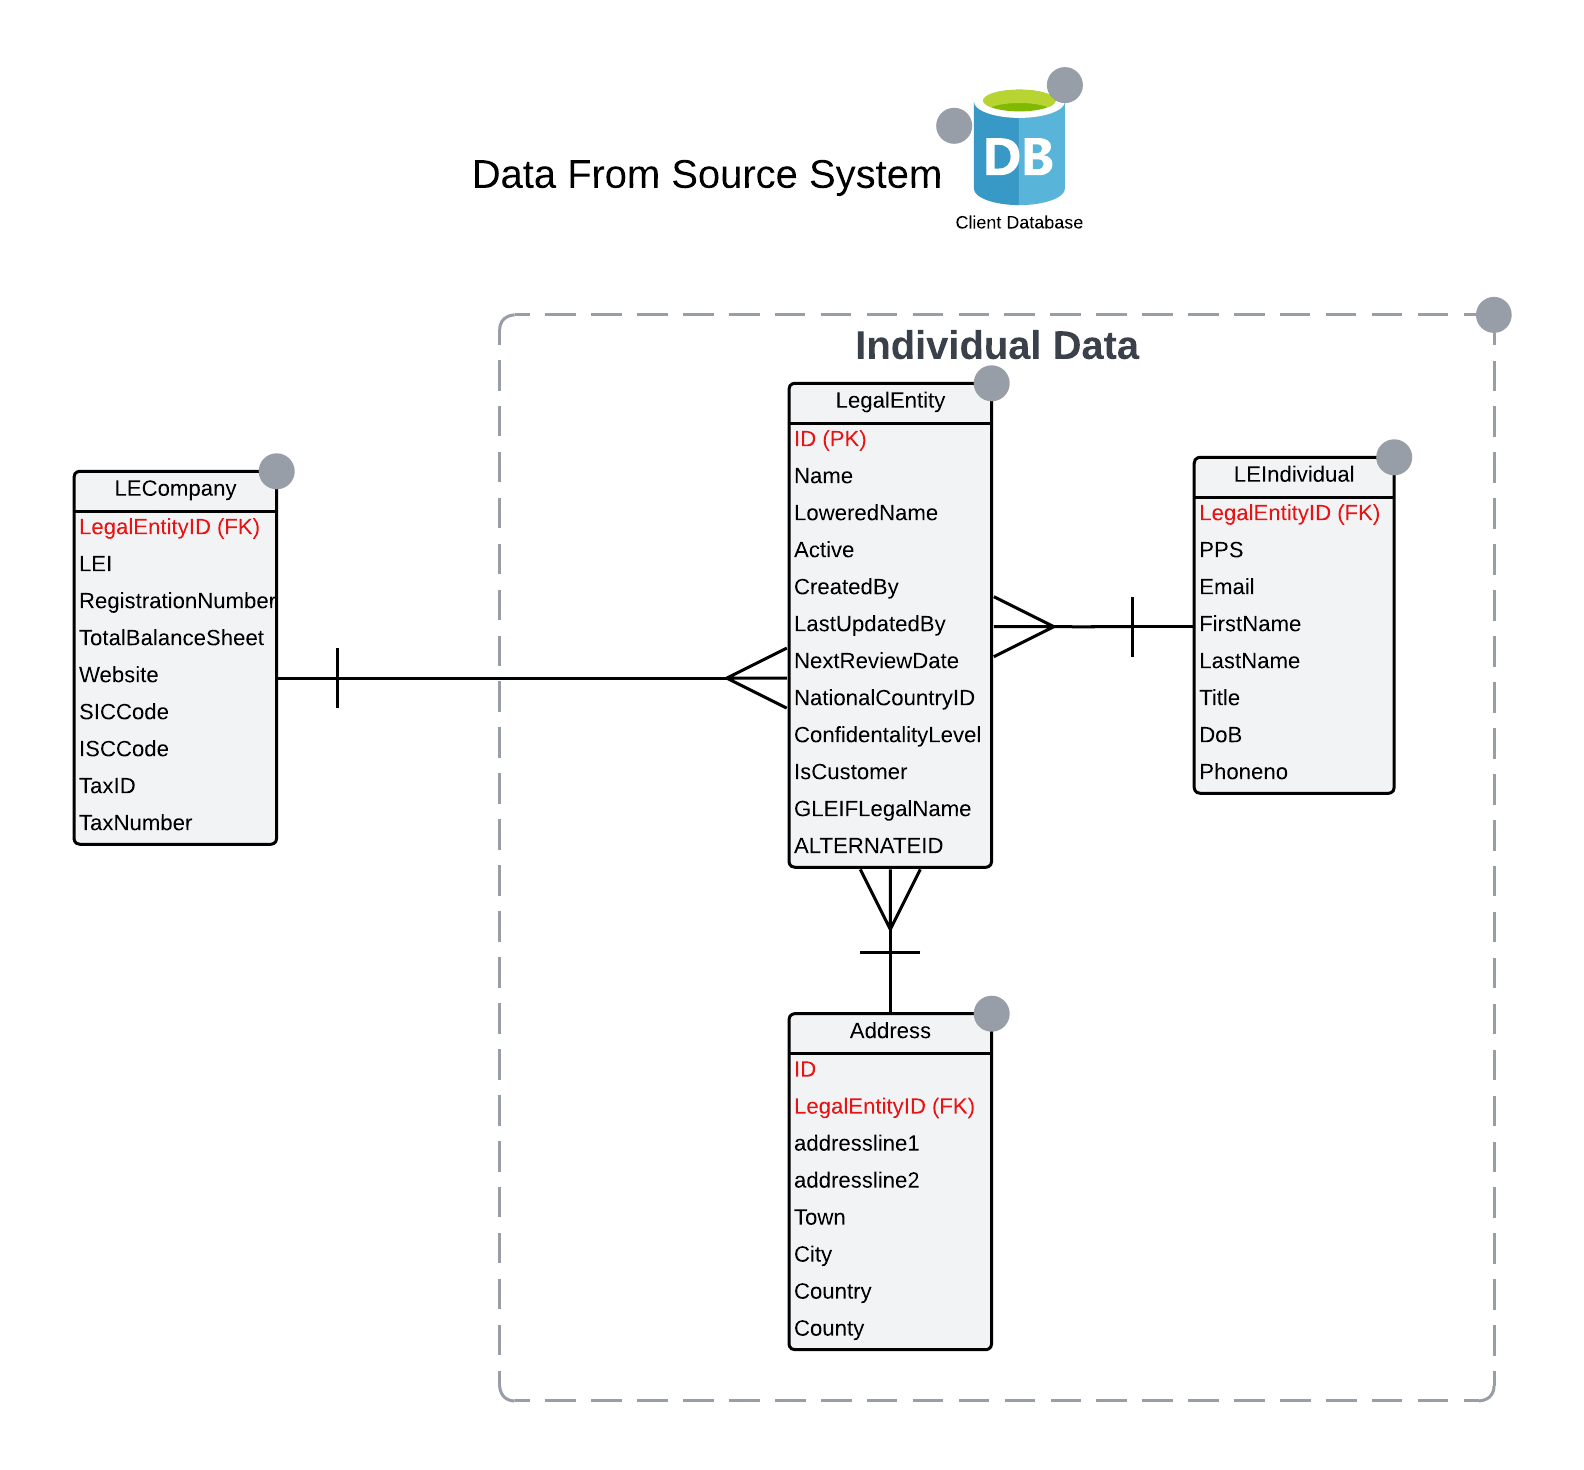
The LegalEntity table might serve as the Primary Data Source, containing core information about the entity. It will be used in both the Individual and Company data migration. Additional tables, such as LEIndividual, can be linked to the LegalEntity table through their primary and foreign keys. The primary key the LegalEntity.ID, is used to match with the foreign key LEIndividual.LegalEntityID.
To join the tables:
-
Select ADD JOIN: After selecting the Primary Data Source, click ADD JOIN to configure additional table relationships.
-
Specify the tables and columns: The Primary Data Source should always appear on the right side of the join configuration. For example, in a join between
LegalEntity(primary table) andLEIndividual(secondary table) theLegalEntity.IDappears on the right andLEIndividual.LegalEntityID, which contains the foreign key, appears on the left.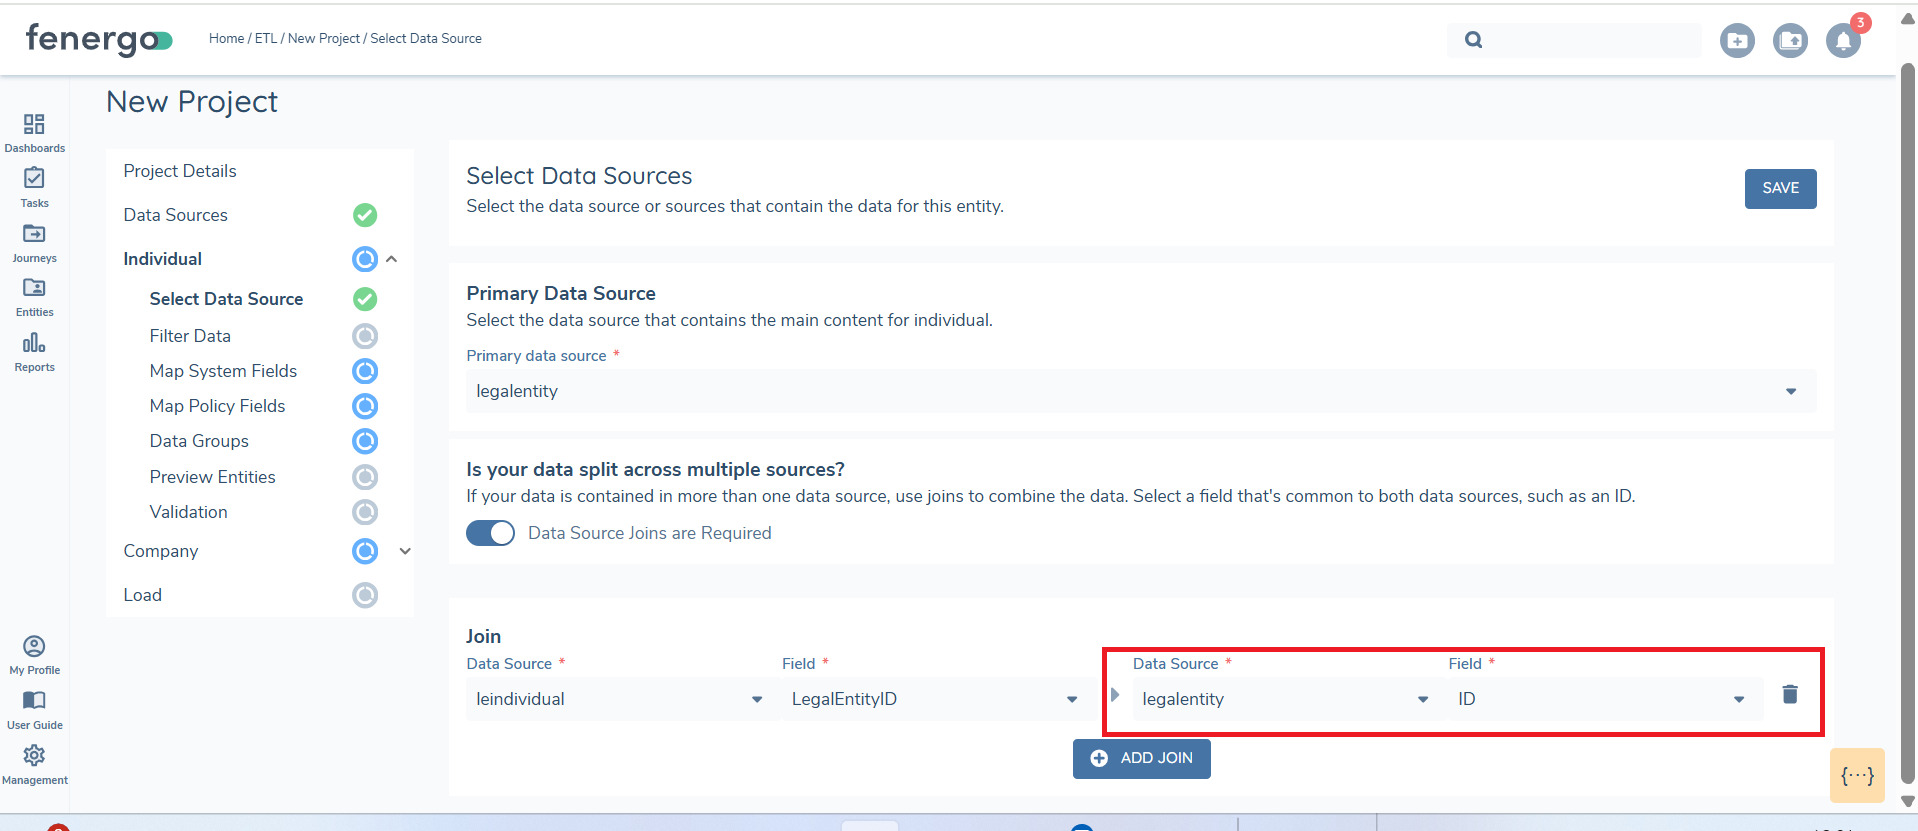
-
Save JOINS: Once all joins are configured, click SAVE. During the 'Preview' stage this will be flattened into a single unified dataset.
SELECT * FROM LegalEntity
INNER JOIN LEIndividual
ON LegalEntity.ID = LEIndividual.LegalEntityID;
This query ensures only matching rows between the two tables are retrieved.
Filter Data
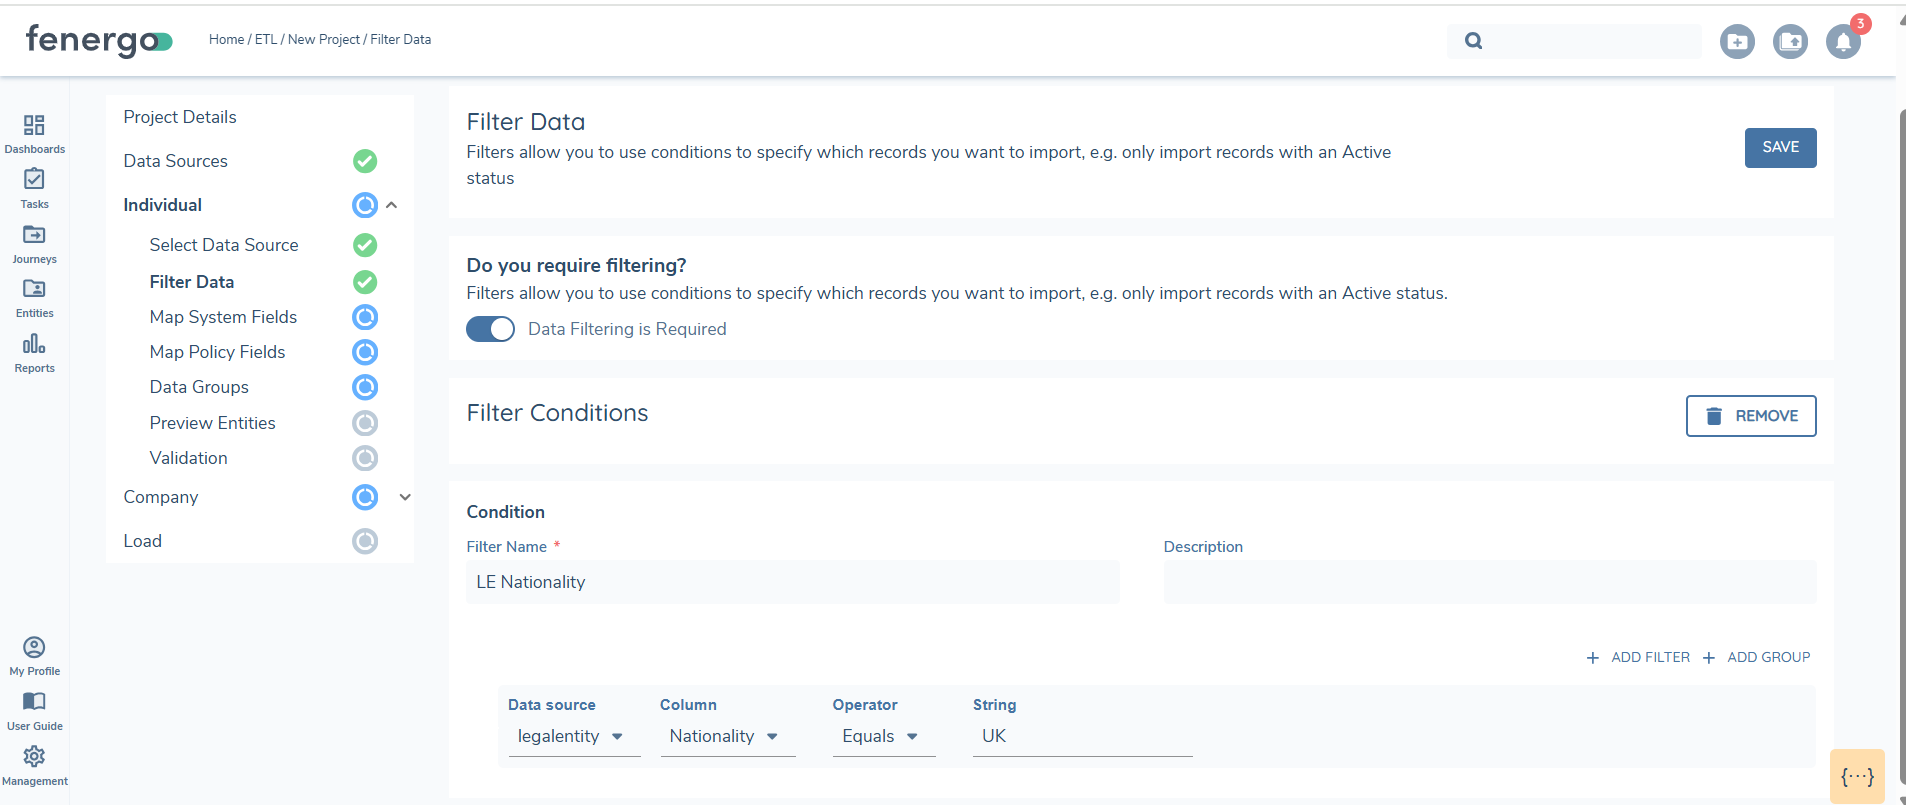
Filters can be applied to uploaded data sources to refine the data for validation and loading. You can set conditions by selecting a data source and applying filters. For example, if you want to view only entities with a nationality of the UK, applying this filter will allow you to work with just that subset of data from the uploaded source. When you move to the preview stage, only the filtered data will be displayed, validated and loaded.
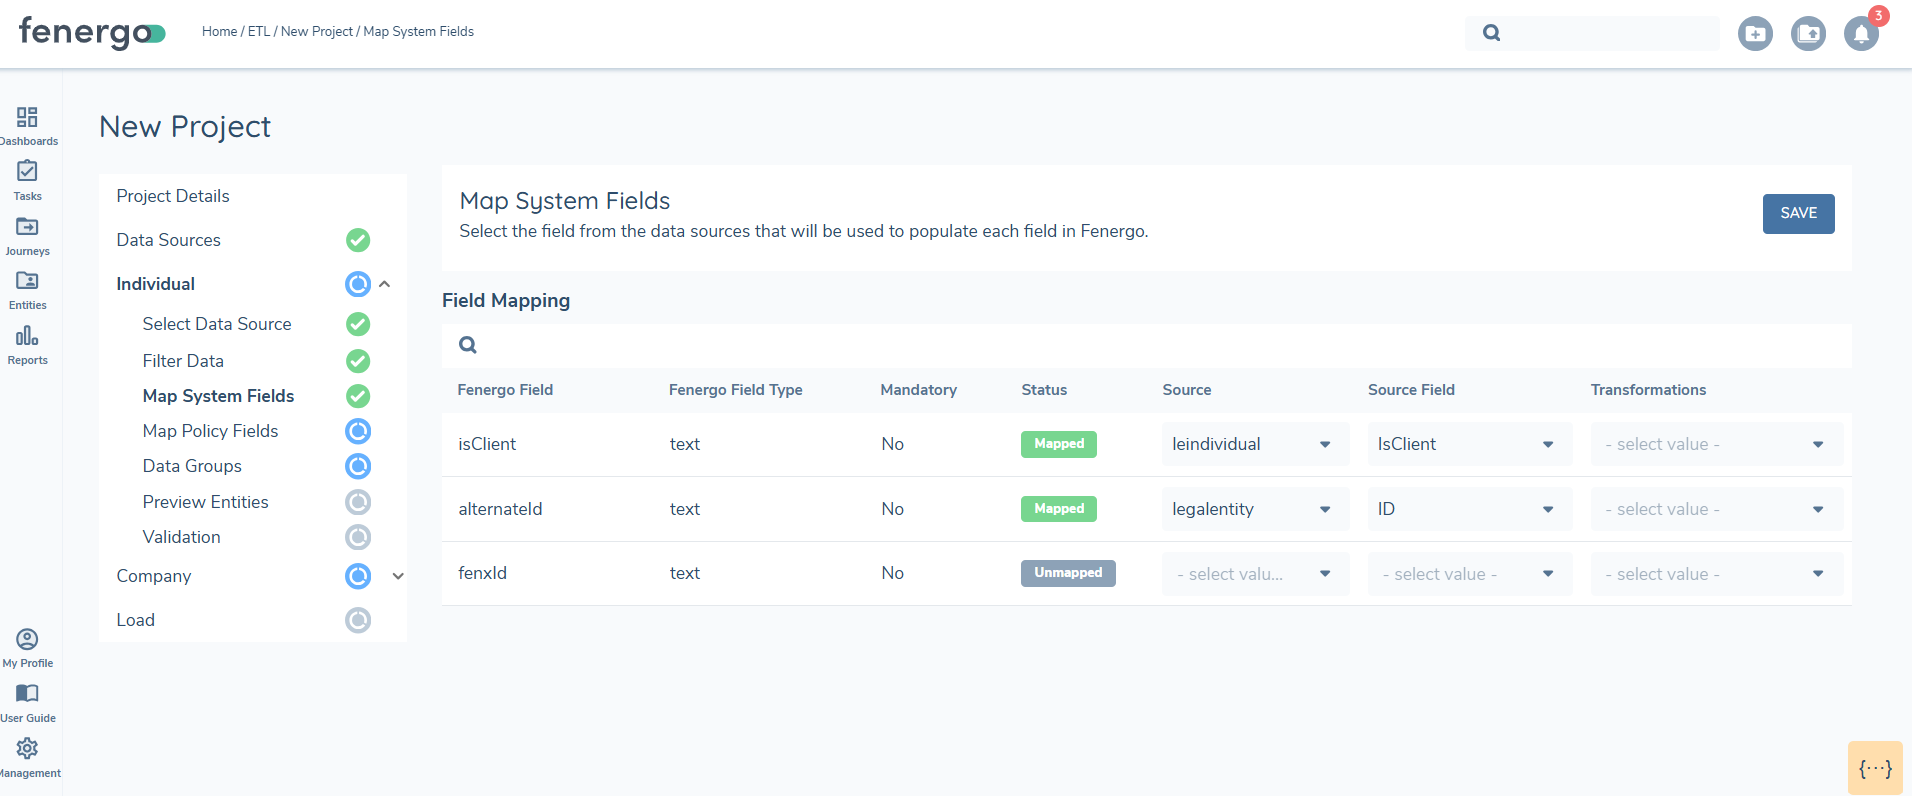
Map System Fields
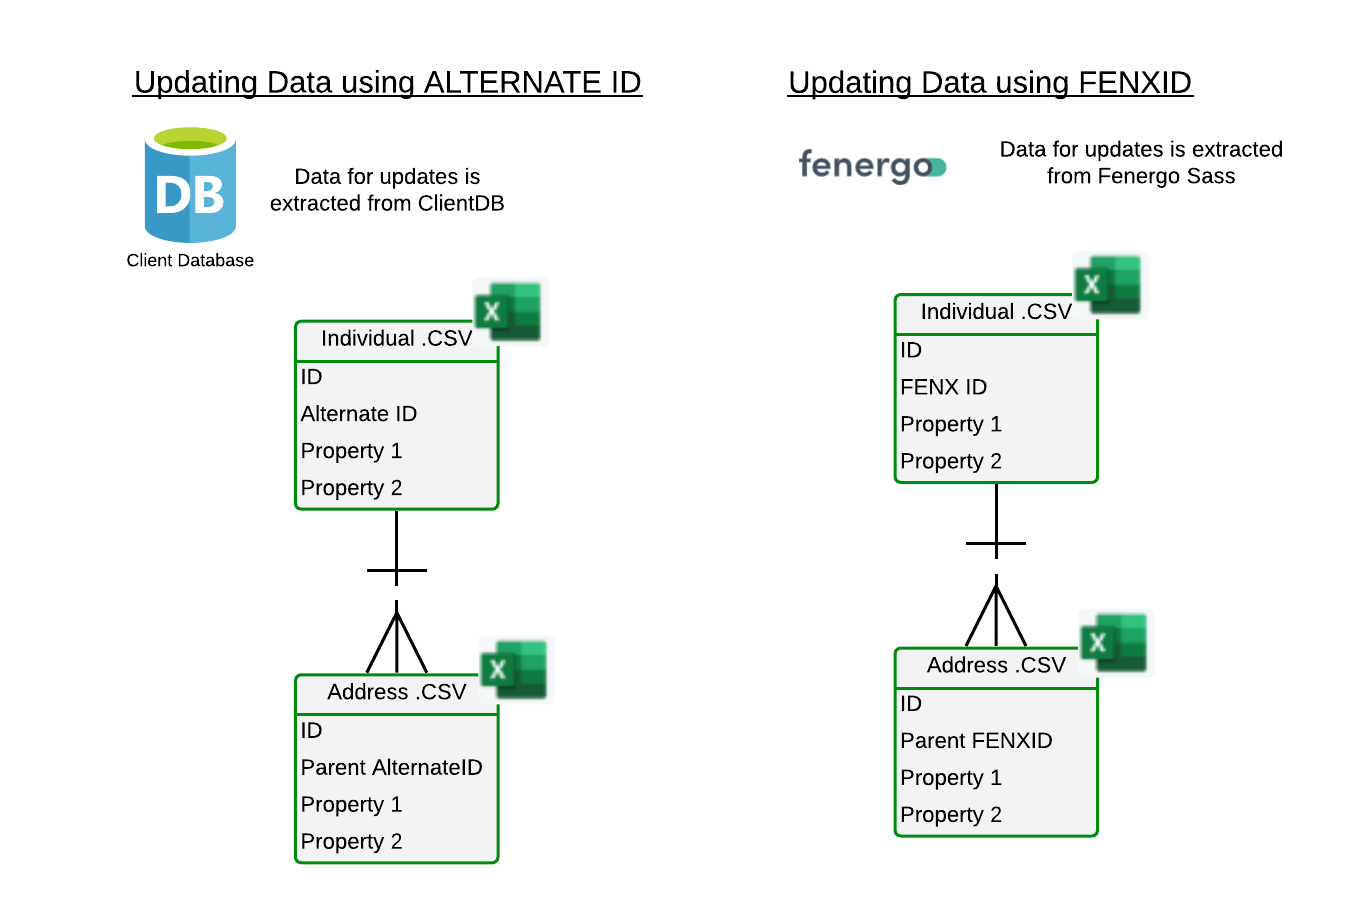
System fields are essential for migration and are required to transfer data into FenX. Each migration must use either the ALTERNATEID or the FENXID as the unique reference. Entities are created using the ALTERNATEID, which serves as the foreign key from the source system. Records can be updated using either the FENXID or the ALTERNATEID, but only one unique reference can be used for each data transfer. A migration cannot include both ALTERNATEID and FENXID simultaneously. Controls exist on the UI to only allow one of these fields to be mapped.
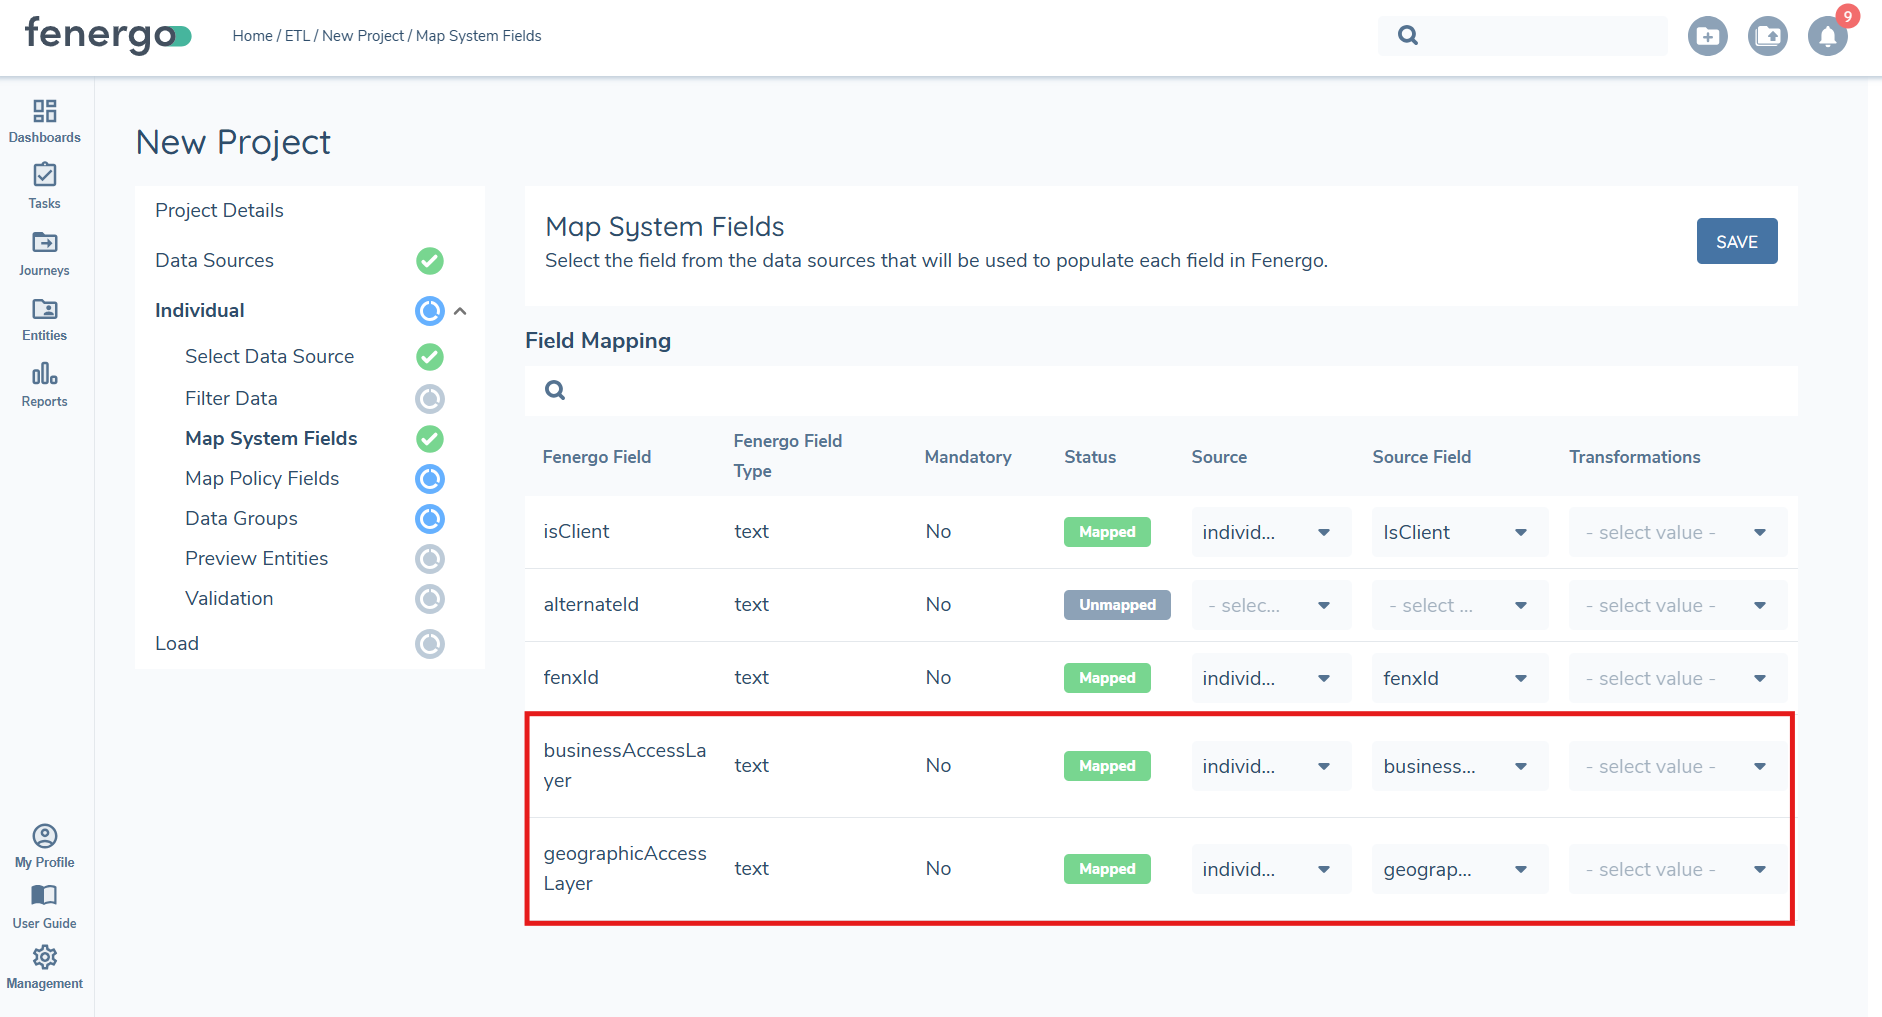
To set the Client chip on the entity and assign the Client role, column must be included in the datasource and mapped to the IsClient field. The value should be set to TRUE or FALSE when uploaded.Setting the value to TRUE in the datasource will activate the client chip on the entity profile page and assign the Client role.
Additionally, static access layers can be assigned during migration by including the BusinessAccessLayer and GeographicAccessLayer fields in the data source and mapping them in the system fields section. These fields support manual assignment of access layers for the following data types: Individual, Company, Other, Investment Account, Bank Account, and Entity Documents. Static access layers are excluded for Product, Associations, and Product To Entity Associations data types. If no static access layers are provided during entity creation the default of 'Global' is applied. ETL validates that any static access layers referenced in the migration file exist in the tenant configuration. This check runs at the validation stage, before any entities are loaded. If a BusinessAccessLayer or GeographicAccessLayer datakey does not resolve to a configured access layer, the file is flagged with a validation error so it can be corrected before the load proceeds. This prevents entities being migrated in a state where no users have matching access layers, which would otherwise leave them inaccessible after load.
When working with static access layers, it is the datakey that must be used and included in the .CSV file. Ensure that the correct datakey values are added to the relevant field(s) before uploading. This is essential for accurate mapping and validation during the ETL process.
Static access layers cannot be updated for entities with in-progress journeys. If an entity is currently undergoing a journey, any updates to its access layers will be skipped.
We do not check for in-progress journeys on investment and bank accounts, static access layers will be applied automatically in those cases.
Map Policy Fields
Each field in the data source can be mapped to a policy. The migration policy selected during ETL project creation will be used, and fields from the data sources can then be assigned accordingly. The "Automap" feature leverages AI to automatically map policy fields to the data source fields, but users must review these mappings for accuracy and there is a limit of 150 fields approx.
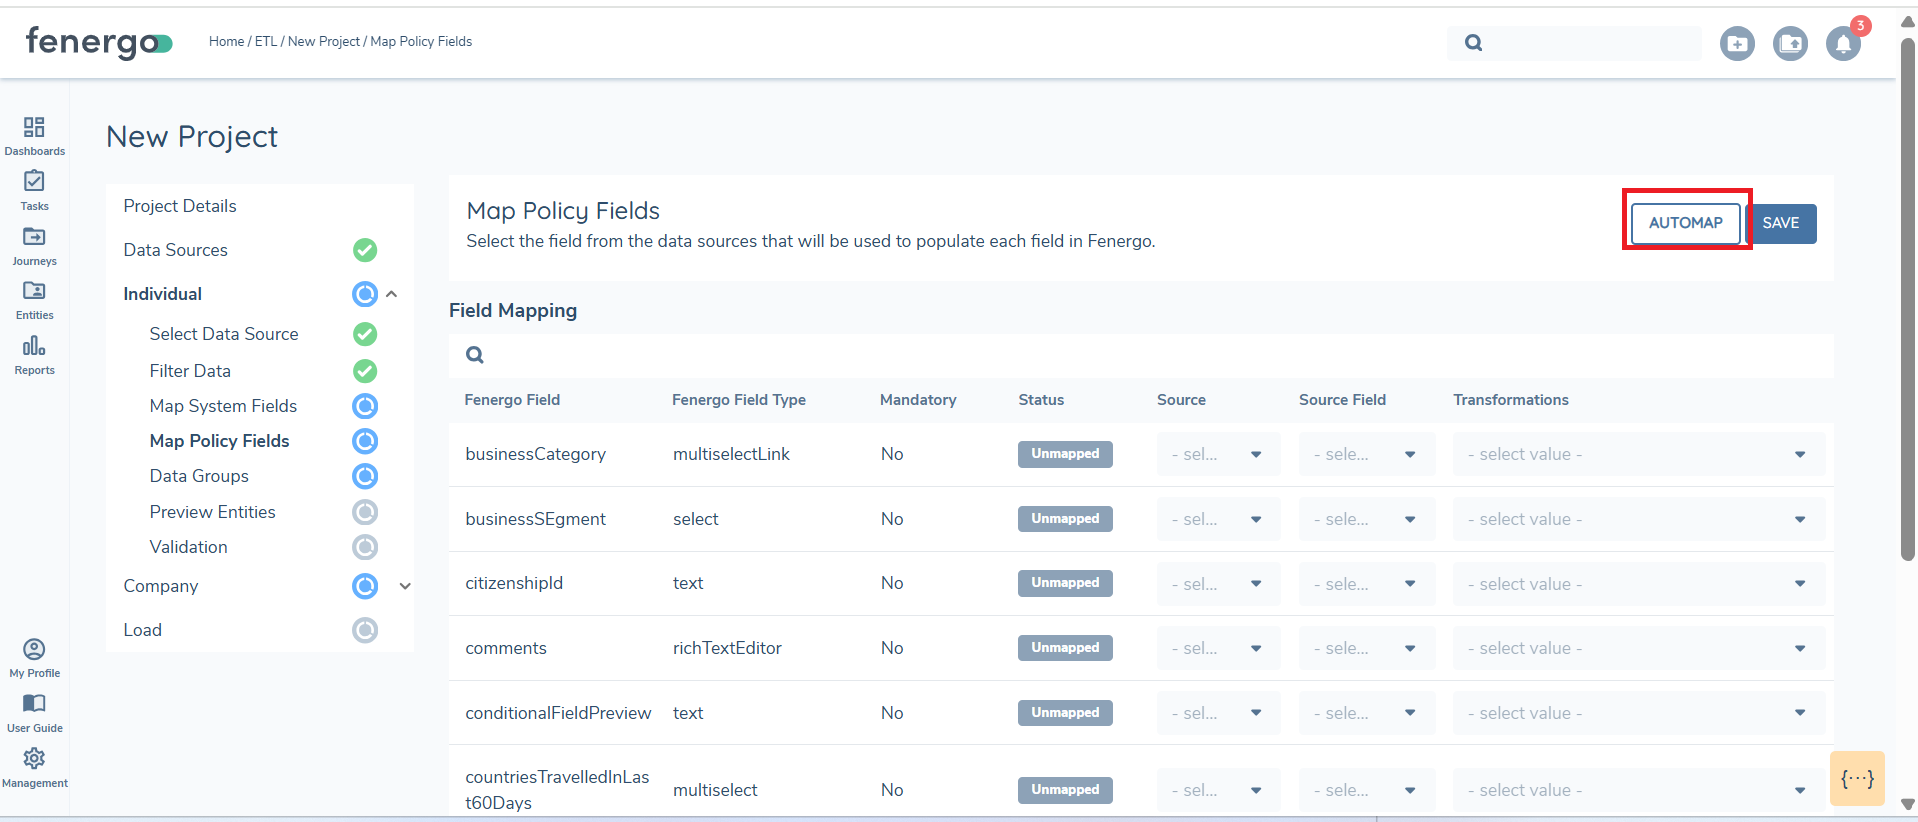
All mandatory fields and/or at least one field must be mapped for the section status to update to "Complete." For any date fields not in ISO 8601 format, the "Date Parse" feature must be used, as only dates in specific accepted formats can be processed.
Date Parse
While in the Map Policy section, locate the field requiring a date format transformation. In the transformation column for that field, click on the ‘select value’ dropdown arrow.
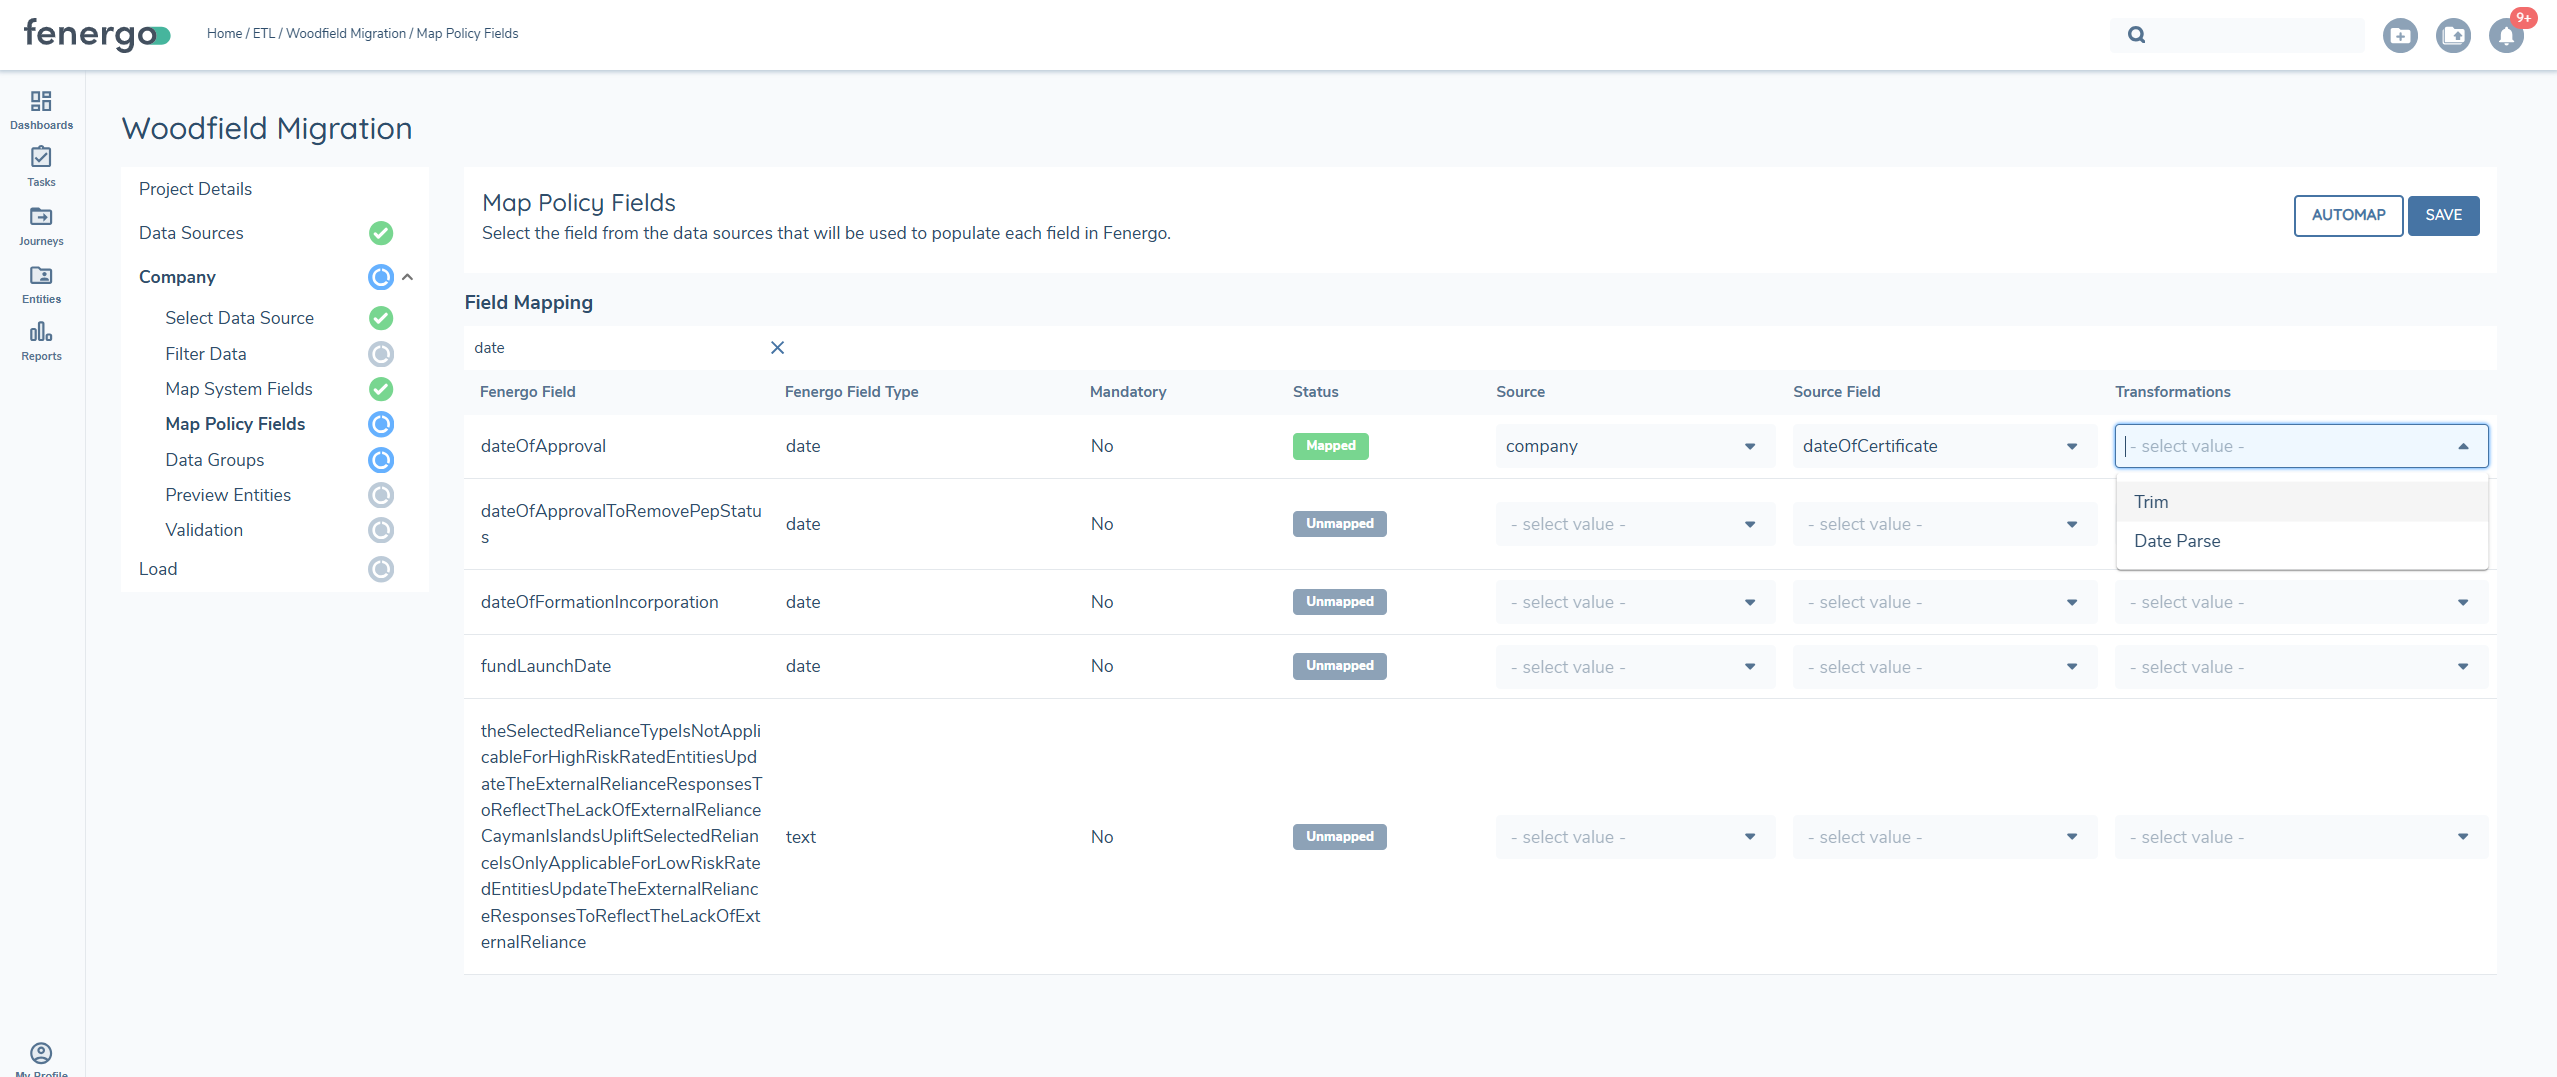
A pop-up box will appear prompting you to select the date format used in your source file. Click the Choose date format dropdown arrow to view the list of formats supported. There are twelve date format options available. Ensure you select the format that exactly matches how dates are structured in your source file (e.g., dd/mm/yyyy, mm-dd-yyyy, etc.).
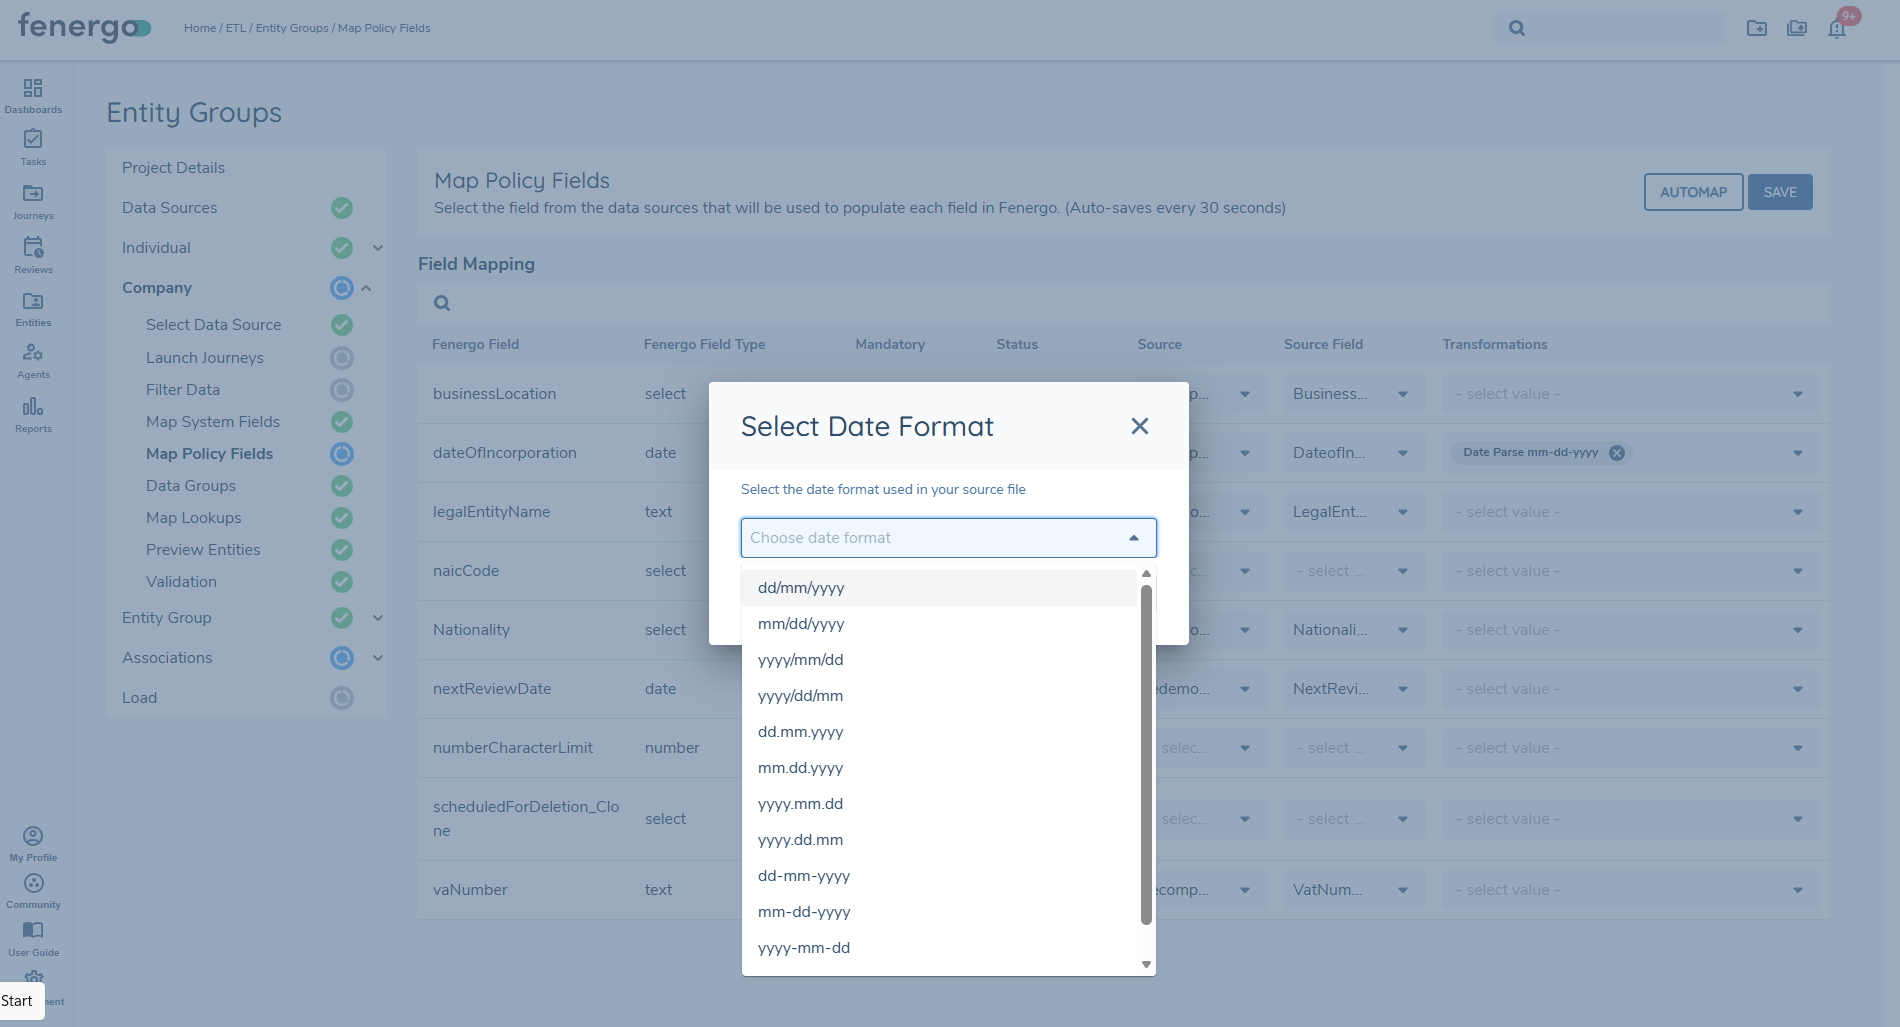
Once the correct date format is selected, click the Confirm button. The selected transformation will be applied and you will be able to view the ISO format during the preview stage.
This process ensures your date fields are correctly transformed during migration, preventing errors related to unsupported formats.
If your source file contains a date value that is mapped to a date field in Fenergo, selecting a date parse format is mandatory in order to proceed, as this will prevent validation errors.
If the wrong date format is selected, the system may be unable to parse the date values correctly. This can result in an error in preview. See the trouble shooting guide for details.
Datagroups
In the Fenergo SaaS platform, a Data Group is a collection of data points used to represent a Sub-Entity, such as an Account or an Address. This is comparable to a link table in traditional data modeling, where an address references a parent record. When a policy includes any Data Groups, they are represented in the Data Group section of the ETL tool. Each datagroup entry must be linked to a parentID in the source file.
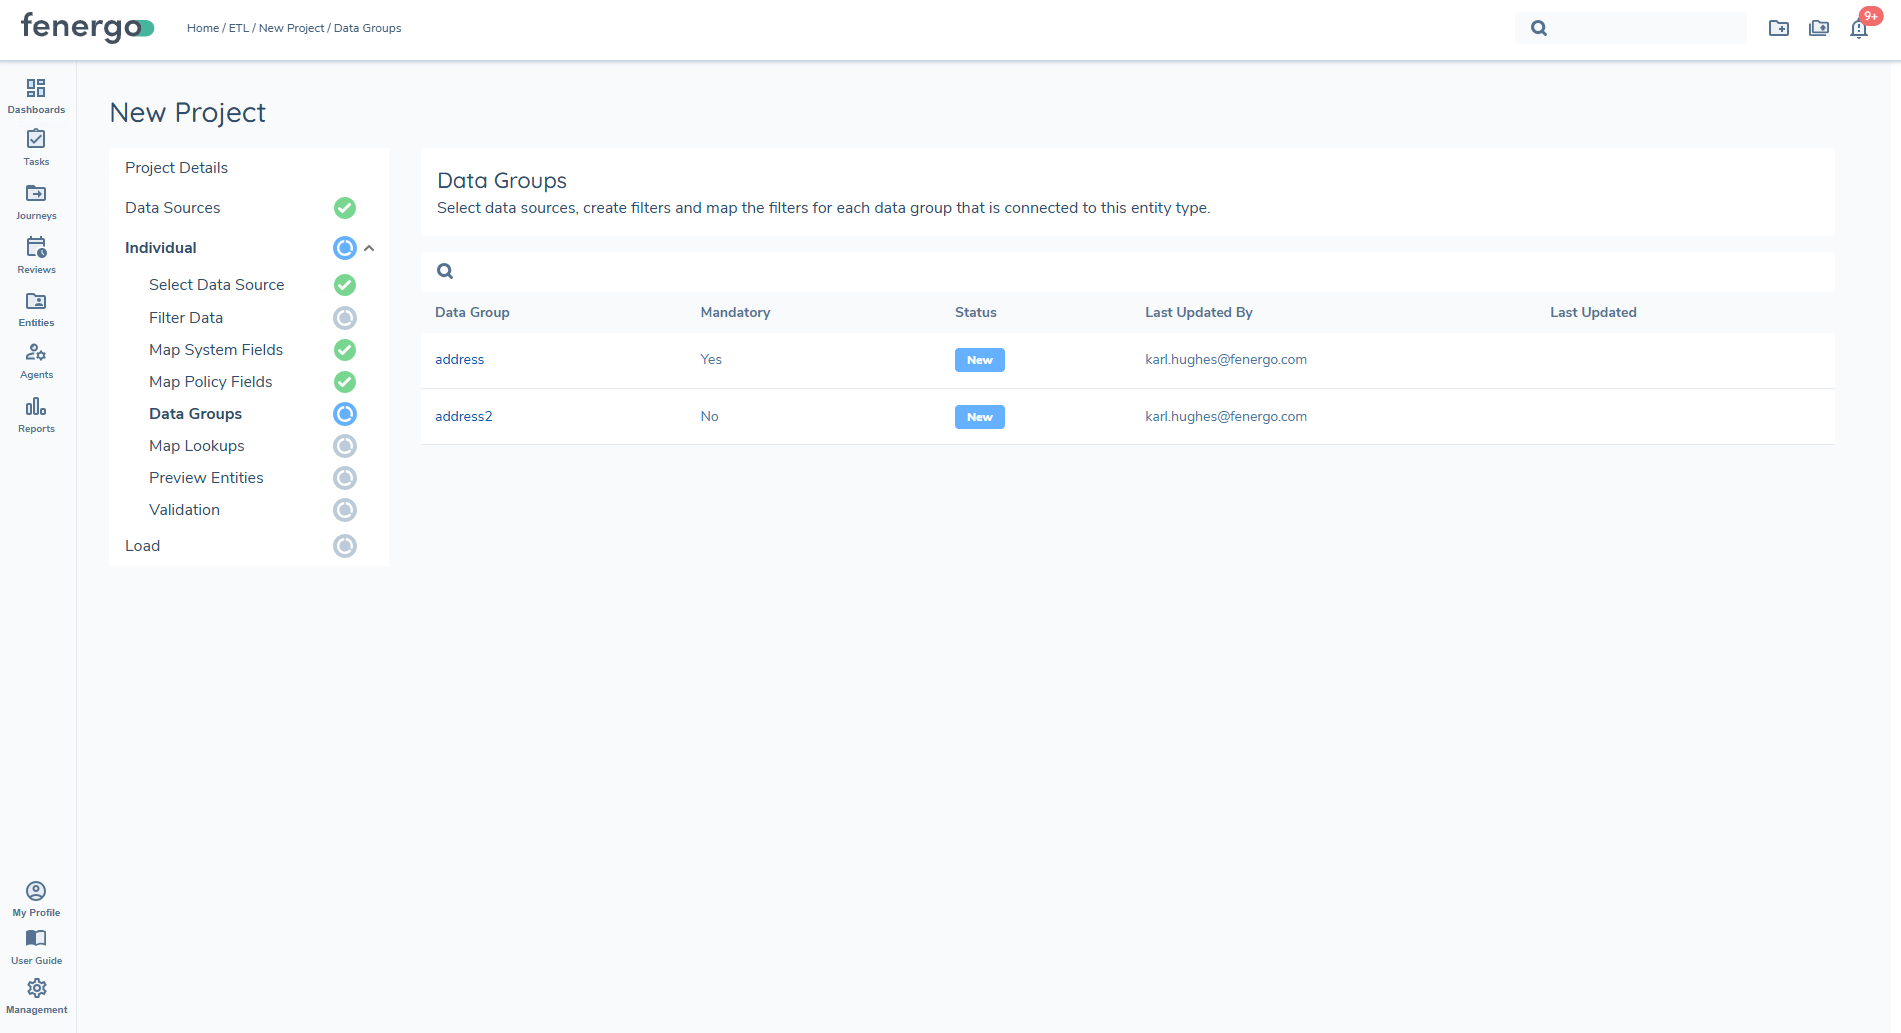
Data Groups are configured in the Policy Configuration screen, functioning like a new Data Type that can be reused across any policy referring to that type. For migration policies containing Data Groups, each must be explicitly mapped in the ETL tool.
Each Data Group requires:
- A separate .CSV file containing data uploaded for the group, this will serve as the primary datasource and must include the Parent Unique Identifer
- Mapping defnitions both system and policy, which includes the unique identifer and policy fields
- Parent ID defined as a system field that will link to the datagroup to the entity.
The system fields must align with the unique identifier defined in the policy, and validations in the UI ensure consistency. In the example below if the unique identifier when mapping the policy system fields is FENXID then the PARENTID defined in the address file must be the PARENTFENXID, alternatively if it is the ALTERNATEID then the Parent ID needs to be the PARENTALTERNATEID.
When migrating datagroups the system will perform CREATE and override any existing datagroups associated with the entity.
The "Auto Map" feature uses AI to automatically map the fields defined for that datagroup in policy to the datagroup.
Mandatory vs. Non-Mandatory Data Groups
ETL distinguishes between mandatory and non-mandatory Data Groups to provide clarity during data migration. A mandatory column is displayed in the Datagroups grid, indicating whether the data requirements the data group is linked to is mandatory or not for the selected entity type. This allows users to immediately understand which Data Groups must be populated and which can be bypassed as they progress through the migration process.
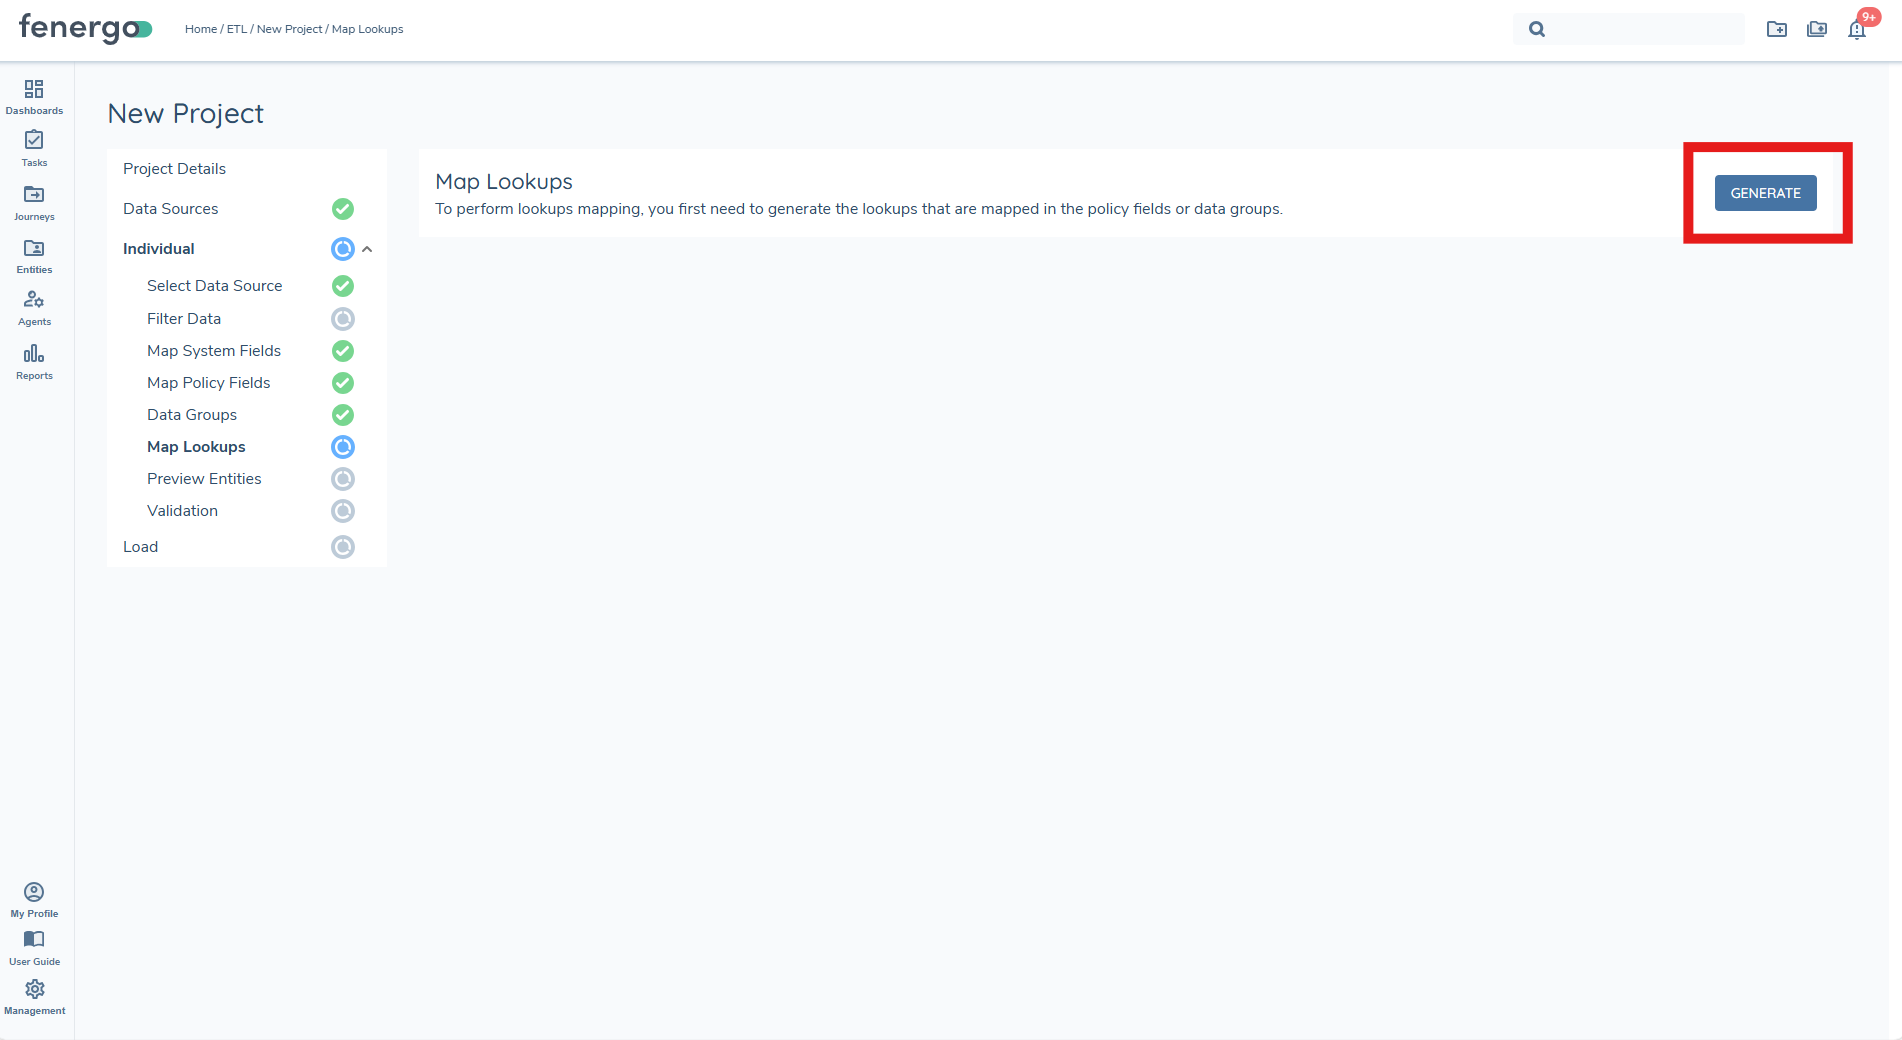
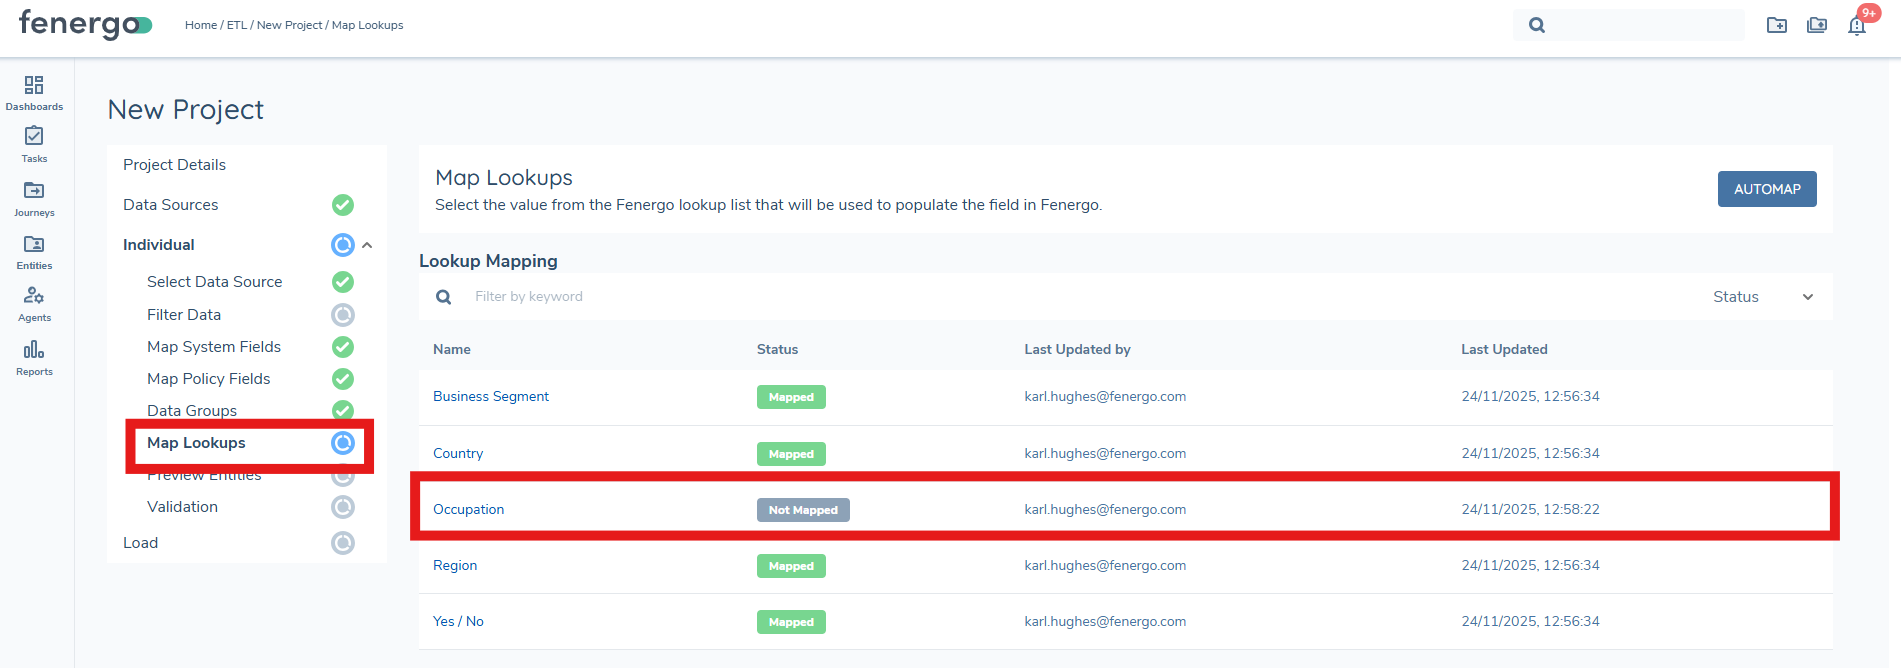
Map Lookups
The Map Lookups step allows users to standardise and validate all lookup-driven values detected in the uploaded data source. This ensures that incoming values (e.g., Country, Industry, Risk Rating) align with the lookup lists configured in Fenergo. Lookup Mappings must be completed before the Preview stage can be run, ensuring clean and consistent data is prepared for Validation and Load.
Generate Lookup Lists
Before users can begin mapping values, they must first generate the lookup lists. This action scans the project configuration and datasource to determine all lookup-driven fields and prepares the mapping table.
When the user clicks Generate, ETL will:
- Identify all lookup-driven fields
This includes Select, Multi-Select, Linked Select / Multi-Select (parent and child lists), and lookup lists defined in Datagroups. - Retrieve the relevant lookup list(s)
The system loads the configured lookup values for each field, ensuring the mapping table reflects the correct version and structure. - Aggregate all unique values from the datasource
ETL scans all relevant columns and compiles every unique raw value that must be mapped.
If a lookup is used in multiple places, values from all occurrences are combined into a single unified list.
Multiselect Lookup Handling
When a multiselect lookup is used in an ETL project, the source file may contain multiple values stored within the same field and separated by a pipe character ('|'). During lookup generation, ETL automatically splits these pipe-separated values into individual entries so they appear as separate raw values in the Map Lookups grid. Each value must be mapped independently to the appropriate lookup option defined in Fenergo.
When proceeding to Preview, all mapped values are displayed under the same field heading but are shown as distinct mapped entries, ensuring multiselect fields retain their correct structure throughout the migration process.
Once generation is complete, the lookup mapping table is displayed and users can begin resolving unmapped values.
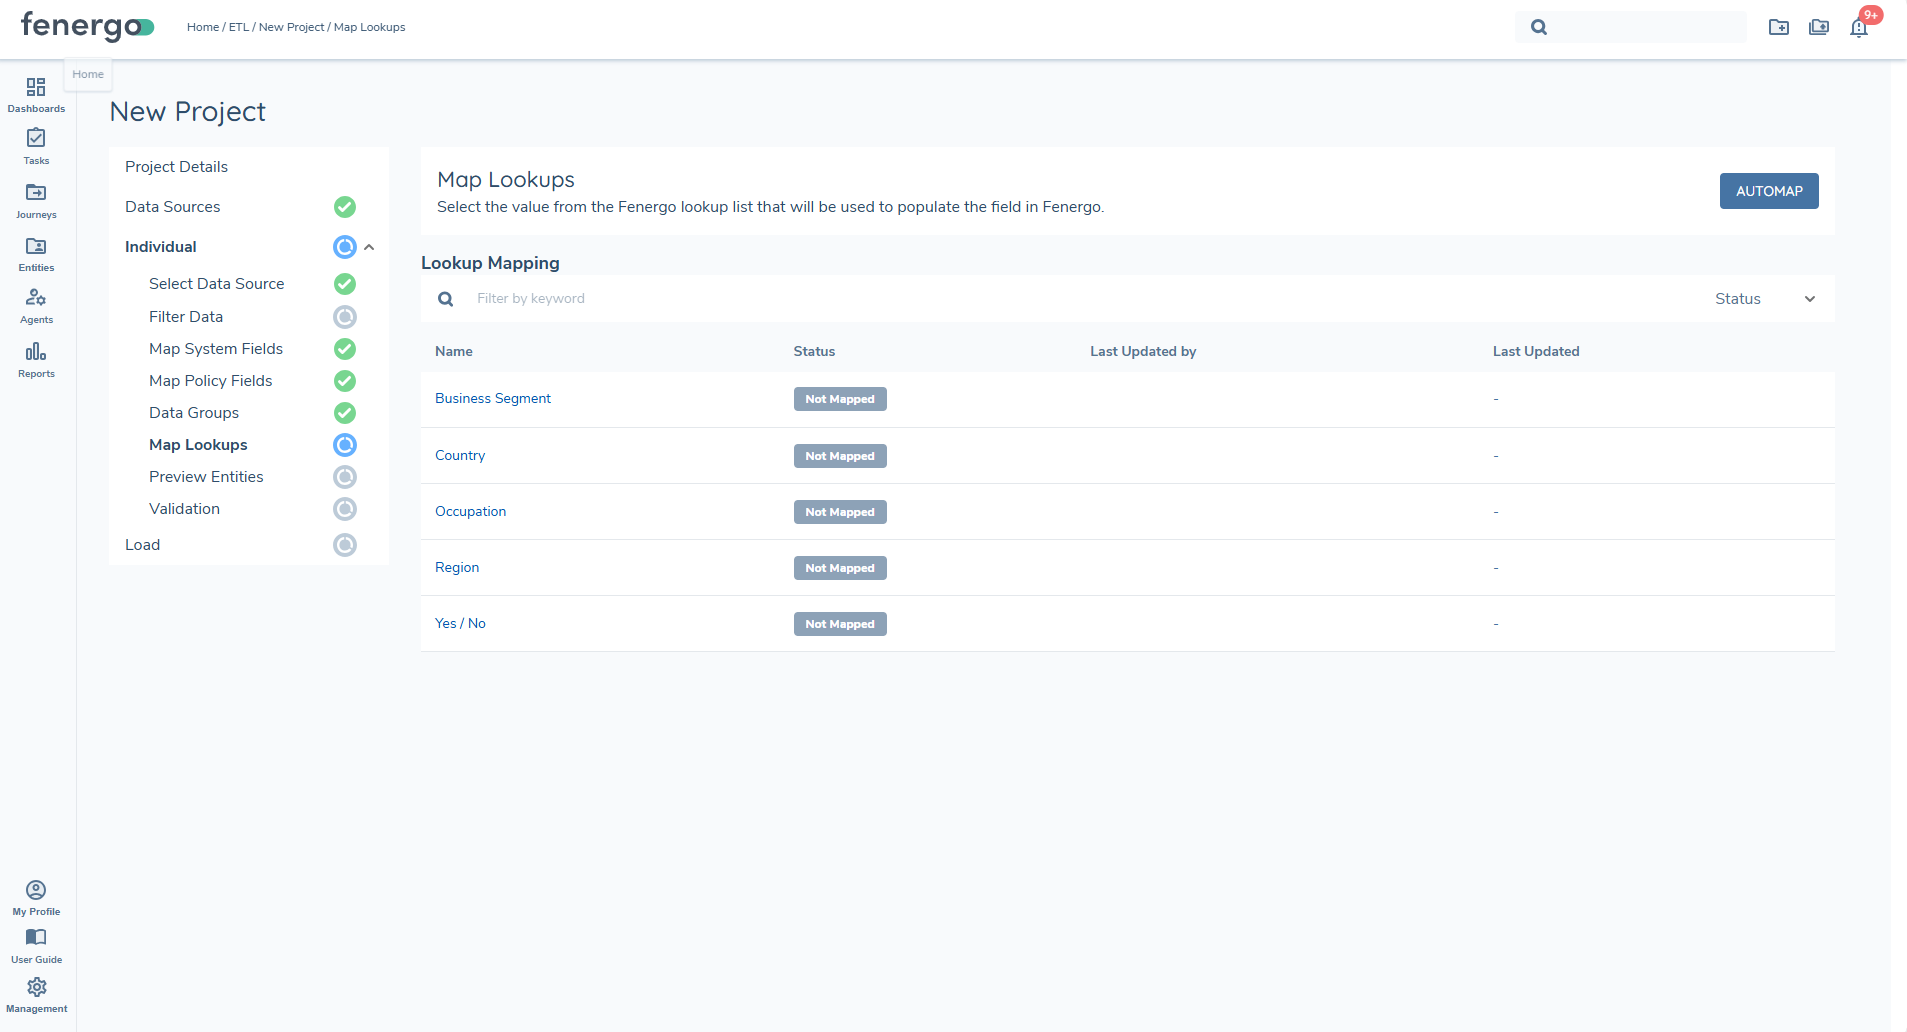
Lookup Mapping Options
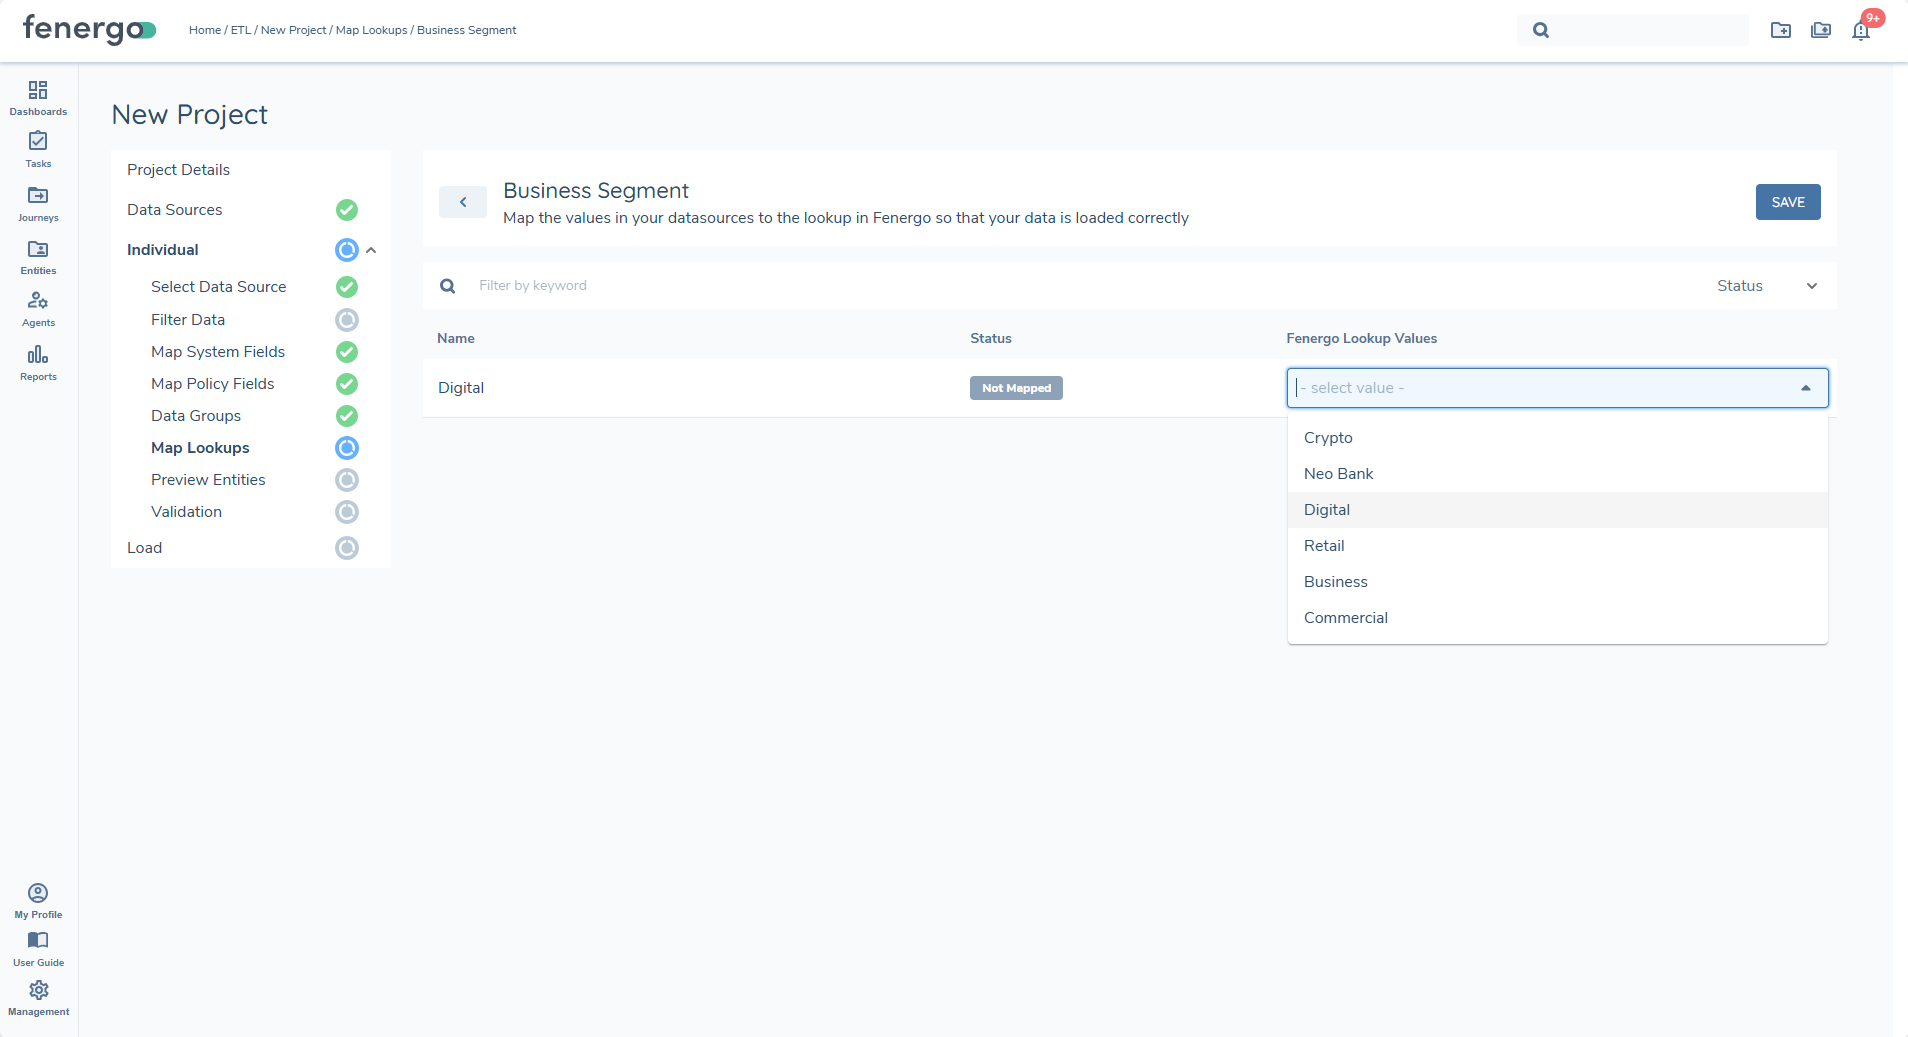
Once lookup lists are generated and displayed in the grid, users can begin mapping the values found in the data source to the corresponding lookup values configured in Fenergo.
Using different lookup lists on requirements that share the same datakey is not supported and can result in arbitrary or incorrect lookup values being returned. Use a single lookup per datakey, or define separate datakeys if differentiation is required.
Manually Mapped
Users may override an automapped value or manually map any value that the system could not confidently match. Manually mapped values also display with a green status indicator. Manual selections always take priority over automapped results.
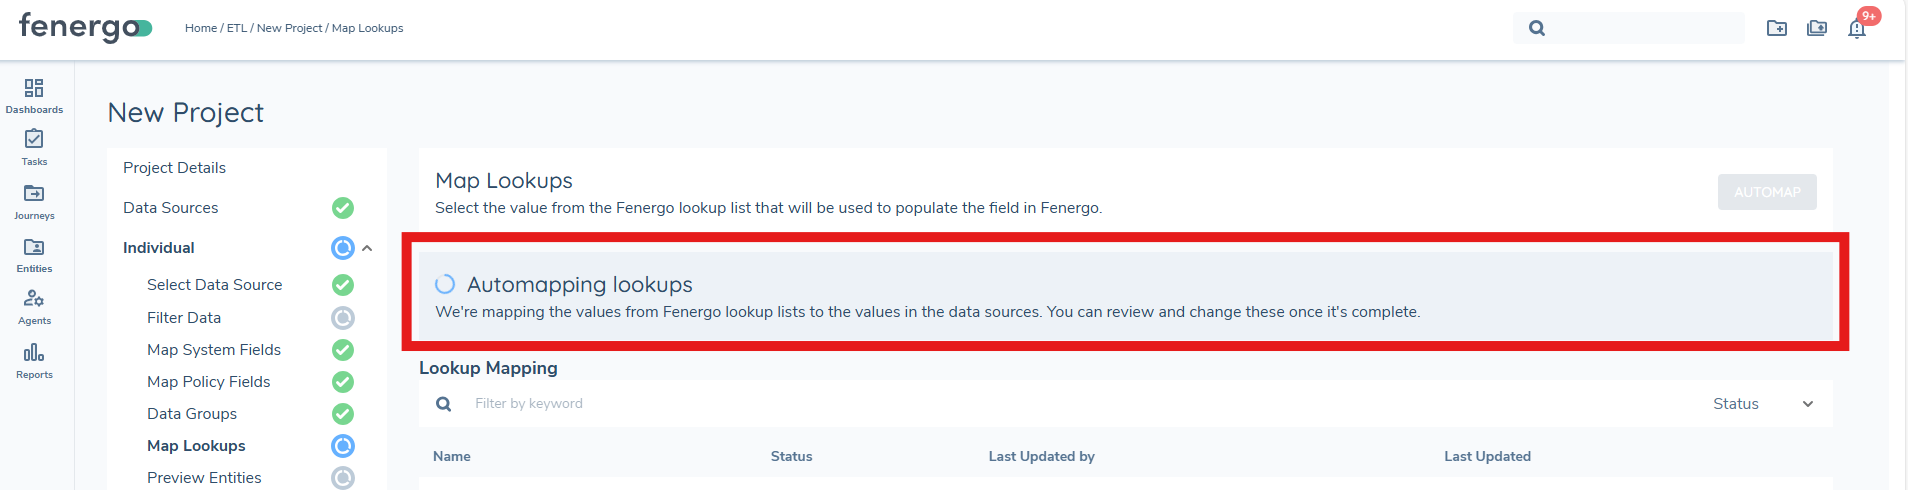
Automapped
Automapping follows a two-stage approach:
- Exact Match Logic checks for a direct, case-insensitive exact match between the raw value and any lookup value. If an exact match is found, it is applied automatically.
- AI-Assisted Matching is used If no exact match exists, the system applies AI-based similarity logic to detect close or probable matches. These matches are only applied when the system has high confidence.
Not Mapped
Any raw value that has not yet been mapped will appear with a grey indicator. All unmapped values must be resolved before the Preview stage can be accessed.
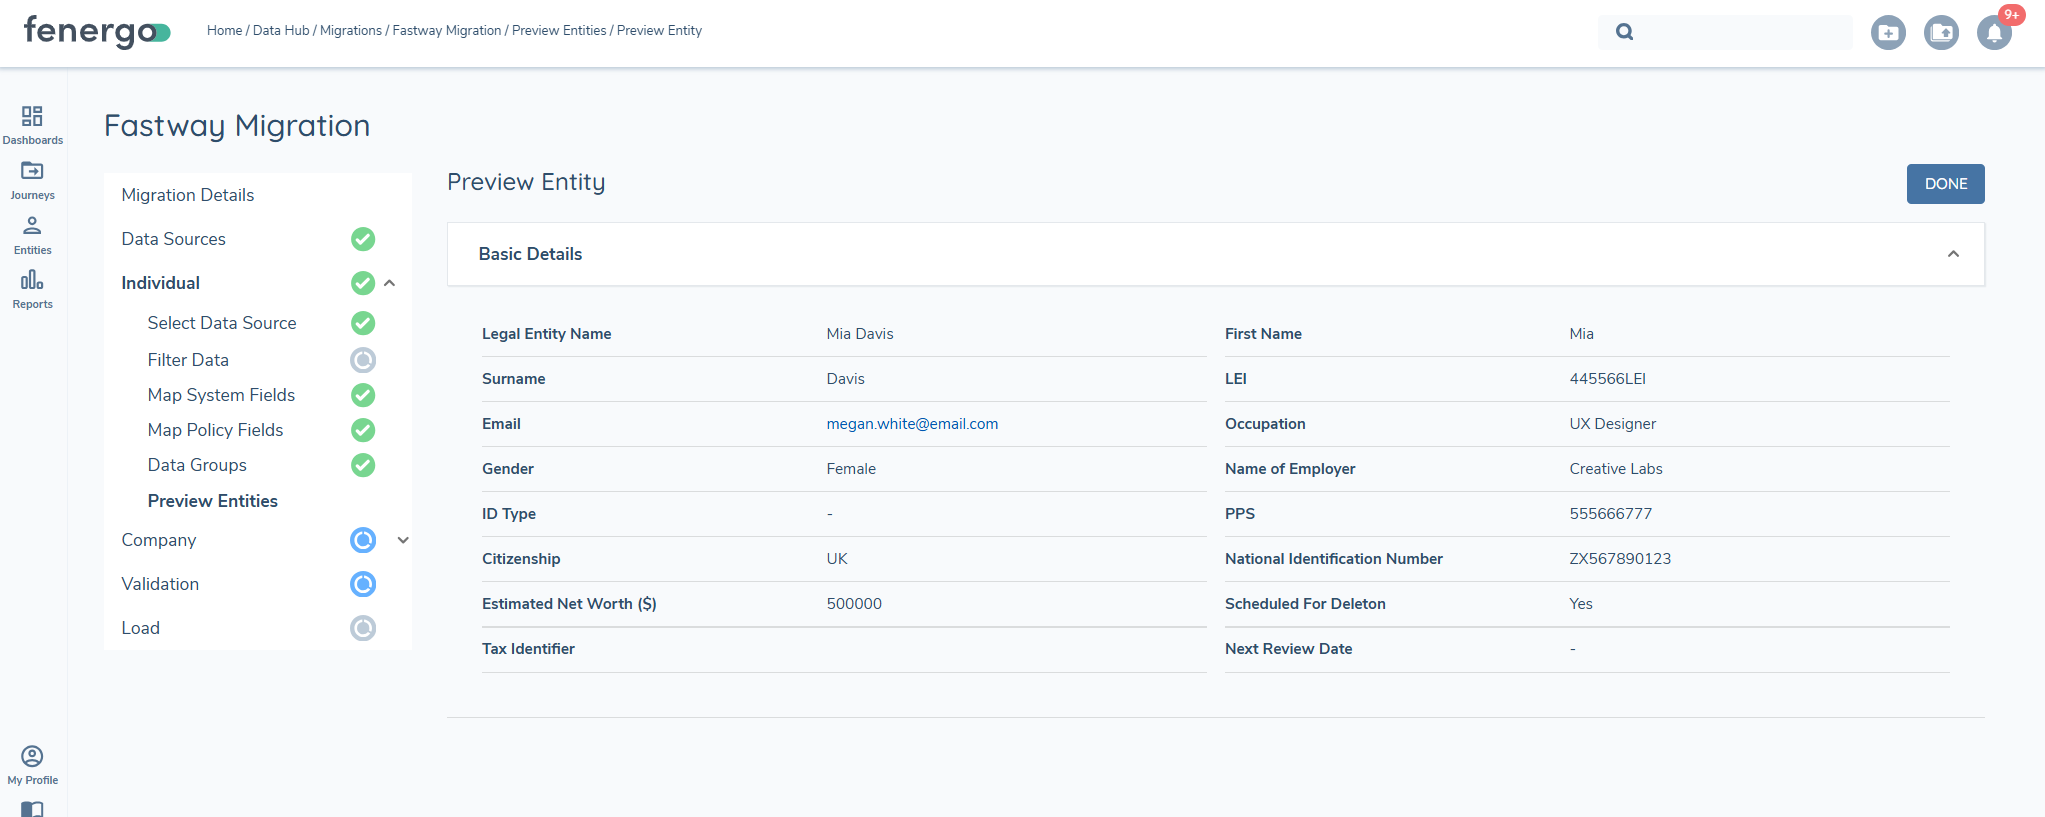
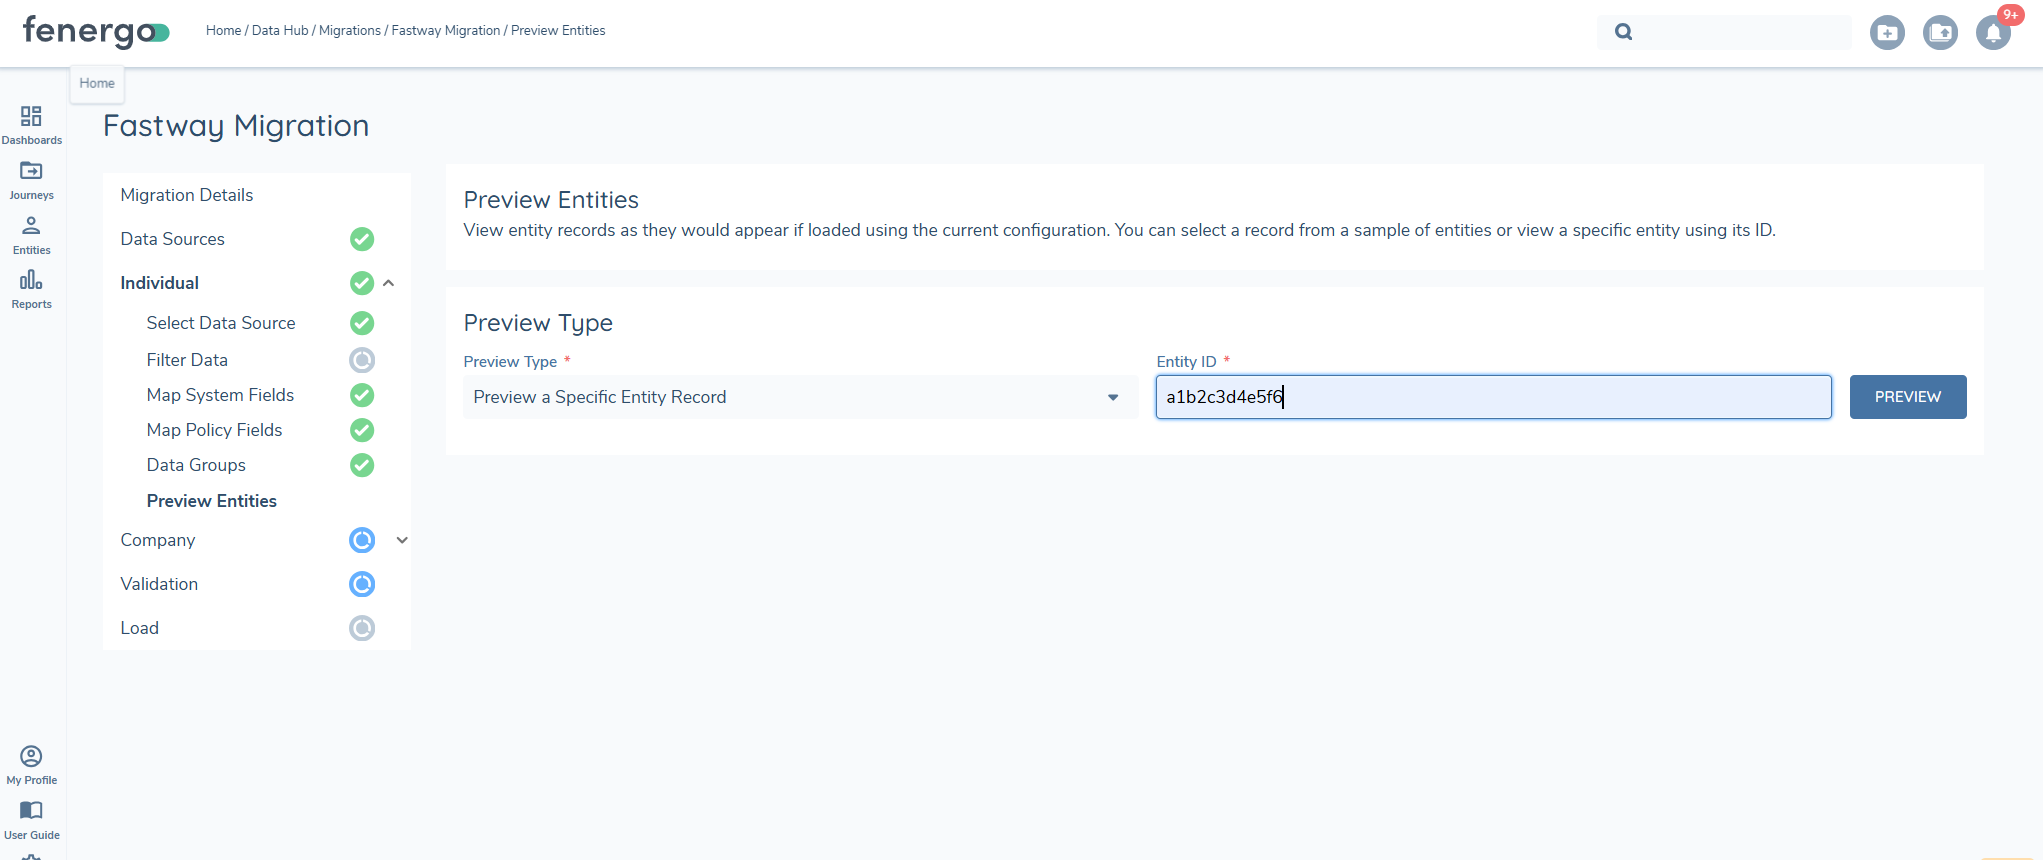
Preview
The Preview feature allows users to verify if data has been correctly mapped and filtered. It aggregates data from the source by linking datagroups to specific entities, applies the mappings to policy fields, and incorporates any defined filters. This provides users with a quick snapshot of how the data will appear once loaded.
Since the preview process involves preparing the payload that will be used in the final load step, it may take some time to complete. This step is mandatory and the primary purpose of this feature is to enable users to confirm that mappings, transformations and filters are accurate before fully validating the data.
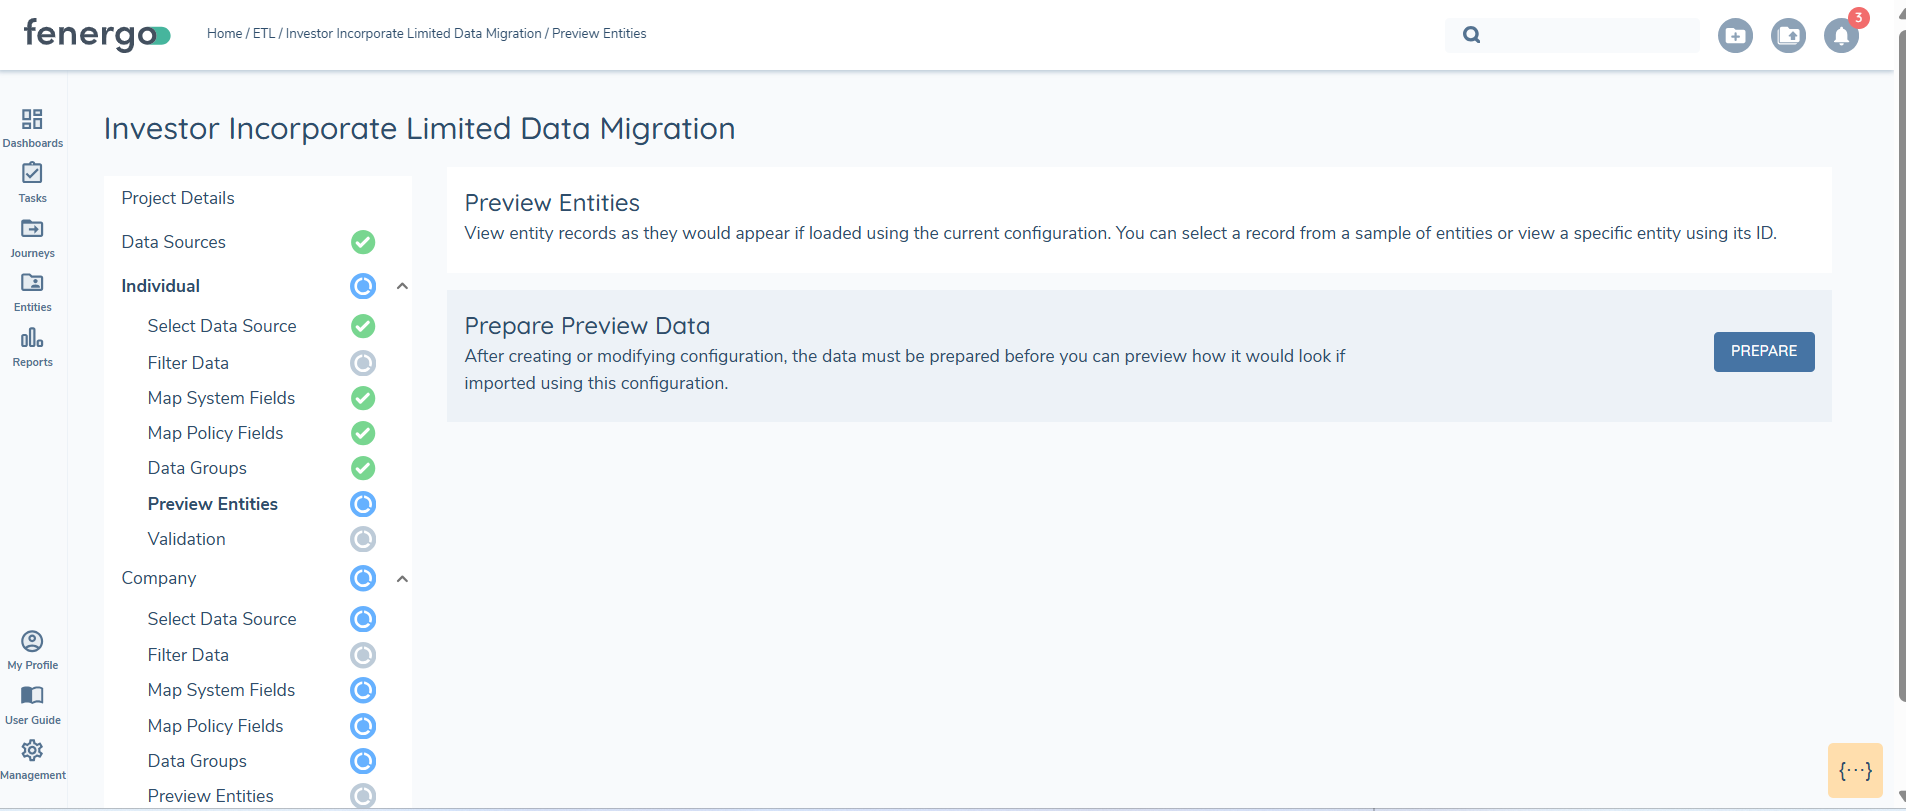
Once the preview is initiated, the system begins aggregating data and random set of 10 entities will be returned. Users can select any of these entities to view detailed information, ensuring that the applied transformations and data mappings are correct. The preview step is mandatory as it includes the data aggregration step.
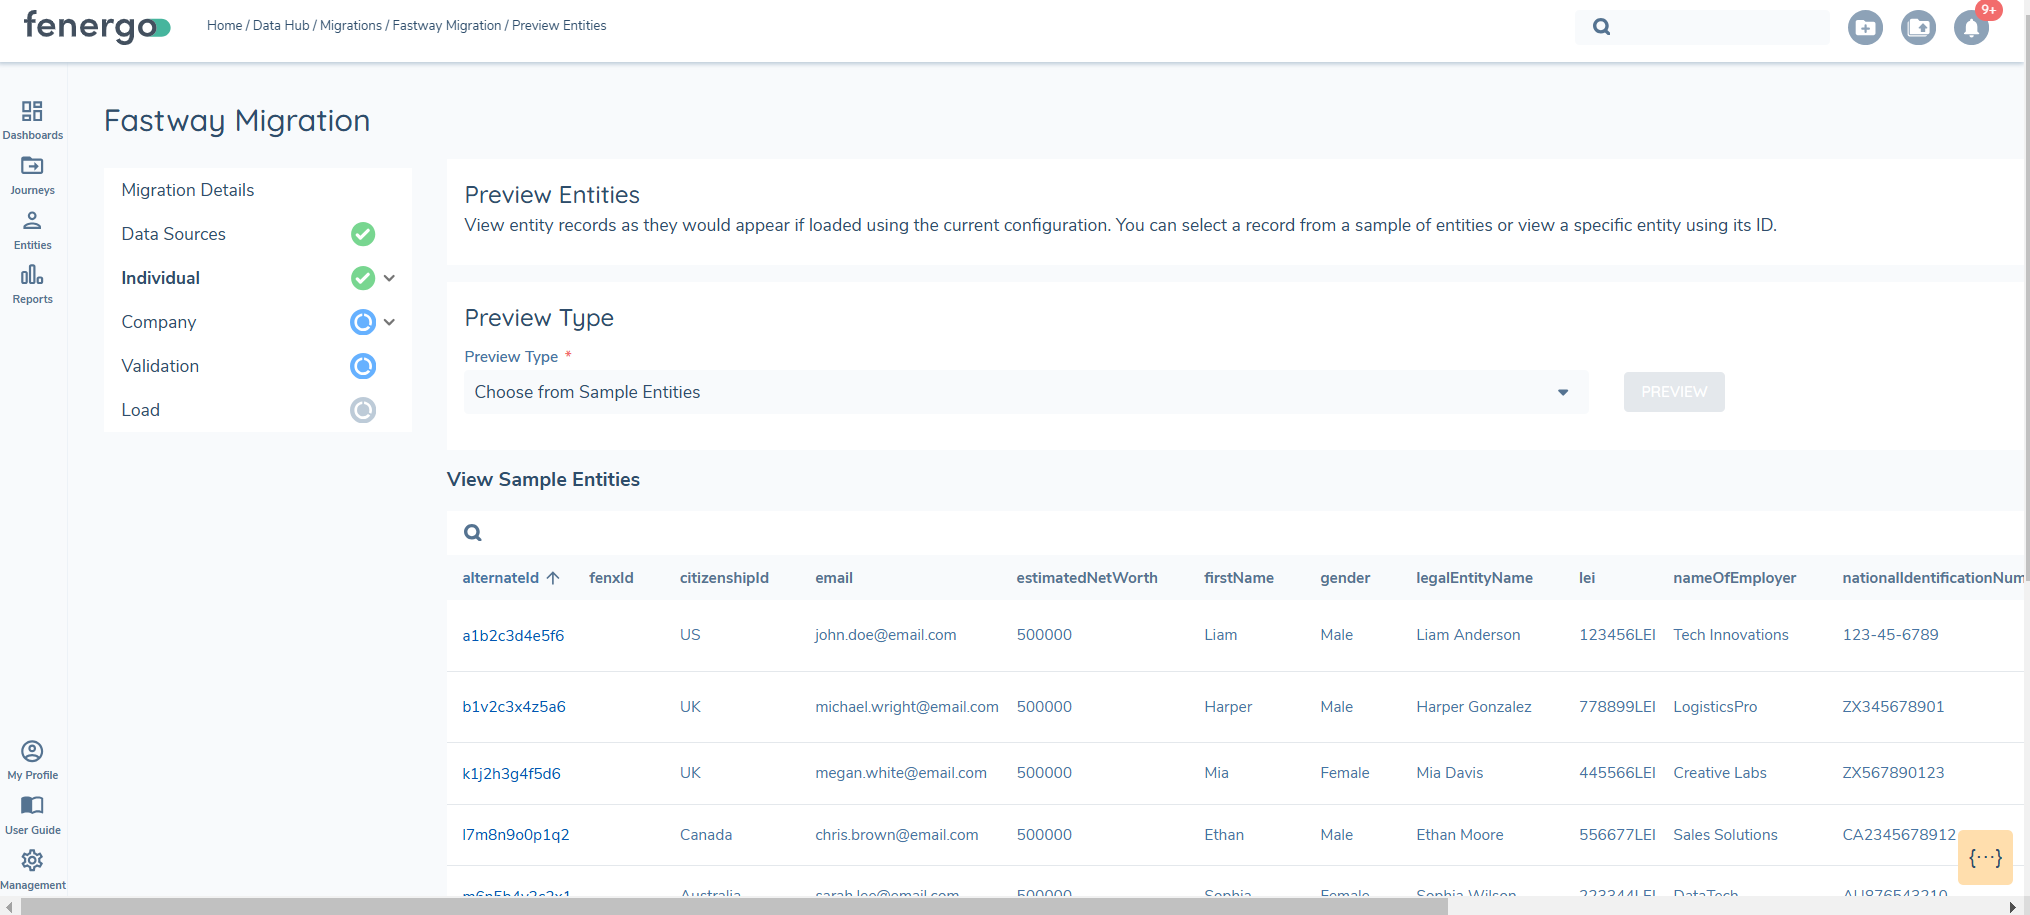
Selecting the ALTERNATEID or the FENXID gives a more detailed view.
Additionally, users can search for a specific ID by entering the FENXID or the ALTERNATEID. This allows targeted searches for specific entities.
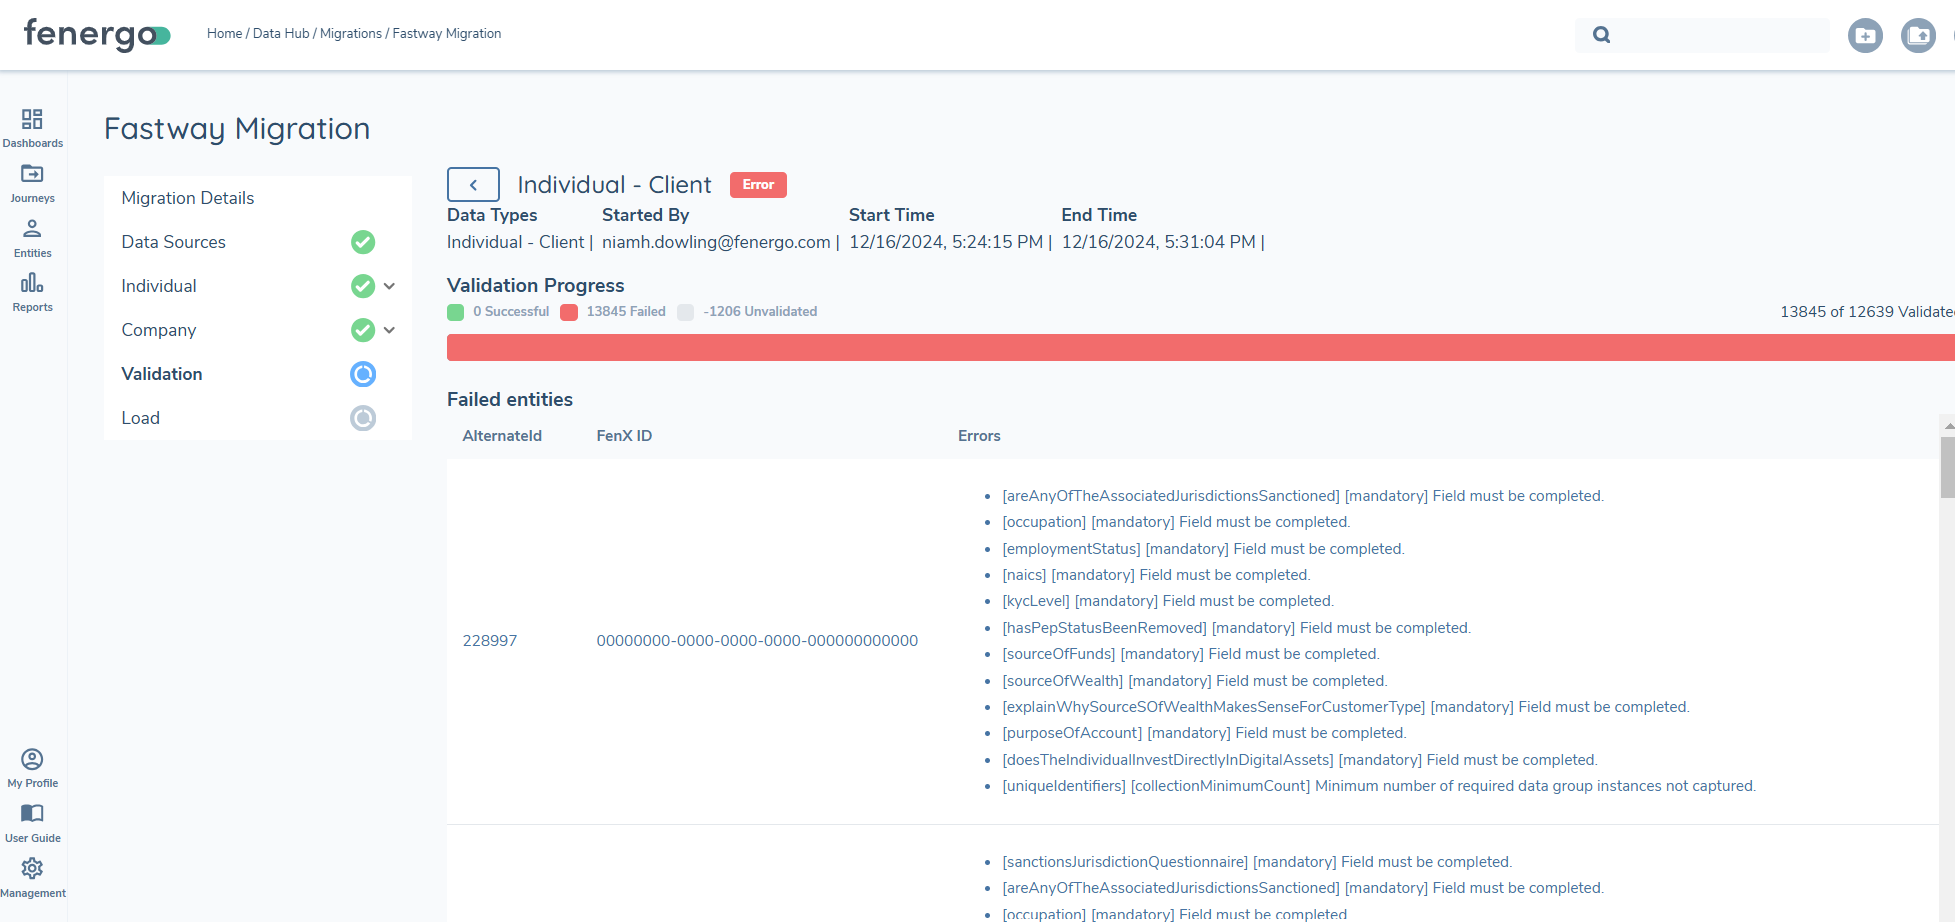
Validation
Each data requirement includes a defined set of data validation rules to ensure compliance when data is loaded into the system. These rules are configured in the Requirement Details screen during migration policy setup. Once a Data Field Type is assigned, a set of Standard Validation options becomes available. These are then executed during the validation step. This validation process is an independent step in the ETL workflow and can be repeated multiple times.
To proceed, all validation issues must be resolved. This can be achieved by either correcting the datasource and re-uploading it or by adjusting the policy definitions. If the latter approach is chosen, a new etl project must be created. By cloning the existing project, the mappings can be preserved, reducing the need for reconfiguration.
The validation option becomes available once the statuses for the mapping, filtering, datagroups and preview are all 'green' for a specific entity.

To intiate the validation process select validate.
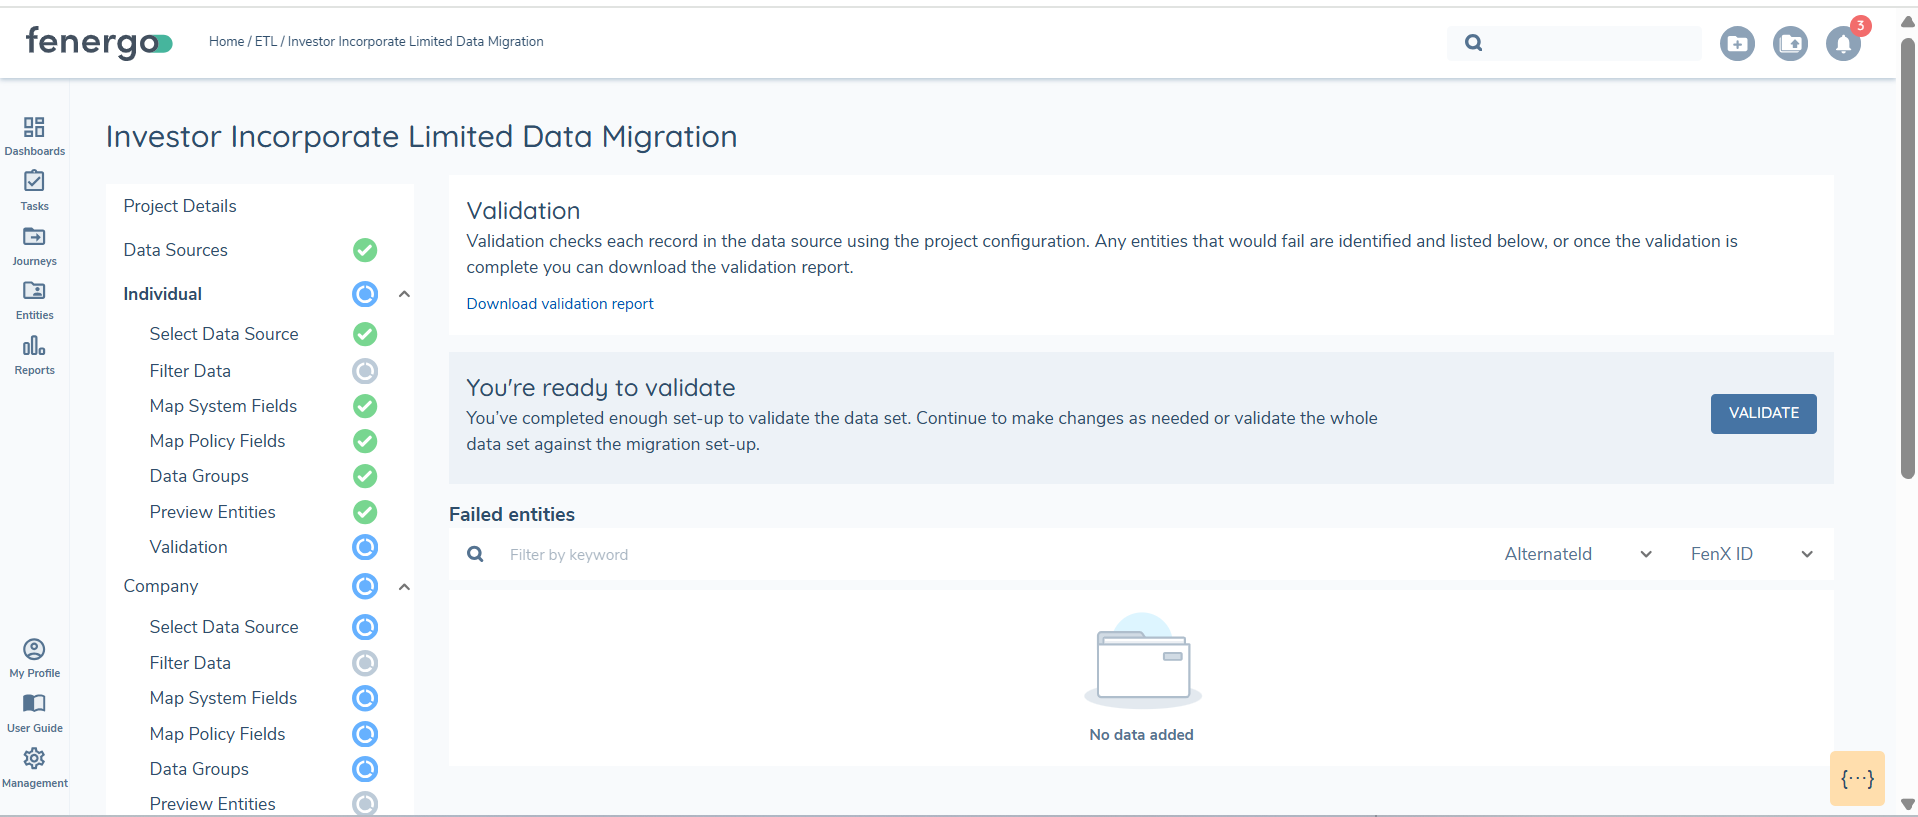
The validation process can take some time. A progress bar with a count will indicate the progression of the process.
If you change the mapping of any policy or system fields, datagroups, datasources, you will need to revalidate. The old results remain but you cannot proceed to load until the validation is re-ran.
Validation results are displayed in the UI or you can download a report, where users can review and fix errors.
Load functionality remains disabled until all validation errors are resolved, guaranteeing that only clean, fully validated data is successfully loaded into the system.
Validation Report
The validation report includes the following columns:
- FENXID - ID of the entity which has the validation issue
- ALTERNATEID - ALTERNATEID of the entity that has the validation issue
- ERROR DESCRIPTION - Description of the error
- DATE CREATED - Date the report was created
- MIGRATION ID - Migration ID
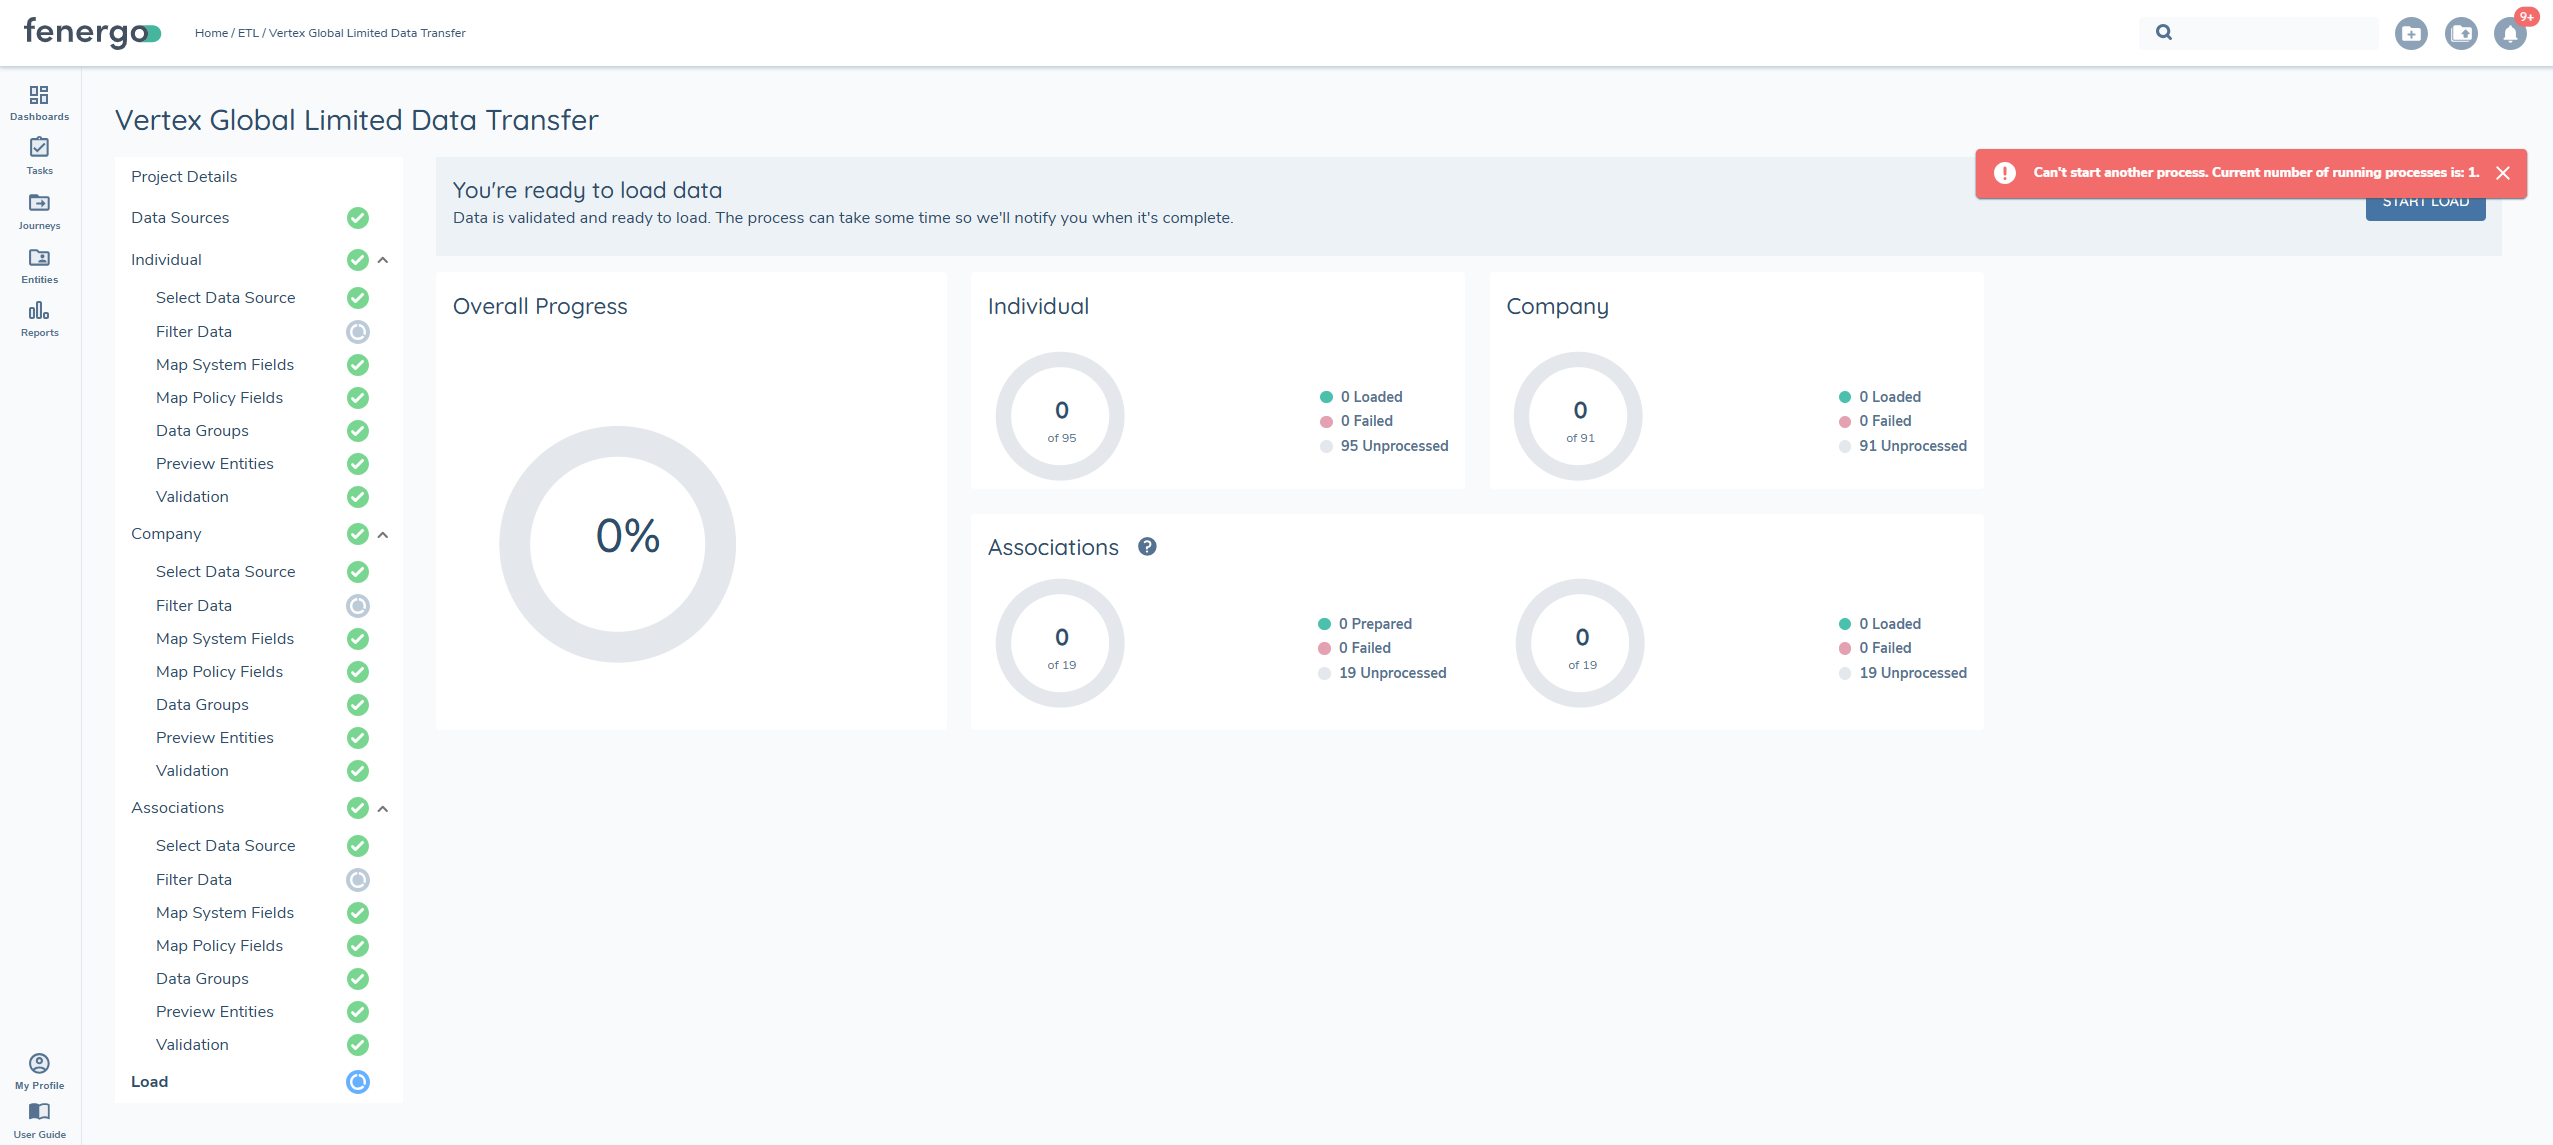
Load
Once all validation issues are resolved and every entity in the migration project has been successfully validated, the LOAD option becomes available.
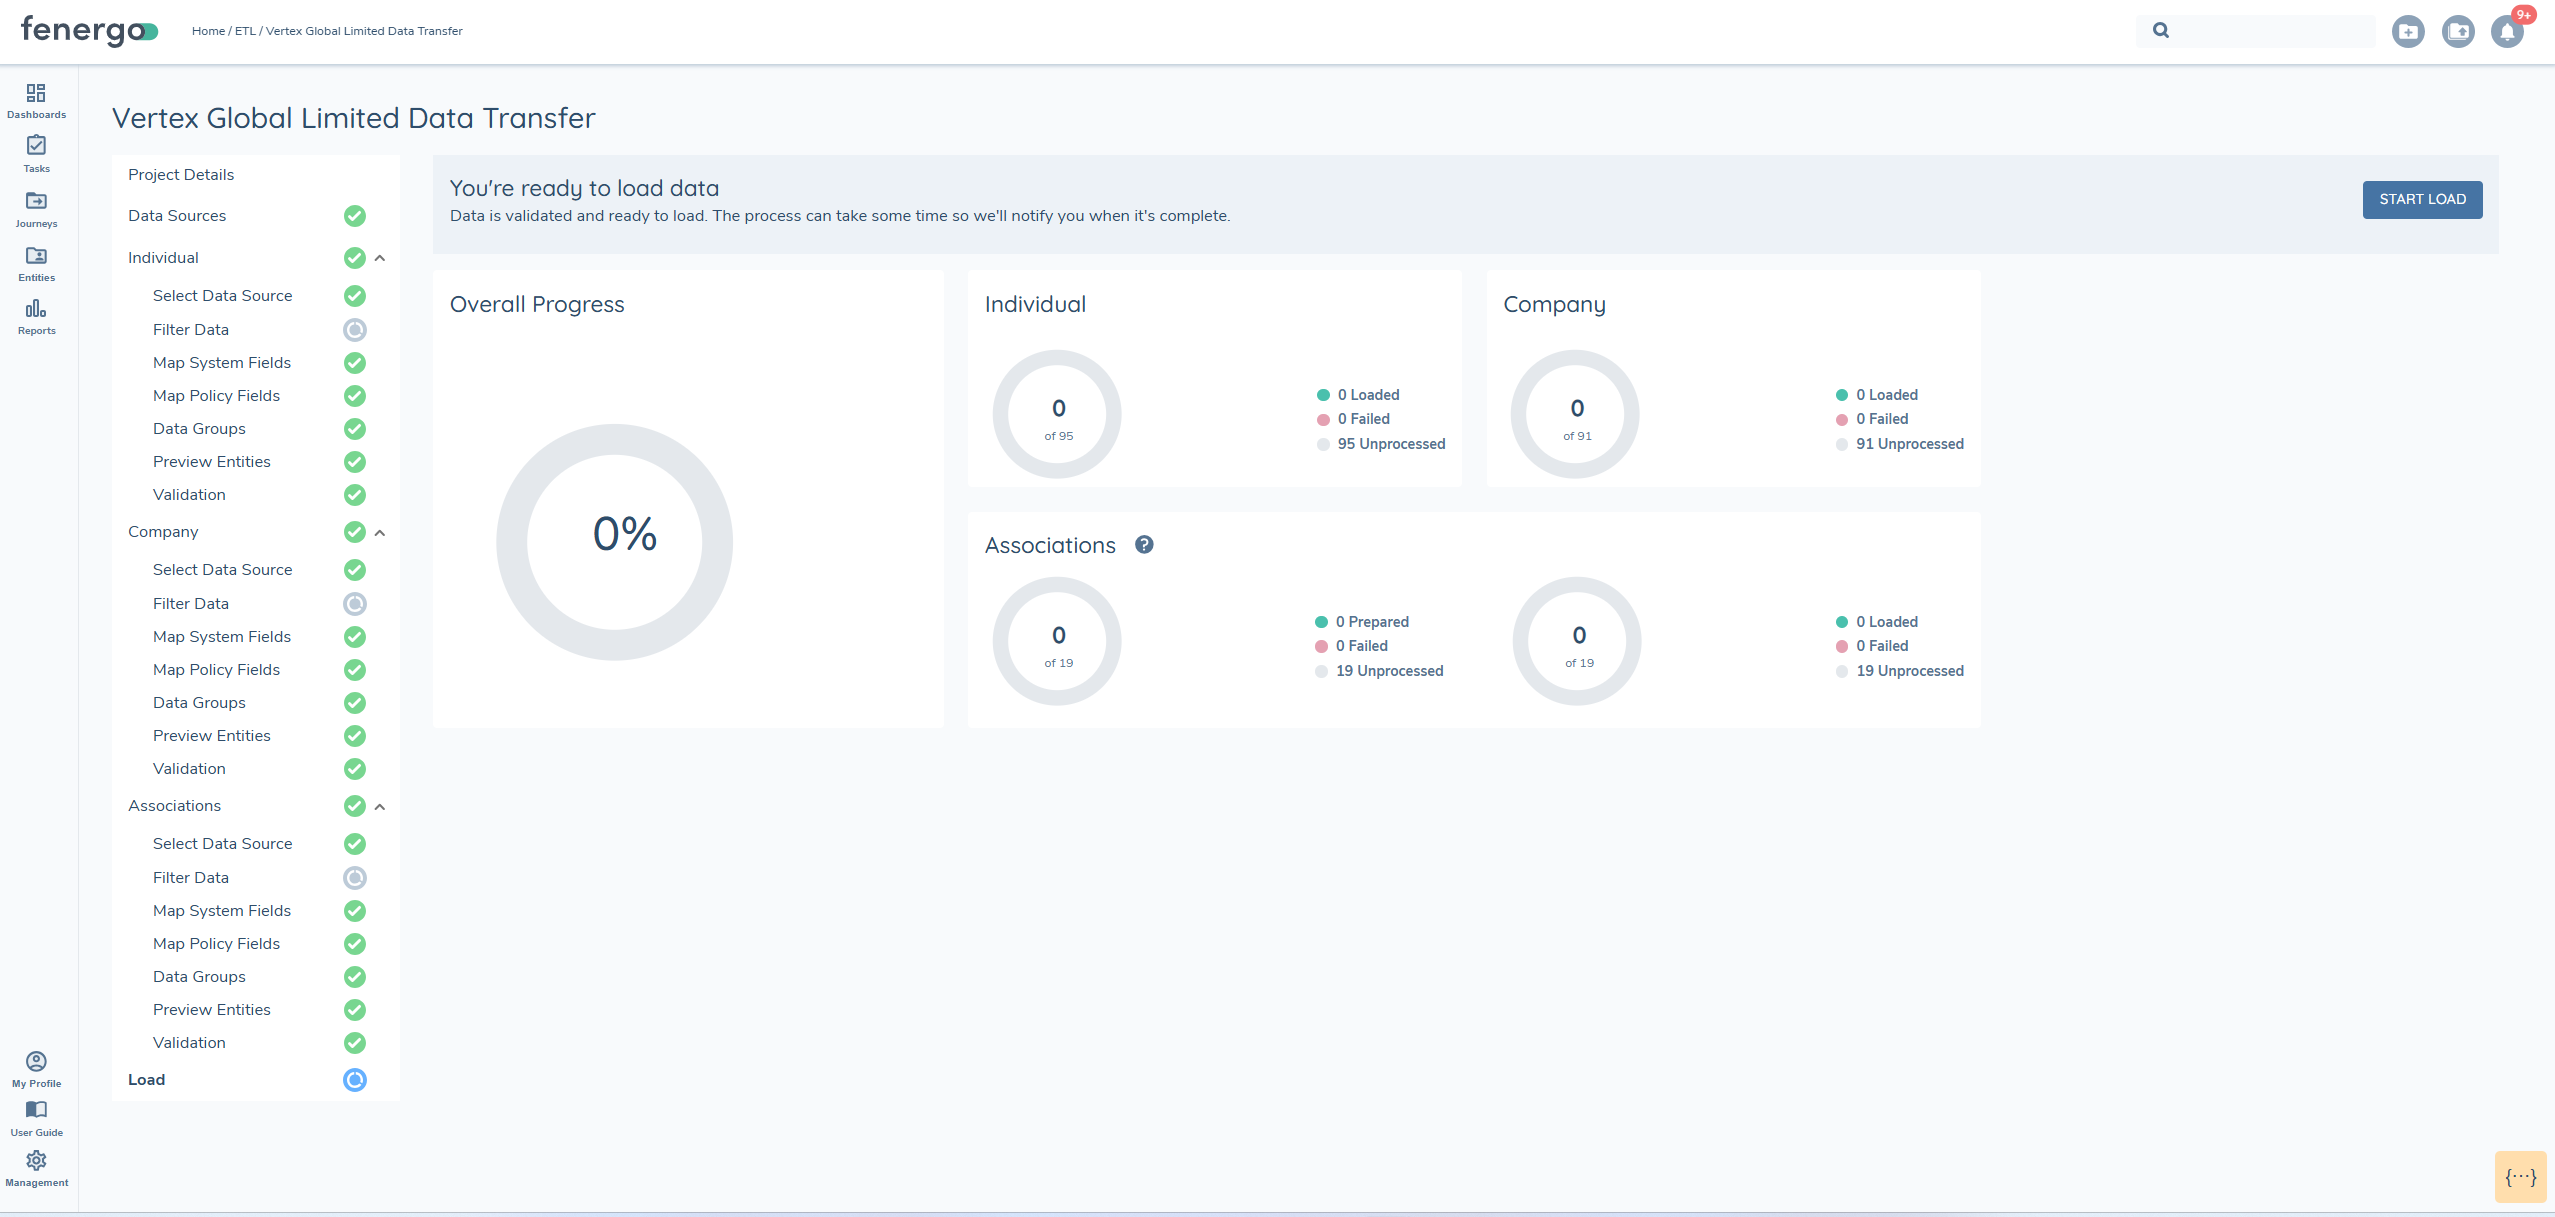
During the load process, the system determines whether each record is an UPDATE or a CREATE based on the presence of a FENXID or ALTERNATEID. A progress elpsis will display and track the status of the load process.
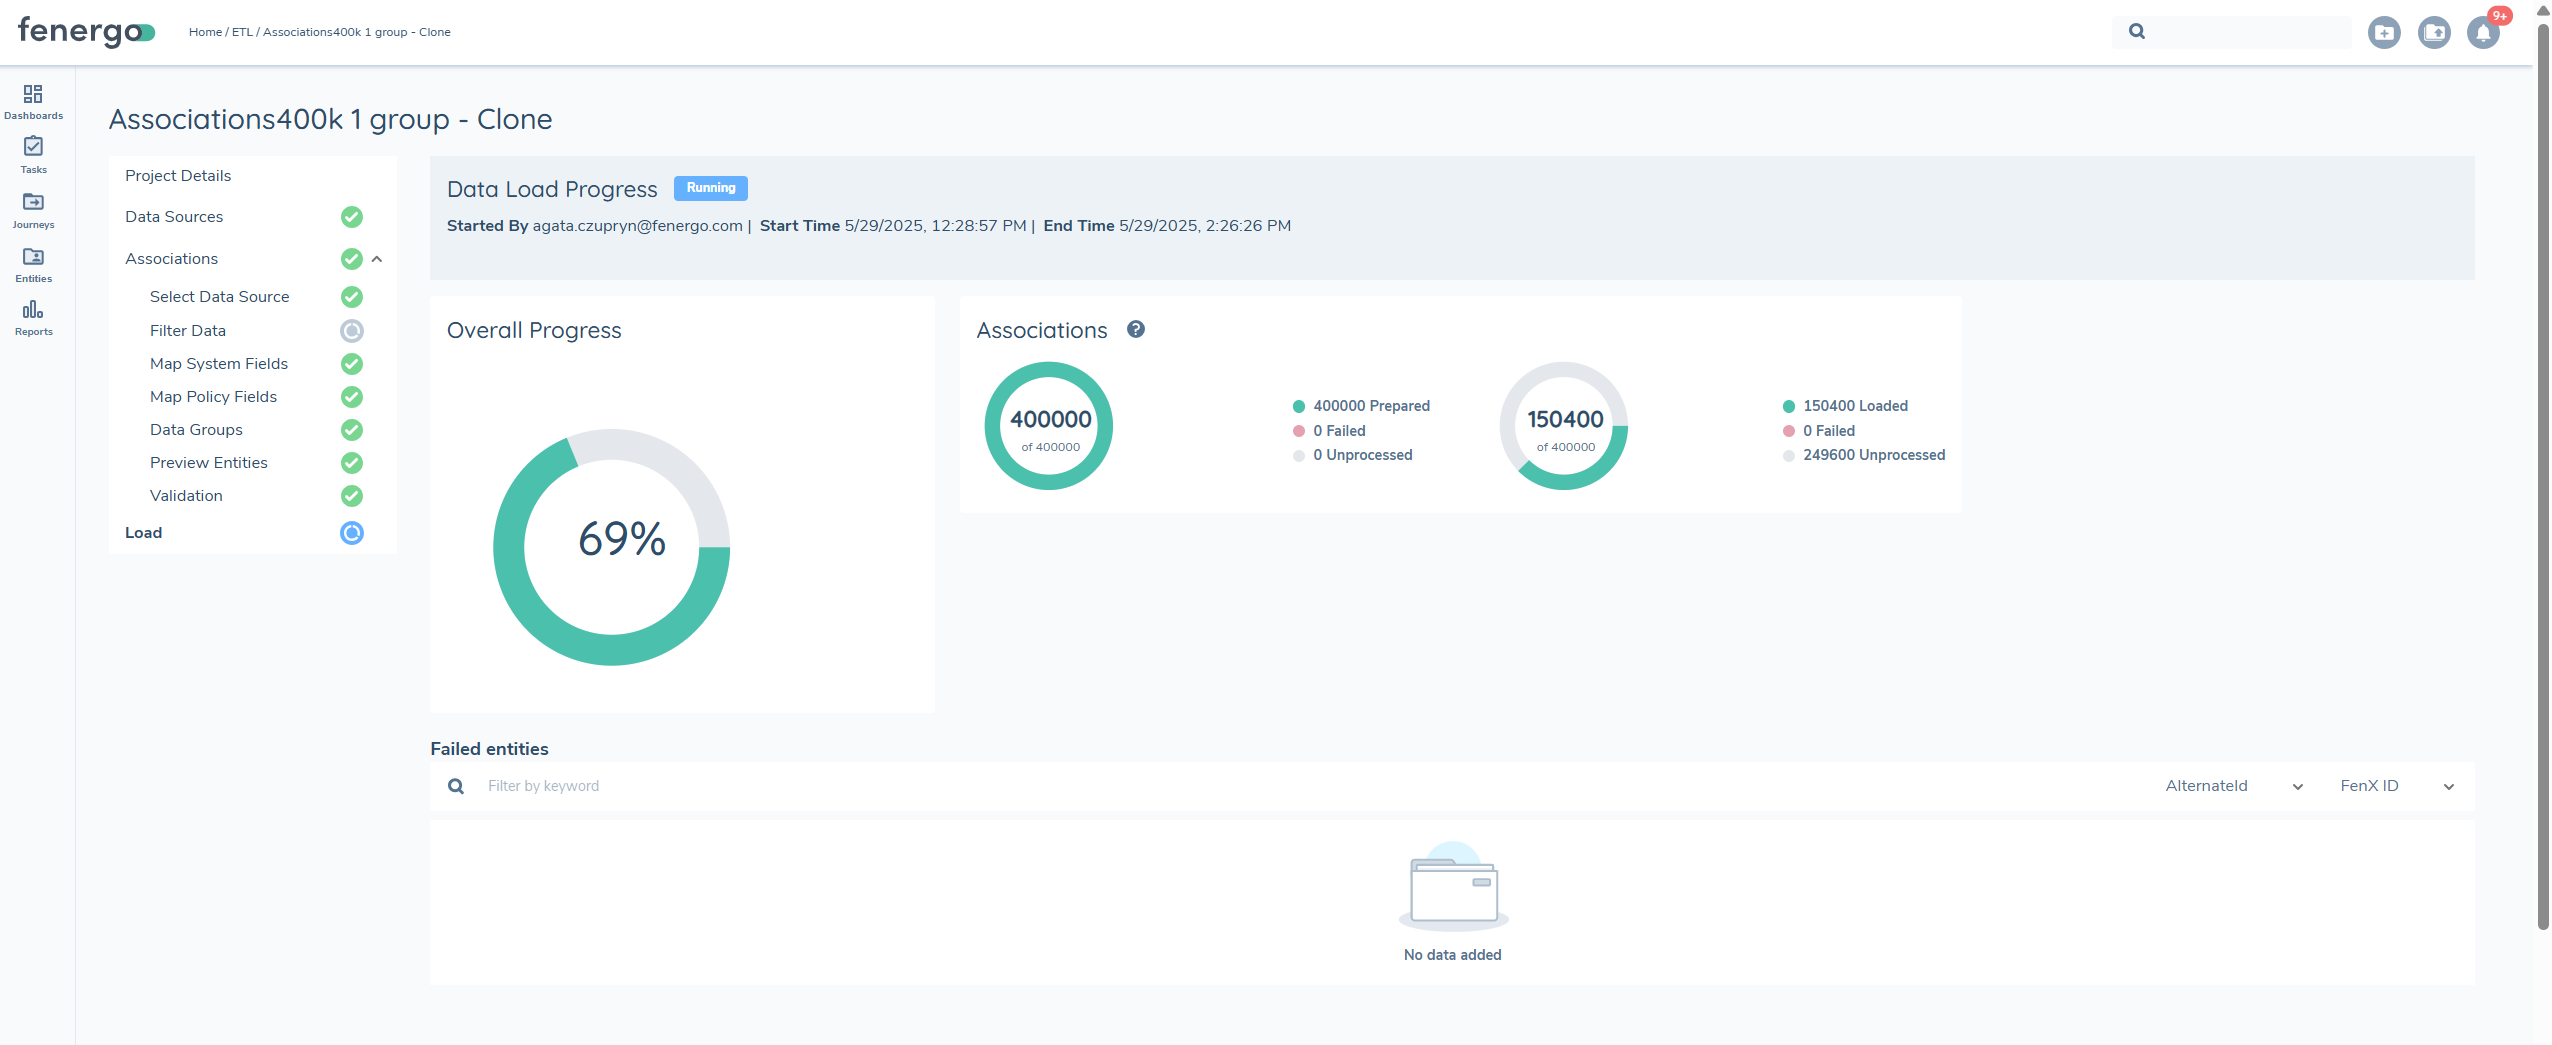
Once the Start Load process is initiated, it cannot be triggered again, and the START LOAD button will no longer be visible.
After the load process is complete, the migration becomes final and cannot be modified, even if failures occur. To address any failed entities, a new migration project must be created. Load failures are rare and generally occur only due to system or network issues.
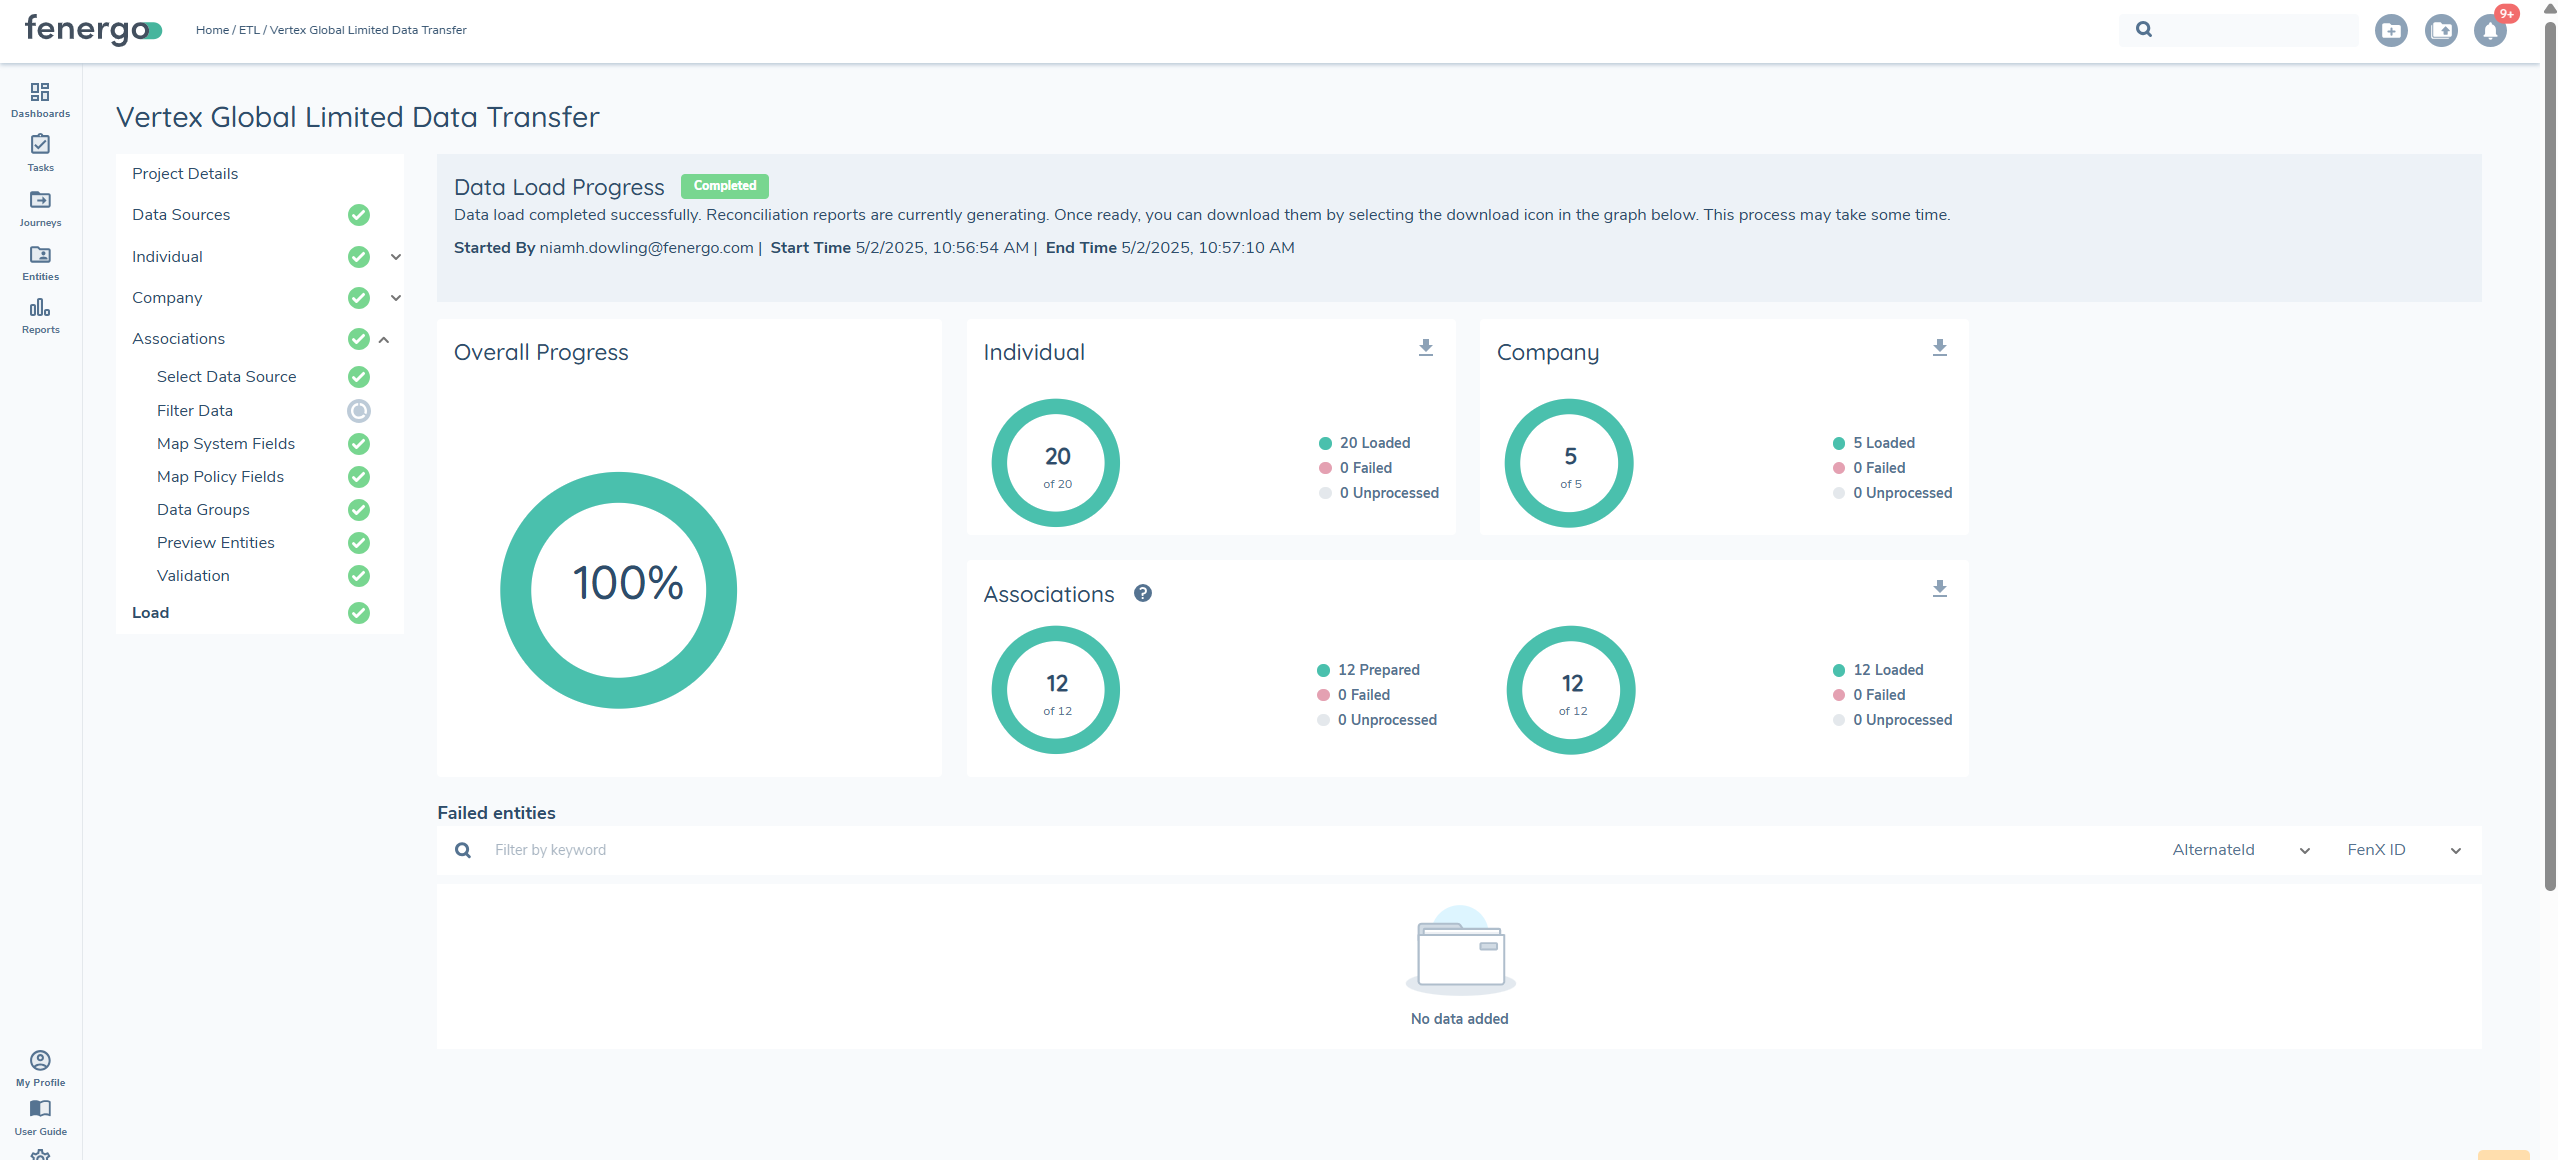
Reconcilation Report
Once the load process is complete, a reconciliation report is generated for each entity. This report allows users to verify what was successfully loaded into FenX and determine whether entity creation or updates were successful

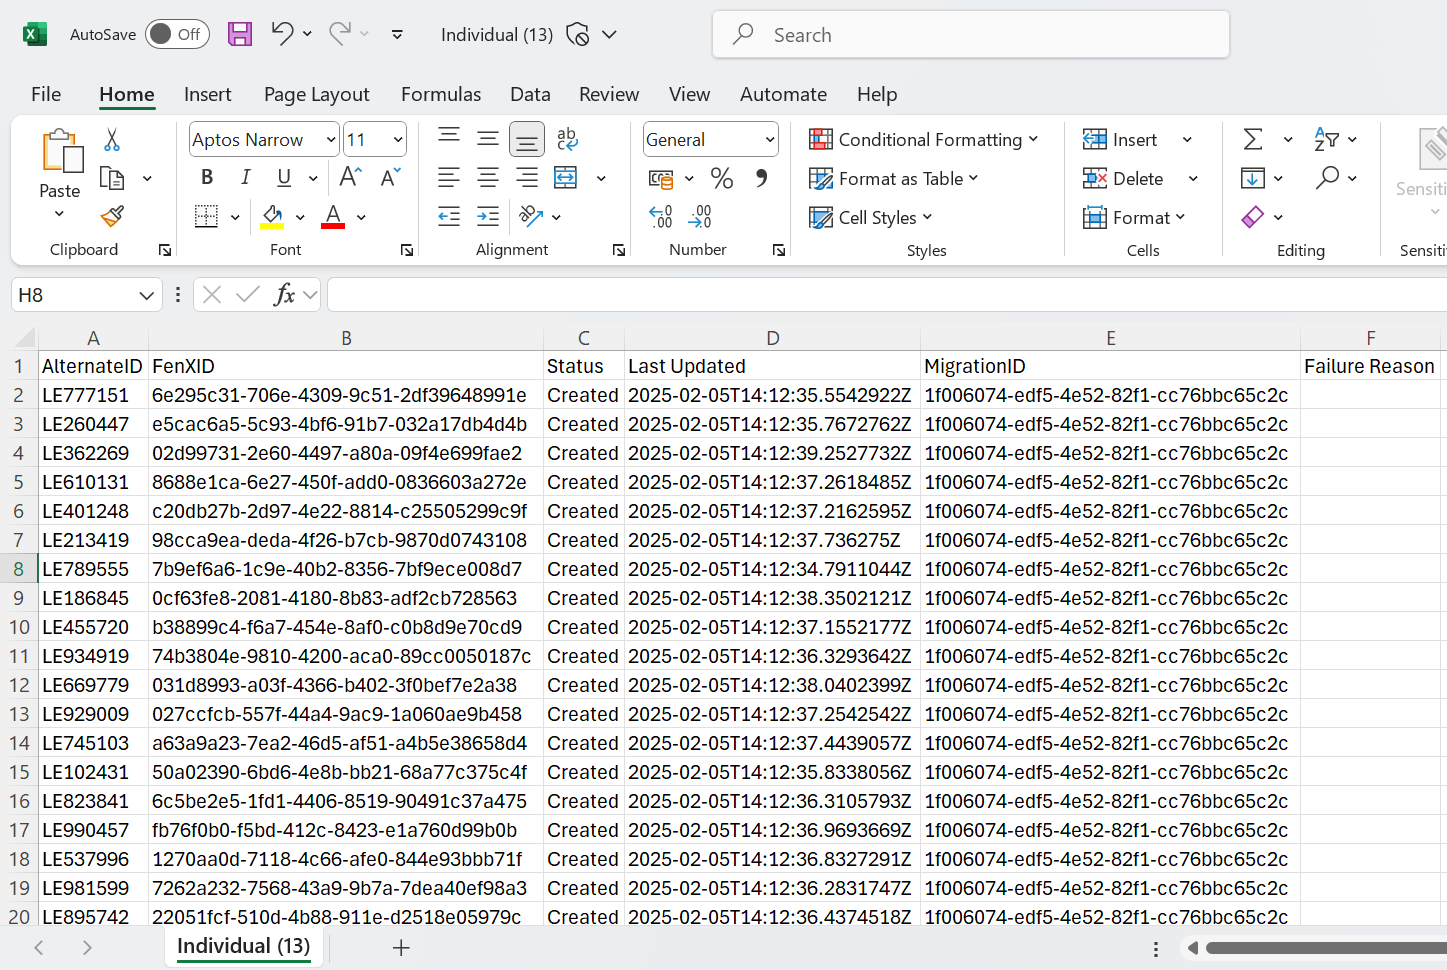
Report Columns
The reconciliation report includes the following columns:
- ALTERNATEID – The unique identifier used during migration.
- FenXID – The system-generated identifier for the entity.
- Status – Indicates whether the entity was CREATED or UPDATED.
- Last Updated – The timestamp of the most recent update.
- MigrationID – The identifier for the migration project.
- Failure Reason – If applicable, provides details on why an entity failed to load.
The ETL process determines whether an action is CREATE or UPDATE only during the load stage. If an update is intended, ensure that the identifiers used are in the correct case to avoid errors
Once a load has successfully passed validation, the likelihood of failures is minimal. However, failures can still occur due to network or cloud resource availability etc. that interrupt the process. In such cases, the load may fail for some entities. These failed entities will appear on the reconciliation report with a status of Failed and a 'Failure Reason' labelled as System error. A new migration must be initiated for the entities that failed.
Notifications
The duration of certain ETL processes can vary depending on the size of your project. To help manage this, users can enable notifications to be alerted when specific processes are complete.Notifications are available for the following ETL processes:
- Validation
- Preview
- Load
Once notifications are enabled for a user, they will automatically receive an alert upon the completion of the selected process.For more details on how event notifications work, please refer to the documentation
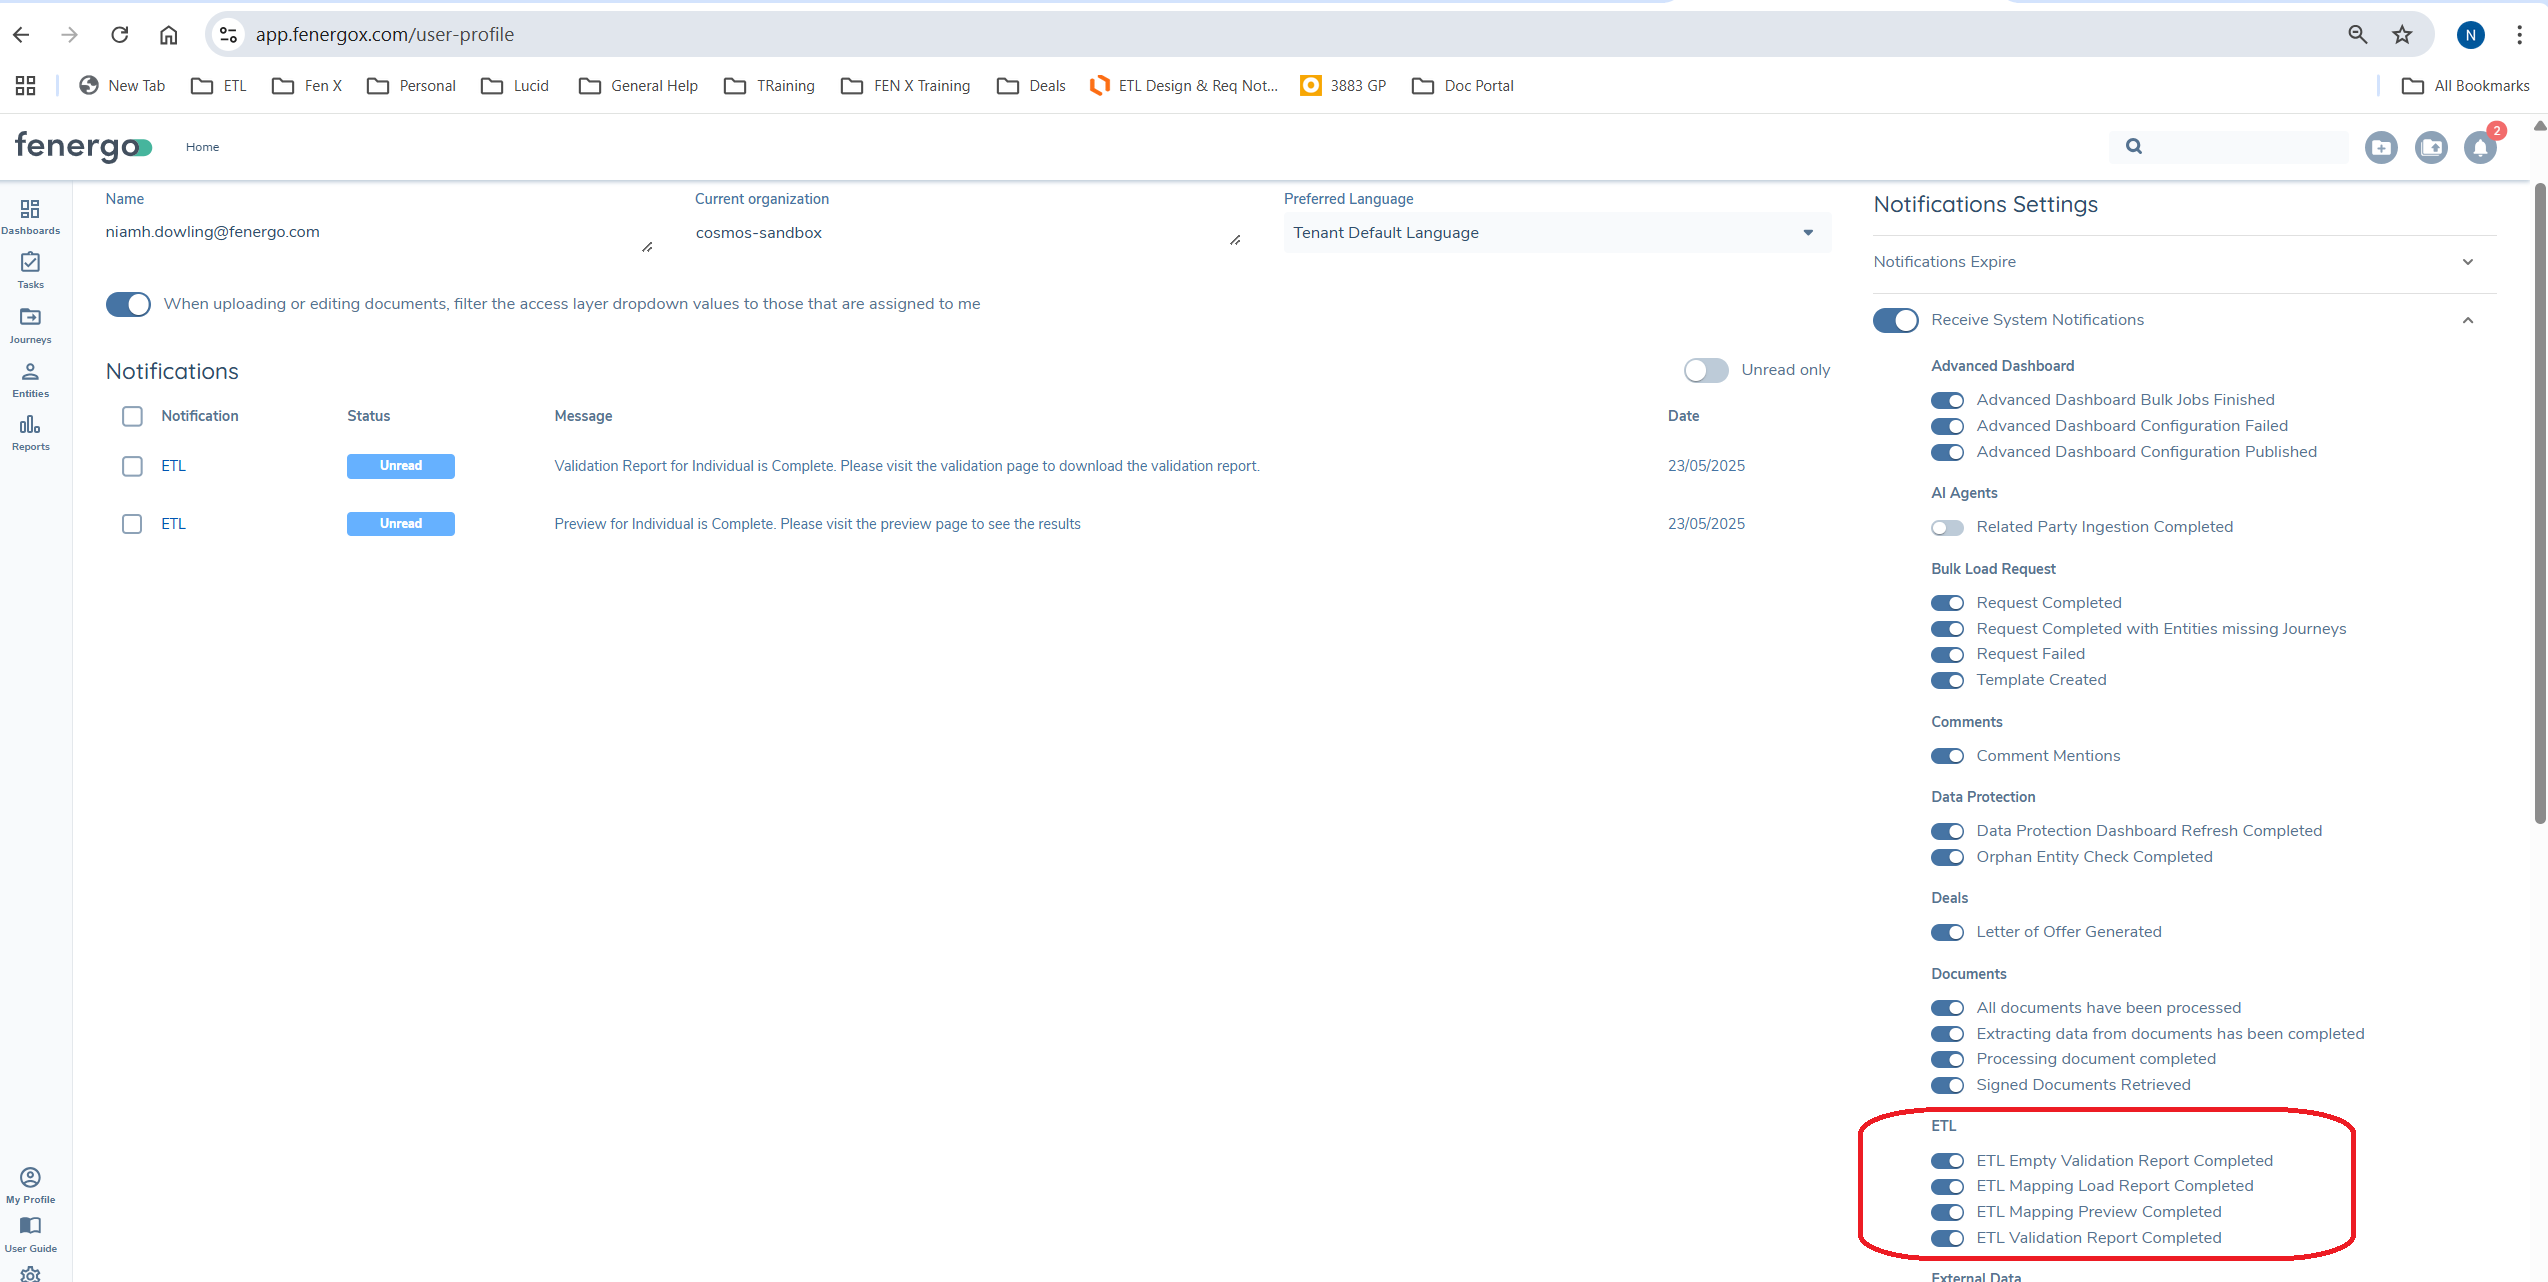
If enabled for a user once the process is complete they will receive a notification. See Notification User Guide
Cloning
The Clone button in the ETL migration tool allows users to duplicate an existing migration project.
This feature is particularly useful when mappings, transformations, and joins have already been set up and need to be reused. Cloning eliminates the need to reapply these configurations manually. It is especially helpful when a migration policy requires updates, such as adding a new data field or modifying existing data attributes.
To clone a project, go to the 'Migrations' tab, select the desired project, and locate the Clone option next to the Delete button.

Upon selecting ClONE, a new modal will open, defaulting to the latest version of the migration project.
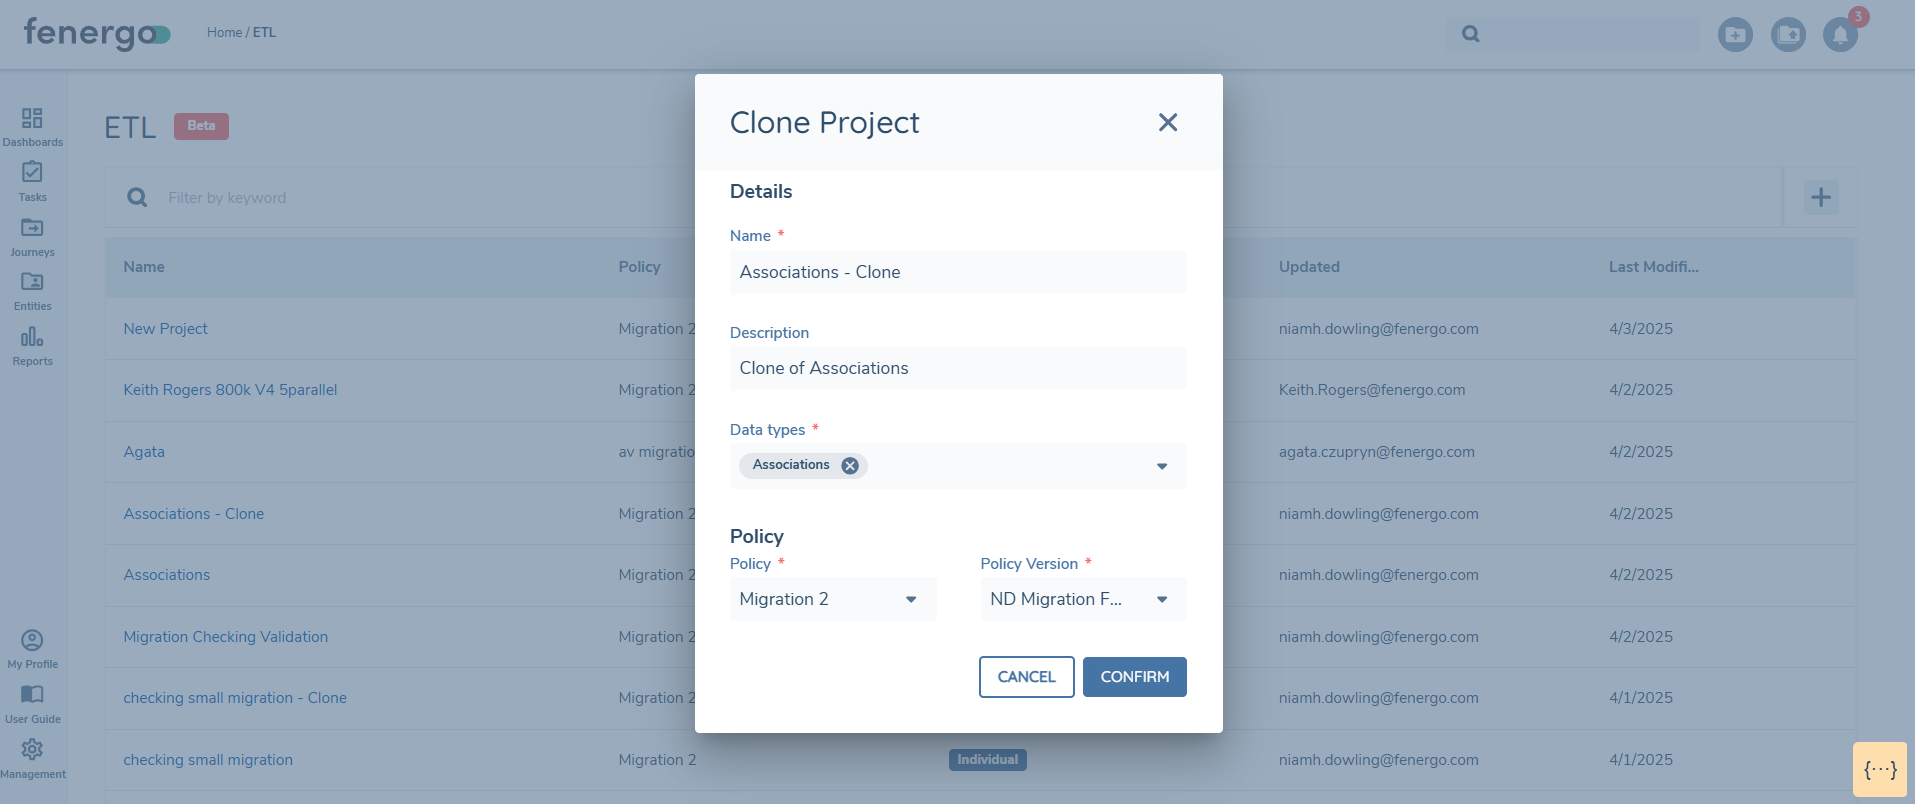
Selecting Confirm will create a new project. This will have no mappings persisted until the datasources are uploaded.
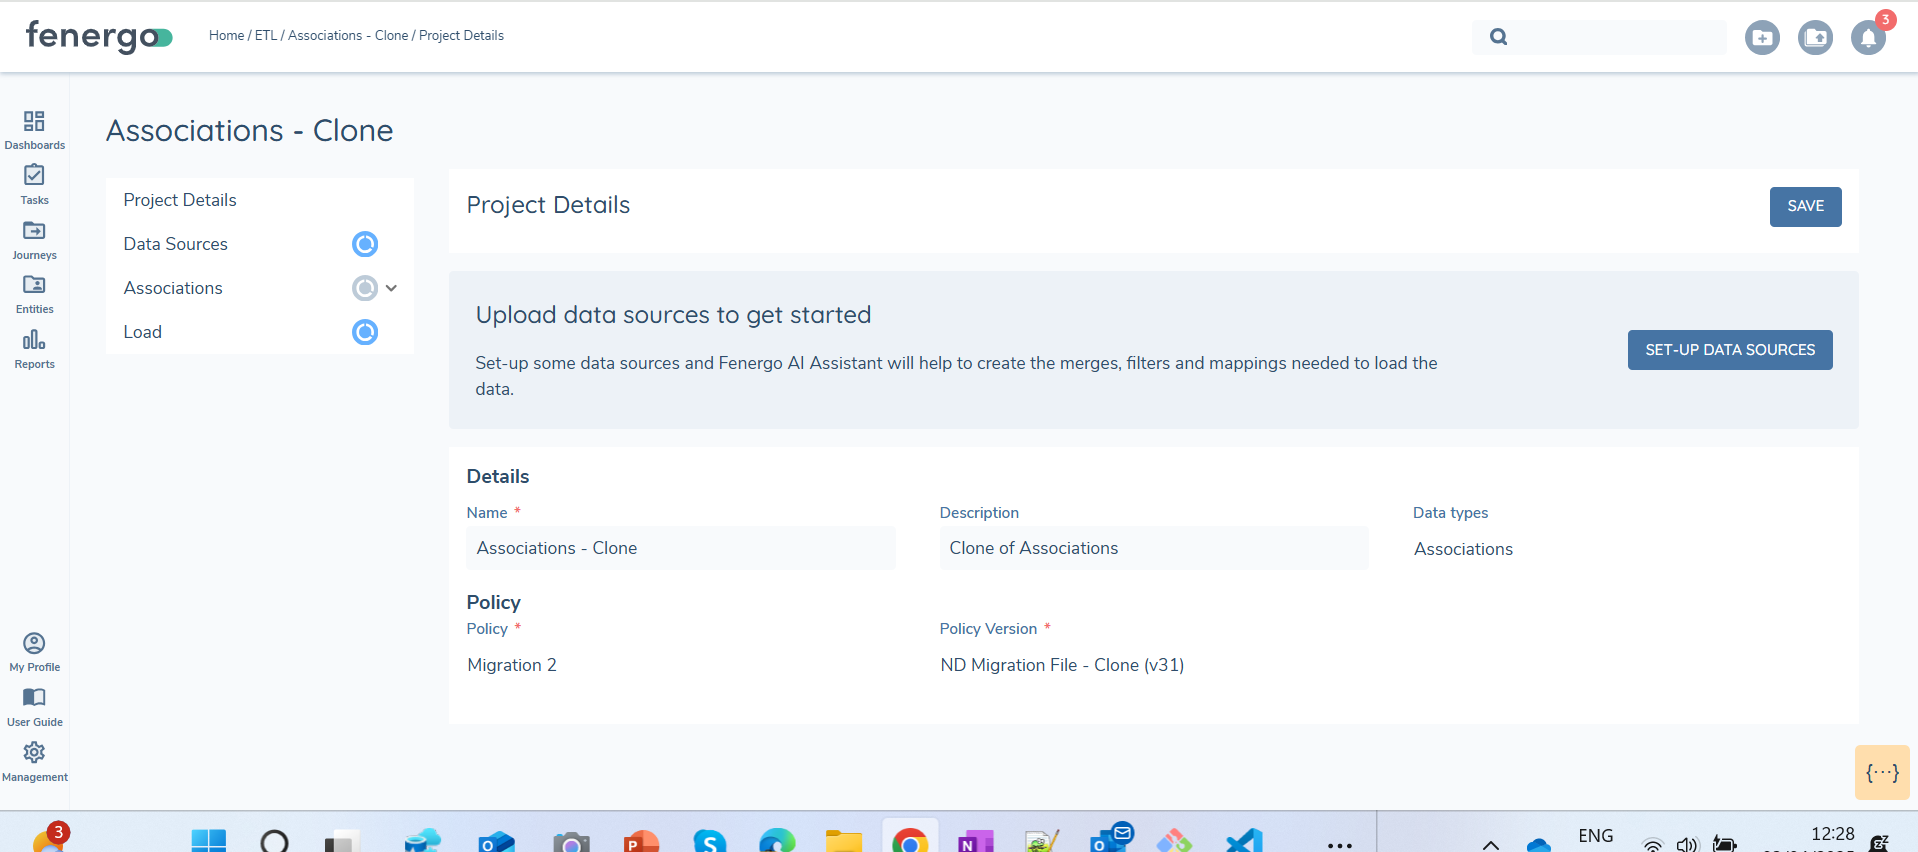
Once data sources are uploaded in the cloned project, all mappings, filtering rules, and joins will automatically persist from the original project. There may be additional fields that need to be mapped in the new version of the policy, these will display as 'Unmapped'.
Preview and Validation will need to be reran.
The same filenames need to be uploaded in the cloned project for the mappings, transformations and filters to persist
Import ETL Configuration from one tenant to another
Configuration Exchange allows configurations to be imported from one tenant to another, providing flexibility in selecting from current or previous versions of Configuration Items. Fenergo SaaS clients are expected to implement configuration changes within a lower tenant (e.g., Dev) and promote these changes to higher environments (Dev → UAT → Pre-Prod → Prod) following rigorous acceptance testing. For full details on how to use Configuration Exchange please see the Configuration User Guide
Similarly, ETL projects can also be imported from one tenant to another. However, a key consideration is that the associated policy must be imported separately and prior to the ETL project.
When importing a project, the system will automatically select the latest version available for the relevant jurisdiction. If no version for the policy exists the it will fail on import. Once imported to the target tenant you will need to add the datasources and all mapping and filtering will persist. Preview and validation will need to be ran again on the target tenant.
API references
It is recommened to use the ETL UI when possible, as this gives the best UX and it is the quickest way to develop and build a migration. In certain business use cases, it might be needed to execute the same functionality via the API's aswell.
All infromation on ETL API's can be found here ETL API Specifications
A synopsis of the API's used in this functional guide can be found here:
| APIs Referenced | APIs Capabilities: |
|---|---|
Create Migration Project #tag/Datasource/operation/CreateMigrationProject | Creates a new migration project |
Upload Data Source #tag/Datasource/operation/CreateDatasource | Uploads data source files to the project |
Create Mapping #tag/Mapping/operation/UpdateMapping | Creates the mapping and filters |
Auto Mapping #tag/Mapping/operation/AutoMapping | Uses AI to create Auto Mapping between source fields in files and policy fields |
Prepare and Aggregate #tag/Mapping/operation/StartPrepareAndAggregate | Prepares data and aggregates from the query |
Start Validation #tag/Mapping/operation/StartValidate | Validates the aggregated data against the policy |
Download Reports #tag/Mapping/operation/DownloadReport | Download the reconciliation reports for load and validation |
Troubleshooting
Why am I seeing the following on preview 'Total count of Individual is 'x'' which is above the limit of 10000' ?'
This error displays because your tenant limits for the migration of a specific entity type is exceeded.
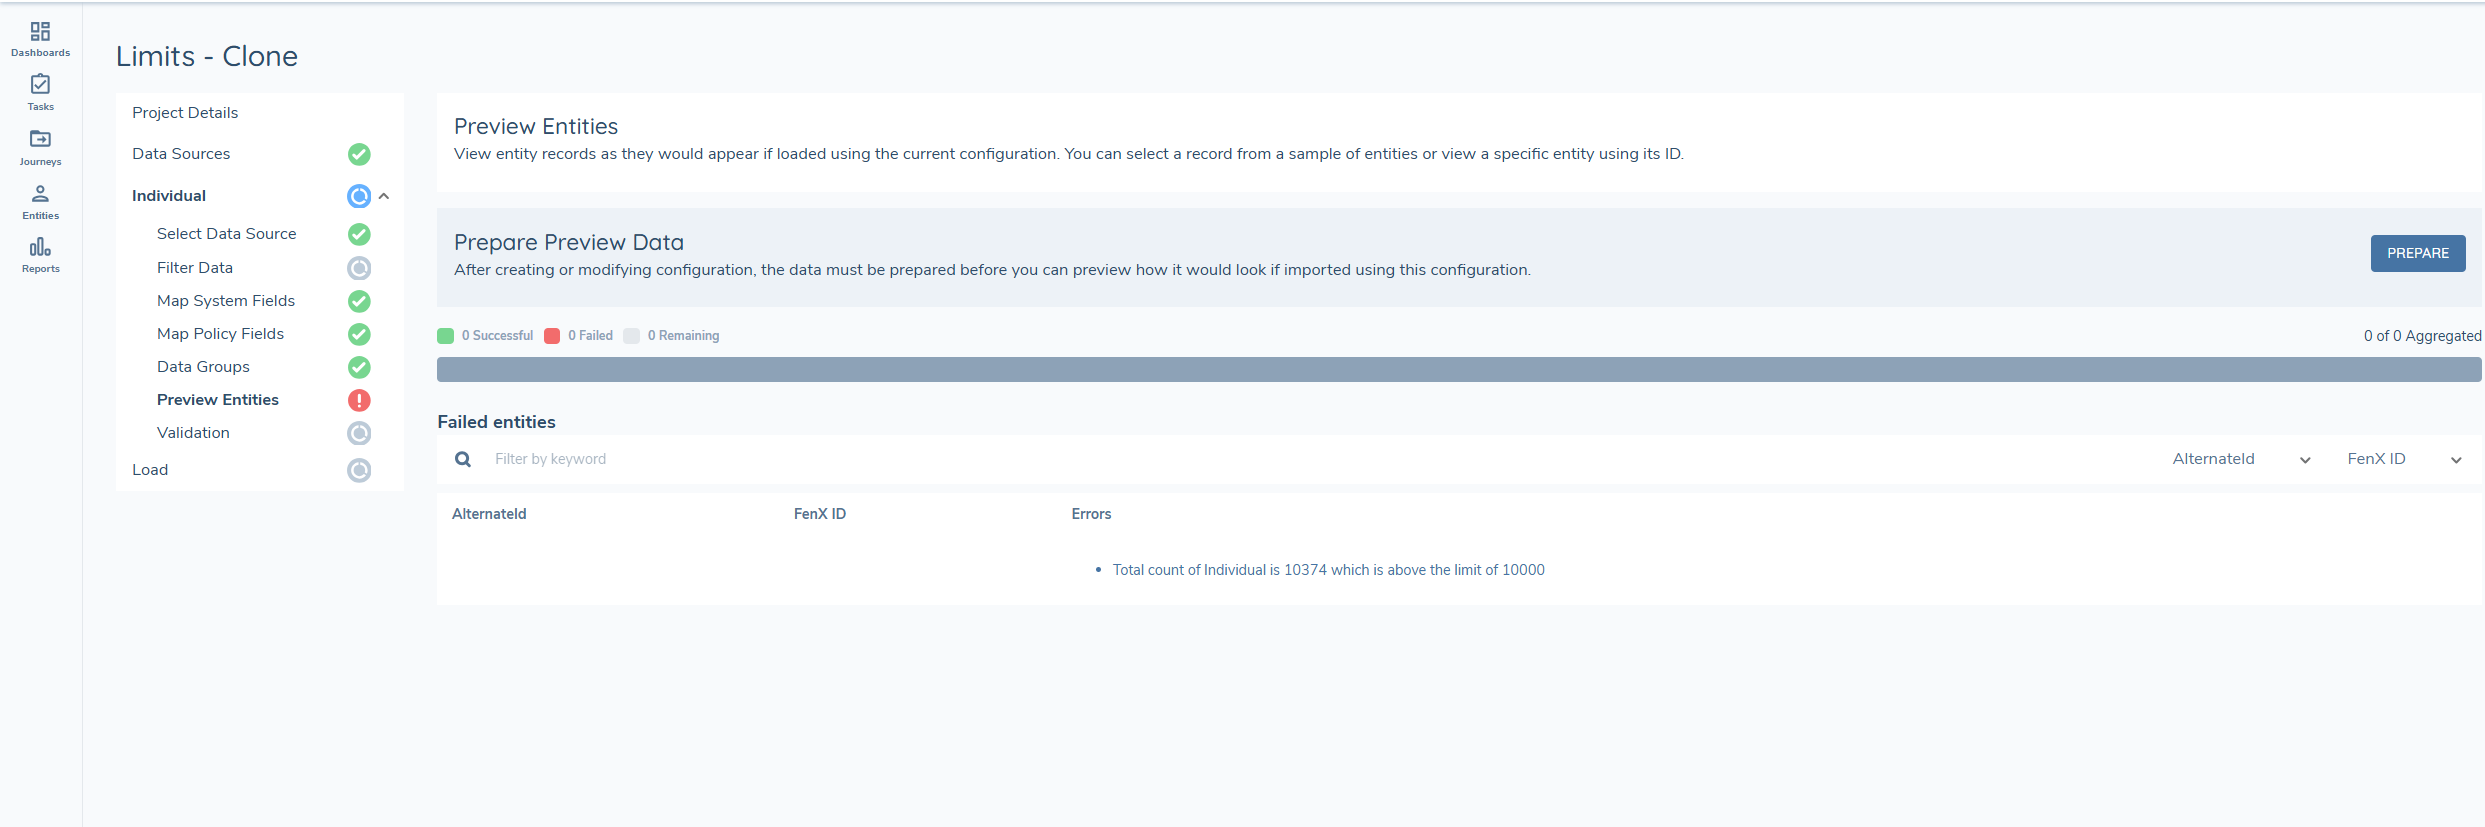
To resolve this issue, contact your csm or support to get limits increased on your tenant. After making these changes, save the file and try uploading it again.
Why am I getting a 'Date Value Cannot be Parsed' error when I select preview?

During the data preview stage, data is aggregated, and transformations are applied to allow users to preview the data before loading. Fen-X requires all dates to be in ISO 8601 format.
Currently, the only date format that can be transformed is dd/mm/yyyy. This error occurs when a different date format is entered in the data source, the date parse function is selected and it cannot be transformed.
Update the dates in the datasource file to dd/mm/yyyy and ensure the Date Parse transformation is applied. Alternatively, format all dates in ISO 8601 format (ISO 8601 '1998-03-17T00:00:00.0000000). If using this format, do not apply the Date Parse transformation.
More dates formats will be supported in future releases.
Why am I seeing an error on Load?
There are limits on the number of loads per tenant that can be active at once. If there is already a load running in your tenant you will see the following message "A load process is already running for this tenant. Please wait for it to complete before starting a new one."
You just need to wait until this load completes before starting a new one.
Why am I seeing the following issue 'Syntax issue identified on row 3 during aggregation: Unable to parse file due to structural inconsistencies, including missing or extra columns, unexpected delimiters, or improperly quoted strings. Please review the file and resolve these issues to proceed.' when uploading a file?
When uploading file the file must have no additional carriage returns or unexpected delimeters or improperlt quoted strings. When this happnes an issue will dispplay on upload. The issue will only display for the first row it encounters. To resolve the isue you need to ensure there no unexpected delimeters throughout the file. This is by design so there is in not thousands or rows of issues w
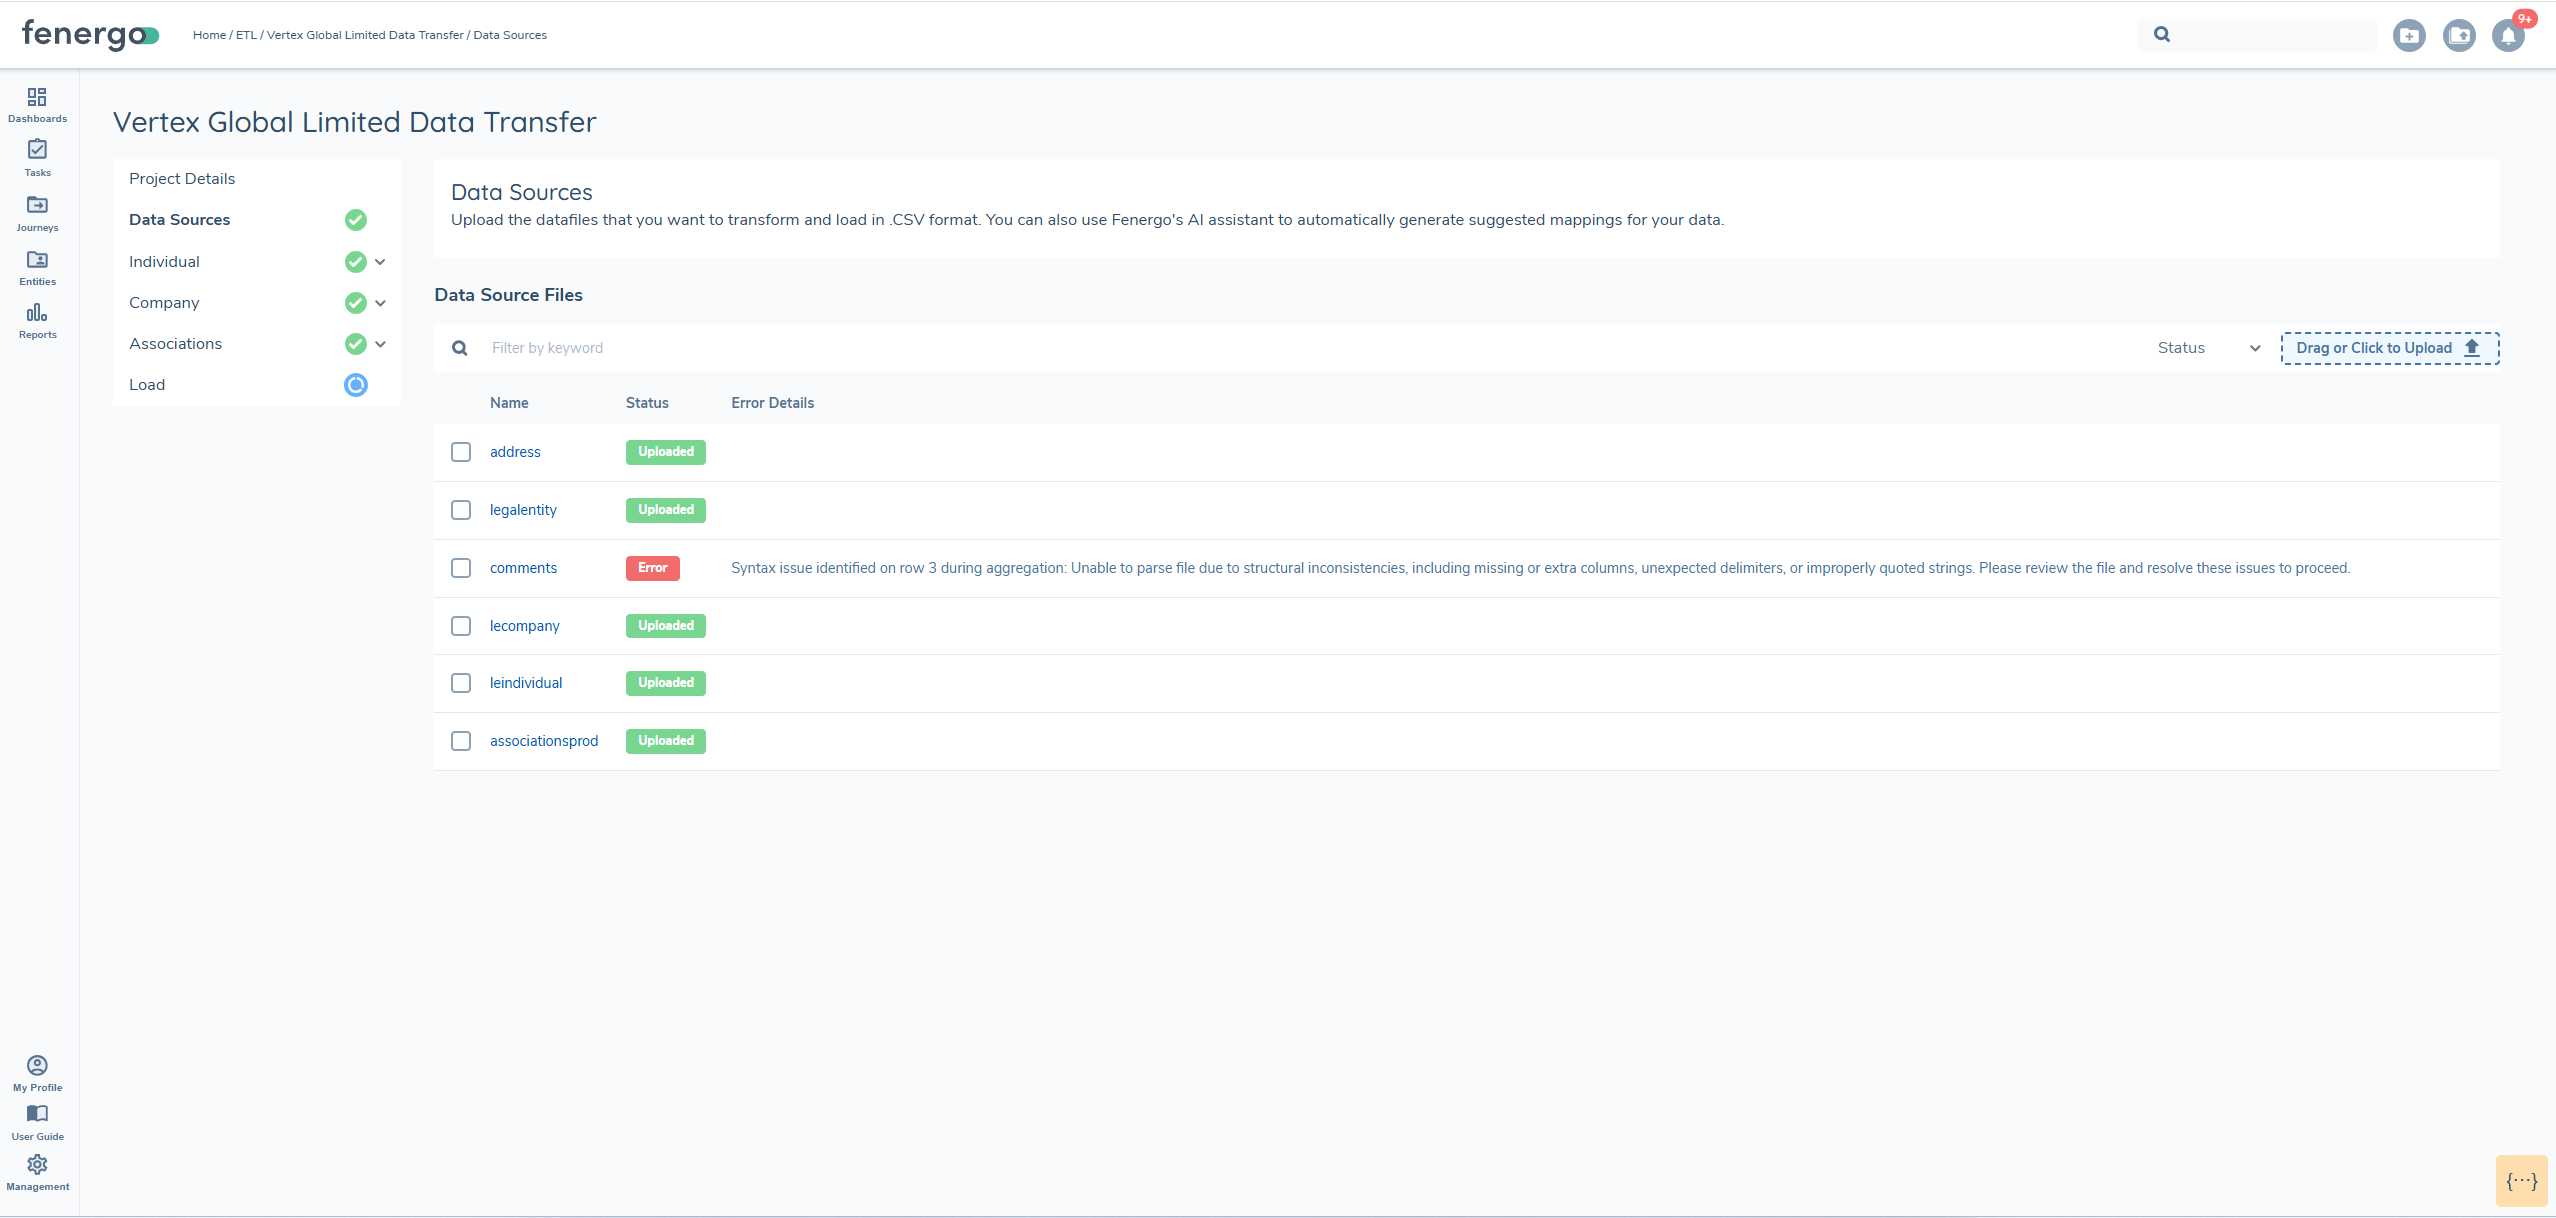
This error occurs when the uploaded file contains formatting issues such as:
- Unexpected delimiters
- Improperly quoted strings
- Missing or extra columns
- Extra carriage returns
These inconsistencies can disrupt file parsing. The system is designed to show the first encountered error to prevent an overwhelming number of messages for every affected row.
To resolve this issue, review the file carefully for structural problems. Ensure delimiters are consistent throughout (e.g., commas or tabs). Verify all strings are correctly quoted if needed. Make sure each row contains the correct number of columns.
Fixing the structure in the entire file-not just the reported row-will prevent further errors during upload.
Why am I seeing the following issue on file upload 'File Format Issue: There are columns with data but no headers, please remove the file, correct the issues, and upload it again?'
This error appears when your CSV file contains columns with data but no corresponding header names in the first row. Every column in your file must have a header to ensure the system can correctly interpret the data.
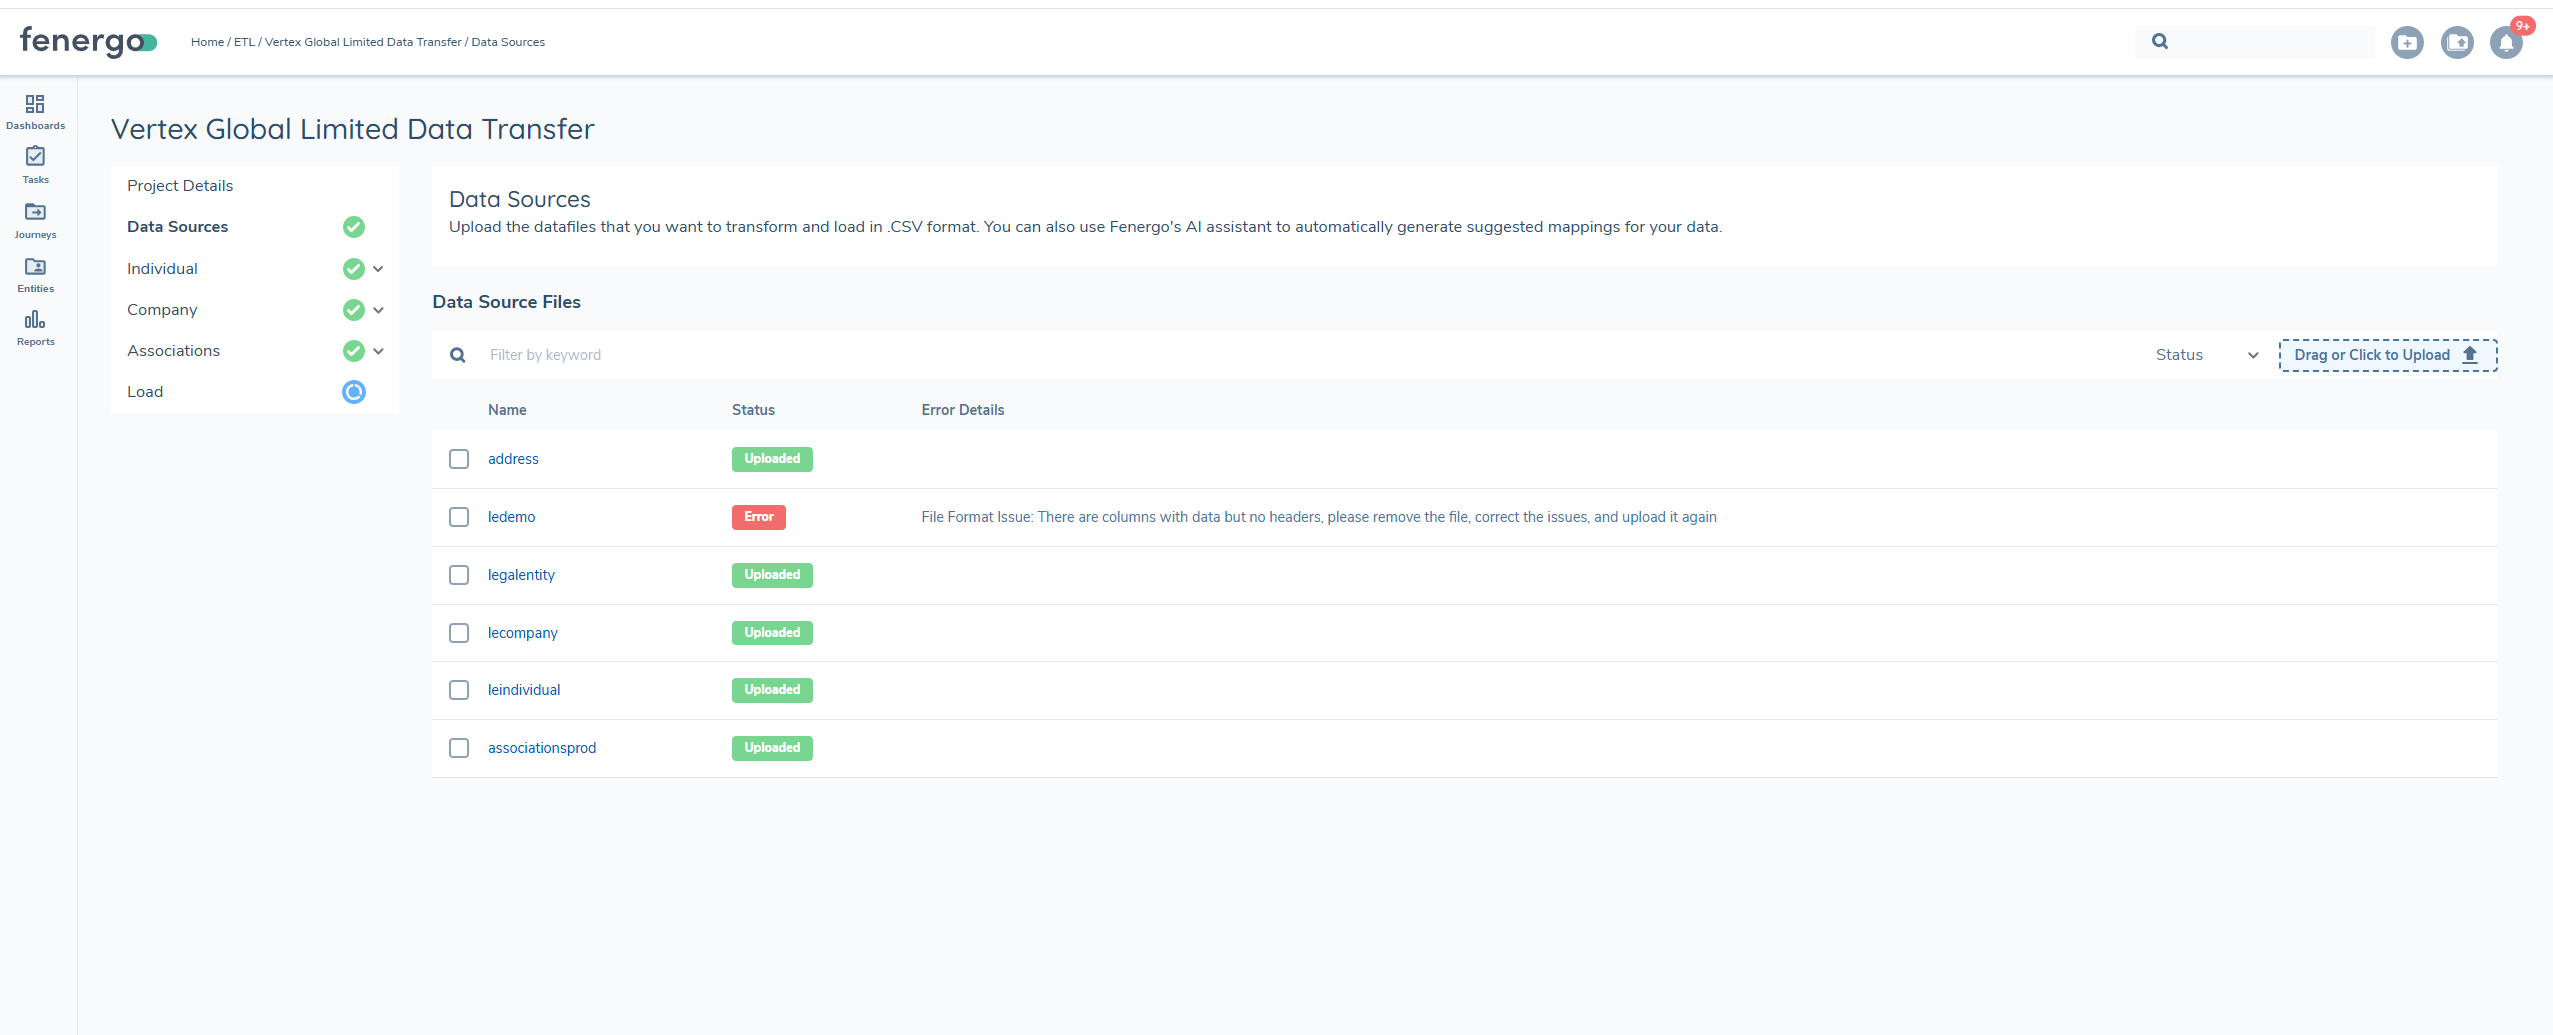
To resolve this issue, Add appropriate headers to all columns that contain data, or remove any data from columns that do not have headers.
After making these changes, save the file and try uploading it again.
Why am I getting an error on Auto-map?'
This error displays because the request to bedrock timed out, we can only support mapping of 150 fields. Reduce your policy size or map once and clone all subsequent projects so mapping persists. The product team are looking to increase these limits