Collateral Management
Collateral Management is a feature built to capture and manage an applicant’s collateral. Collateral is any property or asset that is given by the borrower to secure a loan (in the event of a default on payment / debt occurring). This can occur for multiple products, using a range of collaterals and involving various levels of ownership.
Collateral Capture and Lifecycle
Fenergo SaaS allows for the capture and management of collateral related to an entity. Collateral can be captured and updated within the context of a journey via the Manage Collateral task. The Manage Collateral task will be displayed in a journey dependent on its configuration.
Adding a Collateral
On selecting the Manage Collateral task, if no collaterals are captured against an entity, the default landing page is displayed.
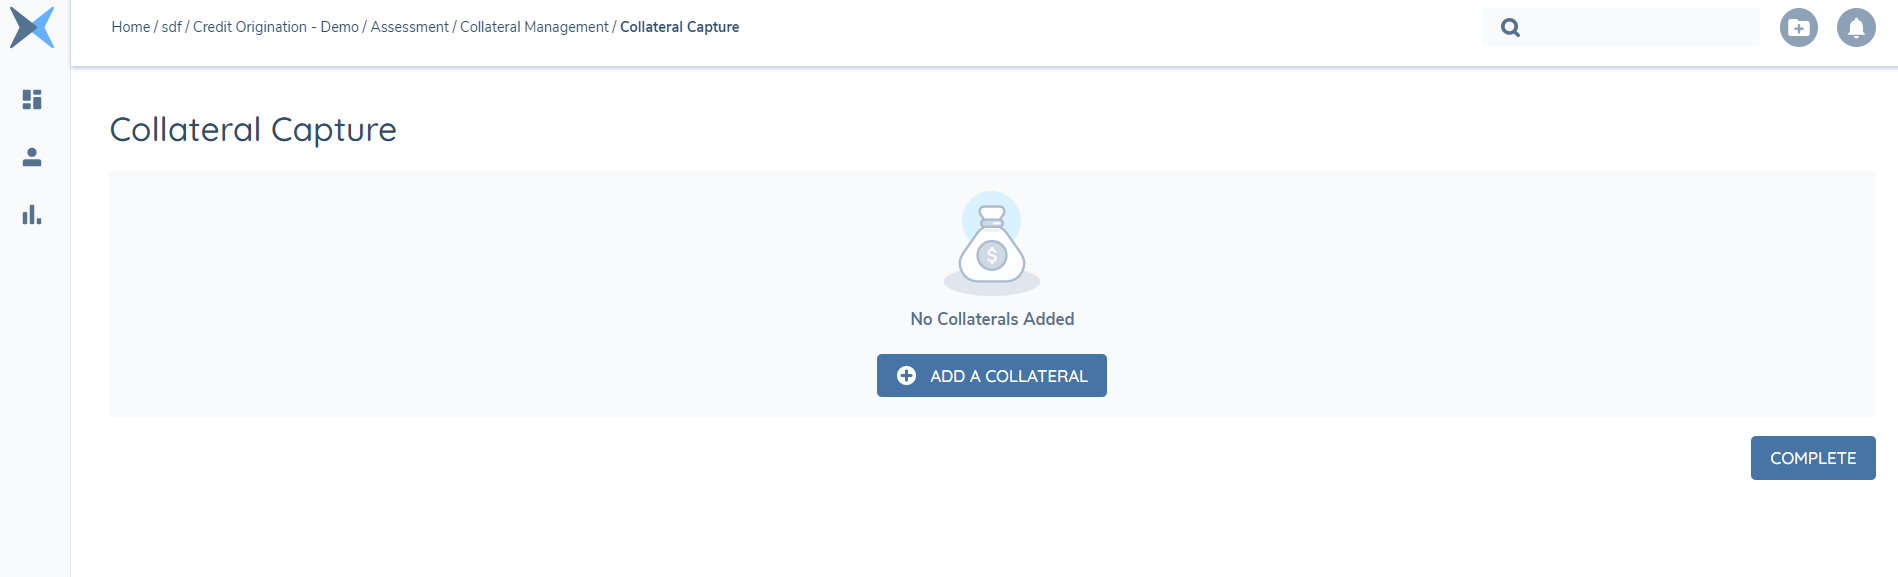
The user can complete this task without adding a collateral by clicking on the COMPLETE button. To add a collateral select ADD A COLLATERAL. This will create a verified and draft record of the collateral. The draft record will be updated in the context of the journey in which the draft record has been created and will then be written to the verified following the collateral verification task. On selecting ADD A COLLATERAL the New Collateral page will be displayed with the applicable data requirements.
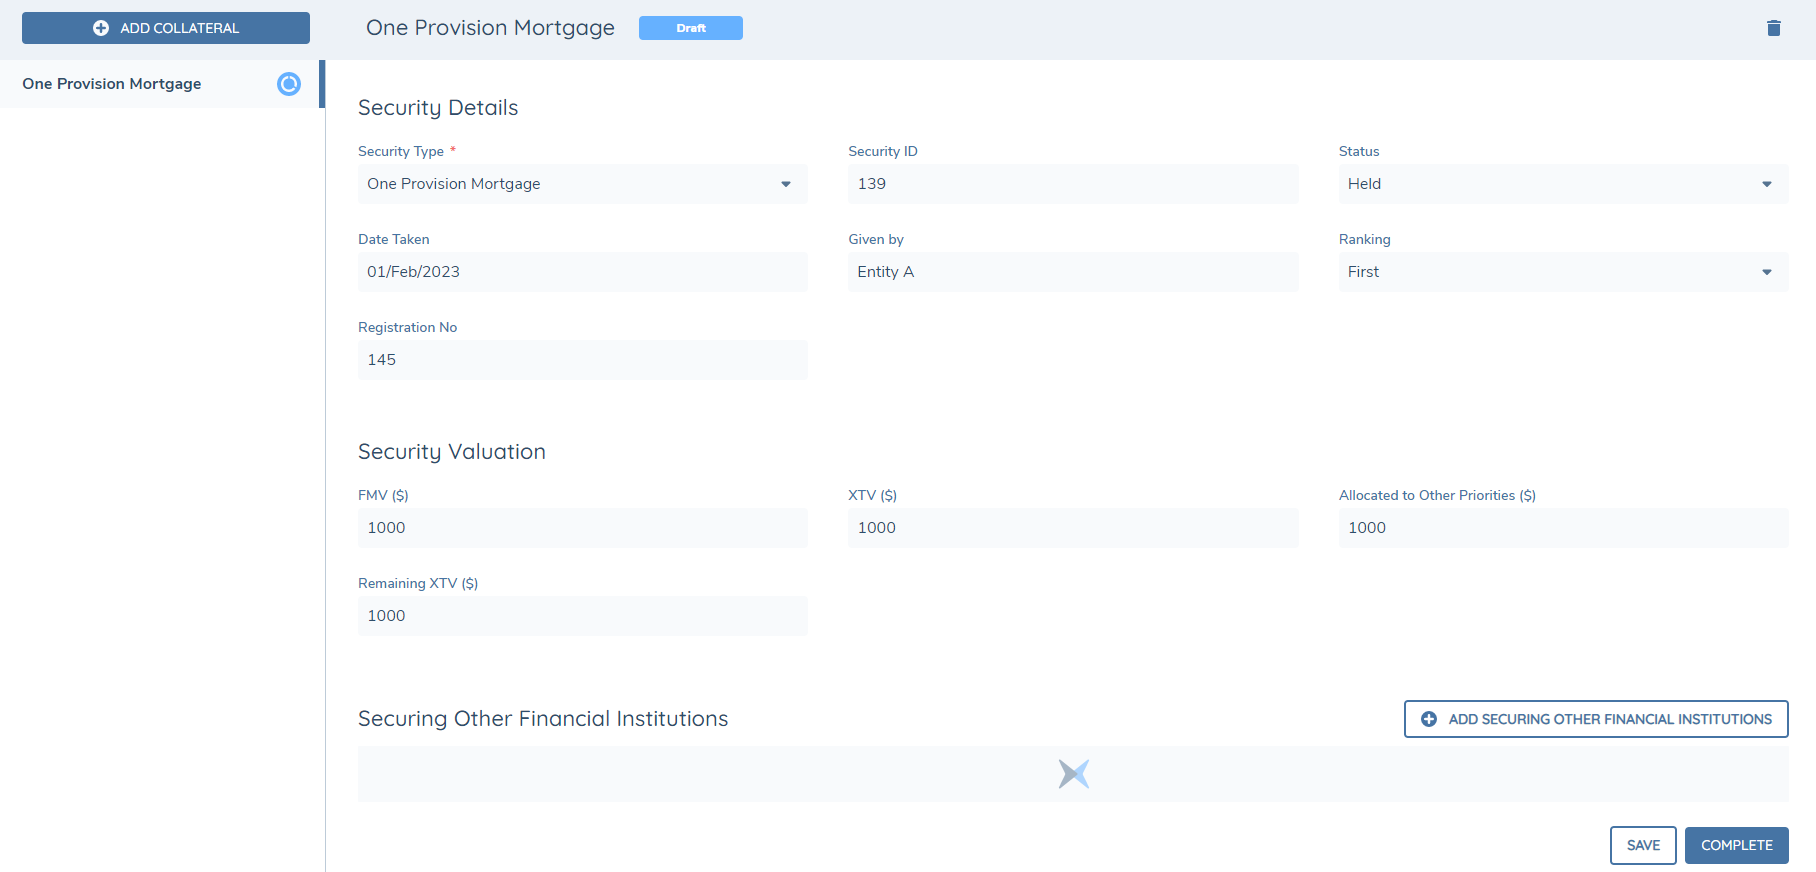
The data requirements are configurable, defined in Policy and from the task the user can capture the data related to the collateral as needed. The field types and data groups supported within the task are an exact match of those in the standard Fen-X data task. Furthermore, fields can be displayed based on conditions in addition to read-only fields and standard data validations.
On selecting either SAVE or COMPLETE the draft version of the collateral is updated. On completion of the task, the data will be presented as read-only.
Collateral Type MUST be provided in order to save or complete the task.
Adding Multiple Collateral
Multiple Collaterals may be added through the Manage Collateral task. To add an additional collateral, select ADD from the header bar.
As with Selecting Add from the landing page, this will create both a verified and draft version of a collateral and the fields that are displayed are dependent on the configuration of the data requirements in Policy. As collaterals are added, the left-hand column will list the collaterals captured against the entity.
On selecting SAVE or COMPLETE, any collaterals where information has been captured or edited will be updated.

Adding Assets:
In the Manage Collateral task, if assets have been configured, then the user will see the default placeholder table appear.
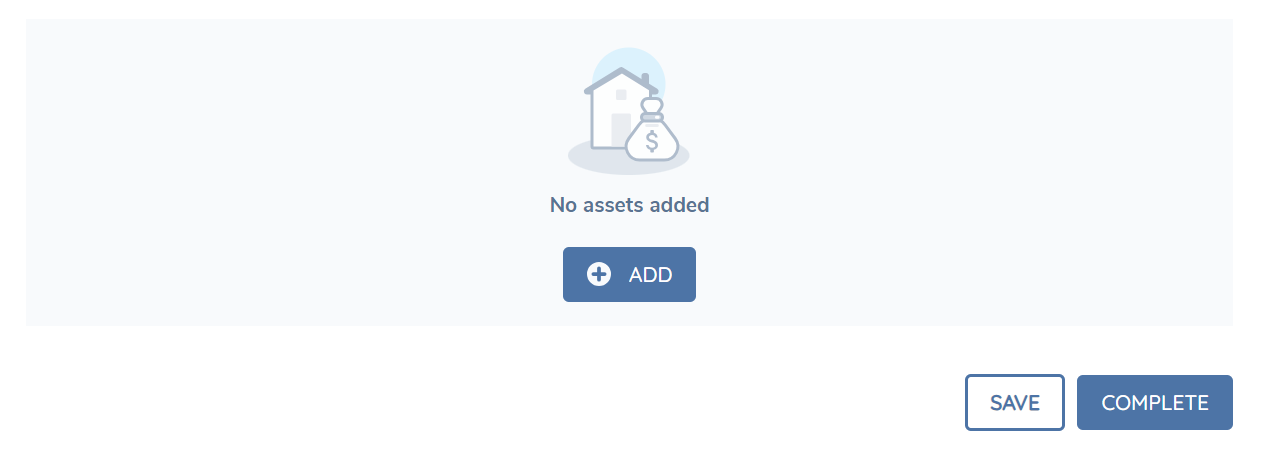
The user can complete this task without adding an asset by clicking on the COMPLETE button. To add an asset select ADD. This will create a verified and draft record of the asset. The draft record will be updated in the context of the journey in which the draft record has been created and will then be written to the verified following the collateral verification task. On selecting ADD, a modal will appear displaying the applicable data requirements.
The data requirements are configurable and are defined in Policy. The field types and data groups supported in the Assets modal, are an exact match of those in the standard Fen-X data task. Furthermore, fields can be displayed based on conditions in addition to read-only fields and standard data validations. Currently, minimum and maximum data group validations for Assets in the Collateral task are NOT supported.
Once clicking on SAVE within the modal, it will be added to the Assets table.
Note: The columns appearing in the Assets table can be ordered through the "Asset Summary Table - Policy Category" in Journey Builder. This category can be used to define the order of up to ten columns (excluding the Asset Type will always appear as the first column).

Note: A value against the Asset Type MUST be selected in order to add the Asset in the modal.
Editing Assets:
Once an Asset has been added, the Asset Type will appear as the first column in the table. To edit the asset, the Asset Type can be selected to trigger the Assets modal and make the necessary changes.
Asset Deletion:
An asset may be deleted before it has been verified via the delete icon in the asset table. After collateral verification, an asset may not be deleted.
Collateral Deletion:
A collateral may be deleted before it has been verified. After collateral verification, a collateral may not be deleted.
Collateral Autosave Functionality:
Autosave is applied when the user navigates to another Collateral in the left hand navigation panel within the same task (if applicable). The save is applied against the collateral that was previously in-focus and this is reflected by the icon against it (in the left hand navigation) changing from “save-in-progress” to “save successful”. If the save is not successful due to invalid data, then a modal will appear notifying the user that they are able to proceed to another Collateral in the task however, the data has not been saved. Additionally, if enabled in Journey Builder, a periodic autosave will occur approximately every 20 seconds subsequent to a user’s edits within the task.
Collateral & Asset Verification:
On adding a collateral (and assets, if applicable), a verified and draft record are created. The draft record will be updated in the context of the journey in which the draft record has been created and will then be written to the verified following the collateral verification task. If a collateral (and assets, if applicable) is added as part of a journey, and verified, it will then be available in any subsequent journeys for that entity.
Collateral Filtering:
Filtering of verified collateral is possible in the following areas:
- Managed Collateral task
- Collateral tab on Manage Deal task
- Collateral tab on main entity view on the manage deal task
Collateral Filtering configuration is achieved by adding a Yes/No column named ""IsHiddenInJourneys"" to a Reference List configured as “Collateral Status”. If the switch is enabled then it will filter that specific collateral in subsequent tasks and journeys. It is important to note this will only happen if the collateral is verified.
Product to Collateral Relationship
Relationships between a product and collateral is captured and managed, via the manage product task or the product tab in the manage deals task. This allows for the clear understanding between the two and the capture of important metadata such as the allocation amount of a collateral against the product.
In the task properties, of the Manage Product task, the 'Display Collateral Grid' toggle must be enabled for the Collateral grid to be displayed. When enabled, the 'Collateral Categories' select dropdown will be displayed. The Collateral Categories selected will be displayed on the 'Relationship' tab within the Product to Collateral modal. Additionally, Policy fields must be configured with a Target Entity of “Related Party” to be displayed in the task.
Product to Collateral Search:
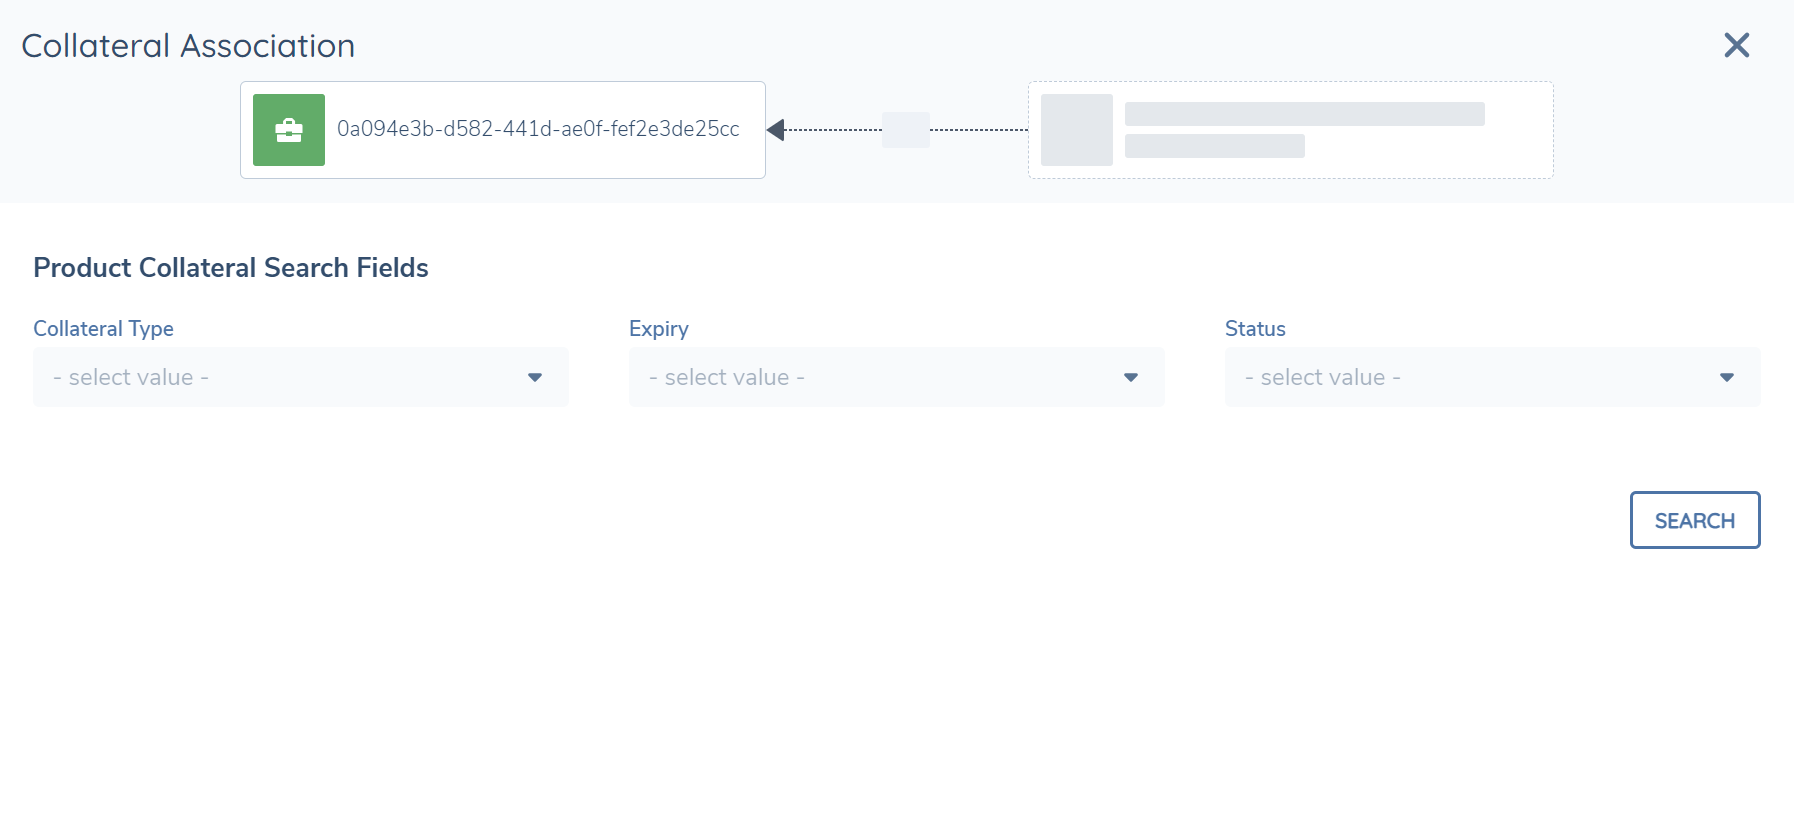
A product can be linked to multiple existing collateral. Before creating a relationship, a search must be completed to see if a collateral already exists for the main entity or for any related parties captured against the product. The search fields are configured in Policy (not Product Policy) through the fields configured under the category of ‘Product Collateral Search Fields’. Examples of this include the Collateral Type, the Collateral ID, the Collateral Status etc. The search fields don't have a maximum limit however, it is recommended that the search fields don't have any associated trigger conditions configured since they will not appear in the search columns if they are triggered. The business category should NOT be configured in the journey builder under ‘Collateral Categories’.
Linking a Collateral:
To link a collateral to a product, complete the following:
- Click into grid to trigger the modal to link the collateral.
- Populate all mandatory fields and select SEARCH. The modal will then display the Collateral – Potential Matches.
- From the Collateral – Potential Matches there is the option to Link. Link will create the relationship to an existing collateral captured by the main entity (draft or verified) or by the product’s related party(s) (verified only).
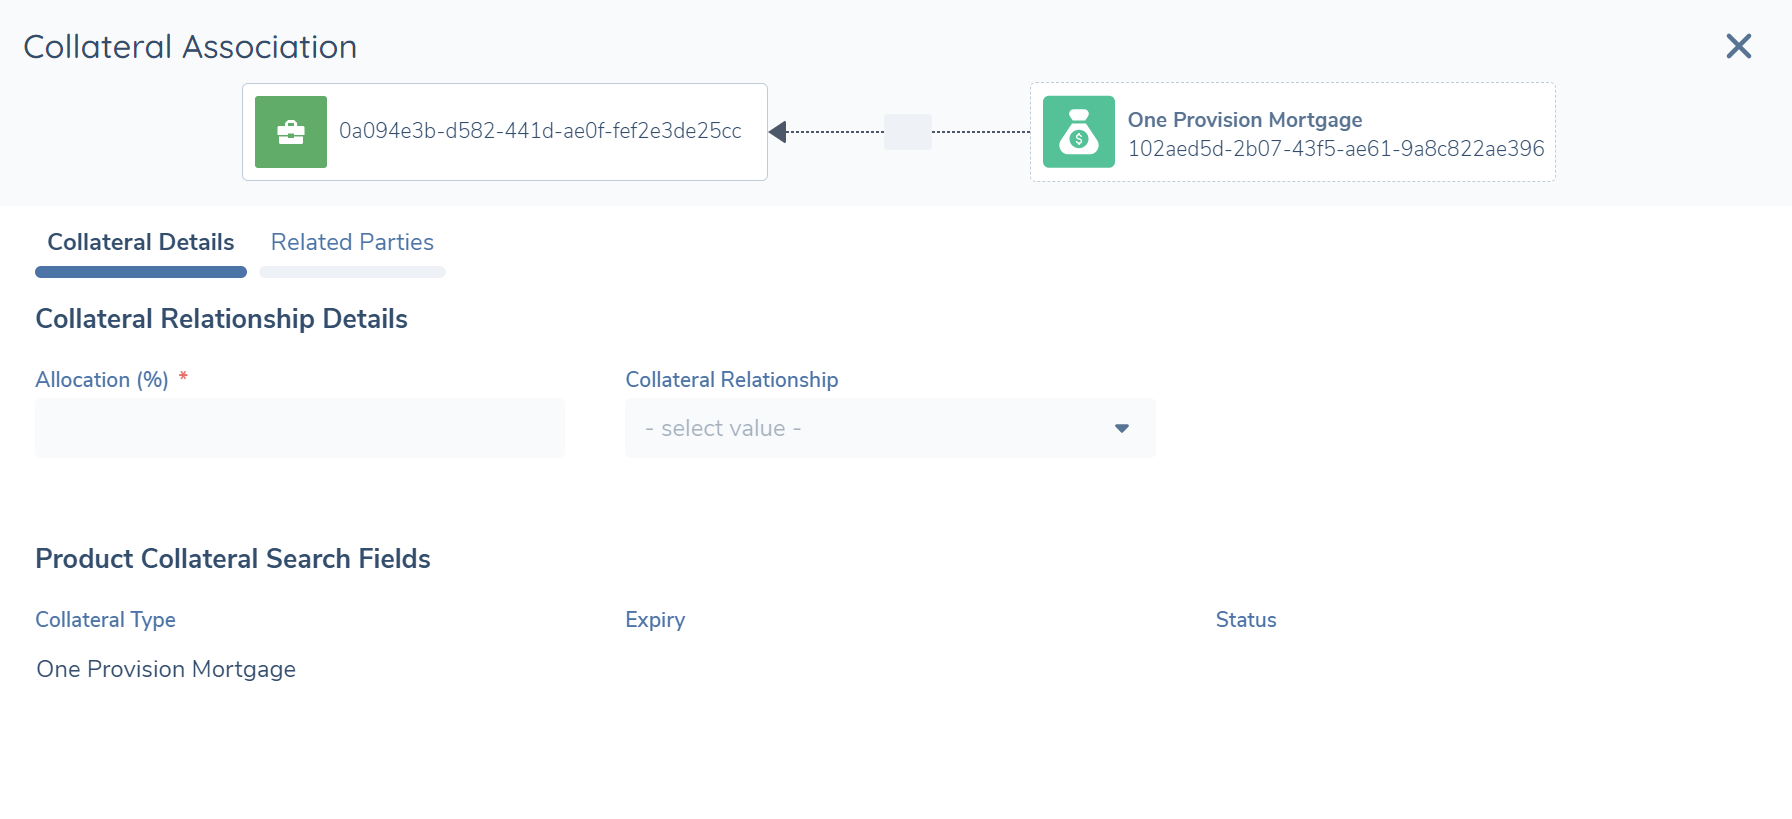
Relationship Details, Related Parties & Managing Linked Collateral:
Information specific to the relationship between the Product and Collateral are configured through a Policy business category configured in the journey builder under ‘Collateral Categories’ e.g. "Product Collateral Relationship Details". The business category must have a datakey of collateralRelationship configured. Additionally, a datakey of ownershipPercentage may be configured to reflect the allocation amount that is linked to the collateral.
Information specific to the relationship between the Product and the Collateral’s Related Parties will appear in the “Related Parties” Tab within the modal. The Name, Type and Role will appear as columns for the table and the user can click on the specific entity to view it’s entity profile page.
Having added a collateral, the relationship will appear in the grid and the relationship may be edited by selecting the collateral or the pencil icon next to it. The fields displayed in the modal are dependent on policy and task configuration, and the collateral relationship should not be deleted (the fields in the "Product Collateral Search Fields" will be read-only).
Deal to Collateral Relationship
Relationships between a deal and collateral is captured and managed, via the deals task. This allows for the clear understanding between the two and the capture of important metadata such as the allocation amount of a collateral against the deal.
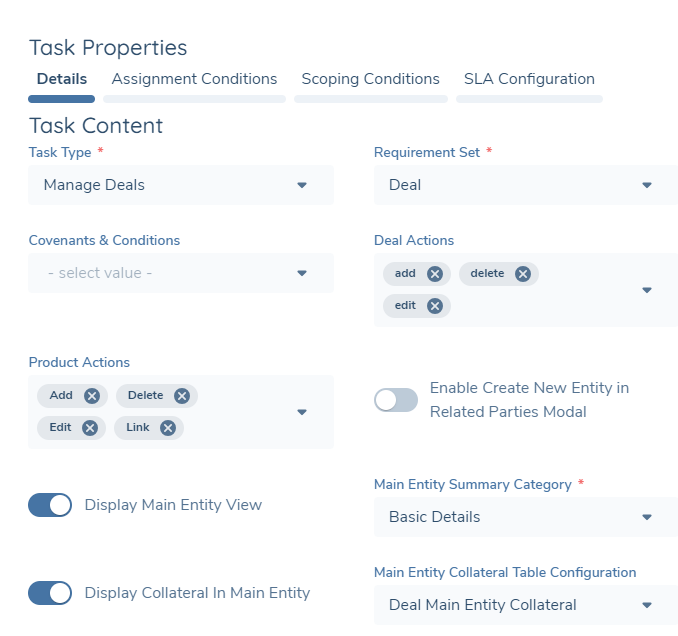
In the task properties, of the Manage Deals task, Collateral must be selected under Deal Content for the Collateral tab to be displayed. When enabled, the 'Collateral Relationship Categories', 'Collateral Details' and 'Collateral Summary Table Configuration' policy category selection will be displayed. The 'Collateral Relationship Categories' will display the editable relationship fields under the Collateral Details tab. The 'Collateral Details' category selected will display the read-only details of the collateral linked under the Collateral Details tab (the category/s selected here should be exactly the same as the policy category used to display the fields in the Collateral task). The “Collateral Asset Details” category will display the read-only details of the assets linked under the Assets Details tab (the category/s selected here should be exactly the same as the policy category used to display the fields in the Collateral task). For the 'Collateral Summary Table Configuration' the category selected here e.g. Column Order will represent the configurable columns that will appear in the Collateral summary table. Policy fields for 'Collateral Relationship Categories' and the 'Collateral Summary Table Configuration' must be configured with a Target Entity of “Related Party” to be displayed in the task.
When the user has configured a datakey named "allocatedFMV" the captured value of the relationship will be displayed in the grid preceding the "Allocated" column.
Deal to Collateral Search:
A deal can be linked to multiple existing collateral. Before creating a relationship, a search must be completed to see if a collateral already exists for the main entity. The search fields are configured through the fields configured under the category of ‘Deal Collateral Search Fields’. Examples of this include the Collateral Type, the Collateral ID, the Collateral Status etc. The search fields don't have a maximum limit however, it is recommended that the search fields don't have any associated trigger conditions configured since they will not appear in the search columns if they are triggered. The business category should NOT be configured in the journey builder.
Linking a Collateral:
To link a collateral, to a deal, complete the following;
- Click into grid to trigger the modal to link the collateral.
- Populate all mandatory fields and select SEARCH. The modal will then display the Collateral – Potential Matches.
- From the Collateral – Potential Matches there is the option to Link. Link will create the relationship to an existing collateral captured by the main entity (draft or verified).
Collateral Details Tab:
Information specific to the relationship between the Deal and Collateral are configured through a business category configured in the journey builder under ‘Collateral Relationship Categories’ e.g. Deal Collateral Relationship Details. The business category MUST have a datakey of "dealCollateralRelationship" configured. Additionally, a datakey of "dealCollateralAllocation" MUST be configured and will be reflected in the collateral summary table. The fields captured under the 'Collateral Details' will appear below the fields captured under the 'Collateral Relationship Categories' and will be read-only. A Deals table will display information specific to the relationship between the collateral and the deals that it is linked to (under the Collateral Details). Furthermore, a Products table will display information specific to the relationship between a collateral and product/s that it may be linked to. A total of six columns (including the allocation appearing as the last column) will appear and the datakeys of "productType"(will appear as Product Type in the table), "borrowerNameConstruct" (will appear as Borrower Name in the table), "accountNumber" (will appear as Acc No in the table), "expires" (will appear as Expiry Date in the table) and "proposedLimit"(will appear as Proposed Limit in the table) should be configured for the Products task so that the values captured against these fields are reflected in the table in that order. Additionally, a total row will sum up the "Allocation" values in the table. If the collateral is not linked to a product this table will not appear.
Assets Details Tab:
Information specific to the relationship between the Deal and the Collateral’s underlying asset’/s are configured through a business category configured in the journey builder under ‘Collateral Asset Details’ e.g. Asset Details. The 'Asset Details' will appear below the fields captured under the 'Collateral Relationship Categories' and will be read-only.
The datakeys of "assetType", "address", "assetDescription", "fmv", "xtv","valuationDate" and "nextValuationDate" if configured in the category will appear as the table header columns in the Asset Details Tab.
Related Parties Tab:
Information specific to the relationship between the Deal and the Collateral’s Related Parties will appear in the “Related Parties” Tab within the modal. The Name, Type and Role will appear as columns for the table and the user can click on the specific entity to view it’s entity profile page.
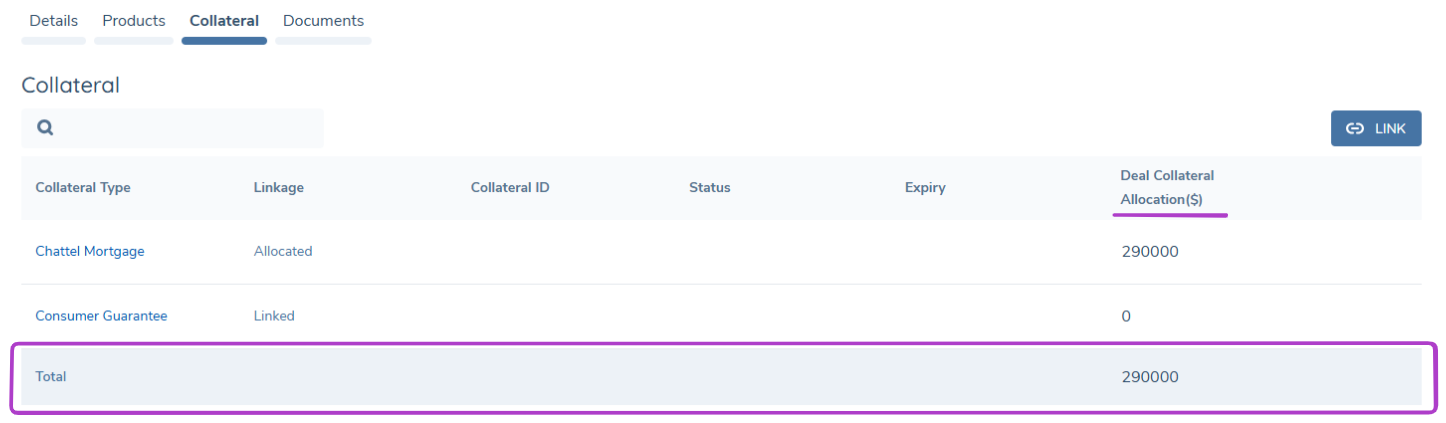
Managing Linked Collateral / Summary Table:
Having added a collateral, the relationship will appear in the grid and the relationship may be edited by selecting the collateral or the pencil icon next to it (The collateral relationship should not be deleted). The summary table will have hardcoded datakeys of "collateralType", "dealCollateralRelationship" and "dealCollateralAllocation". Furthermore, if additonal columns have been configured for the summary table, then a total row will appear summming up all numeric fields (except the allocation column).
Note: Collateral which have been added and verified in the context of a deal can be edited in subsequent journeys.
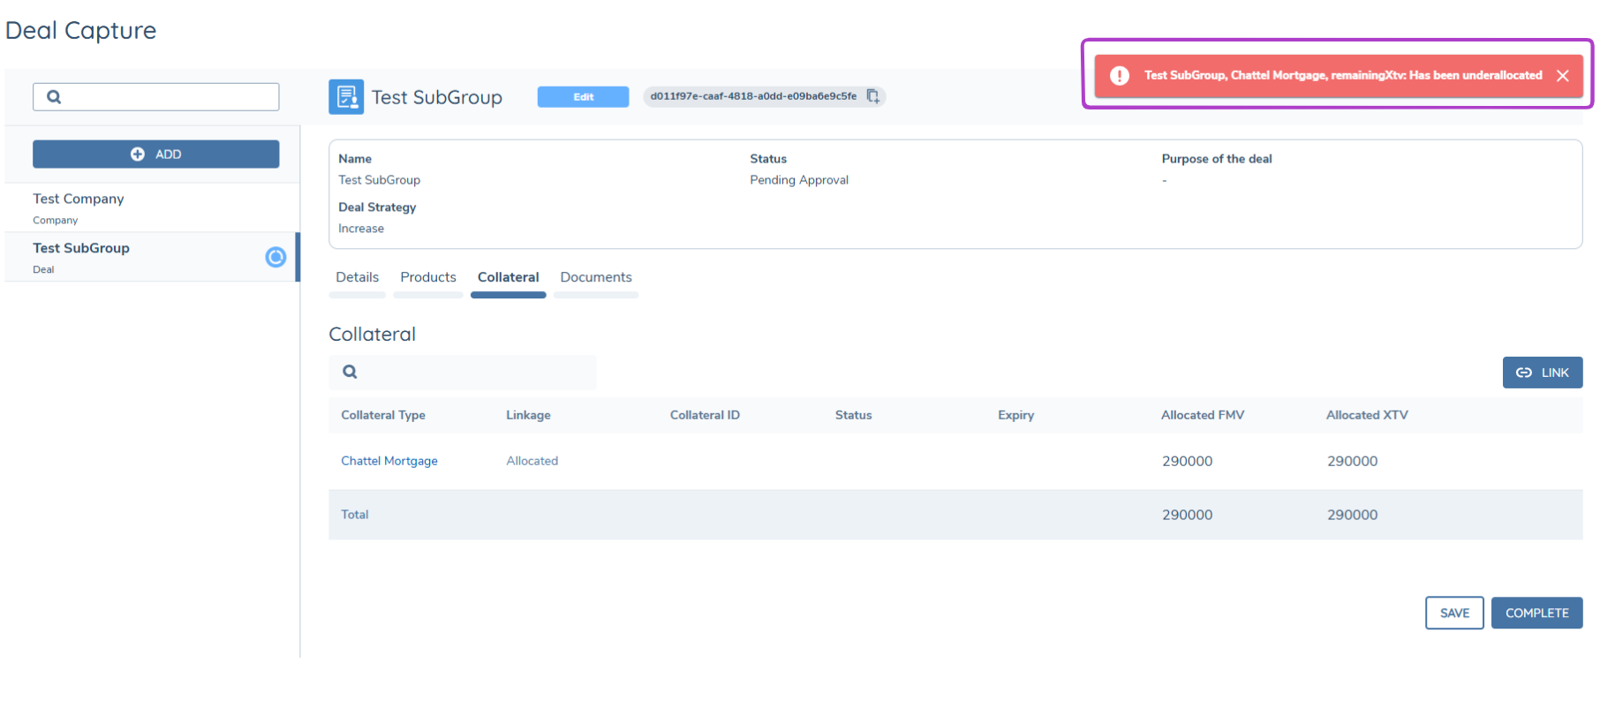
When managing linked Collateral on the Manage Deals task, the summary grid will always show dealCollateralAllocation at the end of the table as the last column. Additionally all Deal to Collateral Allocation will be totalled. See below for reference.
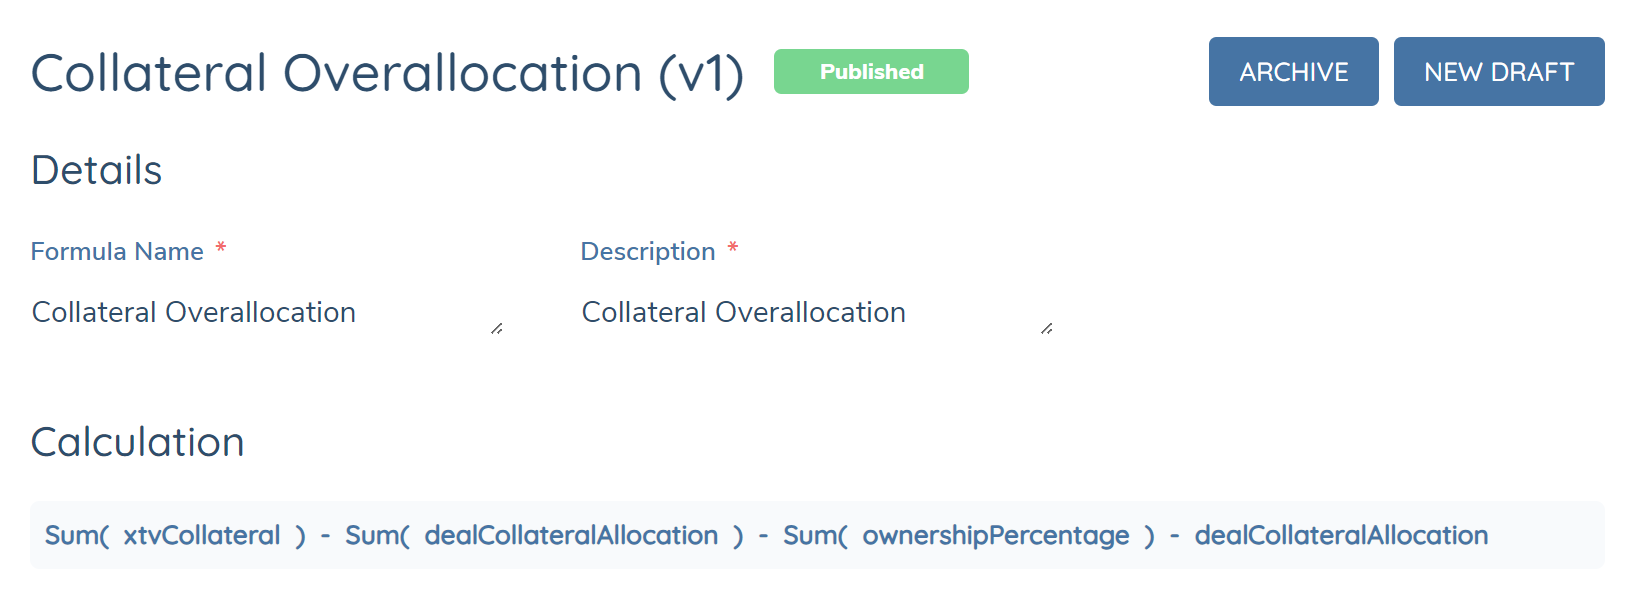
Deal to Collateral Allocation Validation
In allocating a collateral to a deal an important consideration is to prevent a user from overallocating e.g. a collateral worth $100,000 should not exceed $100,000 when linked against a particular deal.
The following steps are best practice on how this should be configured to meet this usecase:
- Ensure a datakey reflects how much the collateral is worth in the collateral task. This can be represented in the form of a calculated field summing up the assets valuation e.g. Sum (Assets XTV) where the datasource is Related Assets.
- Ensure that the "
dealCollateralAllocation" datakey is configured with a default value of zero so that when in the deal to collateral modal, the user is able to automatically view the calculated results before they input a value against the dealCollateralAllocation datafield. - Ensure that within the Deal to Collateral Relationship Details that a datafield is configured to reflect what valuations is left remaining for a user to allocate to the deal. This datafield should be a calculated field with a minimum valuation set to 0. E.g. the formula would reflect the collateral valuation where the datasource is Related Collateral, minused by the sum of the allocation where the datasource is Related Association minused by the sum of the allocation to any Products where the datasource is Related Association minused by the proposed allocation where the datasource would be the Current Task.
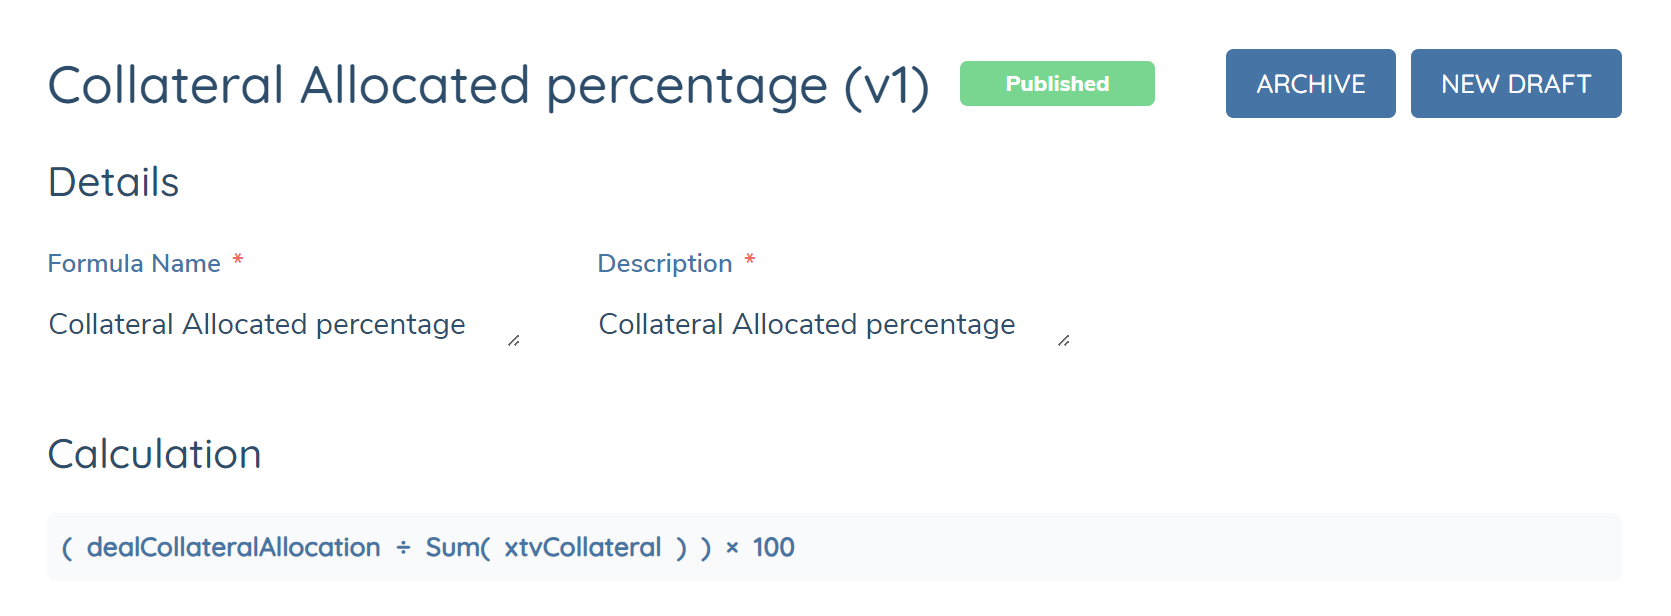
- A percentage can also be configured to reflect the total percentage allocated for the collateral. This calculated field should have a validation where the minimum value is 0 and the maximum value is 100. This should be configured through the allocation being divided by the sum of the collateral valuation where the datasource is Related Collateral and have this multiplied by 100.
In allocating a collateral to a deal (whether it be directly to a deal or through the products tab in the deals task) another important consideration is to prevent a user from underallocating e.g. a collateral worth $100,000 should have this amount fully exhausted to reduced the need for additional checks a banker has to make when there is an amount still left outstanding.
The following explains the configuration and considerations for this usecase:
- Ensure a datakey of "
remainingXtv" has been configured to reflect what valuations is left remaining for a user to allocate to the deal. This may be the same datakey used in step 3 of the underallocation configuration. - The error snackbars that appear if the underallocation and overallocation logic is triggered in the Manage Deals task will require the user to manually close them. This is to ensure that users have the time to read the specifics of which collateral has been underallocated or overallocated and can rectify this.
- The underallocation logic will be ignored for collateral which has a status of "warning" and "alert". Refer to the Collateral Status Configuration section of this userguide for more detail.
When allocating to a Product or Collateral there are certain datakeys which must be configured to define the allocation percentage.
dealCollateralRelationship - Collateral to Deal or Product Link
dealCollateralAllocation - Collateral to Deal Allocation
ownershipPercentage - Collateral to Product Allocation
The two allocation datakeys cannot have trigger conditions applied on them, they must remain static.
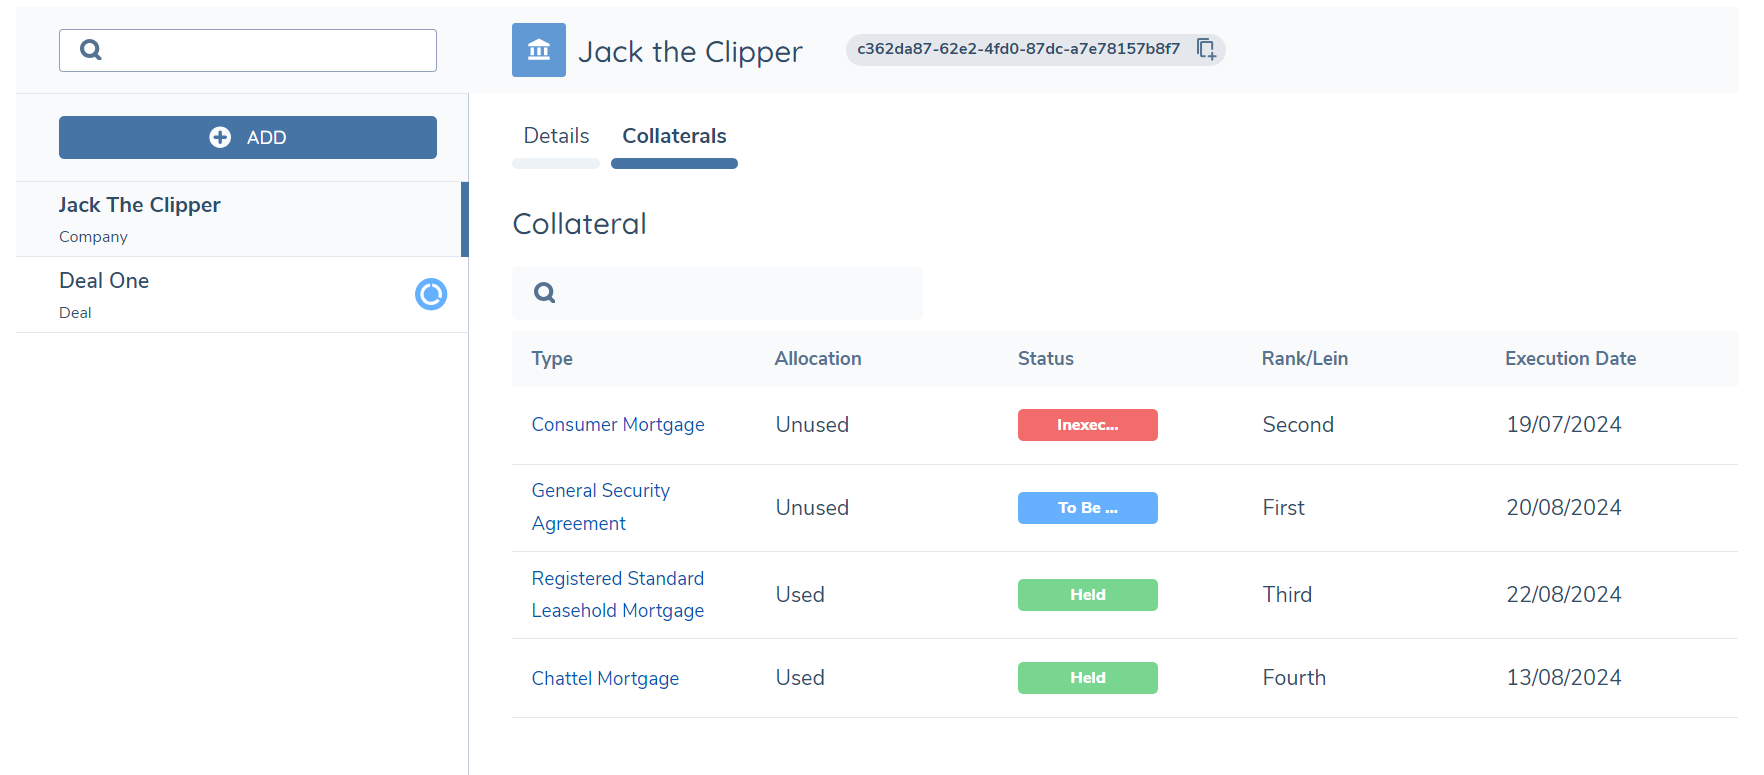
Main Entity View in Manage Deals Task: Collateral Tab
If configured, will display a collateral tab to provide a view of the used/unused collateral by the Main Entity.
Collateral Related Parties
Relationships between a collateral and related parties are captured and managed, via the manage collateral task. This allows for the clear understanding of the different actors, their role to the collateral and the allocation amount.
In the task properties, of the Manage Collateral task, the 'Display Collateral Related Parties Grid' toggle must be enabled for the Related Parties grid to be displayed. When enabled, the 'Collateral Related Party – Policy Category' select dropdown will be displayed. The categories selected will be displayed on the 'Relationship' tab within the Collateral related parties modal. Additionally, Policy fields must be configured with a Target Entity of “Related Party” to be displayed in the task.
Collateral Related Parties Search and Relationship Details:
Related parties and their relationship to a collateral can also be captured for existing entities. Before creating a relationship, a search must be completed to see if an entity already exists. The search fields are configured through the fields configured under the category of ‘Collateral Entity Search Fields’. Examples of this include First Name, Last Name, Legal Entity Name, Company Type etc. and it is recommended that these fields are configured as non-mandatory. The search fields don't have a maximum limit however, it is recommended that the search fields don't have any associated trigger conditions configured since they will not appear in the search columns if they are triggered.
Information specific to the relationship between the collateral and entities are configured through a business category configured in the journey builder under ‘Collateral Related Party - Policy Category’ e.g. ‘Collateral Entity Relationship Details’. The business category must have a datakey of "collateralRelationship" configured. Additionally, a datakey of "ownershipPercentage" may be configured to reflect the allocation amount that is linked to the collateral.

Linking/Adding a Related Party to a Collateral:
To link/add an entity to a collateral, complete the following;
- Select ADD button above the Related Party grid, opening the Collateral Related Party modal.
- Populate all mandatory fields and select SEARCH. The modal will then display the Related Party – Potential Matches.
- From the Related Party – Potential Matches there is the option to Link. Link will create the relationship to an existing entity.
Managing Related Parties:
Having added a related party, the relationship will appear in the grid and the relationship may be edited by selecting the pencil icon against the entity. The fields displayed in the modal are dependent on policy and task configuration (the fields in Entity Details tab will be read-only). In addition, the relationship to the entity may be deleted.

Verification of the Related Parties which are captured against Collateral and the underlying assets (if applicable) is completed by the Verify Collateral task.
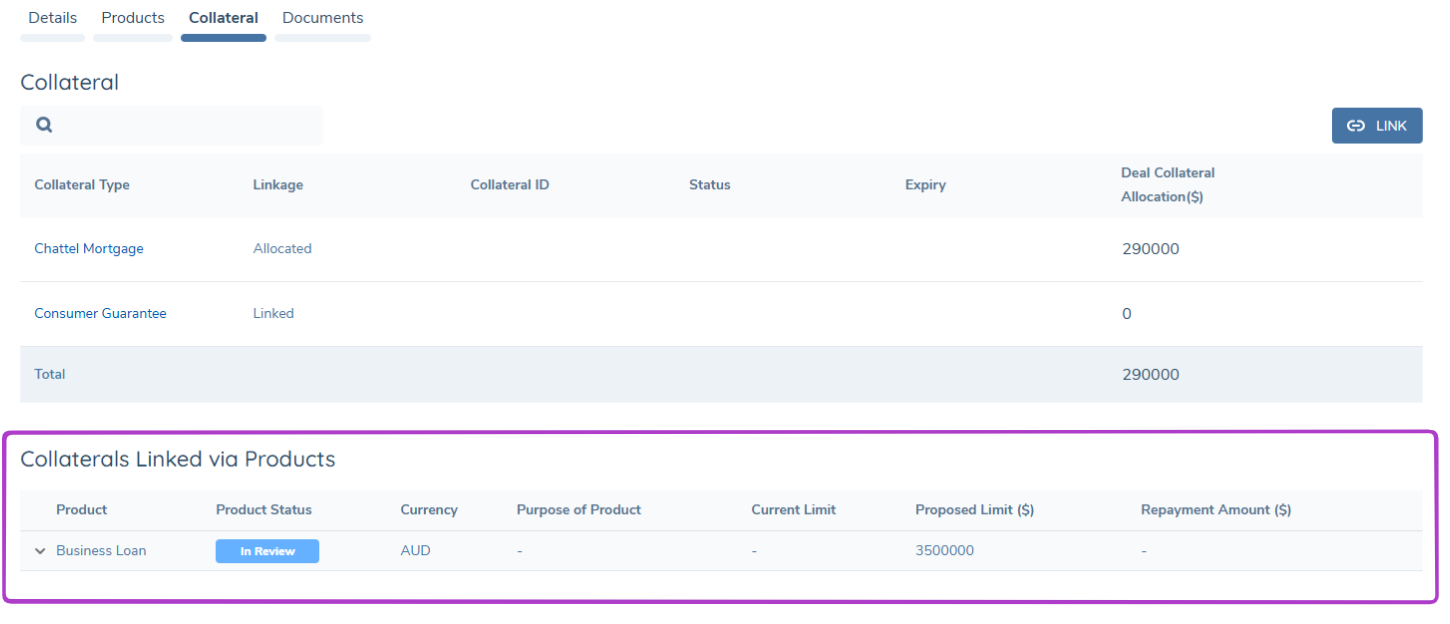
Collateral Linked via Products Grid:
This grid can be seen within the Manage Deals task on the Collateral tab. This is to allow the user to see all collateral, linked via the deal or via products, in one holistic view.
Edits to the collateral can be made in this grid, including allocations. Unlinking can also be completed in this grid. All changes made via this grid on the Collateral tab will automaticaly be reflected on the Products Tab once made.
Collateral however cannot be added via this grid, which must still be completed via the Collateral grid on the Product tab. Collateral can also be linked to products via the Products and Collateral tabs.
Asset Related Parties
Assets can be linked to a Legal Entity through the collateral ownership structure/the collateral related parties. Therefore, the underlying asset, if it exists, is not orphaned when linking a collateral to other entities.
This can be represented in the UI if the ‘Display Asset Related Parties Grid’ is enabled in the journey builder, in the Manage Collateral task. A read-only view of the related party(s) linked to the asset can be viewed within the Asset modal.
Configuring the Collateral Management Feature
Manage Collateral Task Configuration
Data Requirements:
Collateral information that is required to be captured, along with the underlying asset, will be driven by Policy data requirements. These attributes are presented to the user in the Manage Collateral task.
How requirements are added, and the functionality provided listed below, all follow the same implementation as available in Policy. Therefore, for further details please refer to the Policy Configuration User Guide for the following:
-
Supported Field Types
-
Implementation of Data Keys
-
Trigger Conditions and Standard Data Validations
-
Field Ordering
-
Conditional Values
-
Data Groups
Note: A collateral type (datakey of "collateralType") MUST be captured when adding a collateral AND it MUST be configured with the standard mandatory validation for the Collateral Task. If Assets have been enabled, the datakey of "assetType" must also be configured for the task.
Requirement Category:
Requirement Category is a key reference that links the tasks in Journey to the requirements. It defines which section in the task the field will appear, e.g. Collateral Details, Collateral Valuation, Asset Details.
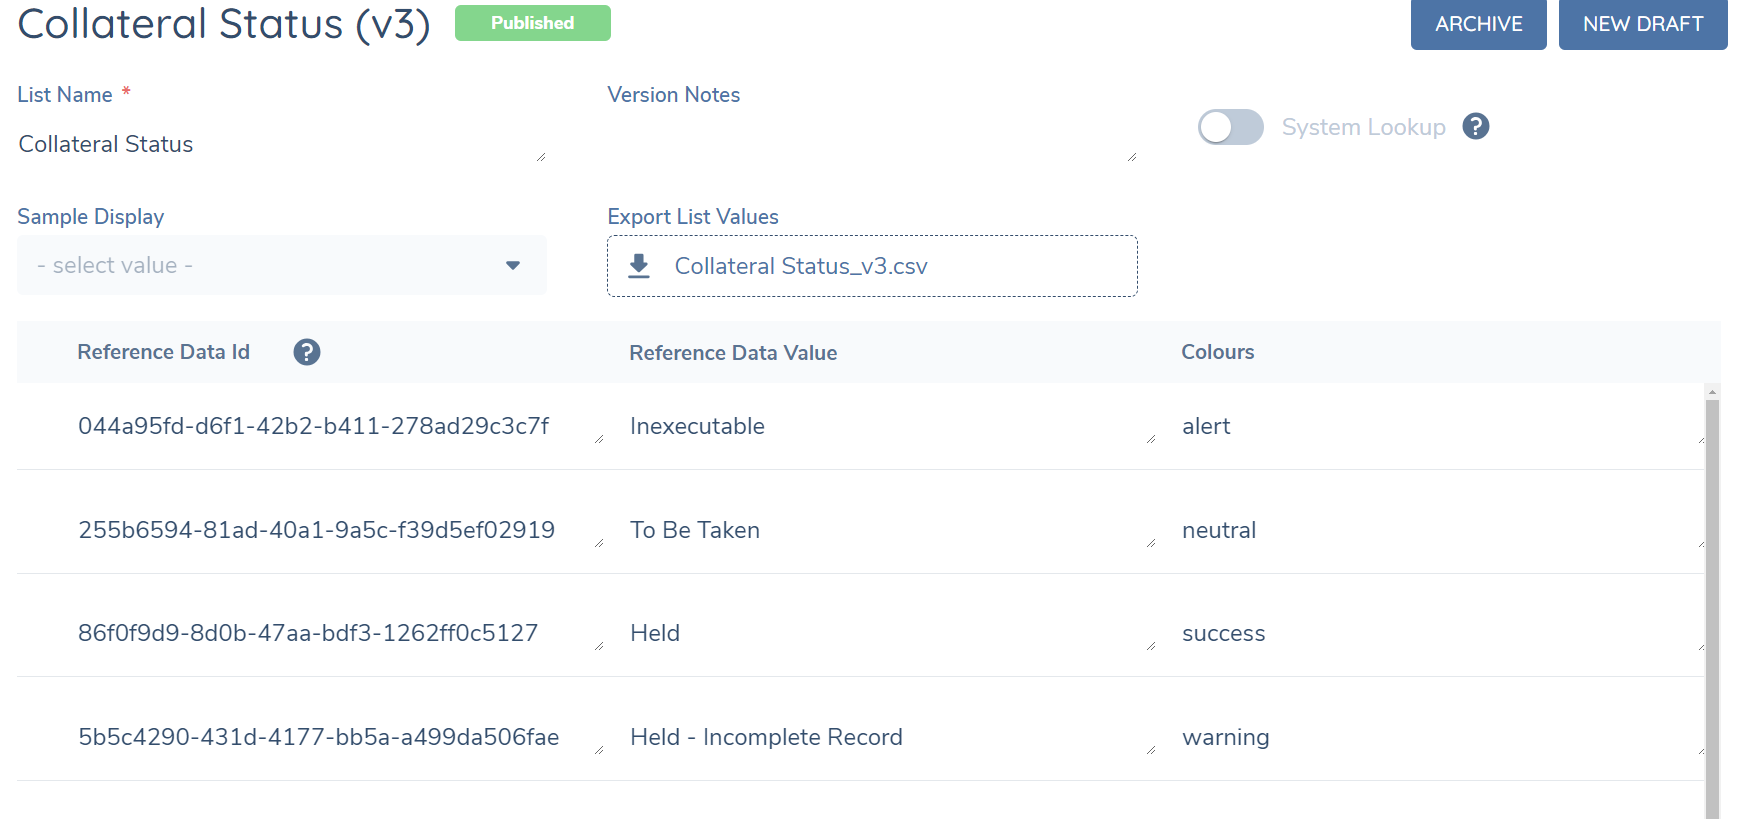
Collateral Status Configuration:
The status for a collateral can be configured as a status chip with a selection of colours. In the Reference Editor, a lookup list with the List Name of "Collateral Status" is required to be linked against a datakey of "collateralStatus". On the first column, the user can configure the collateral status labels. Then, the second column can be used to map the status to the colour of the chip.
Four colours of the chip are supported in the Manage Collateral task, and each of them are mapped to a specific colour:
-
"success" for Green
-
"neutral" for Blue
-
"warning" for Orange
-
"alert" for Red
For example, if "Held" is mapped to "success", then the label of Held will be shown in a green status chip in the Manage Collateral task if that status is selected.
Product-Collateral Relationship Configuration:
In some instances, a product will require a collateral to be captured against it whereas it will be not applicable for others. For instance, most credit cards will not require a collateral to be captured against it.
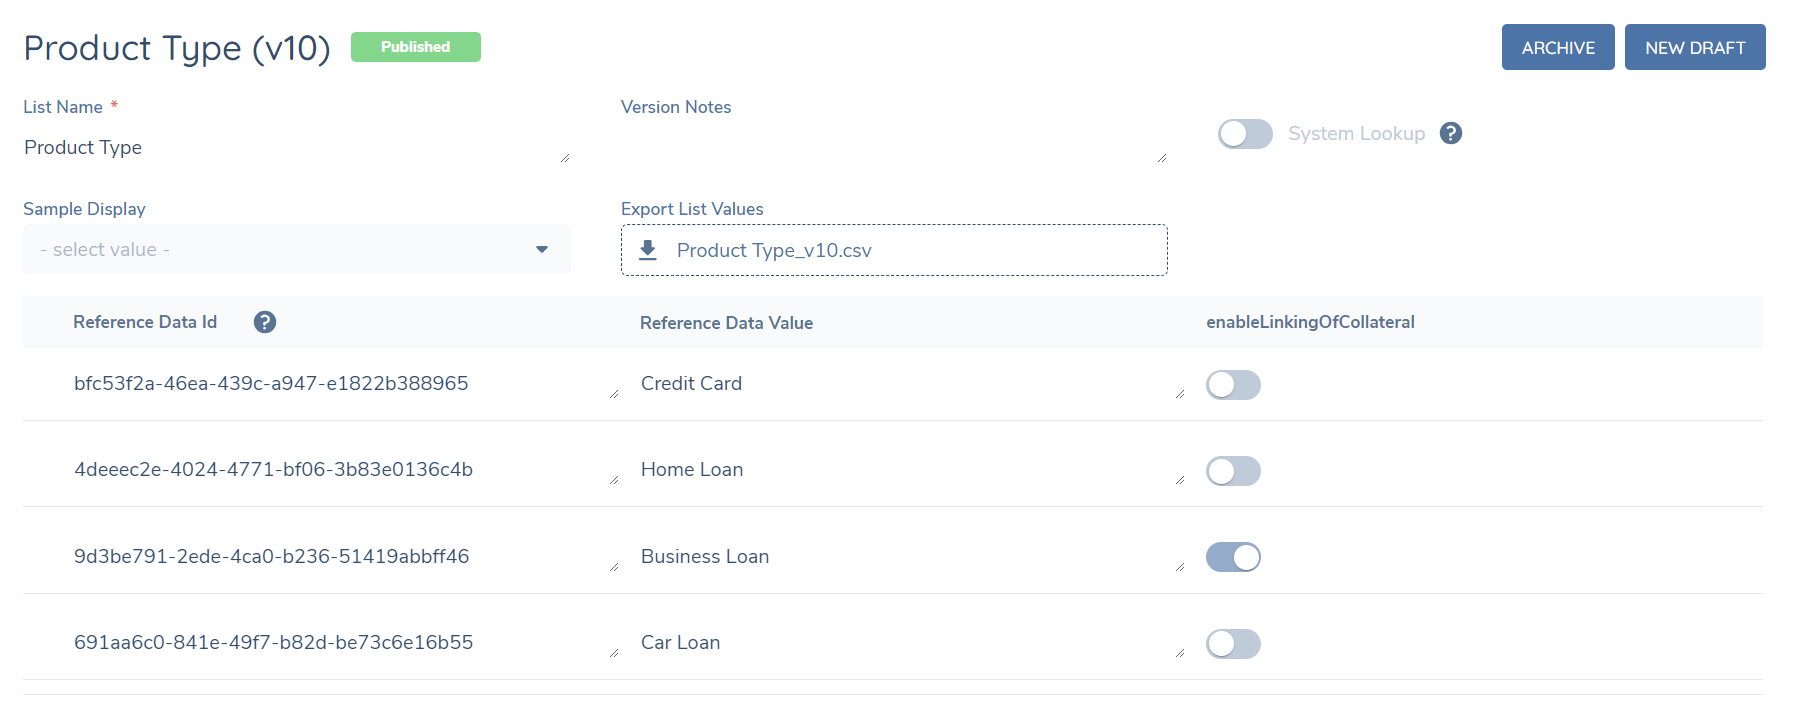
-
In Reference Data, navigate to the lookup that is linked to the datakey of "
productType". Create a second column of Yes/No with the title of "enableLinkingOfCollateral". Enable the switch against which product types should have the collateral grid appear once selected (e.g. “business loan”). -
If not configured, the collateral grid will appear in the manage products task upon it becoming in-progress and regardless of what product is selected (provided the manage products task has been configured to have the collateral grid enabled in Journey Builder)
Collateral-Asset Relationship Configuration:
-
In some instances, a collateral will require an asset to be captured against it whereas it will be not applicable for others. For instance, a guarantee will not require an asset captured against it whereas, a mortgage would require an underlying asset of a property.
-
In Reference Data, navigate to the lookup that is linked to the datakey of "
collateralType". Create a second column of Yes/No. Enable the switch against which collateral types should have the assets grid appear once selected (e.g. “mortgage”). -
If not configured, the assets grid will appear in the manage collateral task upon it becoming in-progress and regardless of what collateral is selected (provided the task has also been configured with Assets enabled).
Collateral and Asset Calculated Fields:
Calculations within the Collateral Task are supported for the Current Task and the Related Asset(s). For further details, refer to the Calculated Fields User Guide.
Collateral Fields Data Provider Configuration:
The Collateral Task supports the configuration of data providers for specific fields.
When the datakeys "inFavourOfNameConstruct" or "givenByNameConstruct" are used, the system displays a "Calculate" option next to the relevant field on the collateral record. Selecting this option triggers an external provider to retrieve data, which then populates the field based on predefined rules.
The populated field will be displayed as read-only and cannot be edited manually, any changes to the underlying data used to generate the field, the user must click the calculate option again.
Journey Configuration
Within Journey Builder there are two tasks that have been added that relate to the functionality provided in terms of capturing a collateral and the collateral lifecycle.
Manage Collateral Task:
The Manage Collateral task serves as the data capture task for collateral requirements and the underlying asset's requirements. In configuring the Manage Collateral task the user can configure the Requirement Categories that are to be displayed and captured at the task level. Collateral requirements are configured through the categories selected under “Collateral – Policy Category” and Asset requirements configured through the categories under “Assets – Policy Category”. Additionally, a switch can be enabled within Journey Builder for the periodic autosave functionality.
Furthermore, Journey Builder has been extended to include Collateral as a Source. Assignment and scoping conditions for a Stage, Process and Task can be triggered using collateral data alongside the existing Entity data.
When the ‘Collateral’ value is selected from Source, and the ‘Collateral’ from the associated Field dropdown, the Operator option will be available for selection. The additional Field option in the condition will present the user with the data fields and data groups configured in the latest published versions of Policy.

Manage Deals Task:
The ability to view collateral in the main entity can be configured in the deals task. This feature can be toggled on or off using the "DISPLAY COLLATERAL IN MAIN ENTITY" toggle which will appear if the “DISPLAY MAIN ENTITY VIEW” toggle is enabled.
Once the “DISPLAY MAIN ENTITY VIEW” toggle is enabled, a policy category ("MAIN ENTITY COLLATERL TABLE CONFIGURATION”) should be selected which is used to define the columns that will appear in the collateral grid within the main entity view (in addition to the Collateral Type which will be the static first column in the grid). A maximum of 14 additional columns, can be configured and the field order in the policy category will determine the order of the columns in the grid. Furthermore, a datakey of "isAllocatedCollateral" should be configured in the policy category to determine whether the collateral is “Used” or “Unused” by the main entity in the task (the collateral will be considered to be "Used" if it is linked to a deal by the Main Entity).
Furthermore, the ability to link a collateral through the products tab in the deals task can also be configured. This feature can be enabled via the "DISPLAY COLLATERAL LINK IN PRODUCTS TAB" toggle.
Verify Collateral Task:
This is a system task that will automatically verify the collateral record (and asset, if applicable) and merge the draft with the verified record. This task must be placed after the Manage Collateral task to successfully verify it.