Reference Data
The Reference Data Editor is used to manage lists of values that can be called as lookups for dropdown fields configured in the Policy domain.
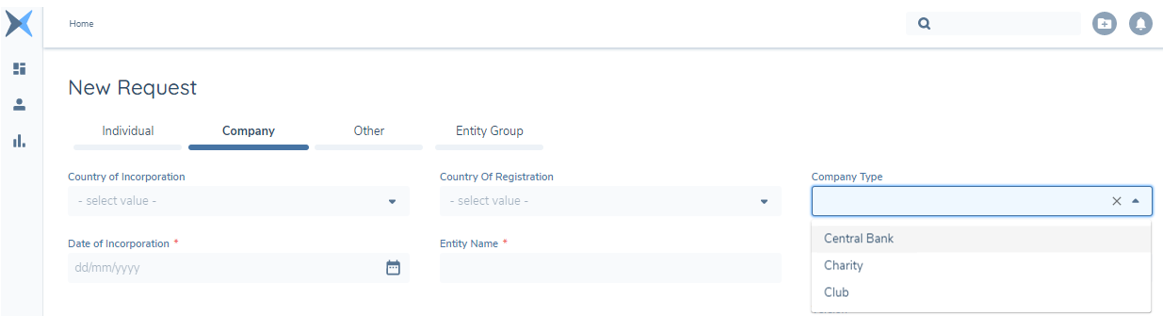
Lookups are used across the system wherever you see a single-select or multi-select dropdown. They are used for capturing client data, for example with lists such as Country, Company Type, Regulators, and NAICS, as well as for internal configuration options, such as Journey Type, Category, and Target Entity. We use System Lookups to protect certain lookups and fields from deletion, as without them the system could not function.
Note that for configuration purposes Lookup versions have a unique behaviour. Configuration from other domains is only available to in other configuration contexts when Published. Lookups are a little bit looser, in that if a published version isn’t available, the most recent Draft can be used in configuration. This is to reduce the need to publish many versions in the early stages of configuration when commonly referenced lookups are frequently updated.
Reference Data Lists
Create Reference Data Lists
Navigate to the Reference Data Lists page by clicking the Reference Data Editor button. On this page you will see a list of existing Reference Data.

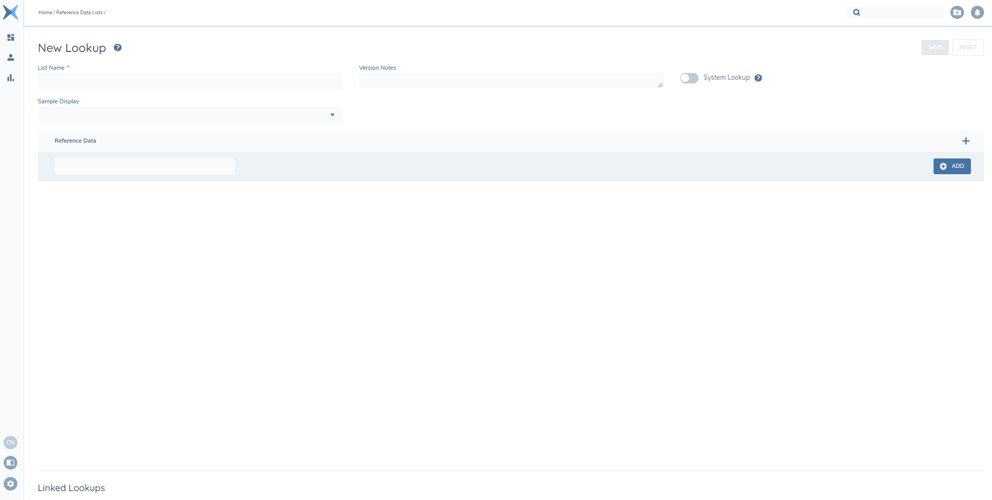
From the Reference Data List screen, click the ‘+’ icon to navigate to the Reference Data Editor screen and create a new list. Reference Data lists must be given a List Name. Once the list has been named you can begin to populate it by adding values into the Add Value field. Click the ‘+’ icon or use the enter key to add each value. Each value entered will be displayed in the Reference Data grid. The list is sorted alphabetically for each new value added. The "Sample Display" field can be used to see how the look up field would display on a task or form. To save the new list, click the Save Changes button
The System Lookup toggle is a control that prevents the deletion of a lookup. It is designed to protect certain critical lookups that the system requires to function. It can be toggled when a new lookup is created only (i.e. before the lookup is moved to Draft V1 Status upon "Save"), and cannot be updated afterwards.
Edit Reference Data Lists
Click the name of the Reference Data list you wish to edit to navigate to the Reference Data Editor screen. Please note that only draft lookups can be edited. New values can be added to the list using the Add Value field. Values can be removed from the list by using the delete icon. The Reference Data values will be displayed in the order they are listed from top-to-bottom.
To edit the order in which the set of values appears can be found, a User can click and hold the icon placed to the left of the value, and drag the value to any order as desired. To undo the custom sorting, Users can click on the reference data column title to re-sort alphabetically or reverse alphabetically.
Click the Save Changes button to save all edits to the list. The Lookup can then be Submitted for Approval and Published.
Note: A User cannot use a pipe character (|) when configuring a lookup value. This is because the | character is used within Fenergo SaaS to separate value inputs into singular entries. The Product Team will be introducing validation to prevent the use of this character when creating values in a Reference Data list, but please ensure that this character is not being used in your Reference Data list of values as it will break your configured lookup.
Delete Reference Data Lists
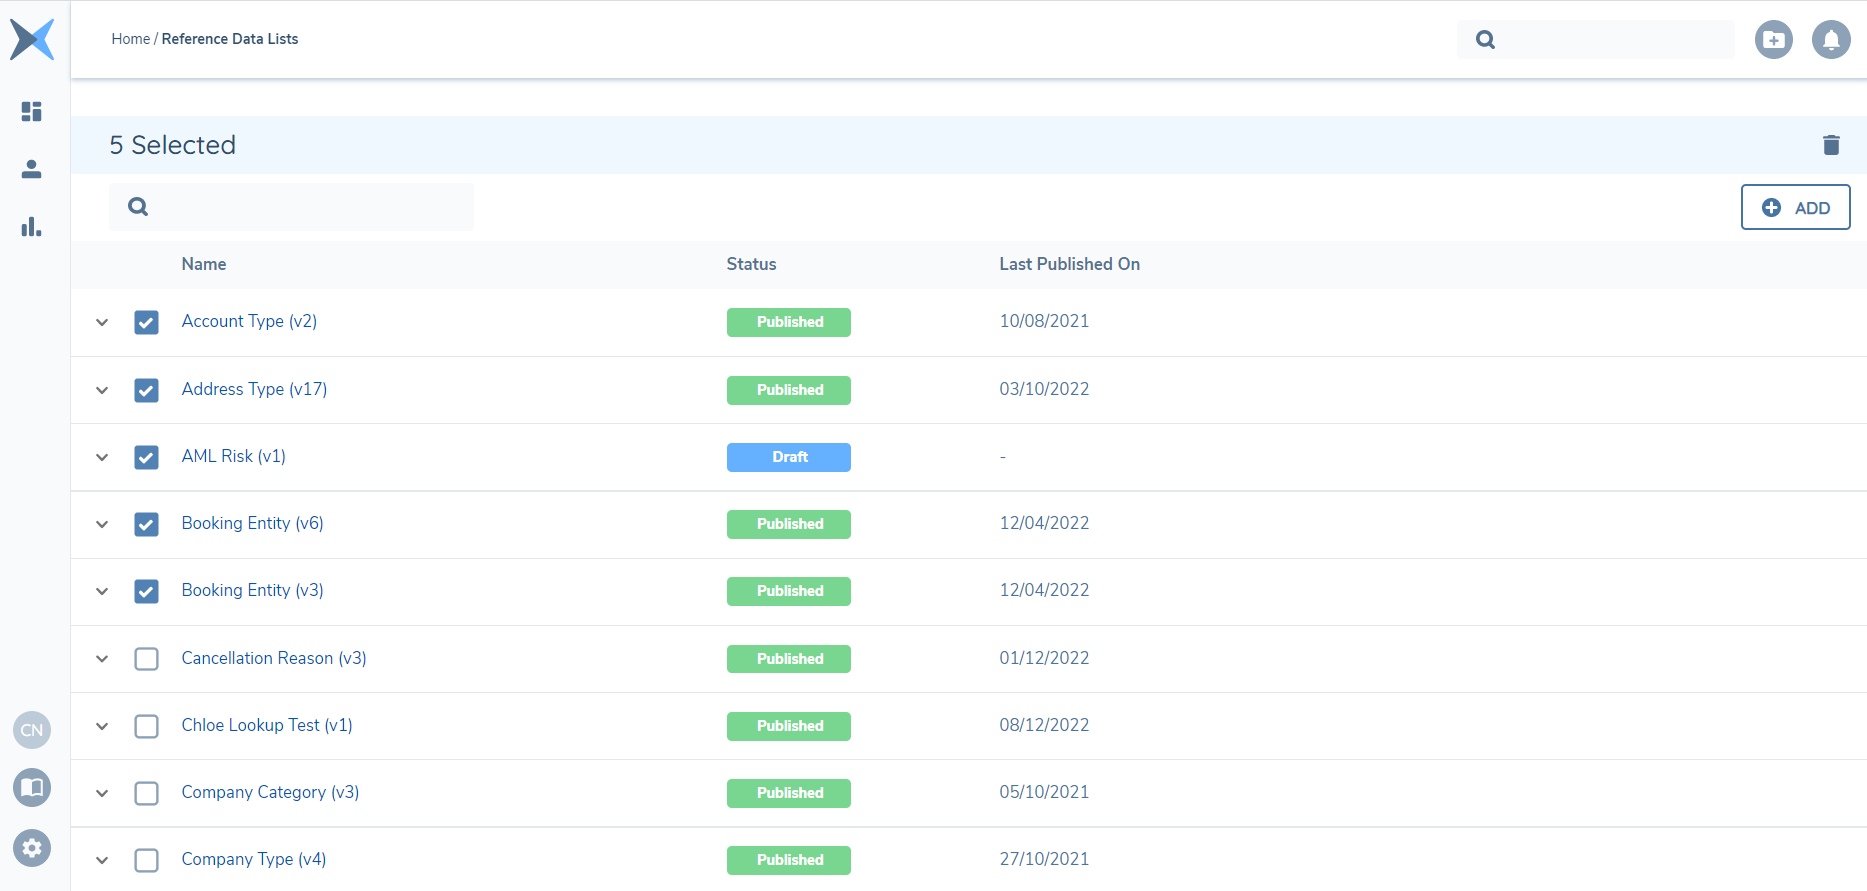
To delete a Reference Data list, navigate to the Reference Data Lists screen. Select the list(s) that are to be deleted using the checkbox. Once selected a delete icon will appear on the top right corner of the screen.
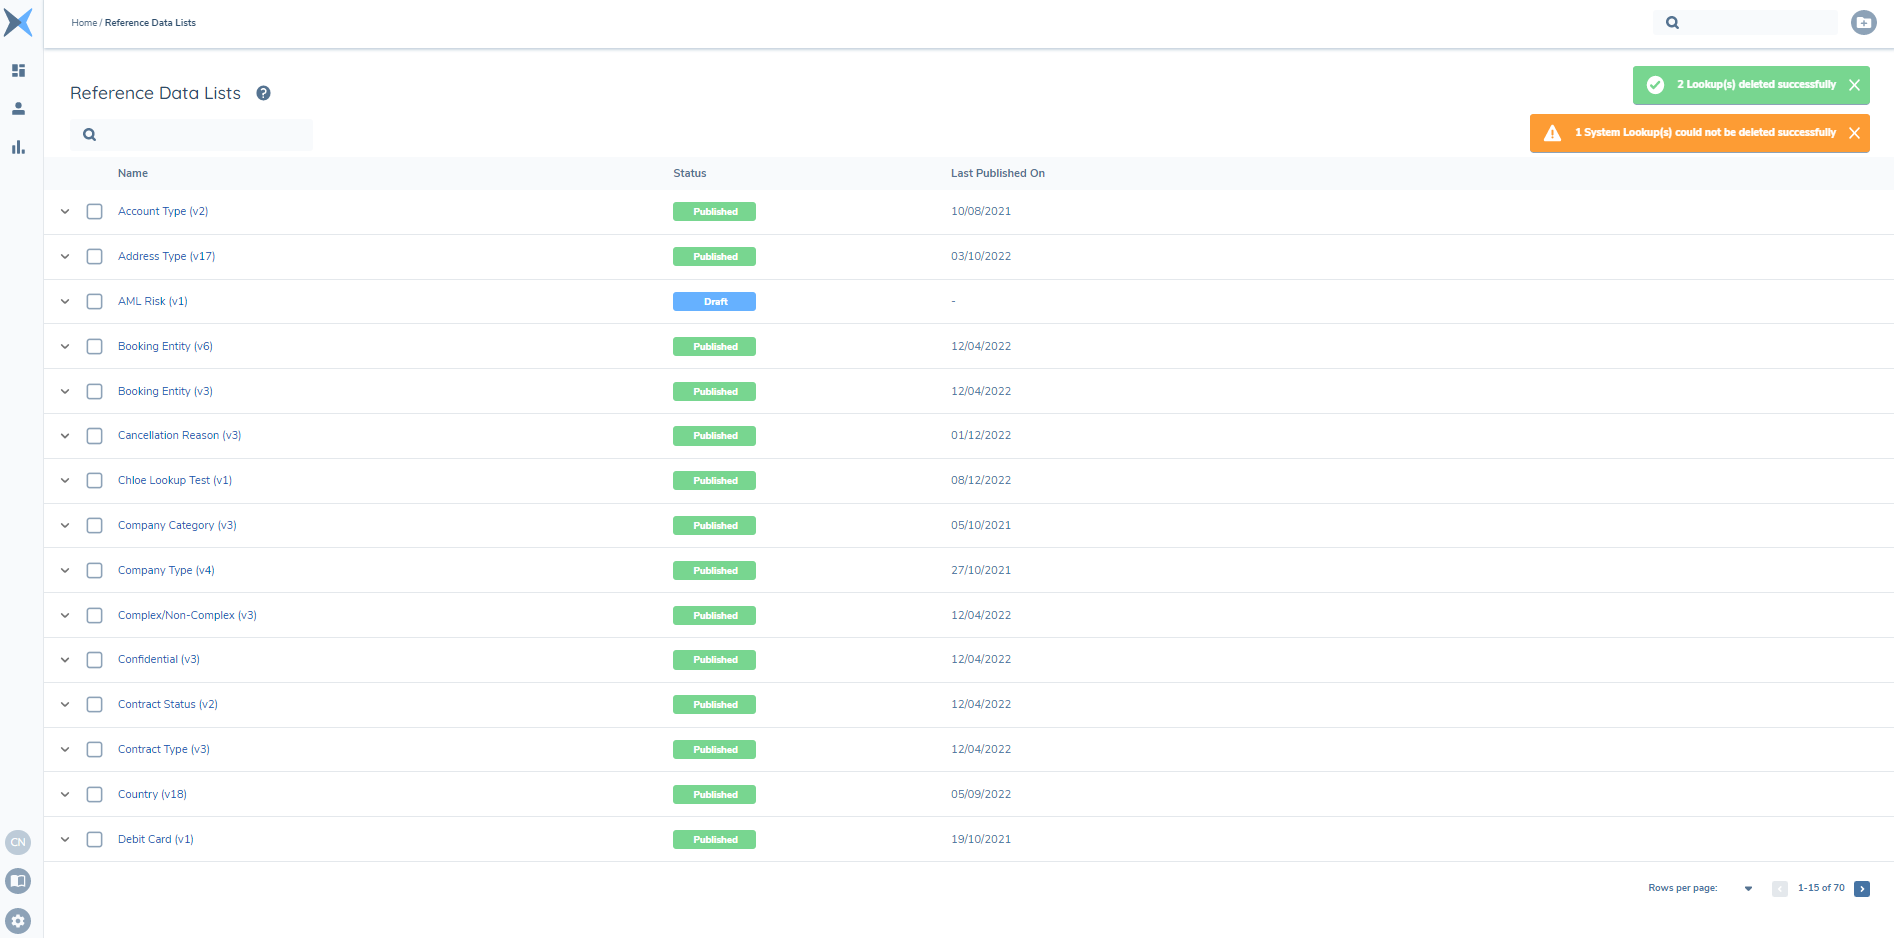
Multiple lists can be deleted at a time. Click the delete icon and confirm the action on the pop-up message to remove the Reference Data list(s). The number of lookups selected for deletion will be displayed, and the number of lookups deleted successfully will also be deleted via a green success message.
If a System Lookup is selected for deletion, a warning message will display that a System Lookup could not be deleted successfully.
Using Reference Data Lists
Reference Data lists can be applied to tasks through the Policy domain. Navigate to the Policy Requirements screen by clicking on the Policy Configuration button. Reference Data list can be used in the form of dropdown fields as part of a Policy Requirement or as part of a Data Group (see Policy User Guide).
To apply a reference data list to a Policy requirement, navigate to the target policy by selecting it from the grid. Create a data requirement with a Data Field Type of either ‘Select Dropdown’ or ‘Multiple Select Dropdown’. The Lookup field must now be populated. Scroll through the lookup names and select a value.

Complete the other mandatory fields and save the data requirement.
The dropdown field will display on the assigned task screen that will show the list of values that were created in the reference data editor.
Journey Behaviour
In most live tenants (i.e. client prod tenants that have 'gone live'), Journey Tasks that use Reference Data (lookups and lookup links) will always receive the latest version available.
In tenants that use the Journey-Configuration Baselines feature (currently all non-live tenants and any live tenants where clients have requested to turn this feature on), Reference Data versions that are available at Journey Launch will be consistently used throughout the journey. In progress journeys using a baseline reference will be unaffected by new publish or archive events for Lookup Lists and Lookup Links. Note: when the feature is turned on, it will only apply to new journeys going forward - existing in-flight journeys will continue to reference the latest reference data versions available.
The Journey Configuration Baselines feature tracks a baseline of active lookup list and lookup link versions. When an event changes the active version of a lookup list or lookup link (Publish new active version or Archive current active version), the system will capture all current lookup and lookup link versions in the latest baseline reference. The baseline reference is captured as point-in-time reference at journey launch and used as a constant source for Lookup List and Lookup Link versions throughout. This prevents some issues that can arise when a value is added or removed from a lookup that may have adverse affects on in-flight journeys. Many clients prefer to always have the latest version available, so this feature is only turned in in live tenants by explicit client request.
Masking the valueID property in the API for Lookup Values
We have implemented a feature that masks the ‘valueID’ property in the API for Lookup values. This enhancement aims to strengthen the protection of Personally Identifiable Information (PII) by preventing users from accessing sensitive Lookup values in the API.
The main purpose of masking the ‘valueID’ property is to mitigate the risk of unauthorised access to sensitive data. This is particularly important when dealing with Lookup values marked as Sensitive Data. By implementing this feature, we ensure that users without PII access will be unable to retrieve sensitive information through the API.
This feature has been seamlessly integrated to our Fenergo SaaS system, automatically managing this enhancement when processing Lookup values marked as Sensitive Data.
Adding metadata to Reference Data Lists
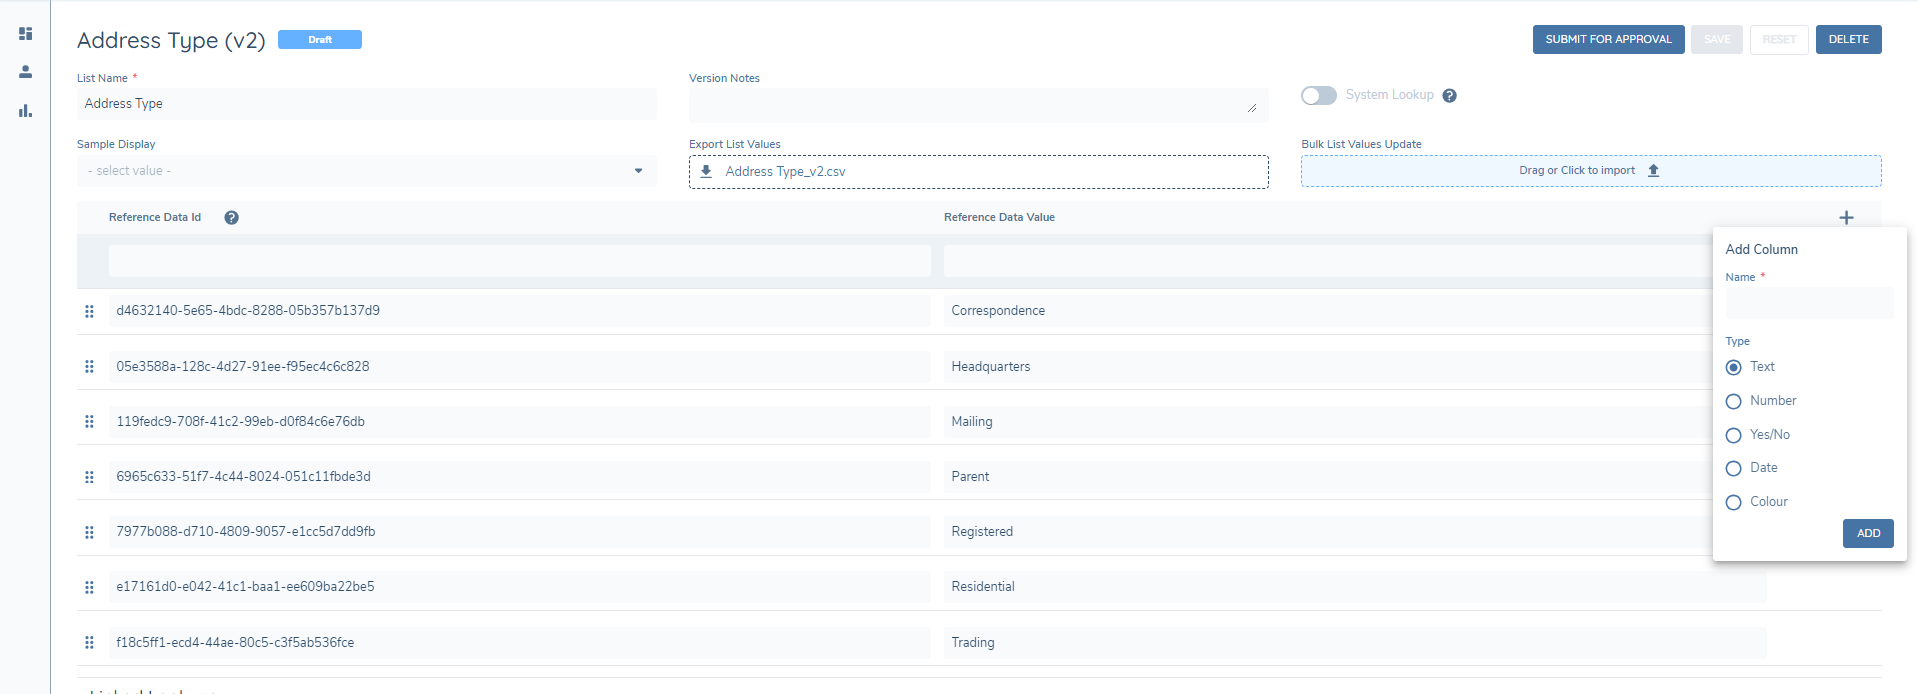
Metadata can now be added to Reference data, this allows users to add context to reference data material. Up to three columns of data can be added per reference table. The format of these columns can be:
- Text – to a maximum of 1000 characters
- Number – to a maximum of 15 digits
- Binary – Yes/No
- Date – standard date format dd/mm/yyyy
- Colour
Once the reference data list is in draft mode, clicking on “+” in the title row will trigger a pop up, to allows users to define the type of column they want to add. Each cell can be populated by clicking into it and adding the relevant data.
The reference data metadata values are currently available in our APIs but further work is required to integrate these values system wide so that they can be used in the logic engine/risk calculations etc.
Adding Colour to a Reference Data value
In the Reference Editor, users can configure a select dropdown to display as a chip within a datagroup grid. To achieve this, users first define the reference data values and then add an additional column named ‘Colour’.
Once the 'Colour' column is added, the Colour Picker tool becomes available, allowing users to select the desired colour for each reference value.
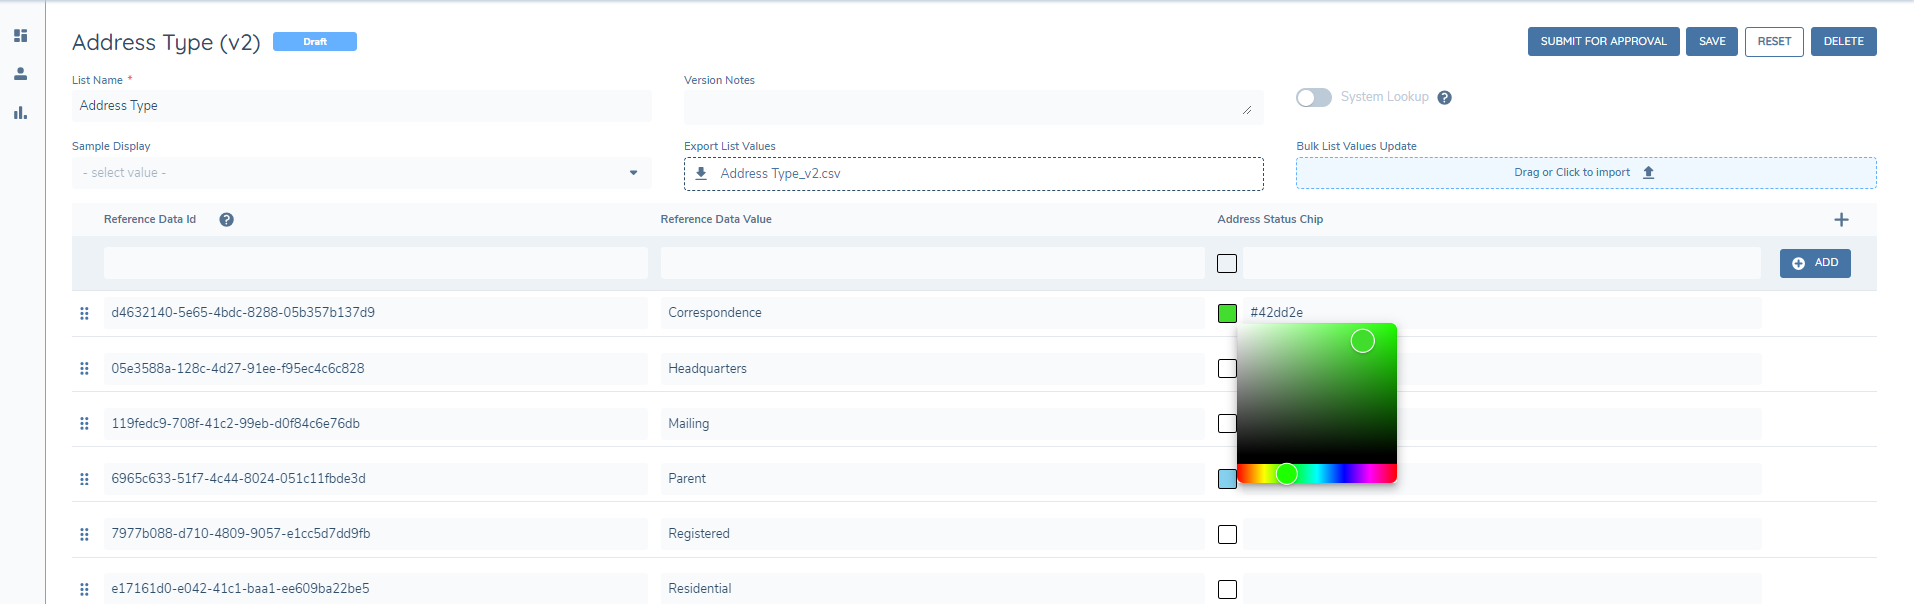
After a colour is selected, users can see the colour and the corresponding RGB (Red, Green, Blue) number. When this select dropdown is configured against a data requirement in a datagroup, it will display as a chip enhancing data readability and organisation.
Note: This is only available for select dropdowns and only enabled on Datagroup grids
Linked Lookups
Linked Lookups allow one list to be filtered down based on the values selected in another list. This is very-common, and is used to refine the options when a User has selected Product Category > Product Type, or Company Type > Company Category for example.
There are a few areas that we configure this in, but broadly it is two things:
- We configure the links between the values lookups
- We use those linked lookups in requirements and tell it which fields to link
We can use those two simple structures to link lookups, and to chain that to as many levels of granularity as desired.
Defining Linked Lookup Fields in Policy
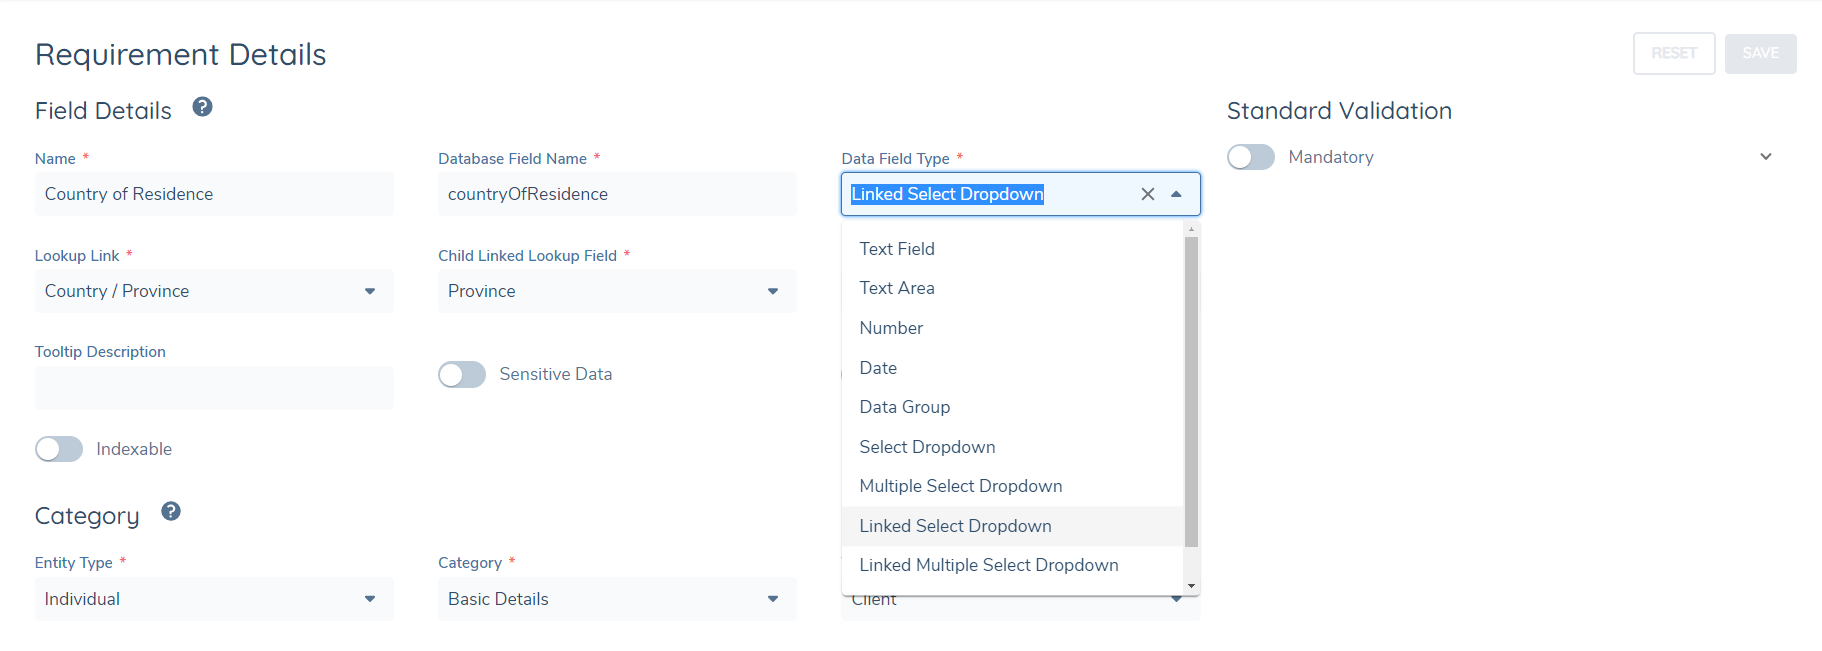
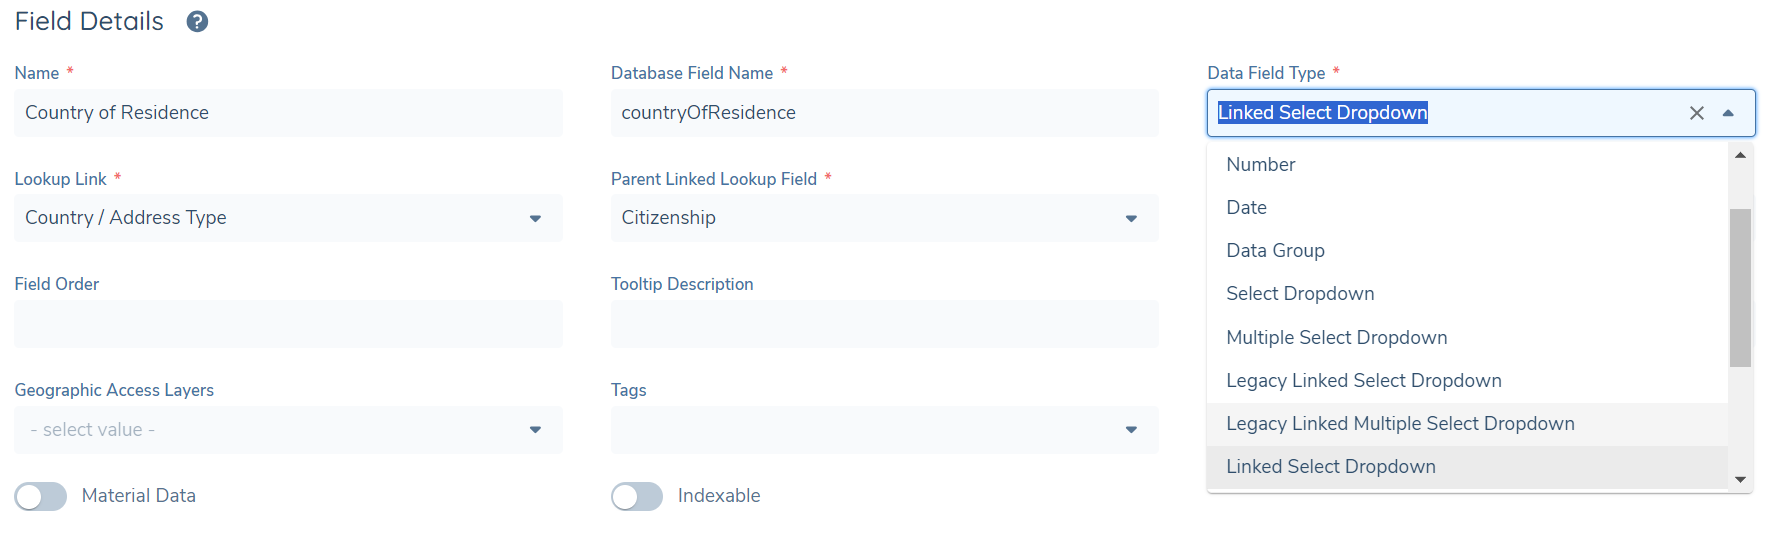
To make use of a created Linked Lookup, users must navigate to the Policy Domain or the Product Domain and either create a new field or update an existing field with the new Linked Lookup they wish to use. Linked Lookups are supported across Policy Categories within the same Policy. This means that configurators can define a Parent field in a category such as Basic Details and link it to a Child field in a category such as Enrich Details. To utilise a Linked Lookup, users must navigate to the Data Field Type option in the Requirement Details screen in Policy and select either of the two Linked Lookup options available:
- Linked Select Dropdown: Allows users to select one option in a dropdown list
- Linked Multiple Select Dropdown: Allows users to select multiple options in a dropdown list
In the example below, we are adding a Linked Lookup between a ‘Region’ field and a ‘Country’ field where, based on the selection of Region in a Journey, users will be presented with a limited set of Countries associated with that Region:
Once the Linked Lookup has been created between the Parent List and Child Lists, any fields that have the Child List defined will be presented in the Child Linked Lookup field.
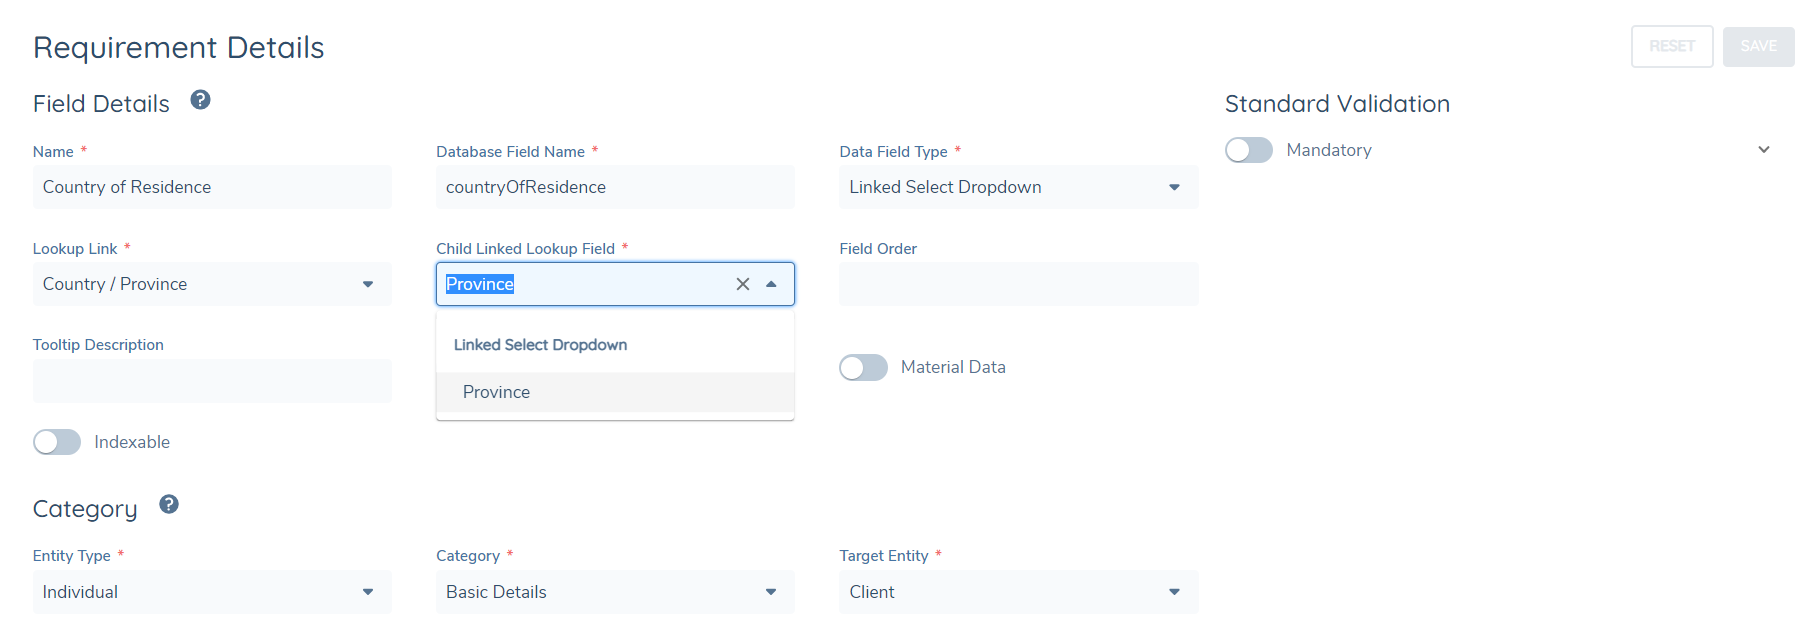
Users must specify which Child Field should be influenced by the field that we are changing to a Link Lookup in the dropdown. Then, based on the selection of the Parent field, the values in the Child field will be filtered in line with what users have configured in the Linked Lookup.
Multiple Children in Linked Lookups
Currently in Fenergo, when using Linked Lookup fields in Policy or in Product, users are required to configure a 'Parent' field and link it to a 'Child' field. This particular set of config creates a limiting 1:1 relationship between Parent and Child.
In order to improve flexibility and accommodate 1:many relationships, we have introduced new versions of the Select Link and Multiple Select Link fields. This update shifts the configuration approach from the Parent field to the Child field, allowing multiple Children fields to be associated with a single Parent field.
To maintain compatibility, the existing Linked Lookup fields remain, now labelled with a 'Legacy' prefix. Additionally, users can choose from the new field types, Linked Select Dropdown and Linked Multiple Select Dropdown, alongside the Legacy options when configuring Policy fields. This ensures that existing field configurations persist without intervention, while allowing configurators to leverage this enhanced functionality for more flexible Linked Lookups in Policy Requirements.
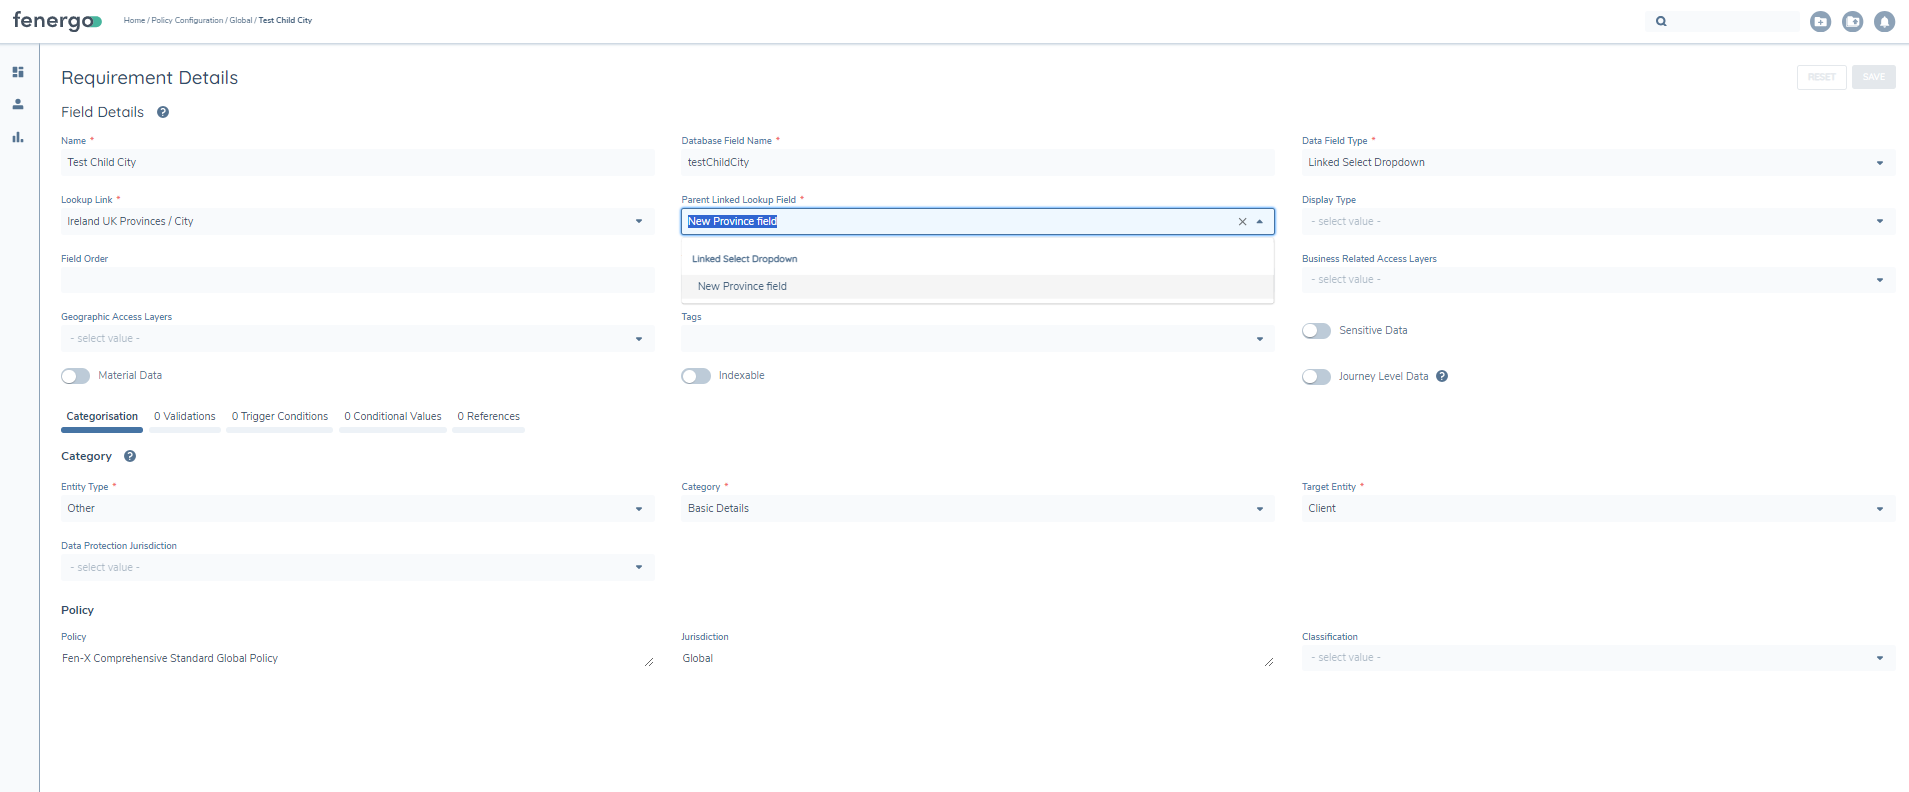
Creating multi-level Linked Lookup fields
Users may require multiple levels of Linked Lookup fields where the selection of a value in one field, drives the available options in the next field, and the selection of this field allows additional filtering in more fields. The purpose behind this is to create guard-rails for users in how they capture data. In other words, users can select from a pre-defined list based on selection of previous fields, promoting greater levels of data integrity in line with a client's business processes.
To configure multi-level Linked Lookup fields, users will follow the existing process of ensuring that all relevant Linked Lookups are created in the Reference Data Editor before creating or updating the required fields. Previously, users were only able to select Parent Linked fields that had a dropdown of Select Dropdown or Multiple Select Dropdown. However, this has now been updated to also include Linked Lookup fields, allowing users to create cascading data flows across multiple fields.
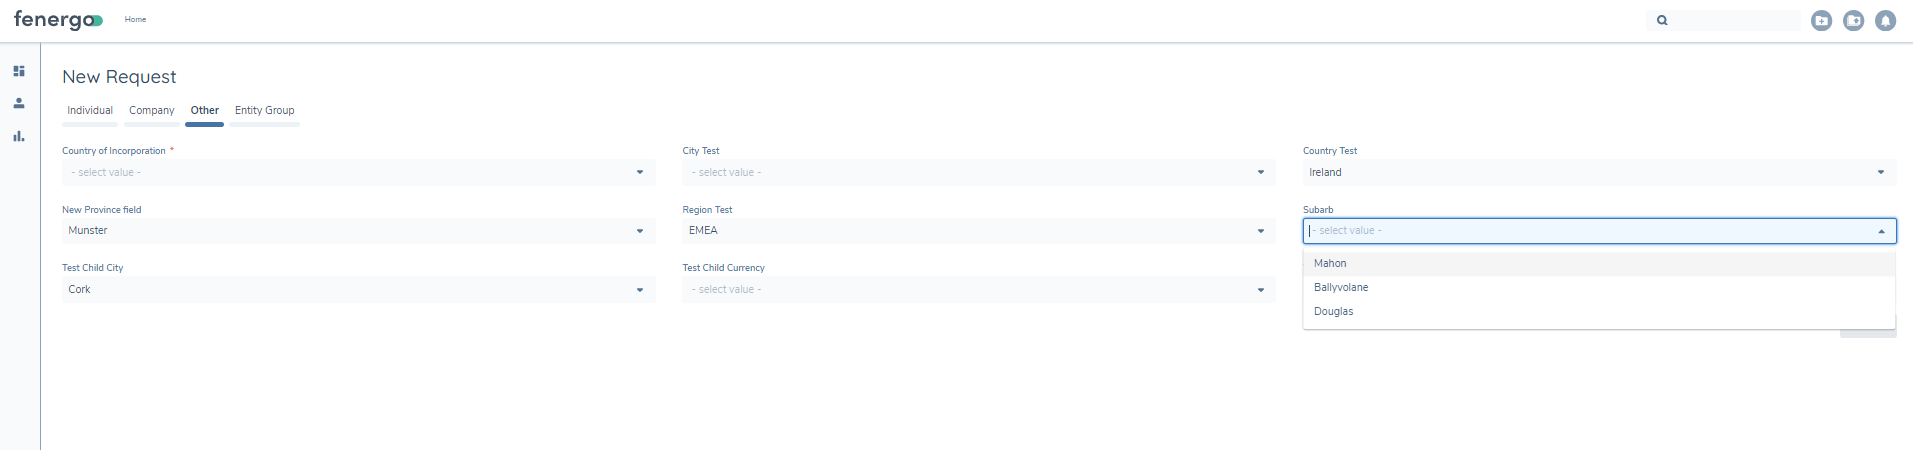
Leveraging Linked Lookups in Data Capture Tasks
Once the fields have been updated or created and the Linked Lookups defined, users will then be able to utilise them in any Data Capture task.
Importing Linked Lookups using Configuration Exchange
To import already created Linked Lookups, configurators will need to navigate to Configuration Exchange domain and select which Linked Lookups they wish to import:
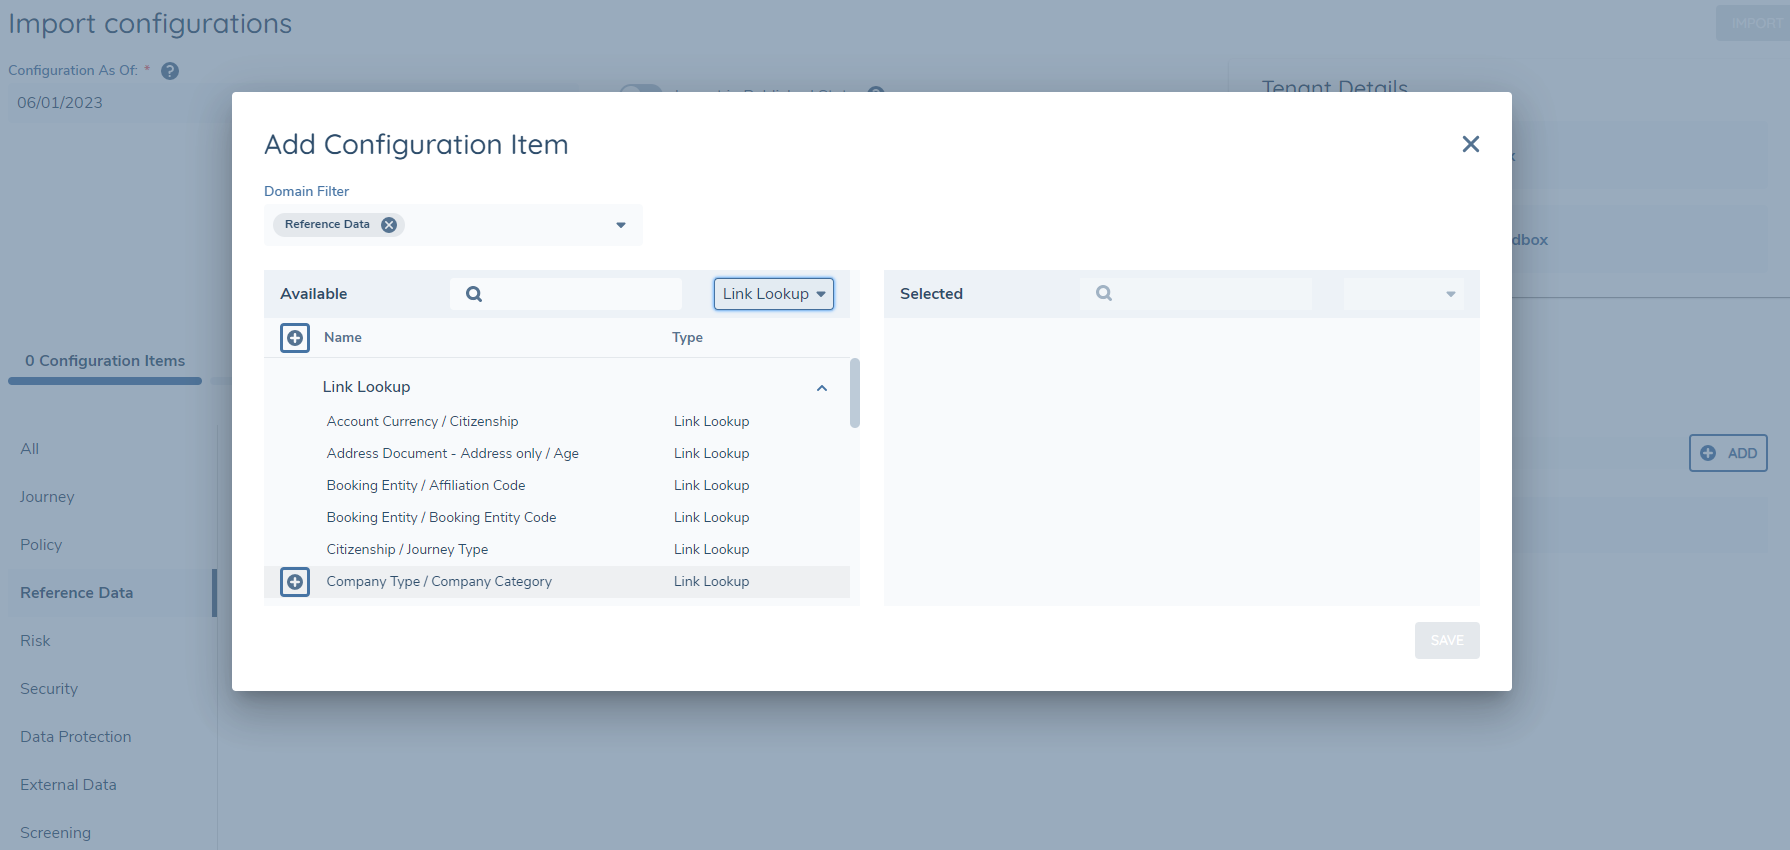
Once happy with their selection, configurators will then Import.
Lookup IDs
A lookup ID property has been introduced in Reference Data Domain which will tie each value in a lookup to a unique ID. When we create a new lookup value, a unique GUID is created for this value. However, users have the option of including their own IDs if preferred. The purpose for introducing Lookup ID is to ensure that we always have a consistent value for a lookup entry. Currently, in Fenergo SaaS, when users change lookup values in a lookup table, we break any associated conditions that use this particular lookup. By introducing the ID property, we can ensure a more robust process and prevent any breakages of conditions if we change an associated lookup string value.
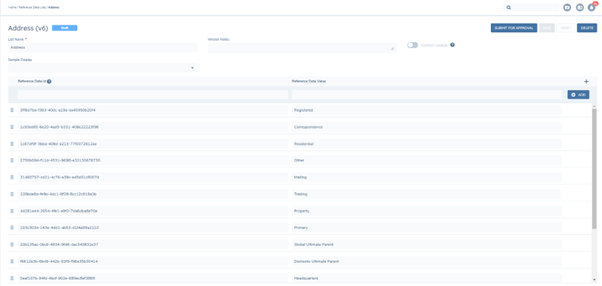
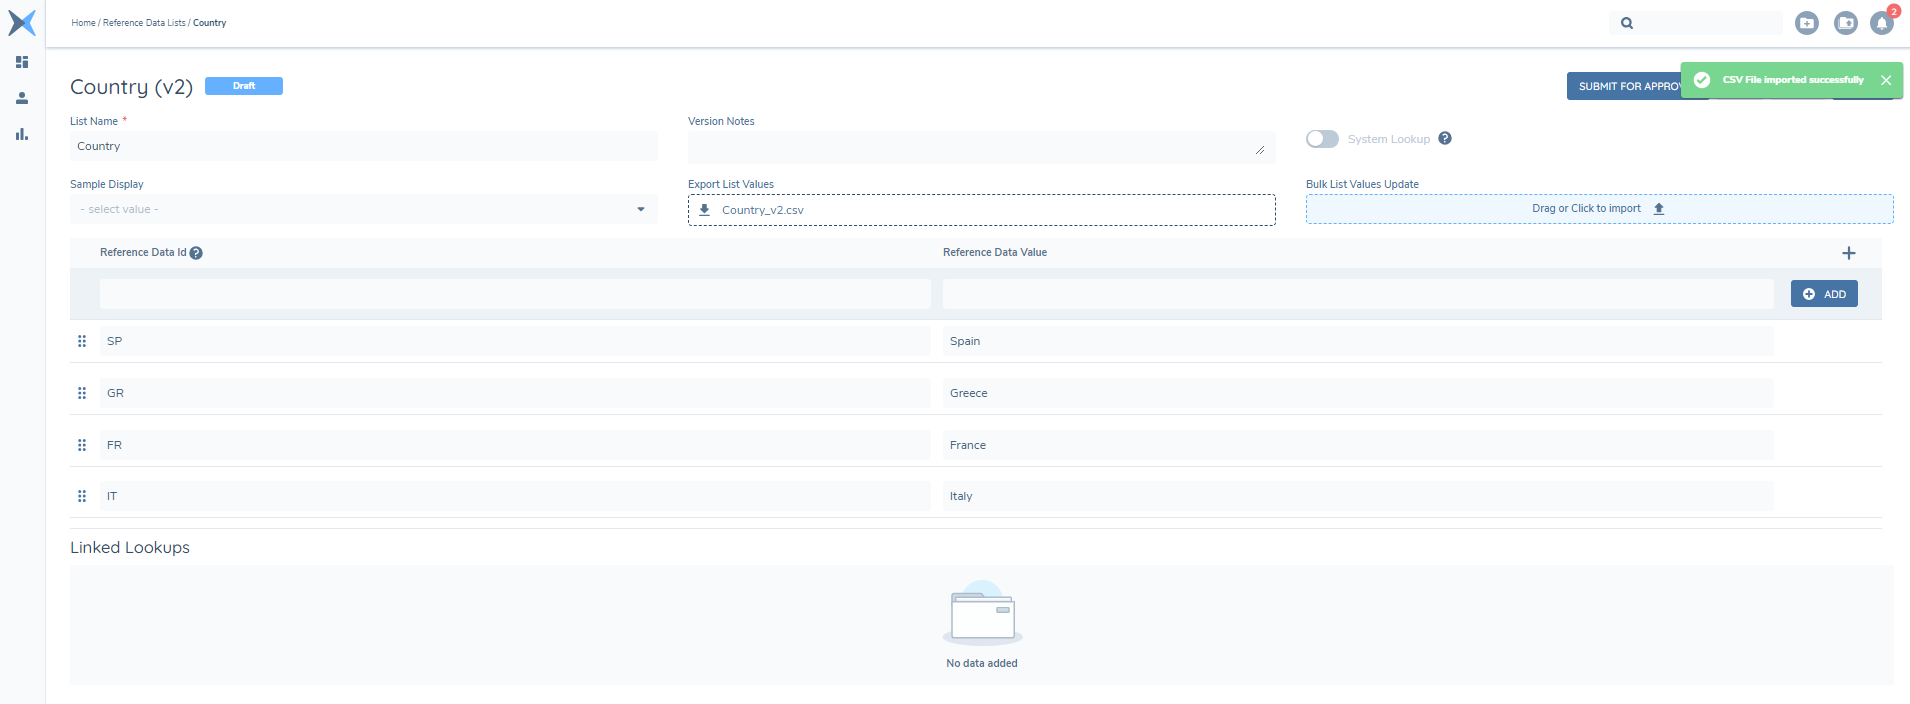
When in the Reference Data Domain, navigate to a chosen Lookup / create a new Lookup. This will take the user to the Reference Data Lists screen which will allow them to either add a new lookup value / edit an existing lookup value in the Lookup table. Within this table, users will now notice a ‘Reference Data ID’ column with an associated tooltip on the label stating: “Reference Data ID is not required. If not value is provided, a default unique identifier will be provided upon saving”.
As part of this change, users will be able to add in multiple columns along side their Lookup IDs and Lookup values. This will give clients the ability to tag as much metadata as possible to their specific Lookups and associated values.
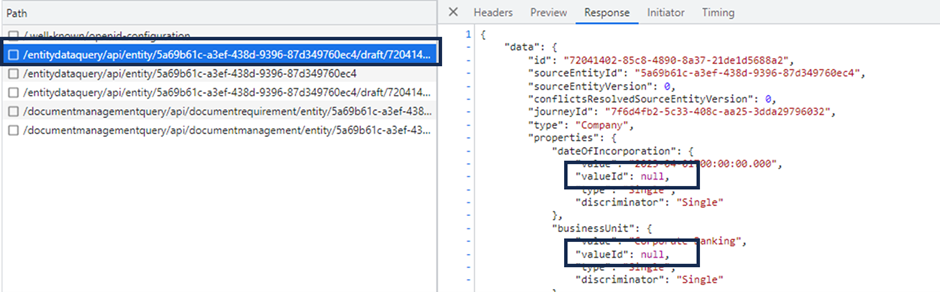
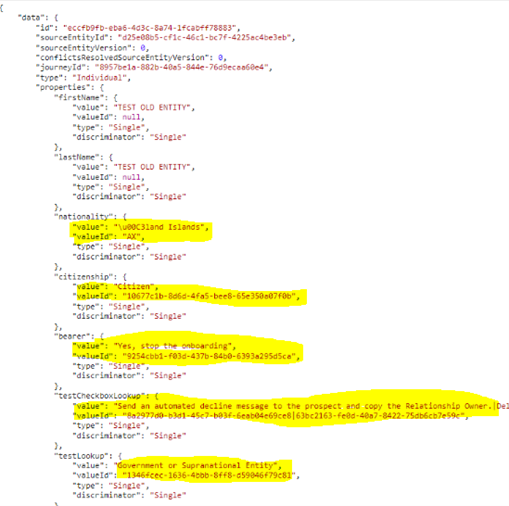
Seeing Lookup Ids in Journeys
When in Journeys, users will be able to see associated Lookup value IDs by checking the Entity Data Query endpoint. Within the endpoint response, the property ‘ValueId’ has been introduced which will link back to the ID input when configuring the Lookup.
Important Notes:
- As part of the Lookup ID functionality, when Lookup IDs are applied against Lookup values, these changes will be reflected against in flight Journeys when the Entity has its draft saved (either on Save / Complete or via Entity Data Command endpoint).
- We do not plan to show the Lookup IDs on the front end in Journeys but they will be shown in Configuration modules such as Lookup tables and in Scoping Conditions.
Managing Conditions reliant on changed Lookup Values
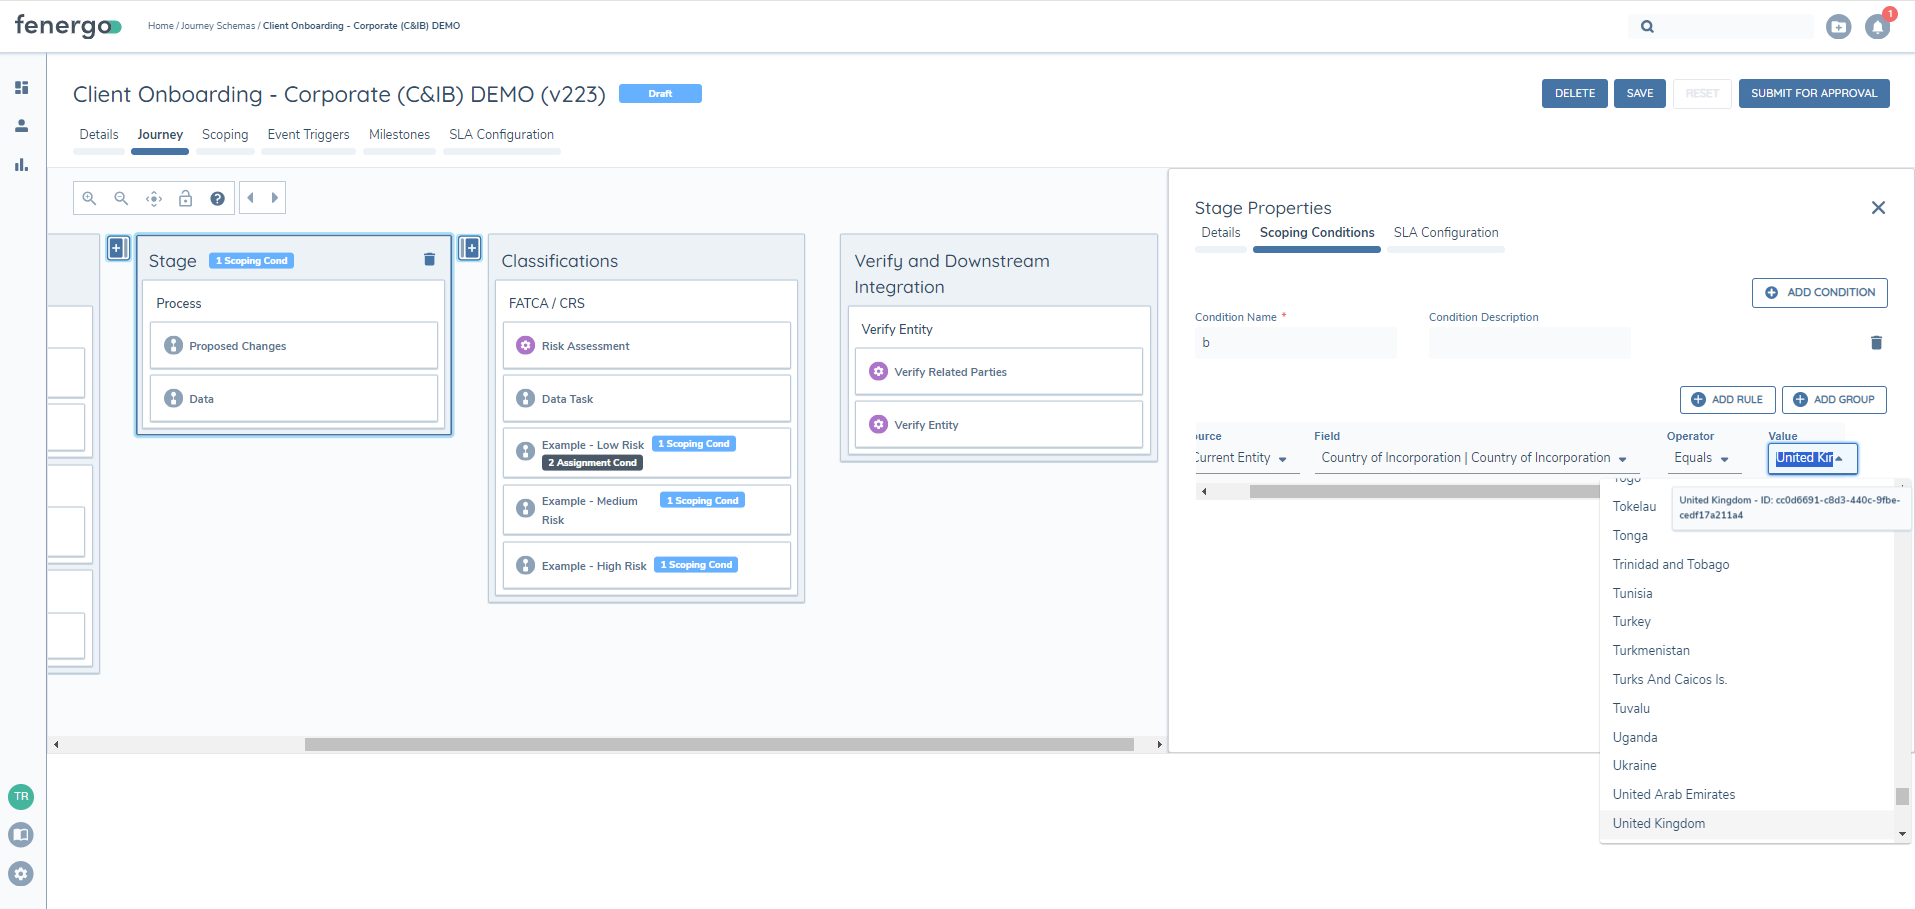
The ability to keep conditions consistent following lookup value changes has now been deployed to Production. Previously, when making changes in Reference Data Editor Domain, users had to be mindful of those values acting as drivers of conditions in other domains like Journey and Policy. If a user had a value in a field acting as a condition in another domain and the user changed this value in the Lookup, the condition would not trigger as the system could not find the specific string value included as part of the condition. With recent Lookup ID changes however, users can now prevent this from happening by enabling Lookup IDs in their Lookup and then ensuring that their Journey items (Journeys, Stages, Processes, Tasks) or Policy items (Requirements) have taken in the latest versions of the Published Lookups which include the Lookup IDs. This means, that when a user wants to make a change in Reference Data, say for example 'Ireland' to 'Republic of Ireland', they need to ensure that wherever this value acts as a driver for conditionality (i.e. whereveer there is a field used as a condition that has this value) must be using the latest version of the Lookup with its configured Lookup ID. Users will be able to see if the Lookup IDs are applied to their Lookup values in their conditions based on the hover-over tooltip that is available over every Lookup value (see below for more):
Downloading & Uploading CSV files of Lookup Lists
The downloading and uploading of CSV files for Lookup lists capabilities offer many benefits to the Fenergo SaaS user. Having the ability to download a lookup list allows the user to effortlessly export the entire lookup, streamlining the process of analysis and reporting. The upload feature allows users to efficiently update or add large sets of data to a Lookup list by uploading their CSV file. In turn, this saves time as we reduce the need for manual data entry.
Both functionalities are accessible from the Reference Data Lists screen and within each individual Lookup. As we navigate to a specific Lookup, there are a couple of aspects to note straight away.
Firstly, to avail of both functionalities, the Lookup must exist. Secondly, the Reference Data ID column and the Reference Data Value column must have at least one value populated in each. This is due to the current behaviour of Lookups whereby both columns must have at least one value populated in order to save the Lookup overall.
Downloading a CSV file of a Lookup list
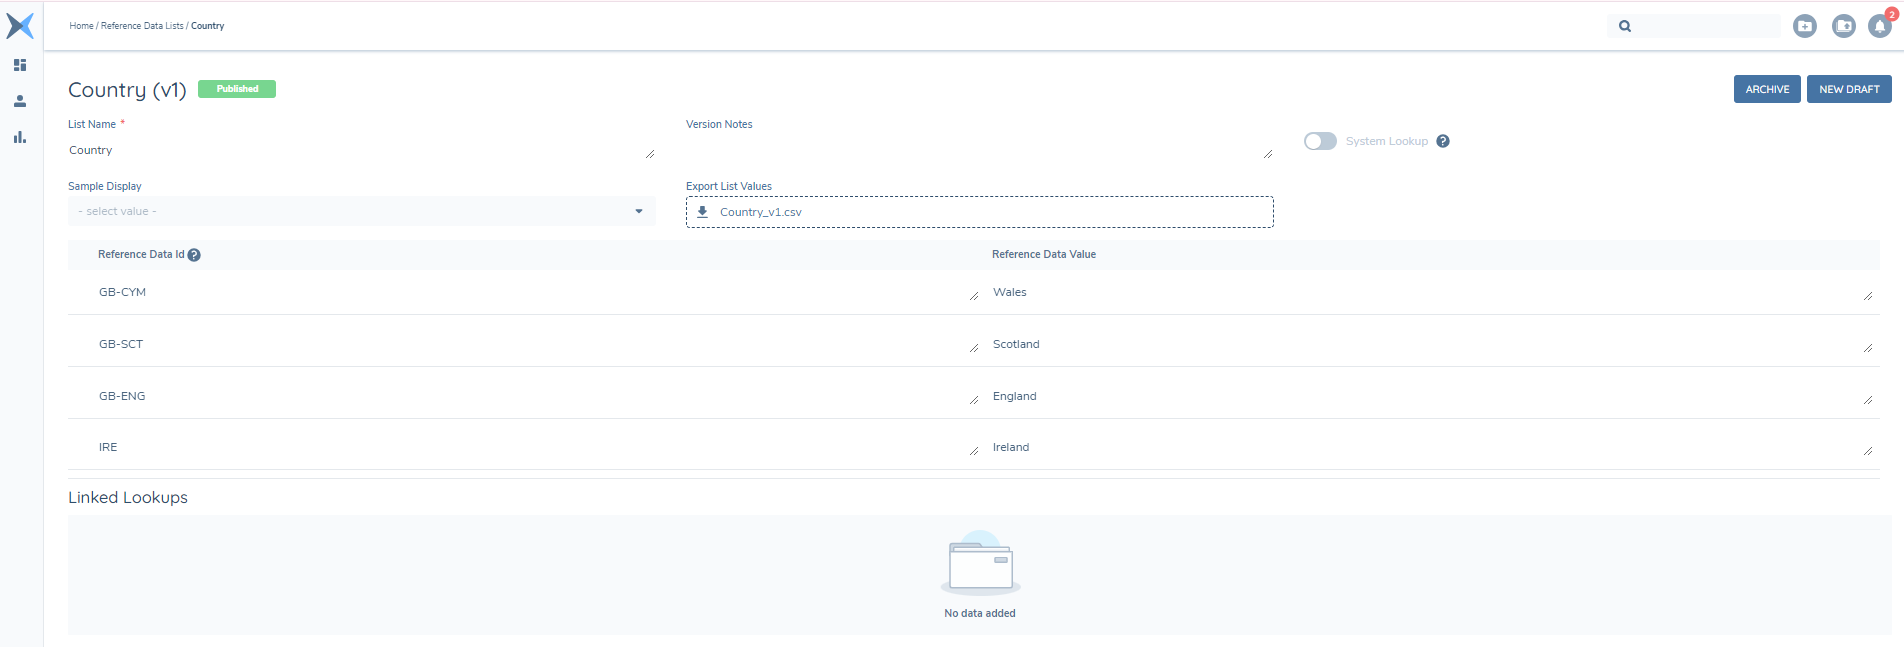
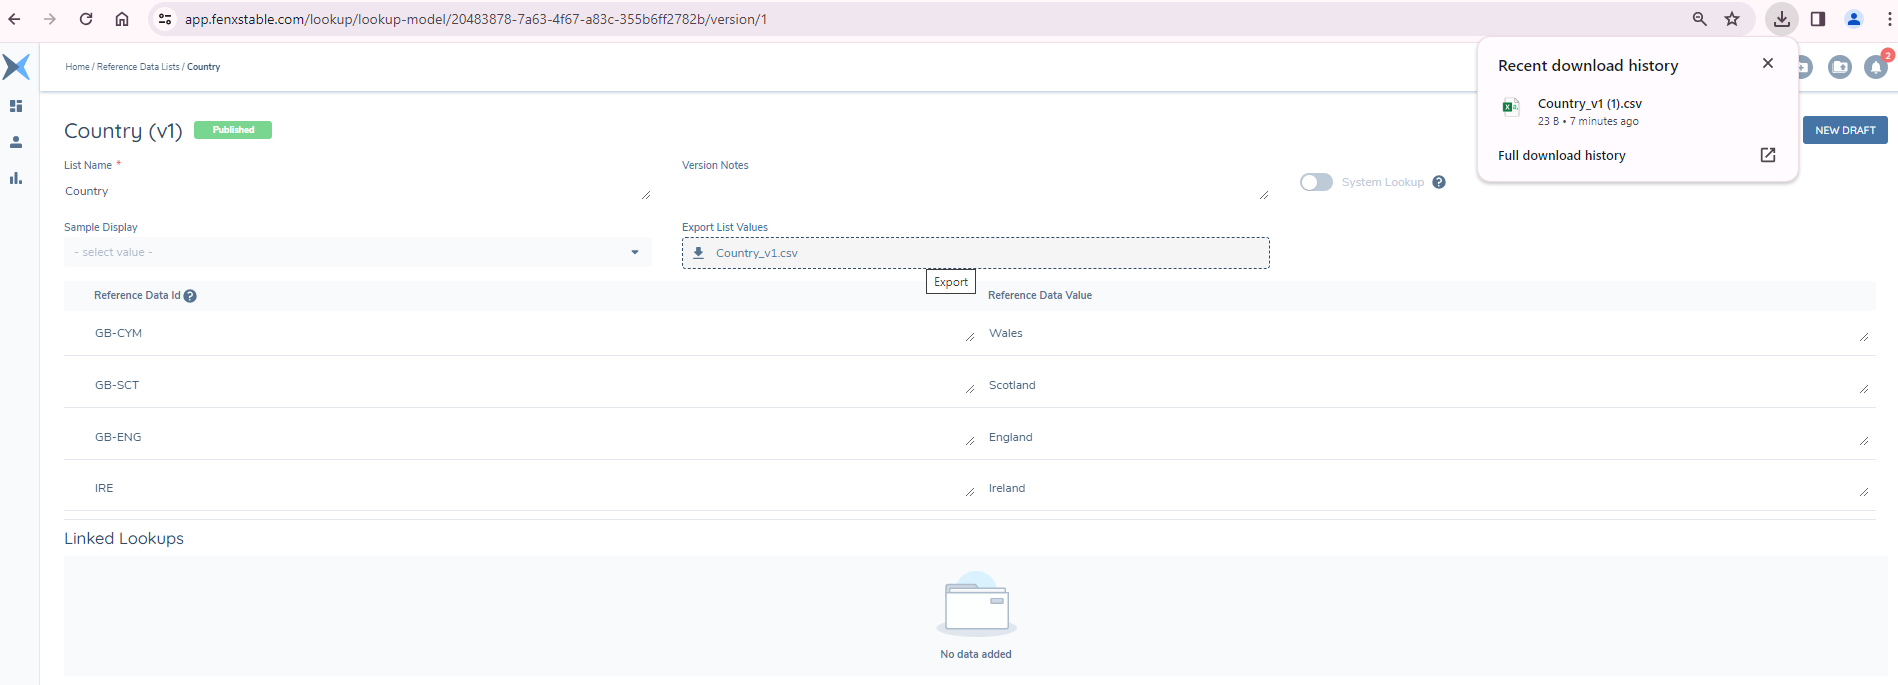
In the case of our 'Country' Lookup example, the published version of the Lookup provides the ability to download it. This is because you can download a Lookup list regardless of it’s status. This functionality extends across all Lookup statuses, be it Draft, Published, awaiting Approval, or Archived-irrespective of the status, you retain the capability to download the Lookup list.
Upon selecting the download option, a CSV file containing all columns and their corresponding values will be generated and downloaded to your device.
Uploading a CSV file of a Lookup List
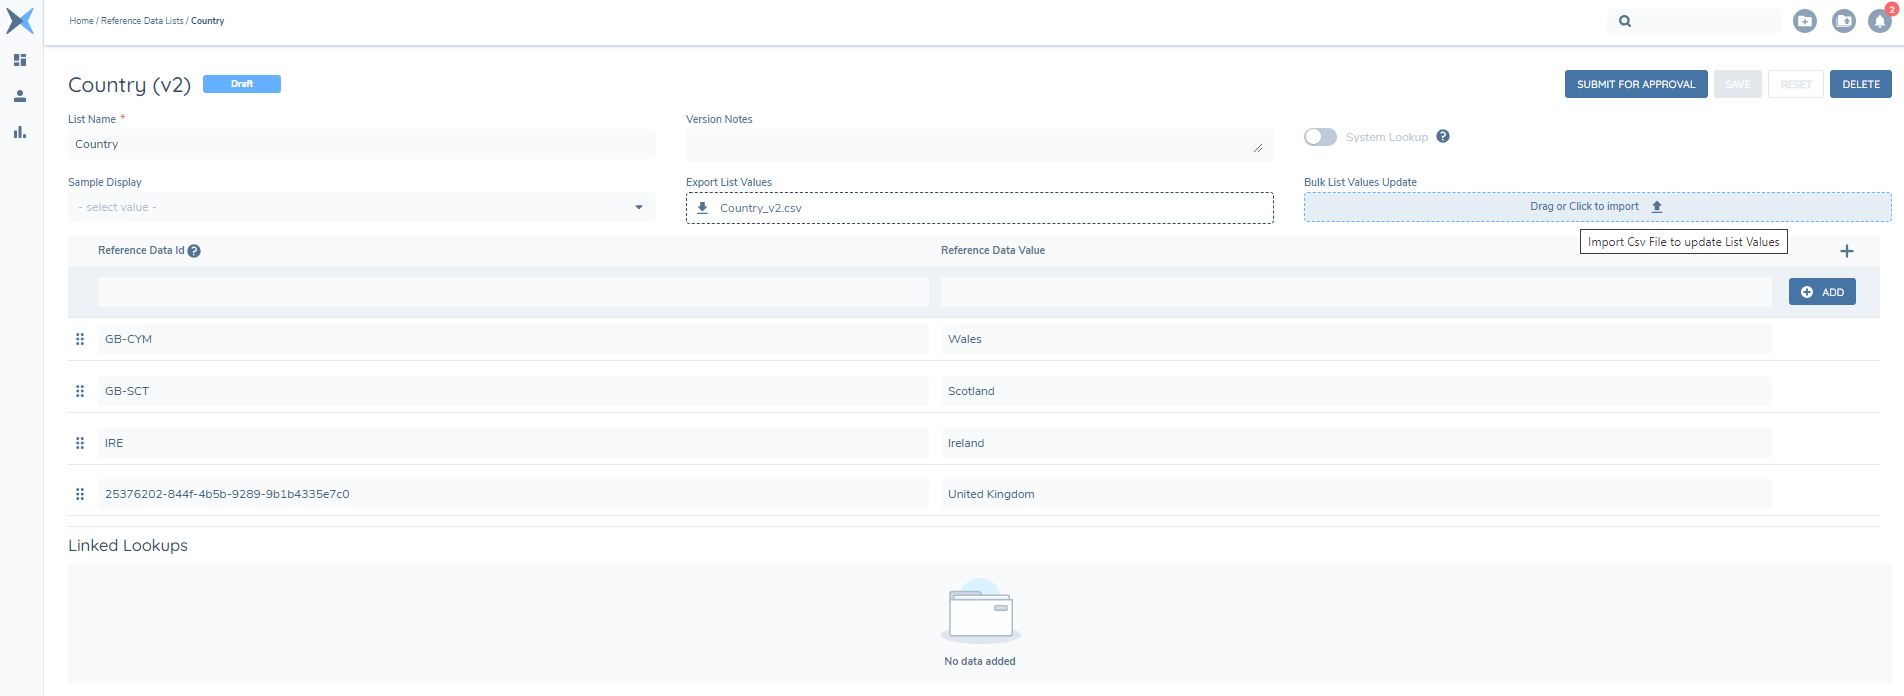
Uploading a CSV file involves a slightly different process than downloading. CSV file uploads are supported exclusively for Draft versions of Lookups. Therefore, you'll need to create a new Draft version of your Lookup in order to access the upload option.
Once a Draft is created, you will then have the ability to either drag and drop your file or else click on the Upload area to browse and upload your chosen file.
To ensure a successful upload, there are some important aspects to note:
- The file must be in CSV format.
- Both the Reference Data ID column and the Reference Data Value column are mandatory. Ensure that the Reference Data Value column in your CSV file is populated. Regarding the Reference Data ID column, you have the option to either populate it with your own IDs or leave it blank, allowing the system to automatically generate an ID upon file upload.
- Column headers must match exactly between the specified headers in the Fenergo SaaS Lookup and those in your CSV file.
- The data you upload must align with the chosen type for each column. For instance, if you designate a column as a date type, ensure that all data in your file's date column conforms to the date format. This rule applies to text, number, and yes or no types as well.
Important Note: When uploading a CSV file with a Date column, please be aware that the Fenergo SaaS system exclusively accepts dates in the 'yyyy-mm-dd' format. Follow these steps to ensure the Date column is correctly formatted in Microsoft Excel:
- Highlight all dates in the column.
- Press ctrl + 1.
- Navigate to the Number tab and choose the 'Date' category.
- Opt for the yyyy-mm-dd option.
Failure to take consider any of these aspects during the file upload process will result in an unsuccessful upload.
After a successful upload of the CSV file, the previously existing data in your Lookup list is replaced entirely by the newly uploaded data.
Downloading & Uploading CSV files of Linked Lookup Lists
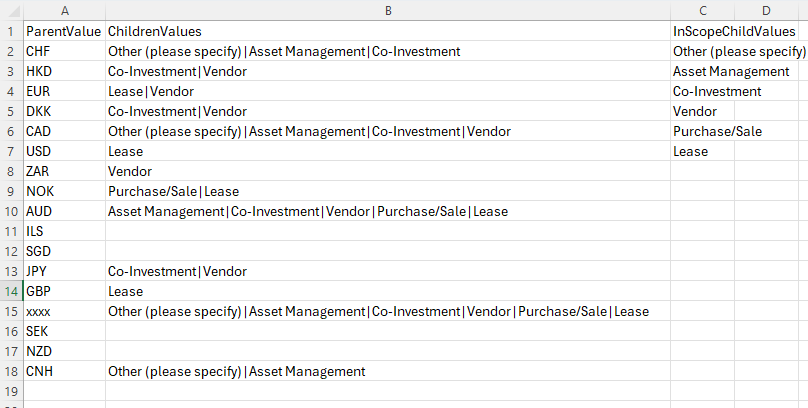
Downloading & Uploading of Linked Lookups follows a similar process as managing Lookup Lists. The key difference is the within the Linked Lookup CSV file, users will be able to create and edit existing Links based on the downloaded version of the Linked Lookup.
Dealing with multiple values within Linked Lookup file
When linking more than one child value to a parent value in a Linked Lookup file, users must remember to separate each value with a '|' value (e.g. Lease|Vendor ). There is no spacing between the values.
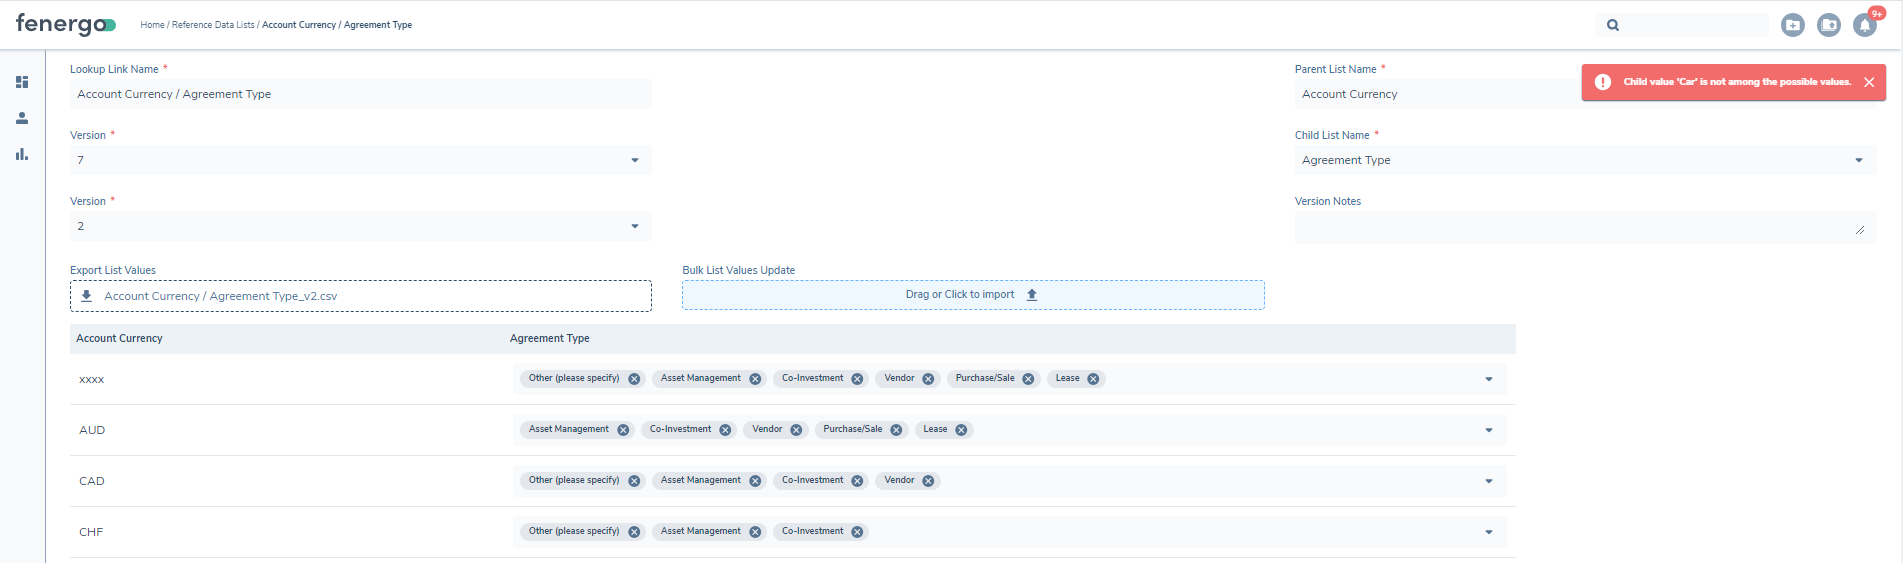
Validating Lookup Values in Linked Lookup Import
As part of the import process, the system will assess what values are acceptable based on the configured Child Lookup table. If users include values that are not in this configured list, the file import will fail with a pop-up notification, informing the user which value caused the import to fail:
Permissions
There are no additional permissions required to avail of these functions. With the current "Reference Data Editor Access," you can access both the download and upload functionalities for CSV files.
Configuring Reference Data
Lookup Links Configuration
Lookup Links are the connecting entity between the values in a lookup. This component lets us take two published lookups and create the links between the values. This is what the system looks to when deciding what to filter out of the lists. It is versioned like most other config.
Linked Lookup Editor
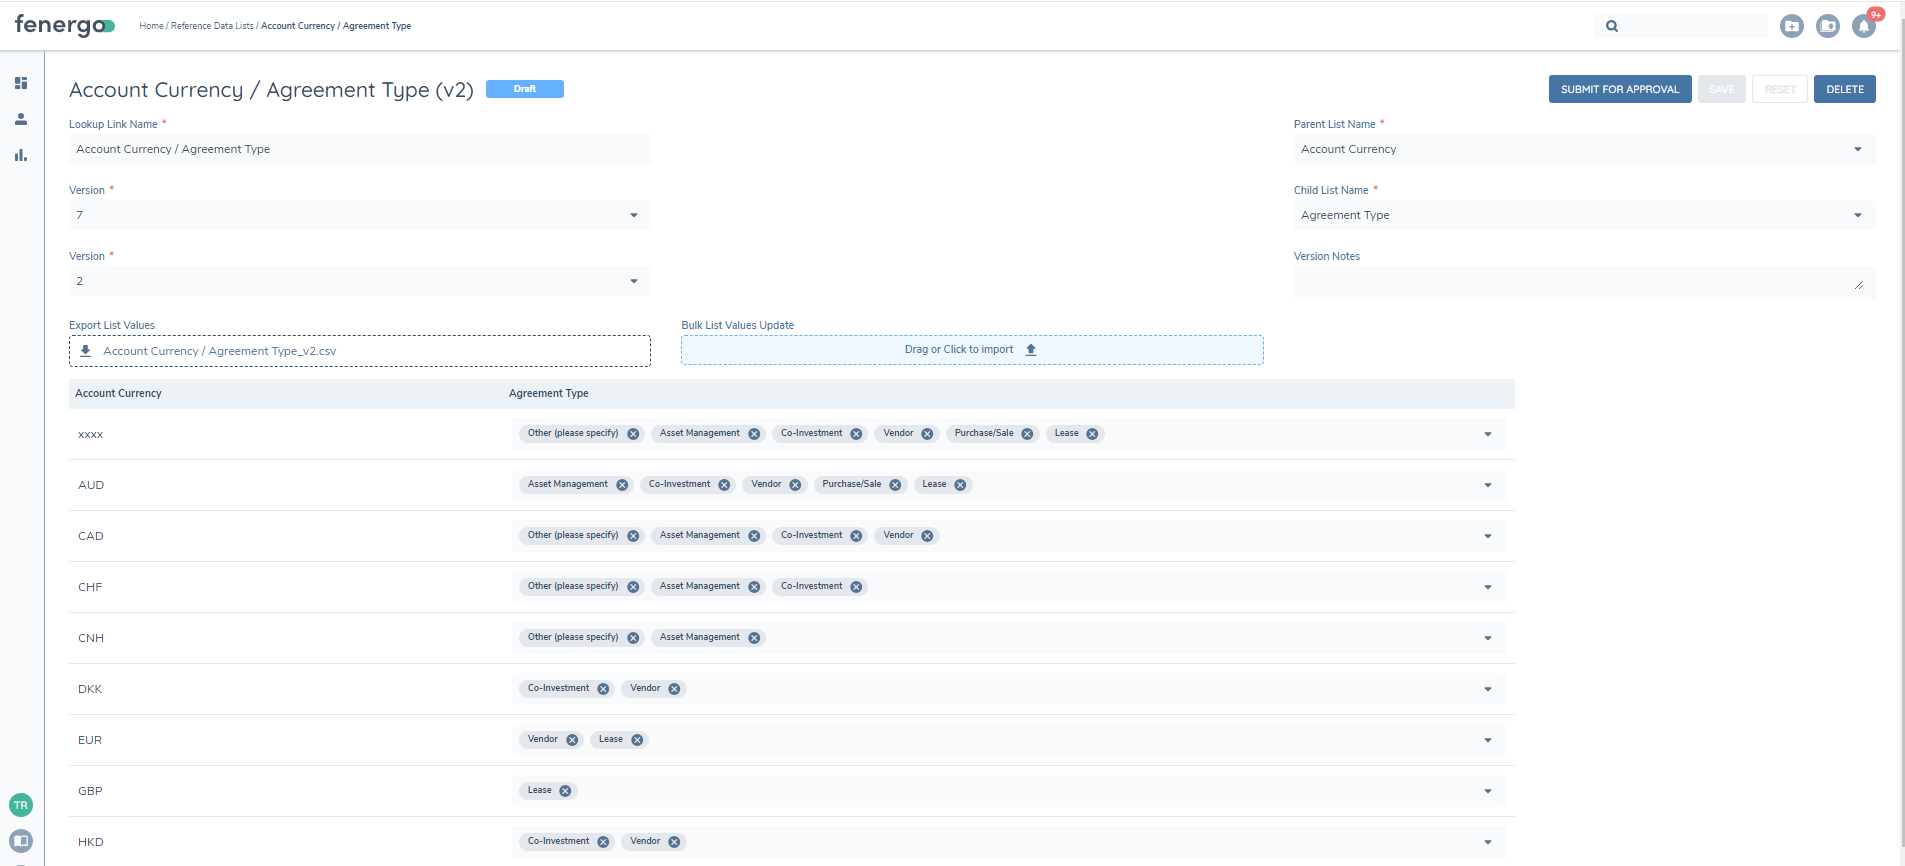
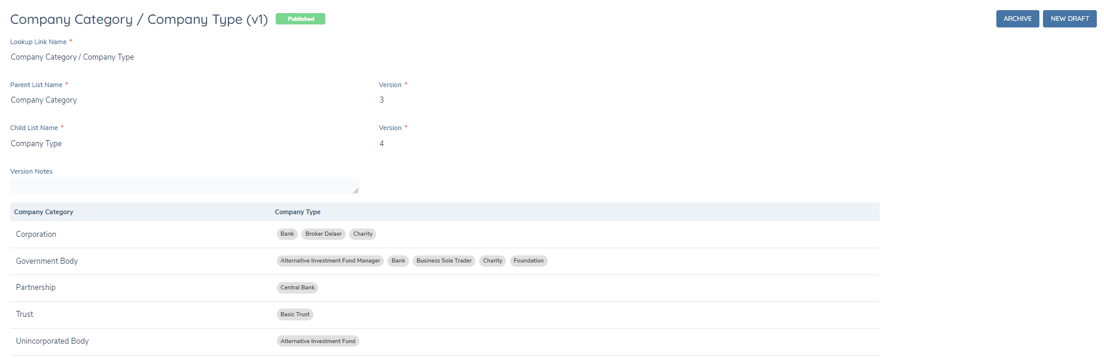
The configuration of this screen is quite simple. We start with the Parent list, and then select the Child list. This relationship defines the direction of filtering; in our journeys, we will select a value from the parent list, which will reduce the values available in the child list. When we select the lookups, it automatically populates the link name. This can be updated if desired.
We then simply link the values. For each row from the parent list, we multi-select the values from the child list that we want to display when that parent value is chosen. So in the example above, if we were to select “Corporation” in the Company Category, only the “Bank”, "Broker Dealer" and "Charity" values would appear in the Company Type lookup.
A value from the child list can be linked to multiple values from the parent list. If a value from the child list is not linked to any value from the parent list then it will never be available to select.