The Fenergo Salesforce App - Functional User Guide
The following document provides an overview of the functionality provided by the Fenergo Salesforce app.
The Fenergo Salesforce app allows Salesforce users to trigger compliant-by-design, Fenergo SaaS, Client Lifecycle Journeys with the data between Salesforce and Fenergo SaaS automatically synced at onboarding initiation.
The KYC/CDD/AML rules configured in Fenergo SaaS will determine the journey-specific data and document requirements that need to be captured as part of a journey. These requirements can be surfaced and fulfilled in Salesforce.
The required data, documents and approvals for journeys can be gathered through the Salesforce UI. In addition automatic updates and notifications streamlines communication throughout the journey.
New Request
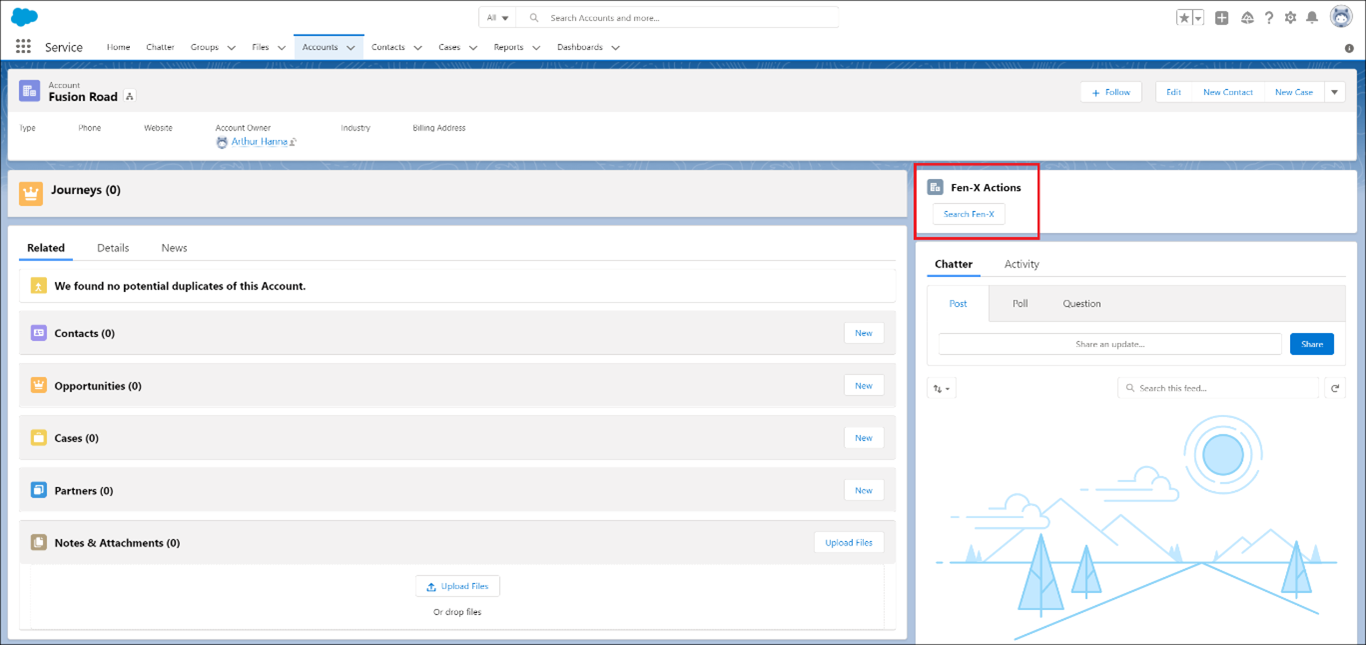
From an account in Salesforce the user will have the ability to select New Request, from the Fenergo SaaS actions component, as indicated in the screenshot below. The account is only available if the Salesforce account is not already subscribed to a Fenergo SaaS entity.
On selecting New Request the New Request window will be opened. The field values will be prepopulated dependent on the mapping of Salesforce to Fenergo SaaS fields (for more information on the mapping refer to Data Model Mapping section of this document).
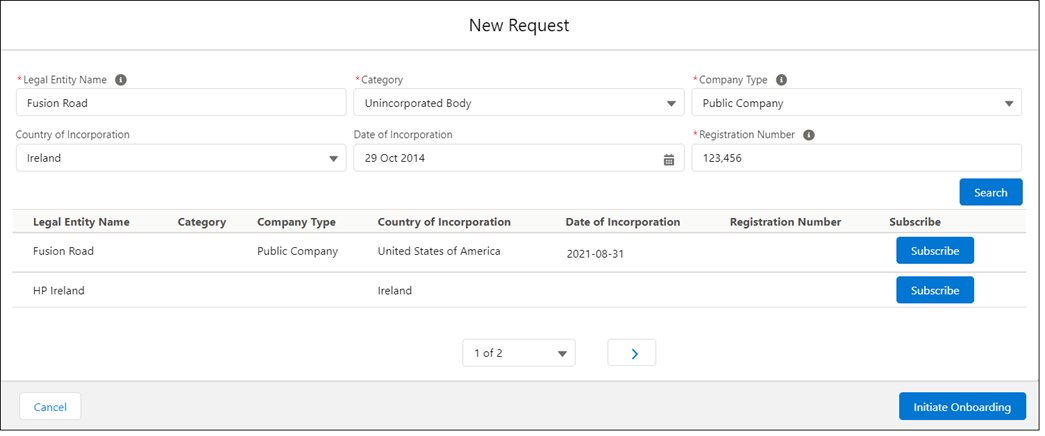
On selecting search the results will be returned from Fenergo SaaS and displayed to the user. The user can update the field values and initiate additional searches from the New Request window as required.
Initiate Onboarding
Having completed a search against the Fenergo SaaS record and if all mandatory values are provided a user will have the ability to select Initiate Onboarding.
When a user clicks on the Initiate Onboarding button, it calls out to Fenergo SaaS, passing the account information that has been mapped to create the entity and trigger the correct journey determined by the scoping rules set in Fenergo SaaS.
Business and Person Accounts
Business Accounts in Salesforce map directly to Company Entities in Fenergo SaaS whereas Person Accounts map to Individual. The specific mapping files for each account type (Business Account and Individual) provides the capability for the automatic data sync from Salesforce to Fenergo SaaS and Fenergo SaaS to Salesforce.
The Salesforce app does not allow for the mapping of Business Account in Salesforce to Individual in Fenergo SaaS.
Account Subscription
Having completed a Fenergo SaaS search, if a valid result is returned, users have the ability to subscribe the Salesforce Account to a Fenergo SaaS entity via the Subscribe action. In subscribing the relationship between the Salesforce Account and the Fenergo SaaS entity is created. If in the search results, a Fenergo SaaS entity is already linked to an account, the subscribe button is not available. However, by clicking on the name of entity, in the search grid, it will open a new tab on the Account page in Salesforce.
On subscribing the Salesforce account to a Fenergo SaaS entity the values on the Salesforce account do not get pushed to the Fenergo SaaS entity. This only occurs at the time of onboarding.
Unsubscription
If a Salesforce account is subscribed to the Fenergo SaaS entity it is possible for a Salesforce Admin to unsubscribe the Salesforce Account and the Fenergo SaaS Entity from the Fenergo SaaS console. This is only available to Salesforce Admin users. By unsubscribe the relationship between the Salesforce account and Fenergo SaaS Legal entity is removed. If unsubscribing and there are any in progress journeys, in Fenergo SaaS, these may need to be manually reverted and any data previously synced between the two will have to be manually reverted. The steps below detail how to complete an un-subscription (remove the link between the Salesforce Account and Fenergo SaaS entity).
-
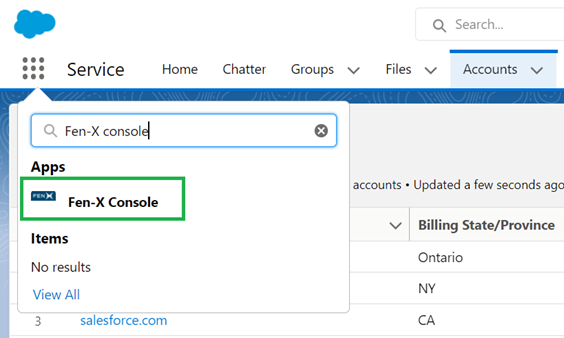
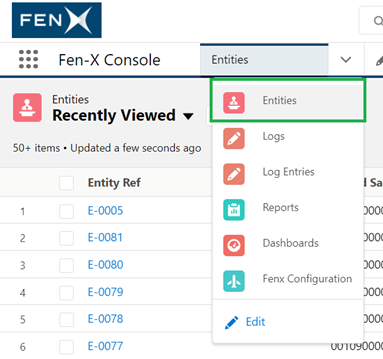
Select Fen-X console from the app selection
-
Select Entities from the menu item. From the Entities page you can search for the applicable entity by the Salesforce account ID.
-
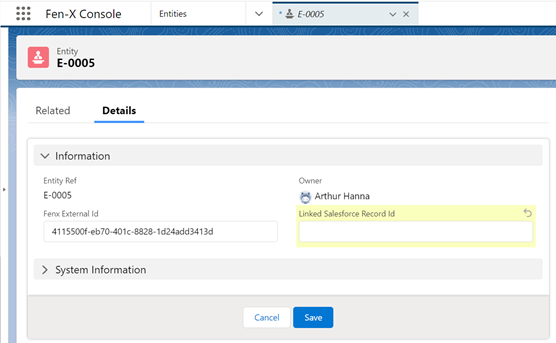
Click on applicable record to open the Details page
-
Click on the pencil icon of the Linked Salesforce Record Id.
-
Remove the value and click Save
Mandatory Search Parameters
The Mandatory Search Parameters functionality ensures that entity searches in the Salesforce Plugin cannot be executed unless all mandatory fields are completed. This aligns with the behaviour in Fenergo's “New Request” screen.
Introducing this functionality will:
- Prevent incomplete searches that may return too many close matches.
- Reduce the risk of Salesforce users subscribing to the wrong entity.
How it works
- Navigate to the Entity Search screen in Salesforce.
- Enter information into all mandatory fields (e.g., Entity Name, Country, etc., depending on configuration).
- Once mandatory fields are completed:
- The Search button becomes enabled, and you can proceed with the entity search.
- If you try to search without completing mandatory fields, the Search button will remain disabled.
For Salesforce Admin: Please continue to read on to learn how to enable this functionality.
To configure mandatory search parameters within Salesforce, follow these steps:
-
Within the Salesforce App, navigate to:
Fenergo Configuration → App Settings → Opt-in Features
-
Locate the Mandatory Search Parameters toggle:
- Switch the toggle ON to enforce mandatory field validation in Salesforce entity search.
- Leave the toggle OFF to keep current behaviour (search allowed without all mandatory fields).
- OFF is the default setting.
-
Click Save
View Entity
On clicking the View Entity action the user will be navigated to Fenergo SaaS and if the logged in will display the Entity Profile page.
ChannelsOnly Team
To restrict all access of a Salesforce User in Fenergo SaaS, whilst maintaining access to interact with the journey as surfaced in Salesforce, in Fenergo SaaS assign users to a team called ChannelsOnly. On attempting to access Fenergo SaaS the below screen will be displayed.
View Client Journey
If an account is subscribed to a Fenergo SaaS entity, the journeys will be displayed inside of the Salesforce Journey Component, as indicated in the screenshot below. The Journey Component provides a Salesforce user the ability to monitor the progress of the journey and interact with the applicable Fenergo SaaS tasks in Salesforce.
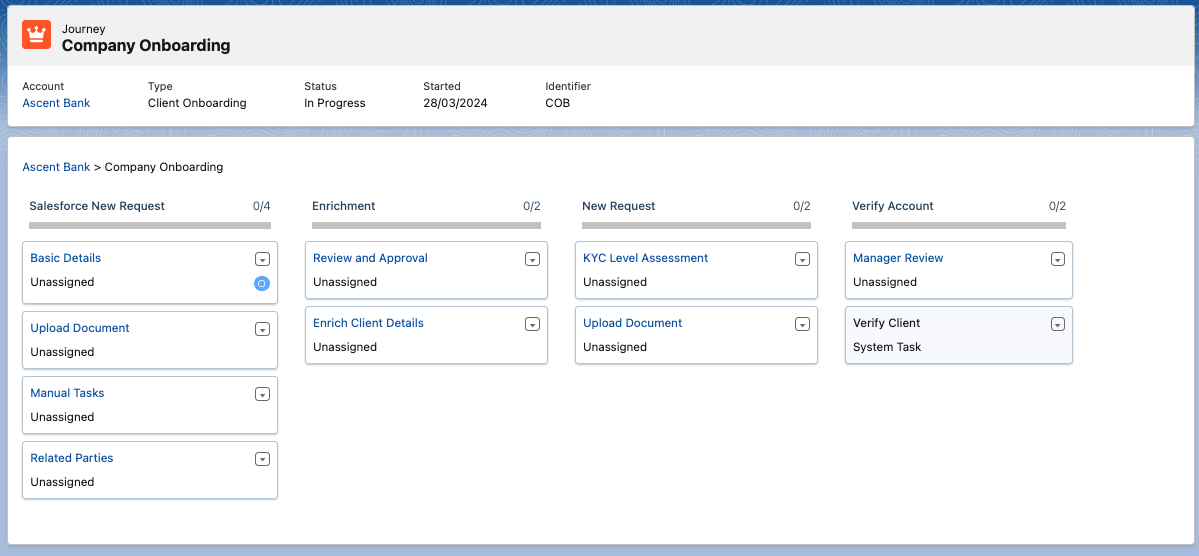
The Salesforce user can access Fenergo SaaS tasks by clicking on a task that is available to them (denoted by the blue hyperlink on the journey).
Filter Conditional Stages/Processes/Tasks
Stages, Processes, and Tasks that have scoping conditions applied are only visible when the scoping conditions for a stage/task have been triggered and the task previous in a journey is completed.
If the scoping condition has not been triggered or the task previous has not been completed, the stage/process/task will not be visible in the Journey Component.
It can take up to 10 seconds for conditonal tasks to display in Salesforce once the previous task is completed.
Supported Task Types in the Fenergo Salesforce App
| Task Type | Description |
|---|---|
| Data Task | Captures relevant account information. |
| Document V1 Task | Allows users to upload documents directly to Fenergo SaaS to meet requirements. The Salesforce document capture task does not require document requirements to be approved before completing the task. Note: The file upload size limit is 200 MB. To enable this, follow the instructions in the Installing Salesforce User Guide. |
| Document V2 Task | An enhanced document management task in Fenergo SaaS that enables users to upload, classify, waive, defer, and intelligently process documents with improved validation, automation, and compliance control. |
| Manual Task | Tracks and records manual actions performed outside the application. |
| Data Review Task | Displays captured information as read-only. Allows the user to approve or reject the task and provide a comment before completing it. |
| Related Party Task | Supports the capture of related parties, displays ownership and control rules, and collects related-party documents. |
| Manage Product Task | Enables users to capture products for an entity. |
| Portal Quick Link Task | Links new or existing users to a portal account directly from a Journey. |
| Ongoing Screening Unsubscription Task | Unsubscribes entities currently enrolled in ongoing screening. |
| Related Party Data & Documents Task | Supports the document management aspect of Fenergo’s Related Party Data & Documents task, allowing users to upload, view, and manage documents linked to related parties directly within Salesforce. Note: Only the document functionality is supported; data capture elements are not available in Salesforce. |
| External Data Combined Task | Allows users to enrich entity and client records with verified information from the external data provider, Orbis. |
Users can view other task types in the Journey component, but they cannot interact with them.
If a task has been completed, it is displayed as read-only.
Data Task
Save and Complete buttons on data tasks are enabled by default which allows users to save data tasks without completing all mandatory fields.
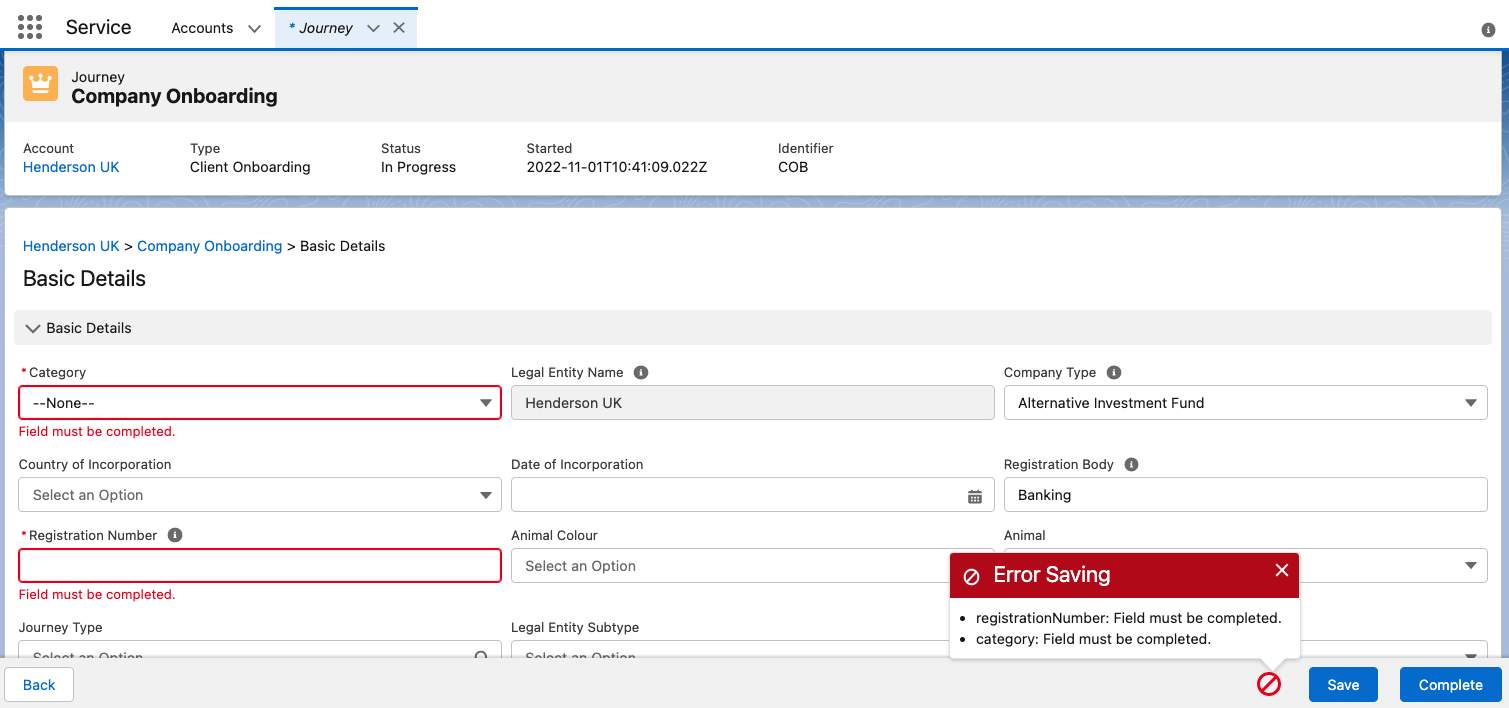
When mandatory fields are not completed, and the user attempts to Save, the data will be successfully saved and the missing mandatory fields will be highlighted to the user.
When a previously completed field that was saved and cleared by the user and attempted to save, the missing mandatory fields will be highlighted to the user and the Fenergo SaaS error messages returned are displayed in a popover message at the bottom of the screen.
When a user attempts to complete a task without completing all mandatory fields/datagroups, the fields will be highlighted to the user and the Fenergo SaaS error messages returned are displayed in a popover message at the bottom of the screen.
The scenarios when a user can save/complete a task are the same as available in Fenergo SaaS.
Conditional triggers from Datagroups are now supported.
Users can now disable the default alphabetical ordering (A-Z) of Policy Categories, enabling a user-defined order. Additionally, Data Groups can be grouped within their respective Policy Categories.
This can be achieved via the enabling and disabling of the Order Alphabetically Toggle and Order Data Groups by Category toggle on the Data Task in Fenergo.
Document V1 Task
The Data and Documents task which combines both data and docs into a single task is not supported.
Document V2 Task
The latest version of the Documents task type (Documents V2) is now available as a selectable task within a Journey.
Given the user has the correct permissions, they will be able to access the Documents V2 task. In addition to the five 'Document Configuration' permissions required for Documents V1, Documents V2 introduces the following new permissions:
- Document Management Access
- Document Management Create
- Document Management Edit
- Document Management Delete
- Document Management Waive or Defer
Please refer to the Document Management V2 User Guide for detailed information on these permissions.
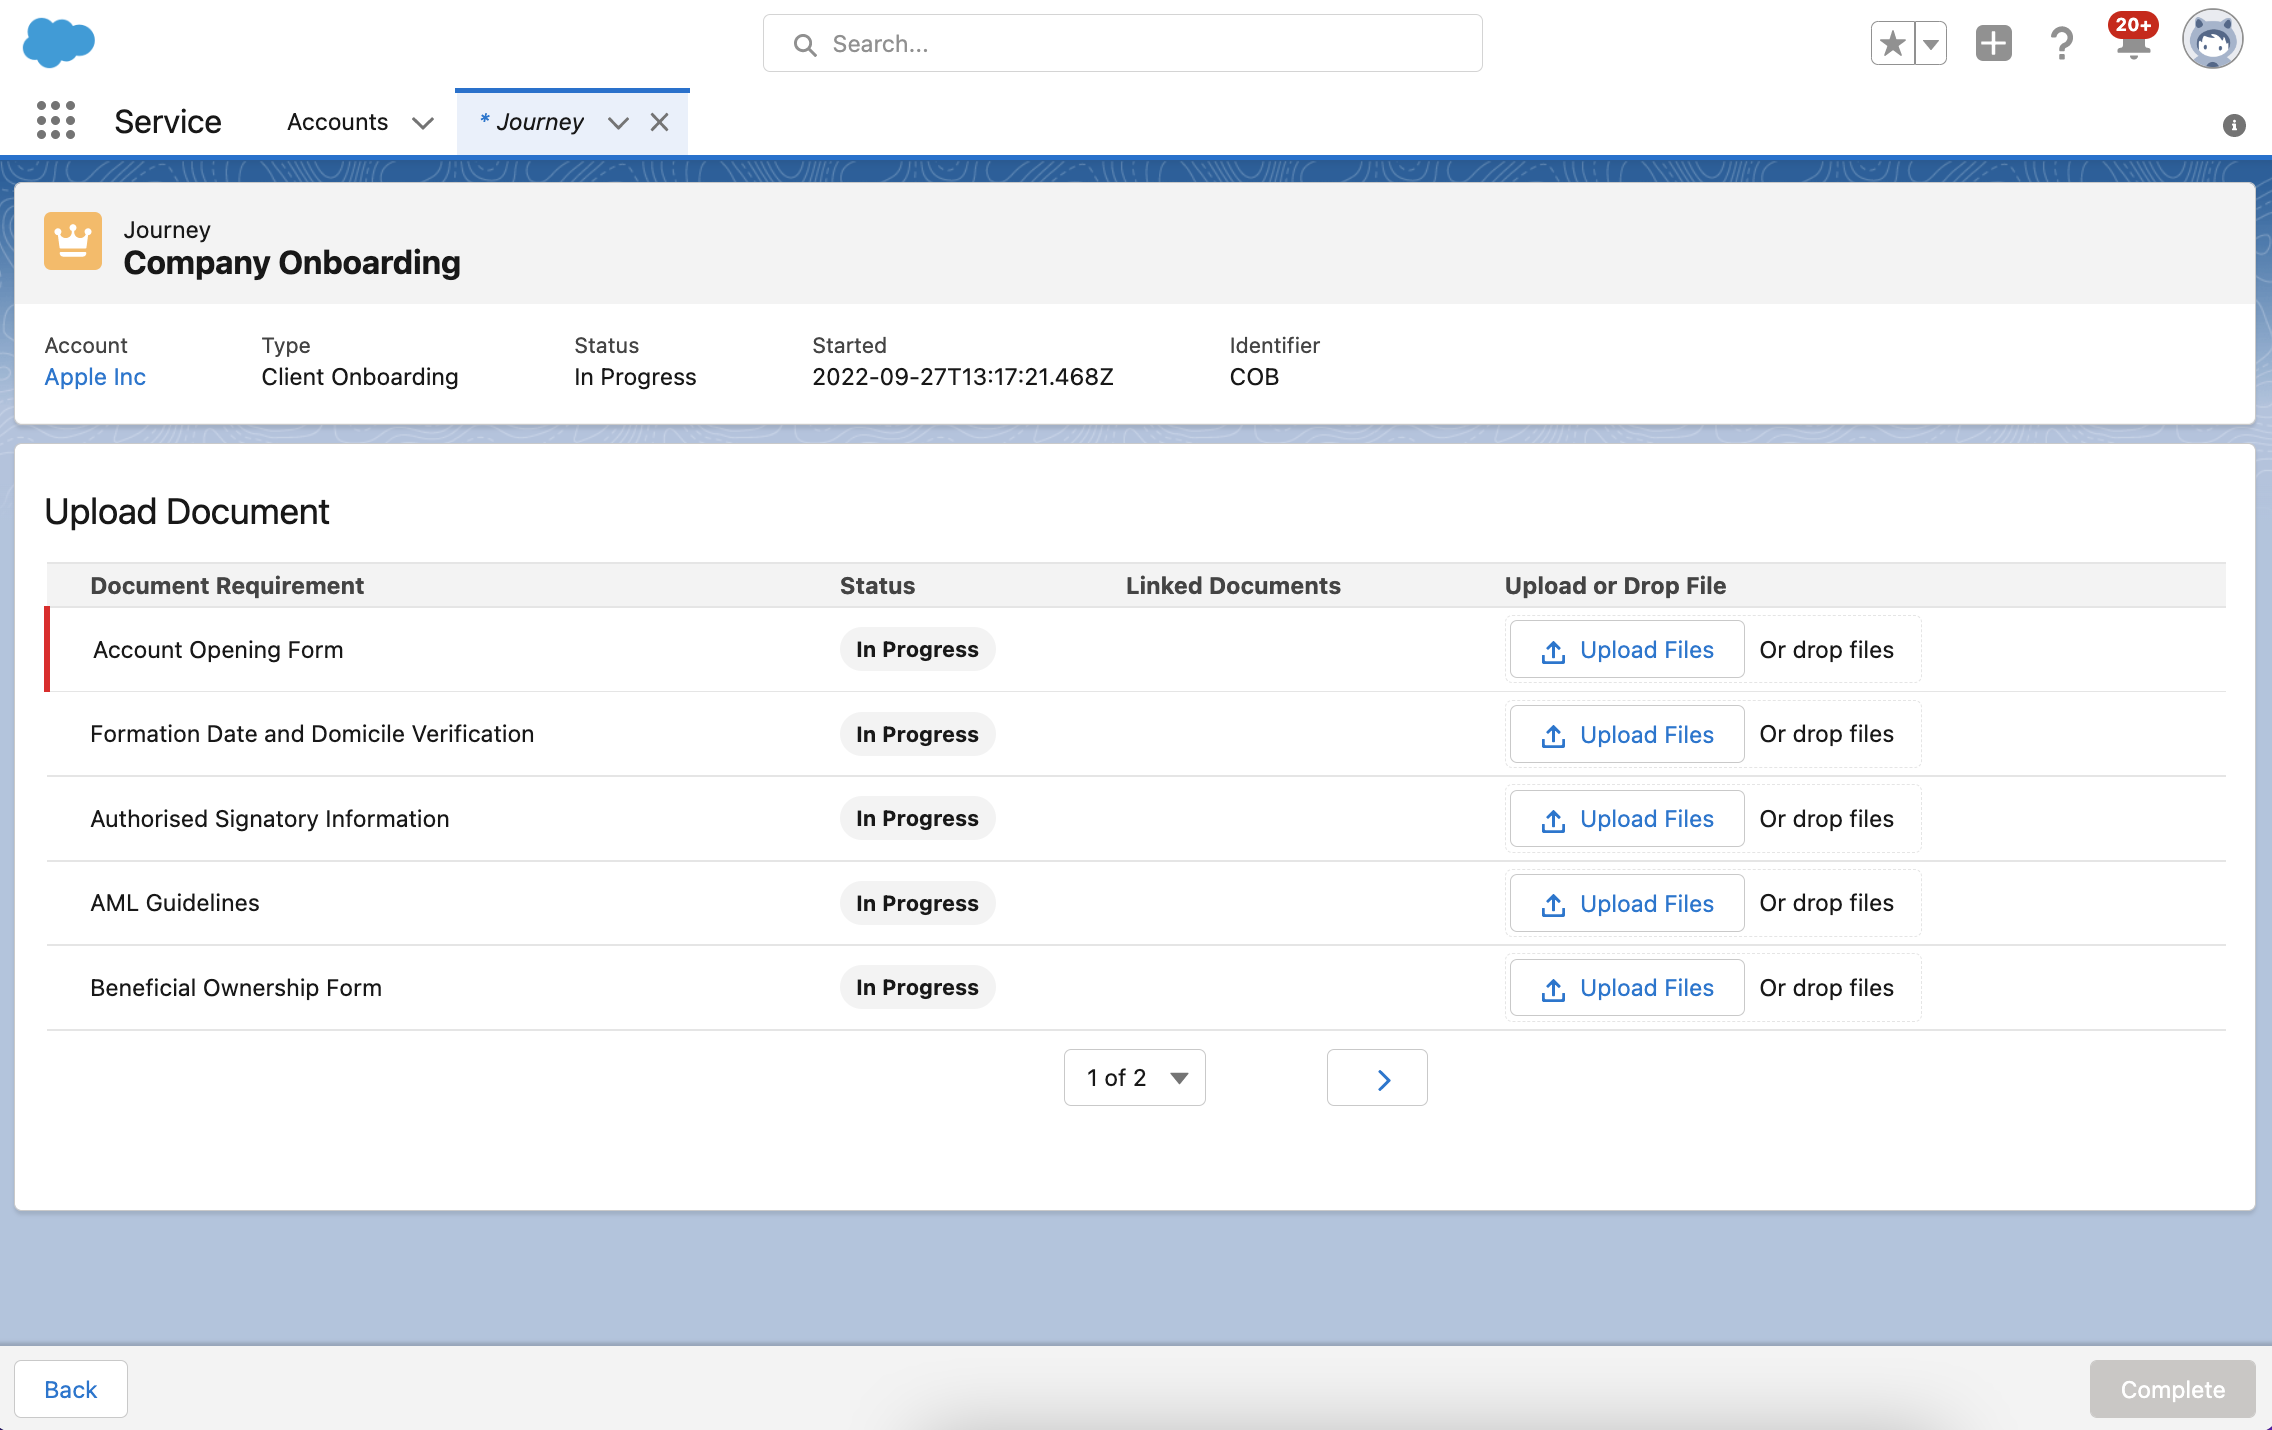
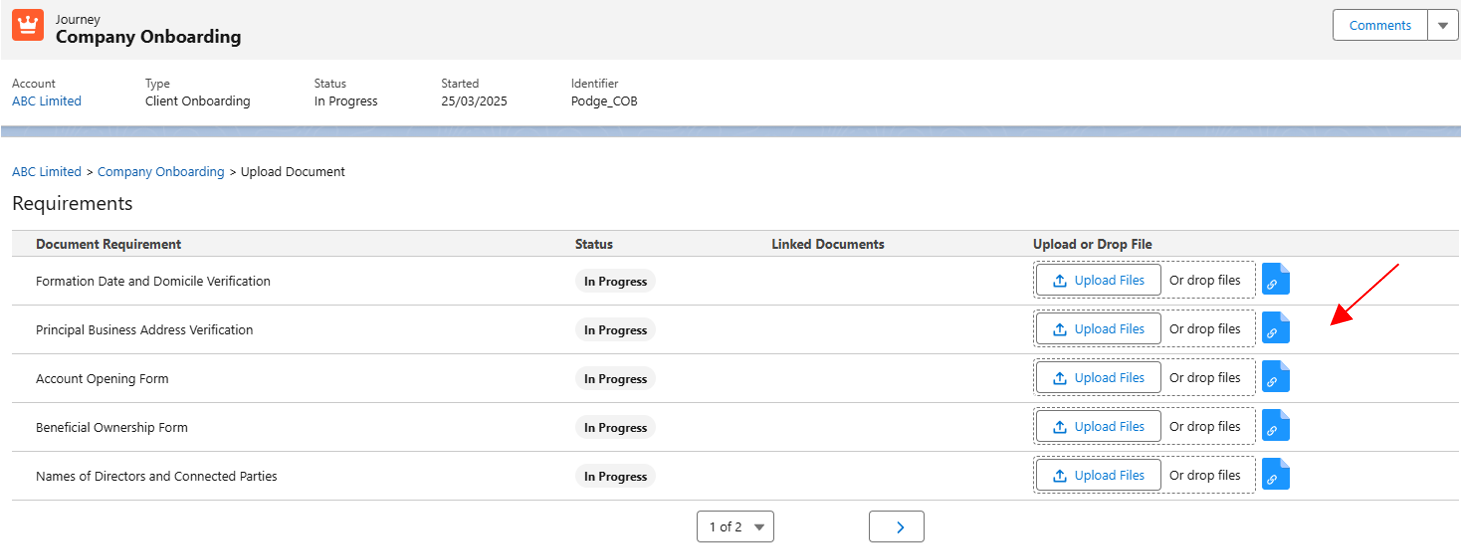
Requirements Grid
Within the Requirements grid, you will see the document requirements relevant to this task. Mandatory requirements are marked with a red line on the left-hand side. The status of each document can be:
- In Progress
- Complete
- Waived
- Deffered
Waiving and deferring requirements are not supported in the initial release of Documents V2. These features are planned for future updates.

Uploading Documents
Users can upload documents by browsing and selecting files or by dragging and dropping files against each requirement. Follow these steps:
- Select or Drop files: Choose files from your device or drag and drop them to the respective requirement.
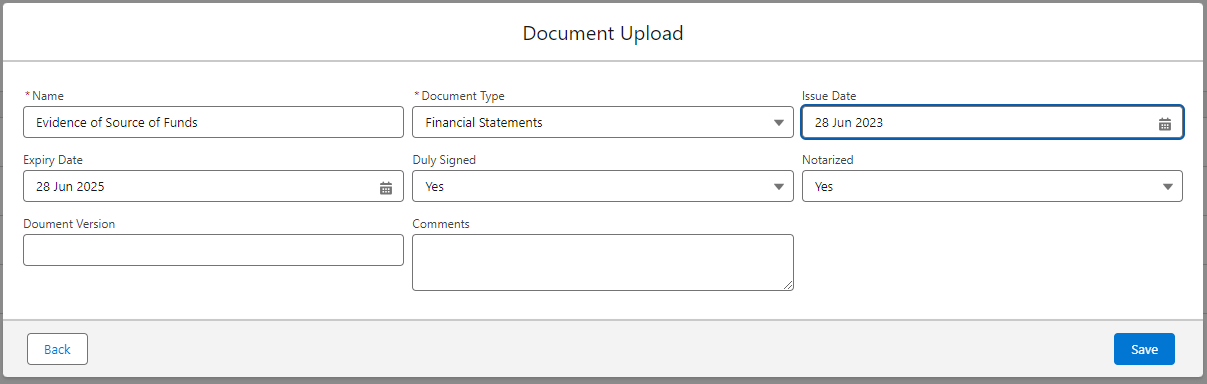
- Document Upload Modal: After selecting or dropping files, the Document Upload modal will open.
Mandatory Fields: The "Name" and "Document Type" fields in the Document Upload Modal are always mandatory. Optional Fields: ther fields may be optional or mandatory, depending on their configuration in Fenergo.
For more detailed information on configuring fields, please refer to the Document Management V2 User Guide.
When users access the Documents task and select a Document Requirement, there are three possible scenarios:
- If there is only one acceptable document type configured, this will be defaulted to the user, making it quicker to upload the document.
- If there are two or more acceptable document types configured for a specific document requirement, the “Document Type” dropdown list will only display the configured acceptable document types for that requirement.
- If there are no acceptable document types configured for a document requirement, all document types should be available to the user in the dropdown list.
Document Restrictions
Salesforce now supports configurable maximum file size and restricted file type settings for document uploads, bringing it in line with Fenergo's existing functionality. This ensures users upload files in the correct format and within the required size limits. For more details, please see the Document Management User Guide
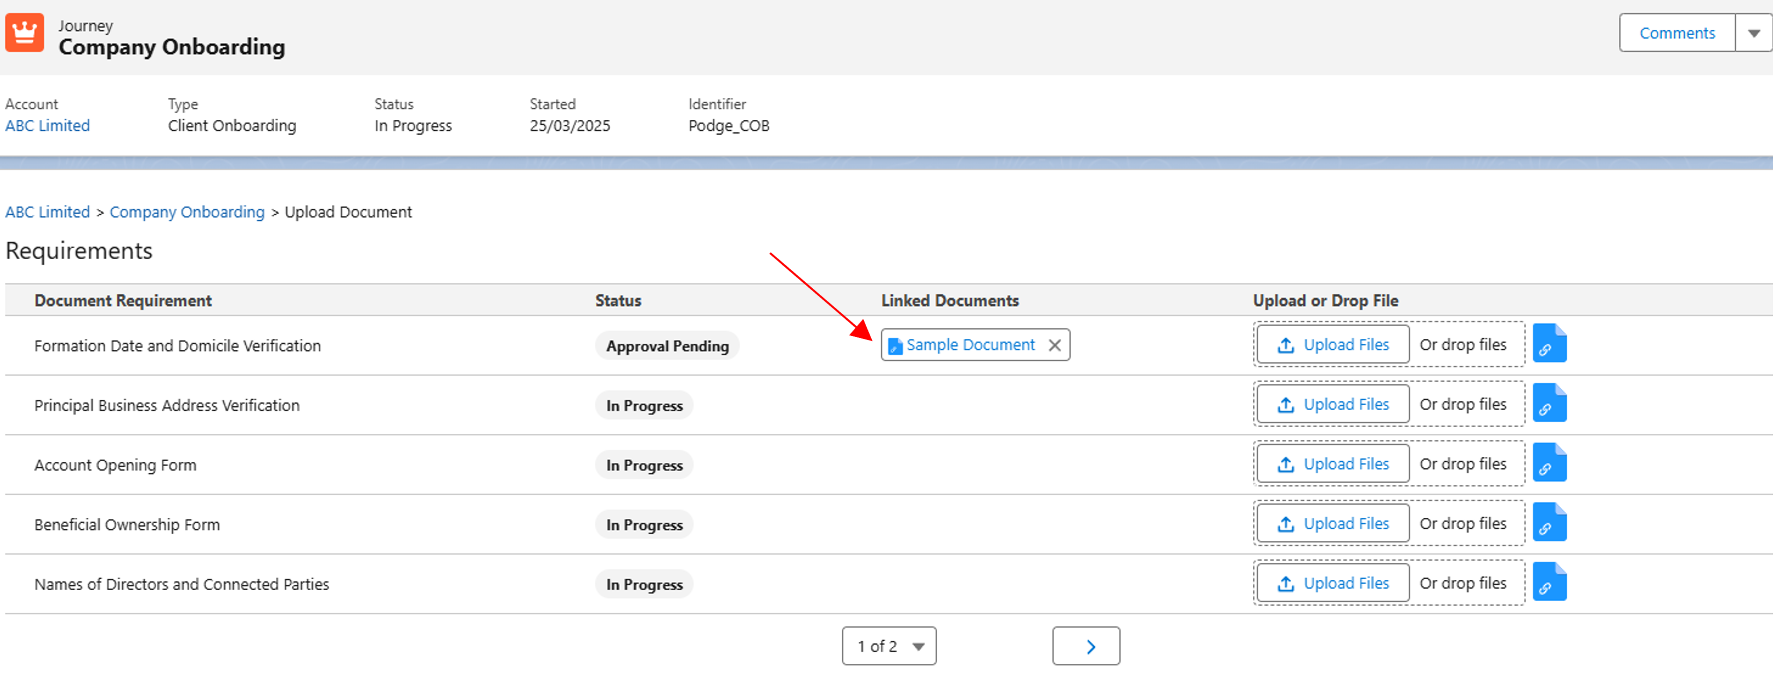
Successful Document Upload
When a document is successfully uploaded against a requirement, a success message will appear:

Uploaded documents will be displayed as chips with the document name as the label.
Deleting Documents
You can delete any document uploaded against a requirement once it has completed the antivirus scan. Document status based on the antivirus scan:
- Blue Chip Label: Document has passed the antivirus scan.
- Red Chip Label: Document is undergoing the antivirus scan.

If you attempt to delete a document that is still undergoing the antivirus scan, you will receive an error message and the deletion will be prevented:

Deferring and Waiving Document Requirements
If a document requirement for the task cannot be met, a user with the Document Management Defer or Waive permission has the option to:
- Defer the requirement: indicate in the system that the document cannot be collected right now but will be available at a future date. The user must specify this future date when marking the requirement as Deferred.
- Waive the requirement: indicate that this document will never be collected.
If necessary, users have the flexibility to waive or defer mandatory or optional document requirements.
Deferring a Document Requirement:
If a document requirement hasn’t been previously waived or deferred, users can defer it by clicking the defer icon. ![]() This icon becomes visible when you hover over the corresponding document requirement in the grid.
This icon becomes visible when you hover over the corresponding document requirement in the grid.
![]()
Clicking this icon will launch the “Defer Requirement?” modal, where a ‘Defer Until’ date is required. Users also have the option to add a comment if desired.
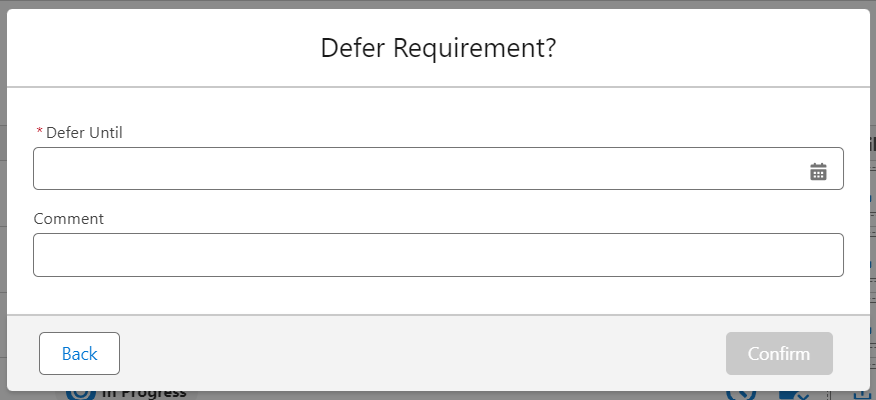
Upon clicking ‘Confirm’, the requirement’s status will be updated to ‘Deferred’. This change, along with the date, will be visible on the status chip. If a comment was added during the deferral process, it can be viewed by hovering over the chip.

If the document requirement is mandatory, the task can be completed provided that all other mandatory requirements have been met.
Once a requirement is deferred, the Defer Until date can be updated by resetting the status and deferring the requirement again.
When the ‘Defer Until’ date has passed, the label and style of the status chip will be updated to indicate that the deferral has expired. Although the status will still be displayed as “Deferred” in the backend, if the requirement is mandatory, you are required to either reset the status and defer again or reset the status and attach a document to the requirement to complete the task.
![]()
Waiving a Document Requirement:
If a document requirement is not already waived or deferred, users can waive it by clicking the waive icon. ![]() This icon becomes visible when you hover over the corresponding document requirement in the grid.
This icon becomes visible when you hover over the corresponding document requirement in the grid.
![]()
Clicking this will open the “Waive Requirement?” modal, where users can add a comment if desired.
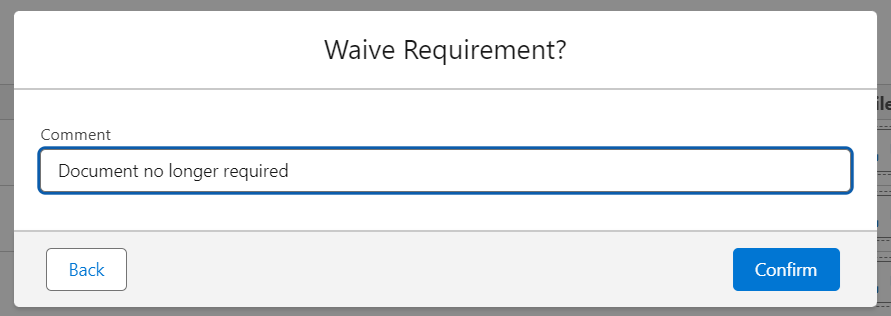
Upon clicking ‘Confirm’, the requirement’s status will be updated to ‘Waived’. This will be visible on the status chip. If a comment was added within the “Waive Requirement?” modal, it can be viewed by hovering over the chip.

If the document requirement is mandatory, the task can be completed provided that all other mandatory requirements have been met.
Resetting a Document Requirement:
If a document requirement has been deferred or waived, you can reset its status by clicking the reset icon ![]() , that becomes visible when you hover over the requirement.
, that becomes visible when you hover over the requirement.
![]()
When a document is already linked to a requirement, the status chip will display “Complete”. However, if no documents are linked, the status chip will show “In Progress”.
If a document is uploaded directly to a requirement that has been waived or deferred, the status will automatically revert and then change to “Complete”. However, if you modify or remove a document already linked to a waived or deferred requirement, or if a matching document is linked to such a requirement, the status will not update automatically.
We will be introducing the following additional Documents V2 capabilities to Salesforce in the future:
- Bulk Upload Including Requirement Linking: Enhanced functionality to upload multiple documents at once and link them to specific requirements.
- Matching Requirements Linking: Improved linking of documents to matching requirements for streamlined processing.
- Intelligent Document Processing Enablement via Salesforce: Advanced intelligent document processing capabilities to enhance document management and automation.
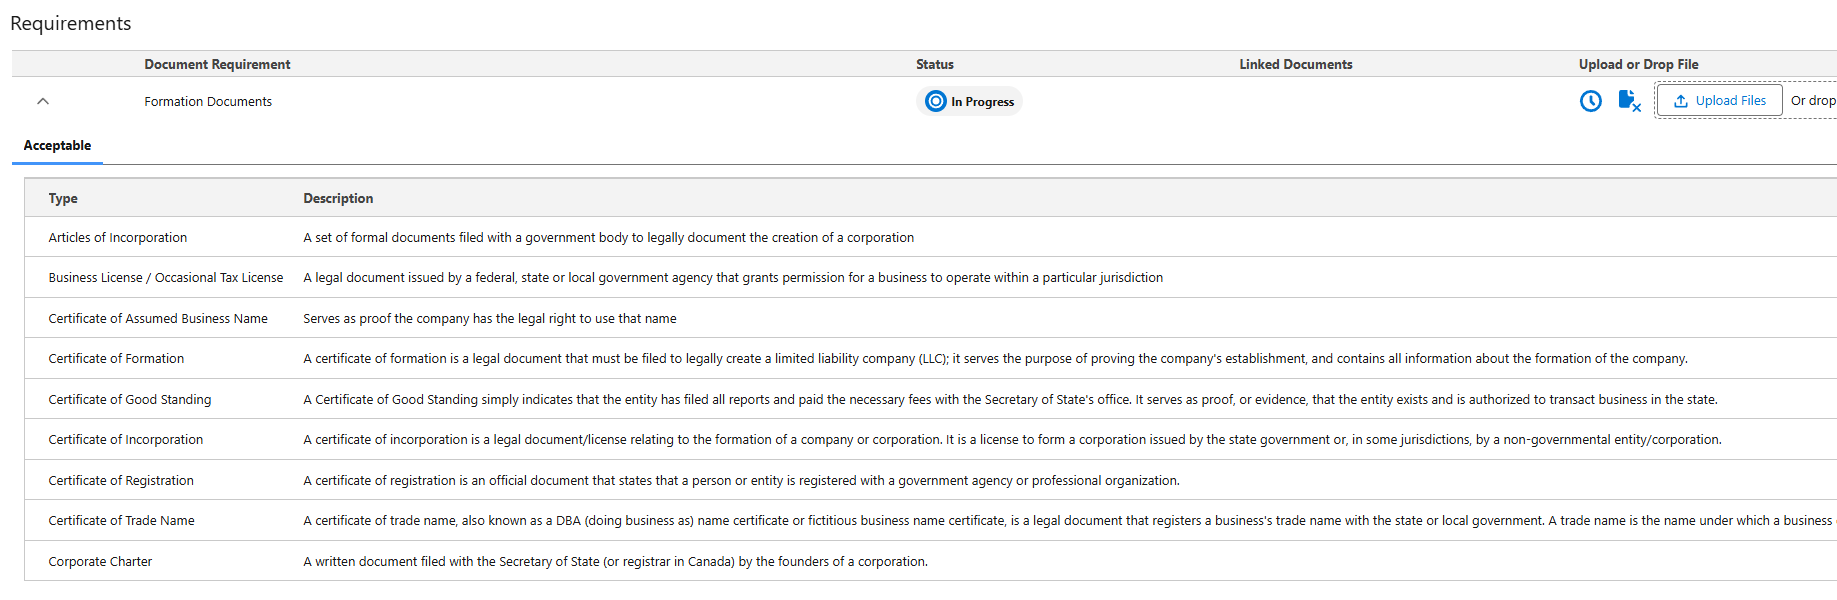
Acceptable Types and Descriptions
As part of the Docs V2 Task in Salesforce, Acceptable Document Types and Document Descriptions are now supported. This will allow Admin to input acceptable types and their document descriptions, allowing Salesforce users like Relationship Managers to know what documents they need to prepare ahead of time.
A tab labelled Acceptable will appear, containing a collapsible table with:
- Type: the document type configured (e.g., Bank Statements, Articles of Incorporation).
- Description: a short description of what the document is.
This is a read-only view, and thus Salesforce users cannot edit or delete the document types or descriptions shown within Salesforce.
These Document Types are configured in:
- Reference Data > Document Types
And Acceptable Types:
- Global Policy > Document Requirements > Acceptable Types
Only acceptable types configured in FenX for the given requirement will appear in Salesforce.
For more information on this, please visit Fenergo's Document Management Guide.
Related Party Task
The pre-configured related parties task displays all previously verified relationships and any new relationships created during the journey in a structured grid format.
The main client in context of the journey is always the first entry in the grid, followed below by other entities which are either directly or indirectly associated to the main client.
The grid displays the hierarchy of the client from a top-down perspective which the main client at the top i.e. if the main client has a shareholder, the entity which is the shareholder will be presented in the grid, however if the main client is a shareholder of another entity, the entity which has the main client as a shareholder will not be presented in the grid.
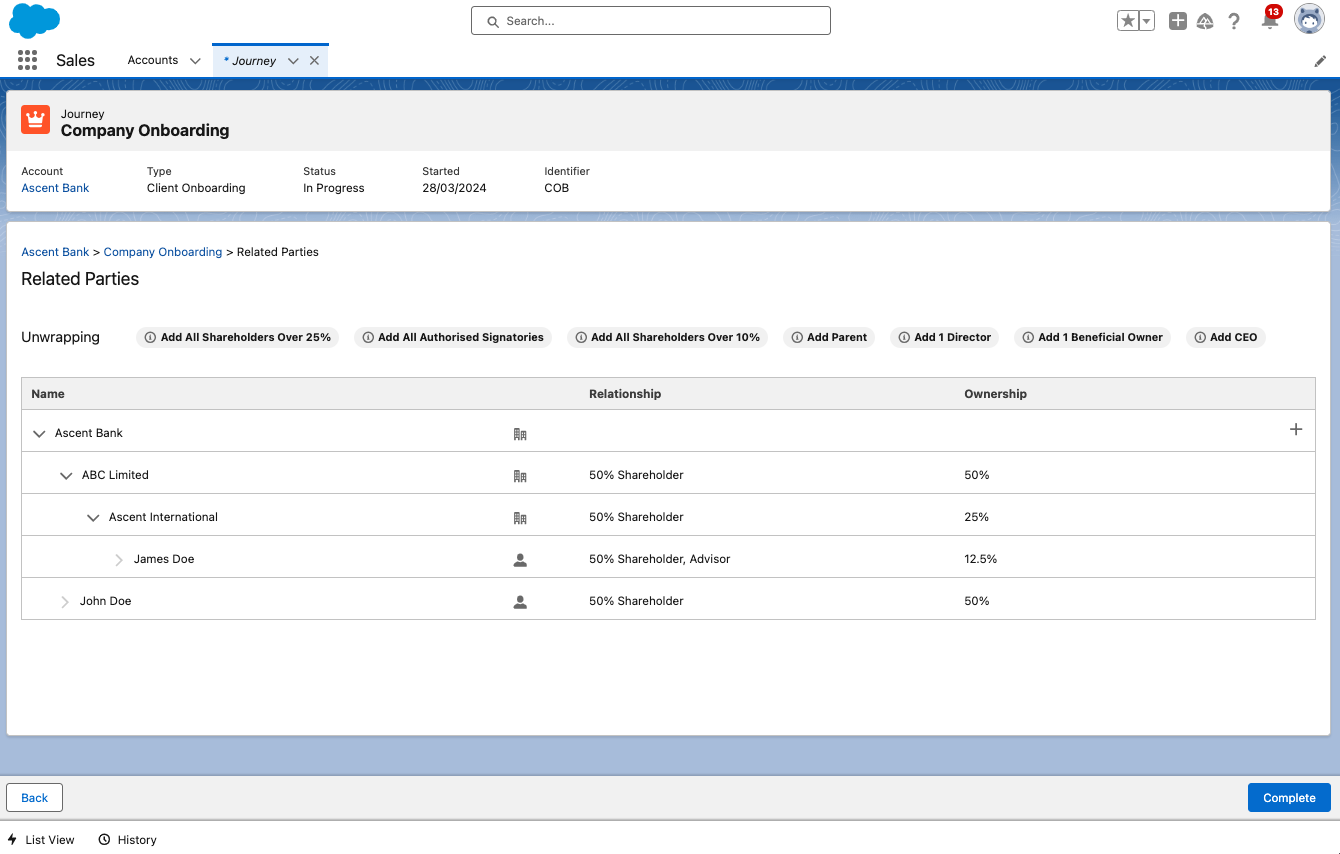
The grid displays:
- The entity name This is retrieved from the field with datakey "legalEntityName"
- An icon to distinguish an Individual from a Company or Other entity type Clicking on this icon will navigate you to the Entity Profile page for that entity
- Relationships If an entity has multiple types of relationships with another entity, all of those relationships will be listed in the Relationship column.
- The Ownership column will display the calculated proportional ownership for each entity in relation to the main client in context.
For each row in the grid there are a set of icons which allow you to perform actions in relation to the related parties listed:
Grid Icons
- The plus icon to add new relationships
- The pencil icon to edit existing relationships
- The bin icon to delete relationships
Adding New Relationships Relationships can be added to any entity in the grid by click on the + icon against the entity you want to add a related party to. A modal will display the related party details to populate, dependent on entity type, and the relationship details. The fields displayed in either section is dependent on the configuration of the applicable categories.
- Currently Only Global Policy is supported across data fields, documents and Ownership and control rules.
- Trigger conditions based on Related Client are now supported on the Related Party Task.
Keep an eye on our roadmap for future enhancements in this area.
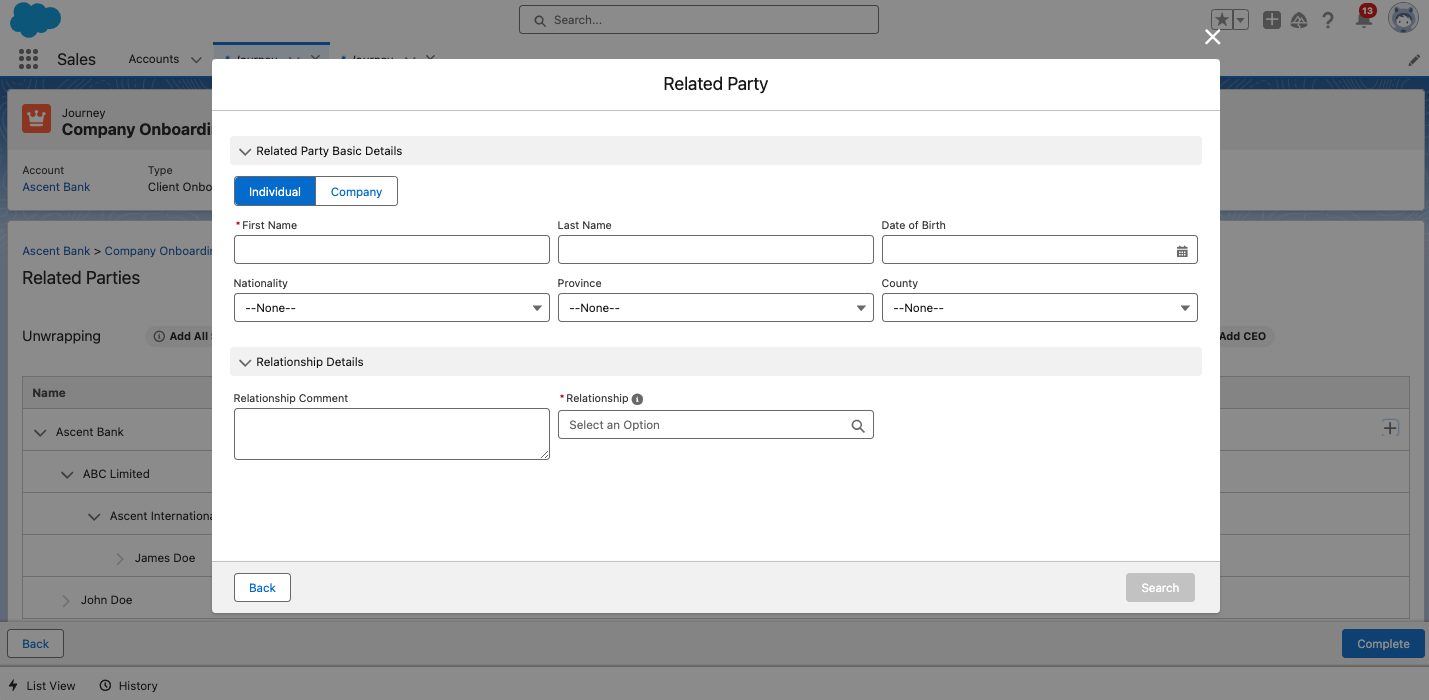
Enter all mandatory related party details and select SEARCH. The window will then display the Related Party – Potential Matches.
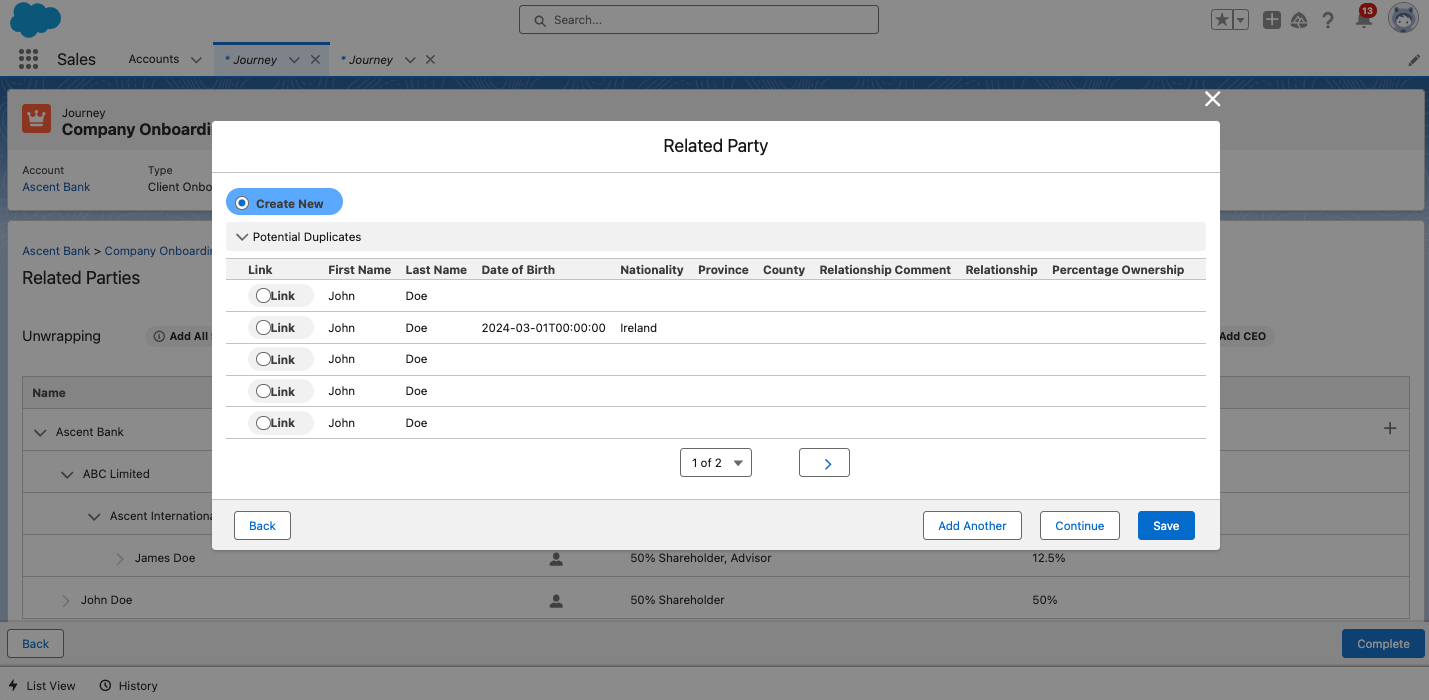
From the Related Party – Potential Matches there is the option to Create New or Link. Create New allows for the creation of the relationship and the new entity, with the basic details taken from the information captured at the time of search, whereas link will create the relationship to an existing entity.
For Create New and Link there are the following options:
- ADD ANOTHER – Creates the relationship and returns the user to the search page
- CONTINUE – Creates the relationship and closes the window
- SAVE – Creates the relationship and closes the window
If no results are returned selecting any of the buttons will create the new entity and the relationship details.
Managing Related Parties
Having added a related party, the relationship will appear in the Related Parties grid and the relationship may be edited by selecting the pencil icon against the record.
In addition, the relationship to the entity may be deleted via the delete icon.
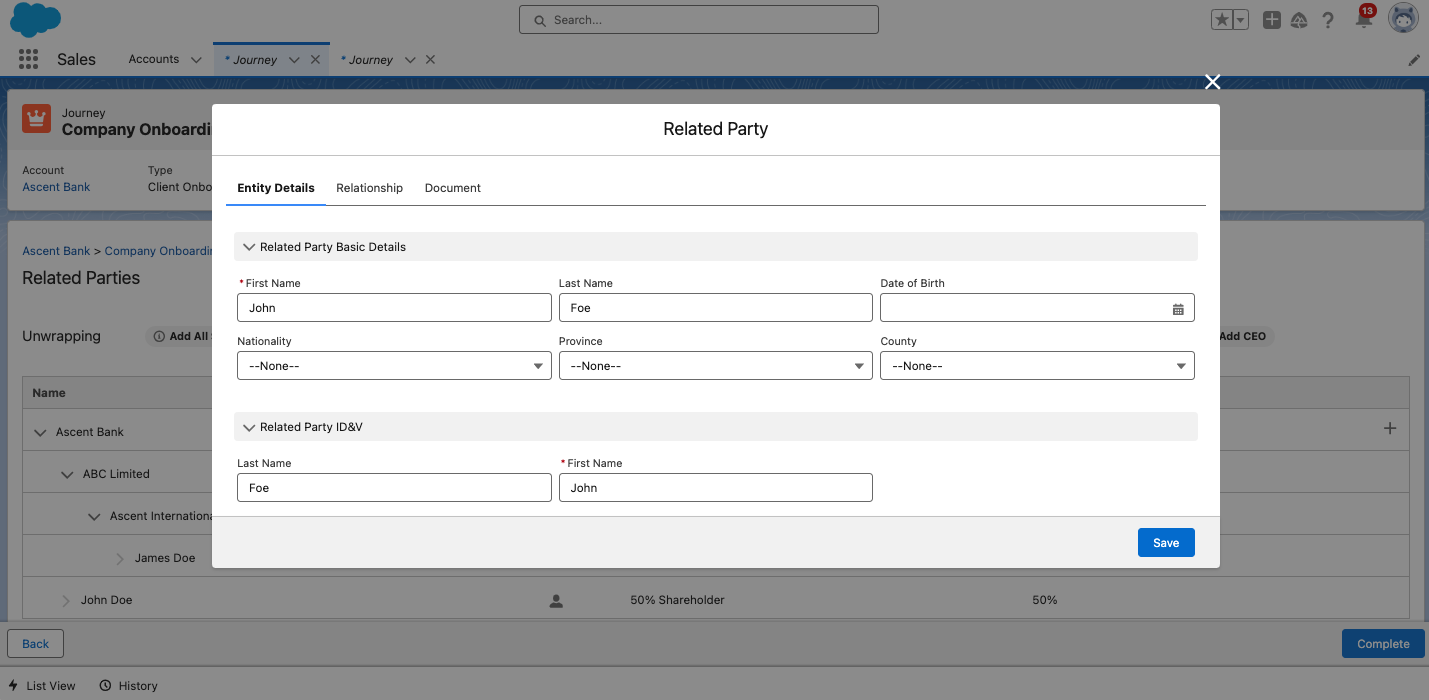
On selecting edit or continue from the Potential Matches screen the Related Party edit window is displayed. The sections and fields displayed in this window are dependent on policy and task configuration.
3 tabs will display to the user when editing a related party:
- Entity Details - Allows users to edit and update related party details
- Relationship - Allows users to modify the relationship type
- Documents - Allows users to upload or remove documents against a document requirement for the related party
Ownership and Control Guidance
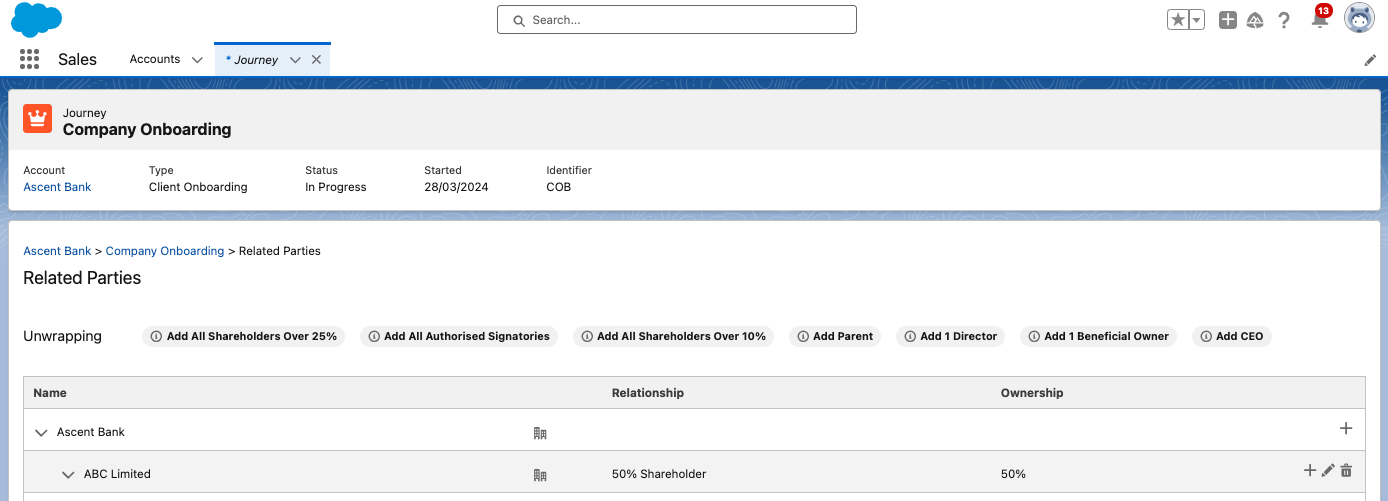
In the Related Parties task, there is a row at the top of the page which will guide the user how to ensure they are meeting policy requirements for determining the key entities and individuals who have ownership of or control over the client being vetted in the journey.
The Unwrapping row guides the user as to which types of relationships should be identified and added to the hierarchy.
For more information on related party functionality, please refer to the Related Party Management Functional User Guide
Enforcement of Unwrapping Rules in Related Party Task
This feature ensures that Salesforce users complete all mandatory Ownership & Control requirements in the Related Party task by enforcing rules through the use of toggles. Users will not be able to proceed with the Related Party task until all mandatory requirements are fulfilled. These mandatory requirements are configurable to fit specific needs.
If a user clicks the "Complete" button without fulfilling the missing mandatory requirements, an error message will appear at the top of the screen, stating: “Please capture all mandatory related parties”. These error messages are configurable. Additionally, a pop-up at the bottom righthand corner of the screen will highlight the specific missing mandatory information, helping the user to identify which requirements need to be fulfilled.
Toggles
-
Mandatory Toggle: Ensures that users cannot proceed with the task if the mandatory related parties have not been added. When this toggle is enabled, all required fields must be completed before the user can continue.
-
Minimum Count Toggle: Enables the user to configure the minimum number of a certain party required to move to the next stage. E.g. “Add at least one Director”.
-
Add All Toggle: Enables the user to add all of a certain type of party. E.g. "Add All Shareholders". Users must manually attest to “Add All” rules. They can do so by clicking on the button, turning it from amber to green which confirms that they have added “All” of that specified party.

Visual Indicators
-
Missing mandatory fields will be highlighted in red and marked with a red asterisk, allowing users to easily identify what needs to be completed.
-
Clear error messages will be displayed, informing and guiding users of any missing mandatory information.
-
Green success messages will be displayed to assure users that the correct information has been captured, meaning the mandatory requirements have been fulfilled.
Please refer to the Related Party Guide for more information on configuring Ownership & Control Rules.
Manage Product Task
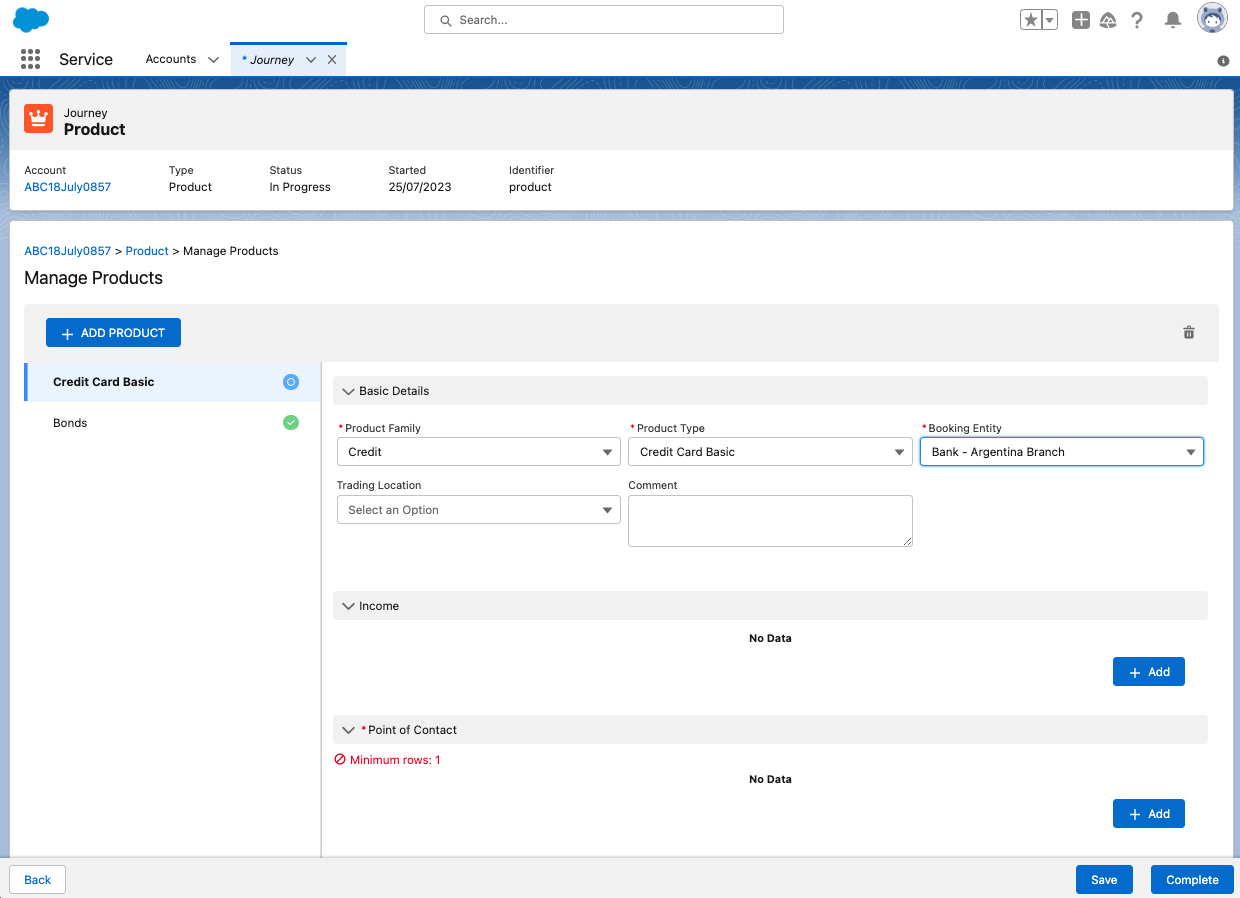
The Manage Product Task allows for the capture and management of products related to an entity. Products can be captured and updated within the context of a journey via the Manage Products task.
For information on configuring the product task, please see the Product Enablement Configuration and User Guides.
The following Manage Product Tasks functionality is supported in Salesforce
- Add Products
- Delete Products
- Edit Onboarded Products
- Revert Edited Products
- Display Requirement Sets from 1 or many requirements sets
- Data Group capture
- Display of Related parties captured for a product. (Note the ability to capture related parties for a product is not available)
Trigger conditions based on Related Products are supported in Salesforce. Both Global and Conditional policies support these trigger conditions.
Portal Quick Link Task
The Portal Quick Link task allows Salesforce users to quickly link new or existing users to a Portal account directly from a Journey.
Permissions
To avail of this feature, Salesforce users require the appropriate permissions, including Quick Link Access, Quick Link Edit, and Portal User Administration. These permissions ensure that only authorised users can link or unlink users to the Portal account.
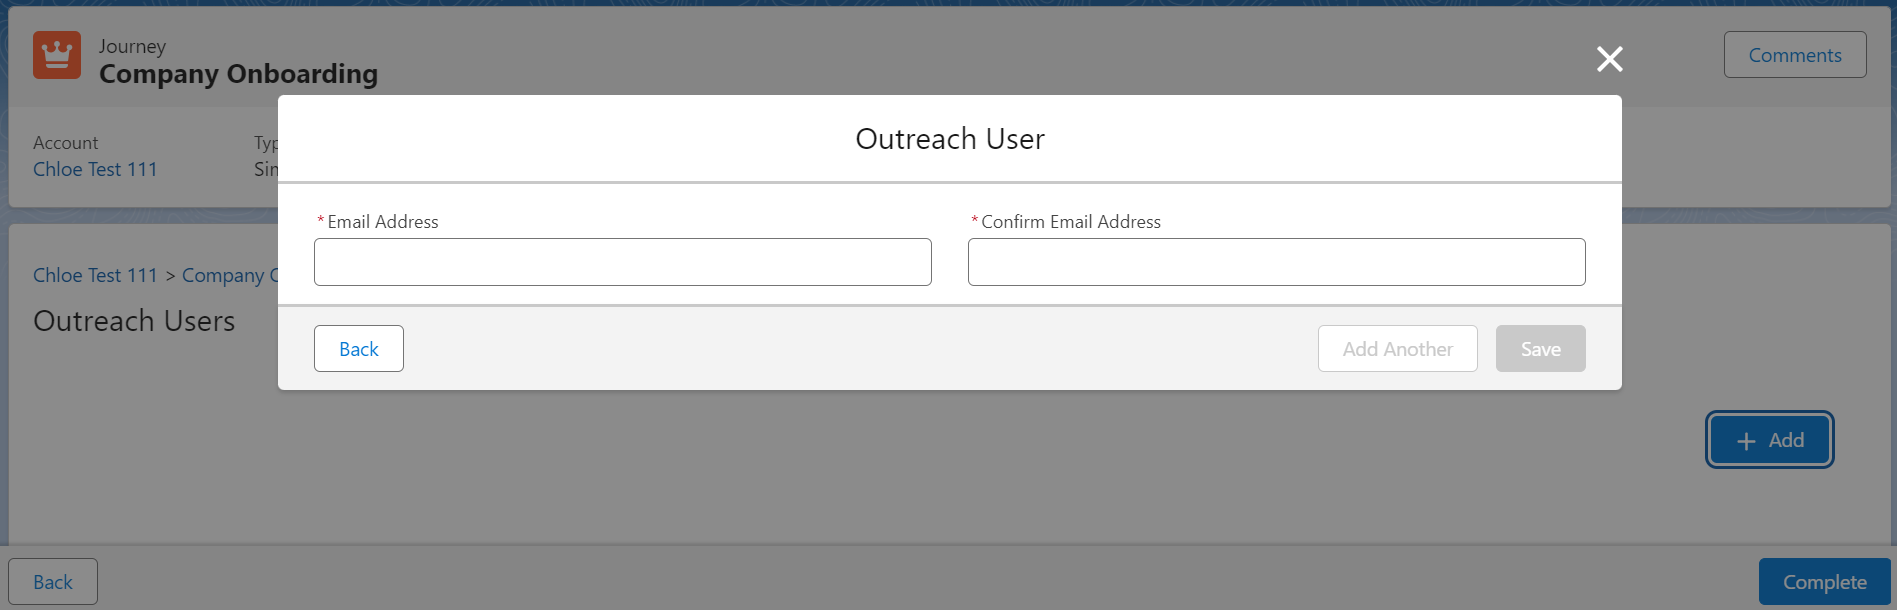
Linking Users
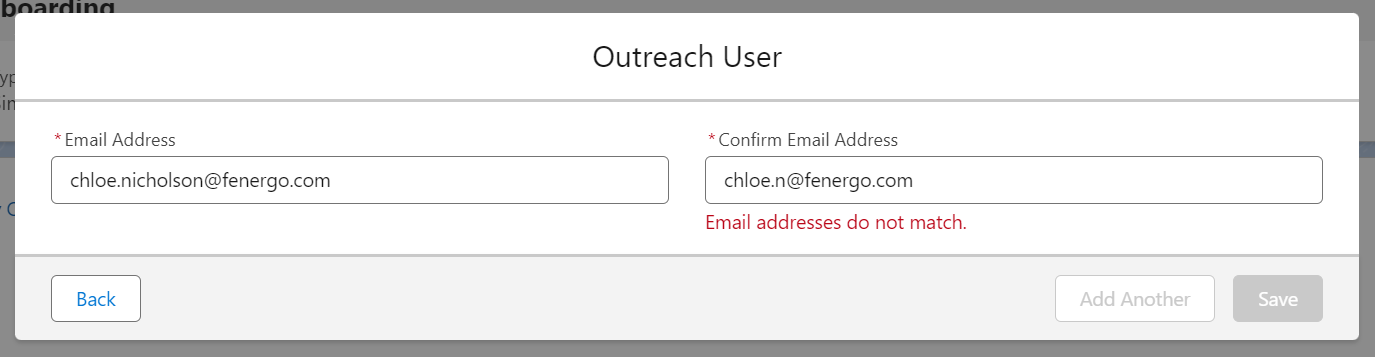
To link a user, click the “Add” button available on the quick link task. This action opens the “Outreach User” modal, where you will need to input the email address of the user you wish to link.
Both Email Address and Confirm Email Address fields are mandatory and marked with a red asterisk.
If the email addresses do not match, an error message will appear below the ‘Confirm Email Address’ field: “Email addresses do not match”.
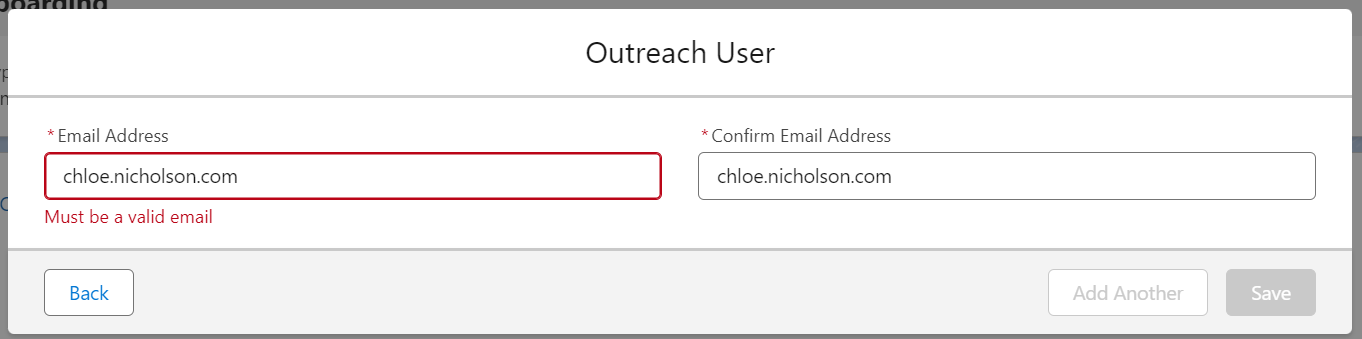
Additionally, only valid email addresses are accepted; if an invalid email is entered, the field will be highlighted red with an error message: “Must be a valid email.”
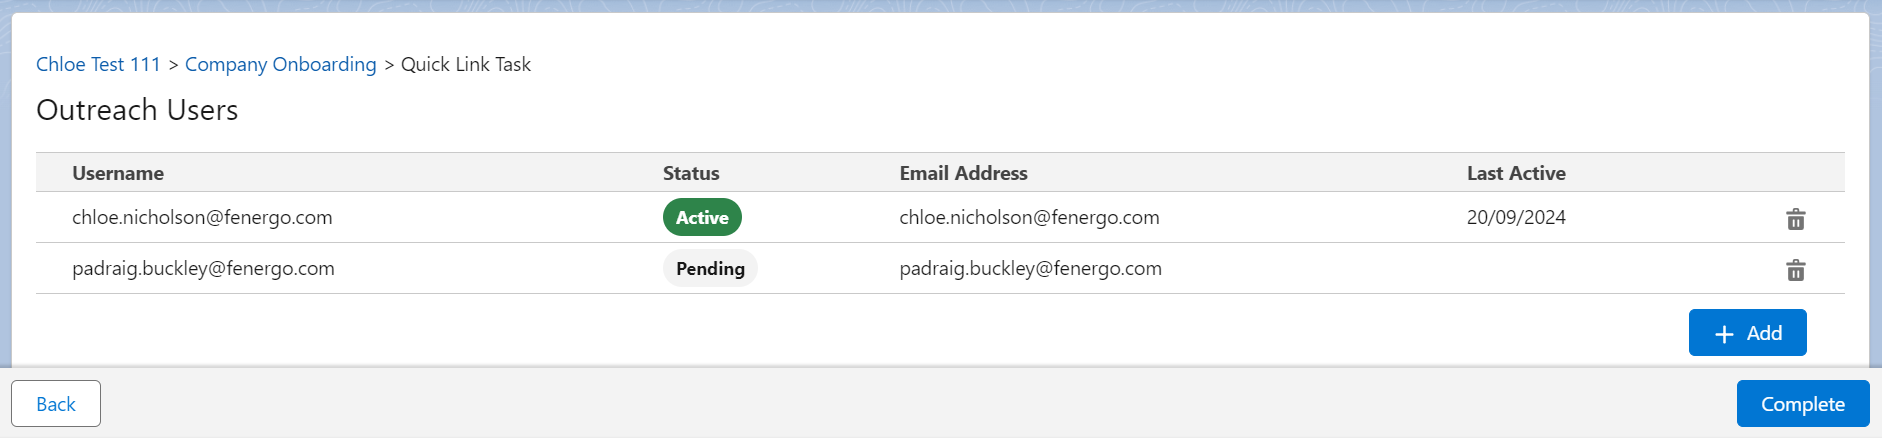
Once the email address is inputted, if it is unverified, the user will receive a verification email to verify their account (User Status = Pending). If the email is verified, the user will receive a notification email when the outreach stage is triggered (User Status = Active).
After linking, the user’s Username, Status (Pending or Active), Email Address, and Last Active date will be displayed in the ‘Outreach Users’ list.
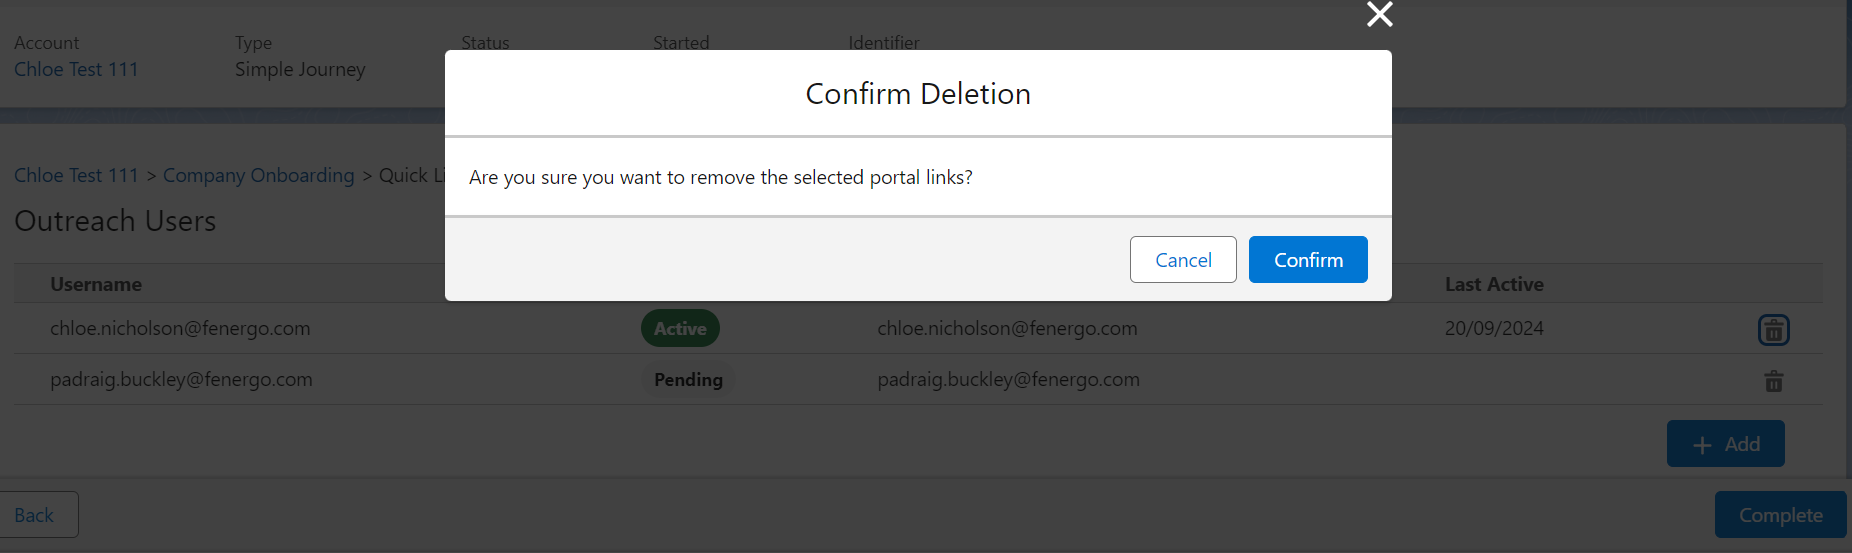
Unlinking Users
To unlink users, select the delete icon next to the relevant user. This action triggers a confirmation modal for deletion, asking for confirmation before unlinking users and updating the display.
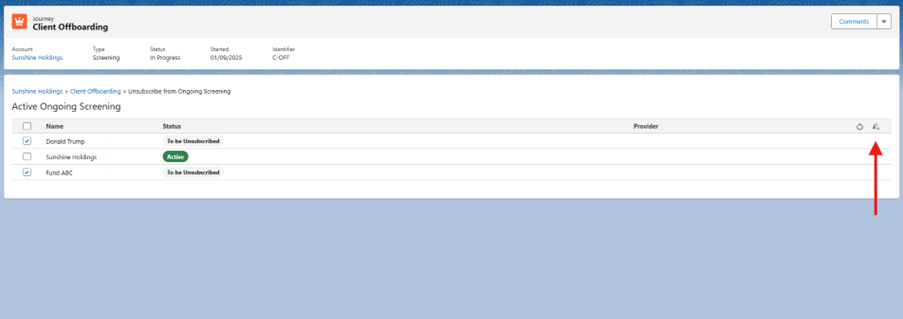
Ongoing Screening Unsubscription Task
The Unsubscribe from Ongoing Screening Task allows users to unsubscribe entities currently enrolled in ongoing screening. Ongoing screening involves the monitoring of an entity profile by a screening provider to capture any changes that may occur after the initial screening has been completed. Entities can be subscribed for Ongoing Screening once they have completed an On Demand Screening process. This will typically occur during the initial Onboarding process or during any subsequent processes where new entities may be added. Salesforce now supports the OGS: Unsubscribe from Ongoing Screening Task within Salesforce.
For more details on Ongoing Screening, please refer to the Screening User Guide.
Please continue reading to learn how to use the OGS Unsubscribe task within Salesforce.
OGS: Unsubscribe from Ongoing Screening Task
A list of entities enrolled in ongoing screening will be displayed within the task.
Users can select one or more entities to mark for unsubscription:
- Click the Mark for Unsubscribe icon: this marks selected entities for removal form ongoing screening.
- A chip labeled To be Unsubscribed will appear beside each marked entity.
To remove the unsubscribe mark:
- Select the entity and click the Reset button: this reverts the entity to its previous status.
- The chip will be removed, and the entity will no longer be marked for unsubscription.
Use the Select All button to mark all entities at once. Click Save and Complete.
Completing the Task
If one or more selected entities are clients (or related to clients) outside the primary customer's hierarchy:
- A warning modal will appear, requesting confirmation to proceed.
- Click Confirm to continue.
Once confirmed:
- The task will complete.
- Entities will display the chip Unsubscribed.
Supported Screening Providers
Unsubscribing from ongoing screening via Salesforce is supported for the following screening providers:
- LexisNexis
- WCO
- GRID
Related Party Data & Documents Task
Overview
This feature introduces the Related Party Data & Documents task to Salesforce, providing Salesforce users with full Documents V2 functionality for selected related parties.
This task only supports the document functionality of the Related Party Data & Docs task, not the data collection capabilities.
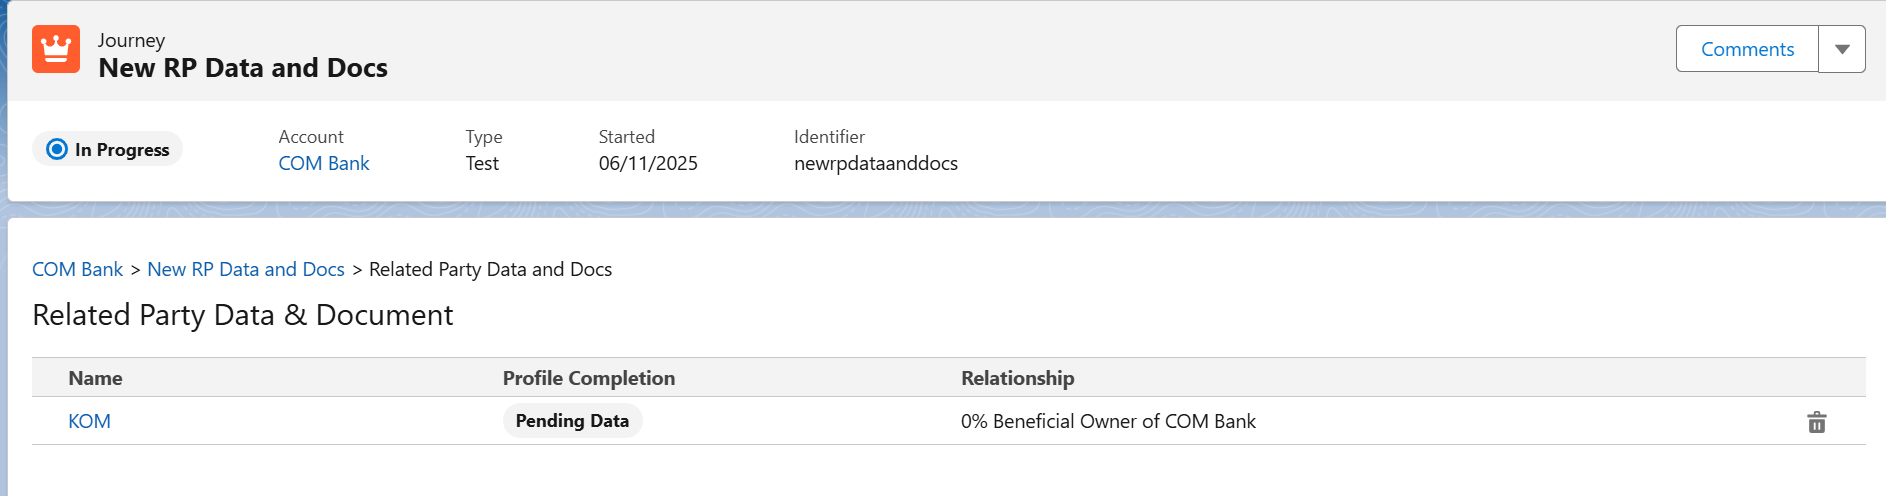
Scoped Related Parties Table
Once a related party has been linked or created, a Related Party Table displays each in scope related party, with their current document compliance status and outstanding actions.
-
The Related Party name is clickable and opens the Document Requirement Modal which displays the related party’s document obligations.
-
The Profile Completion status indicates whether required information has been completed for that Related Party.
-
Users can remove a Related Party from the task by clicking on the bin icon.
This does not delete the related party, it removes it from scope for document collection.
Document Requirements Modal
When a Related Party’s name is clicked on, the Documents V2 grid is displayed with columns.
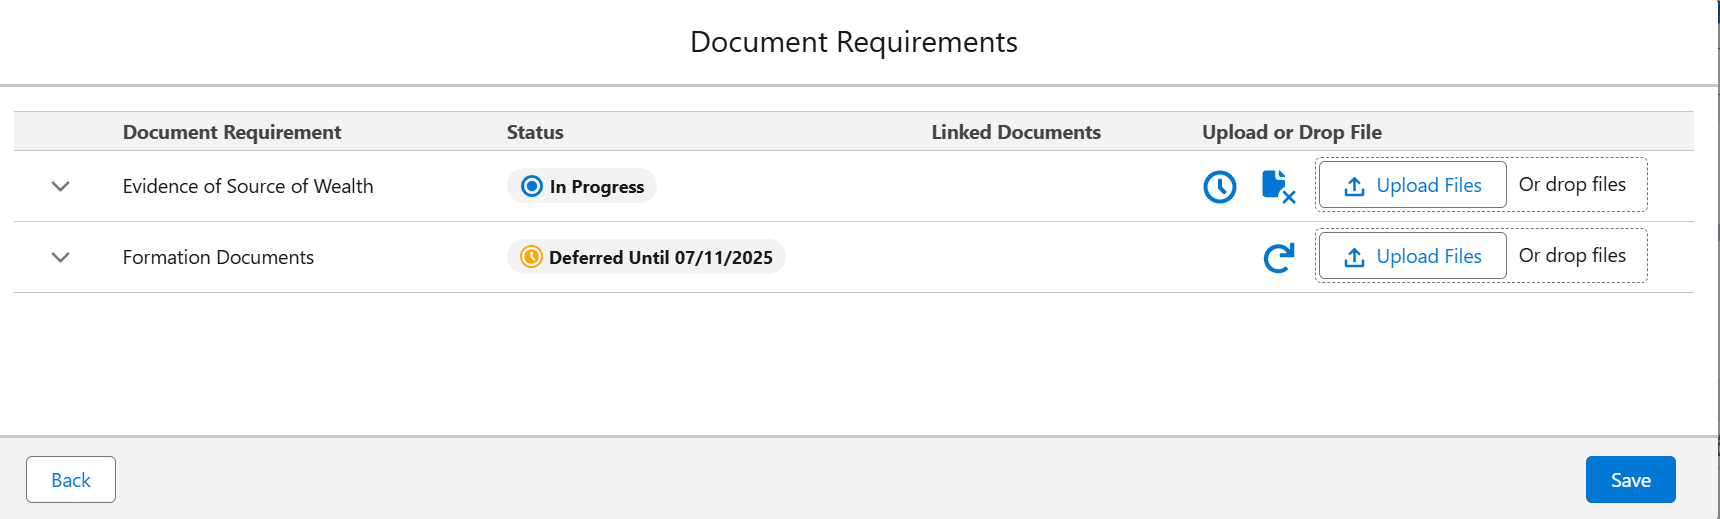
Salesforce users are able to:
- Upload/Drag and drop documents.
- Waive or Defer requirements (with reason/date inputs as configured).
- Expand each requirement to see Acceptable Types & Descriptions.
- Open linked documents in a new browser tab.
Additional Notes:
- This task only supports the document functionality of the Related Party Data & Docs task.
- Related parties must first be created via the existing Related Parties Task, as the hierarchy continues to be maintained there.
- This task must be configured alongside the existing Related Parties Task in a journey.
- Empty state is shown if no related parties are in scope.
For more information on this task and its capabilities please visit Fenergo’s Related Party Adapted Experience Guide
External Data Combined Task
The External Data Combined Task enables Salesforce users to retrieve, review and import verified external data for an entity directly within the Salesforce App. Using third-party data providers, for this feature Orbis, users can enrich a client record, view client details, and related parties directly in the Salesforce App. All configuration and mappings for this functionality are completed within Fenergo.
Fenergo does not certify the accuracy of data from any third-party sources. For further information, please contact the Provider.
Salesforce users can:
- Launch an External Data search directly in Salesforce
- iew automatically generated data matches (where automation is configured)
- Manually request a search (where automation is not configured)
- Refresh the search
- Compare potential matches returned from Orbis
- Select a match to retrieve the external profile
- View Client Data, Shareholders and Company Officials
- Review, Dismiss, Link, Reject and Import entity profile details.
Launching a Search
The External Data Combined task can be initiated directly from Salesforce. The task may be started manually by the user or automatically.
If automation is not configured, the user:
- Opens the External Data Combined Task within the Salesforce journey
- Selects Request to trigger the search

For automation to be active in the task it must be configured in the Journey Builder in Fenergo.
If automation has been configured for the journey:
- The search request is triggered automatically, as the External Data task opens.
- Please note there may be a slight delay while results are being retrieved.
For more information on configuring Automation please refer to the Configuring External Data Guide
Matches Returned
Returned matches are stored as Data Matches and displayed when the task is opened for automation and when the search has been completed when automation has not been configured. The status chip updates to Search Complete.
If multiple matches are returned:
- Results are displayed in a table format
- A chip is used to indicate whether the data match is an Exact Match
- A user selects a match using the Select button to proceed to profile retrieval

If a single exact match is found and automation is configured:
- The full profile is automatically requested.
Retrieving the Profile
Once a match is selected from the External Data Search Results (manually by the Salesforce user or automatically if one single exact match), the full external data profile is requested. The status chip updates to Profile Requested and then Profile Retrieved. The profile is displayed across 3 read only tabs, Client Data, Shareholders and Company Officials.
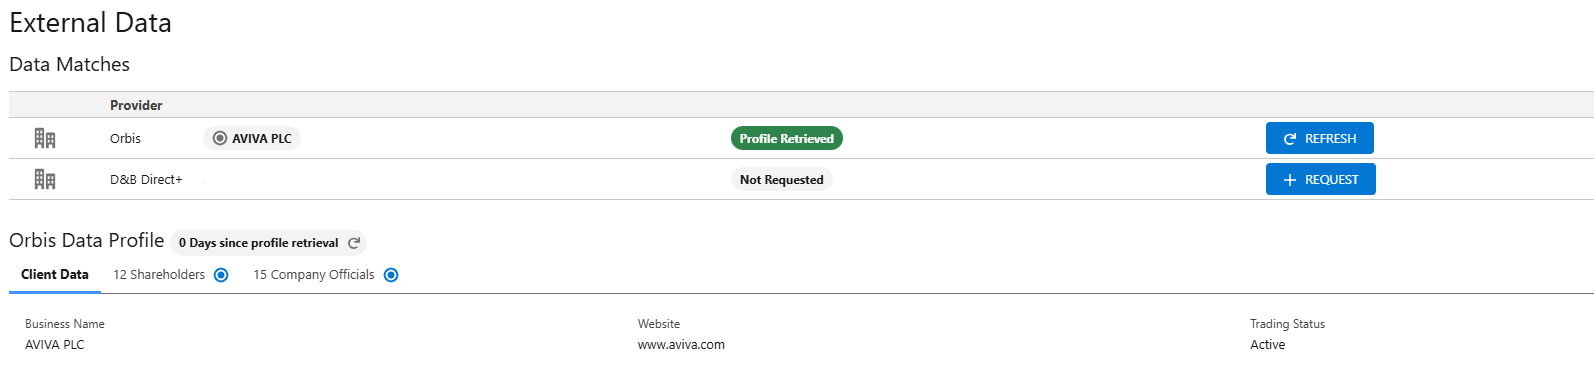
External Data Profile Tabs
Client Data
- Displays information related to the searched entity
- No user actions are available on this read-only tab
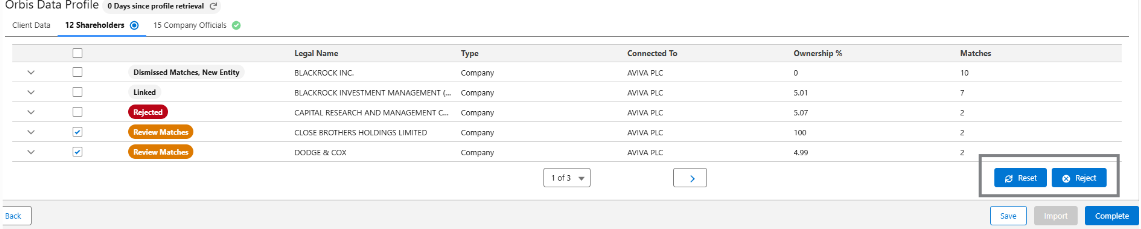
Shareholders and Company Officials
- Displays related party information.
- Where an entity has no probable matches, the entity will be tagged with a New Entity chip to indicate that upon import a new entity shall be created.
- Where an entity has probable match, the entity will be tagged with a Review Matches chip to indicate to the user that action is required.

- Actions available to the user are Dismiss All when a new entity should be created, or Link when an existing entity should be used.
- Should the user not want to import a record, then the user may reject a record by selecting the record individually or in bulk and pressing the Reject button.
- If the user wants to revert a reject decision they have made on a record (e.g., revert from Rejected back to initial state), then the user may reset a record by selecting the record and pressing the Reset button.
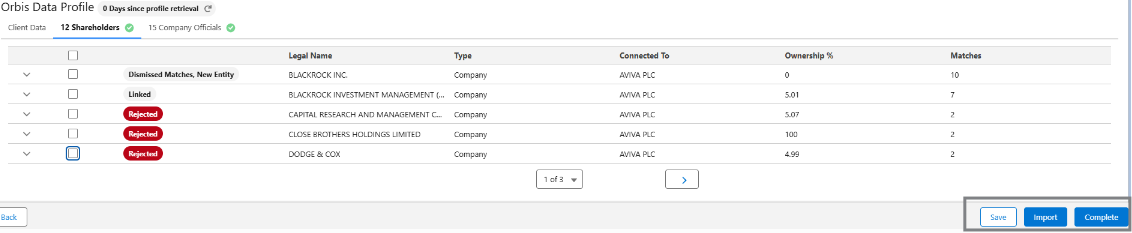
Import
Once deduplication activities are complete and there are no Review Matches alerts outstanding in the Shareholders and Company Officials grid, the Import button becomes available to the Salesforce user. Once the data has been imported the task can be completed.
For more information on configuring and using the External Data Combined Task, please visit Configuring External Data Guide.
Salesforce: Service Level Agreements (SLAs)
Service Level Agreements (SLAs) define how long a user has to complete a journey, stage, or task. SLAs are configured in Fenergo’s Journey Builder and are now supported in Salesforce, allowing users to track deadlines consistently across both platforms. To display a SLA status in Salesforce, the AdvancedDashboardAccess permission is required for the user.
SLAs can be configured at:
- Journey level – overall time commitments for the journey.
- Stage level – commitments for a specific stage within a journey.
- Task level – commitments for completing individual tasks.
Once configured in Fenergo, the SLA icons and hover-over cards will automatically display in Salesforce.
SLA Icons and Hover Cards
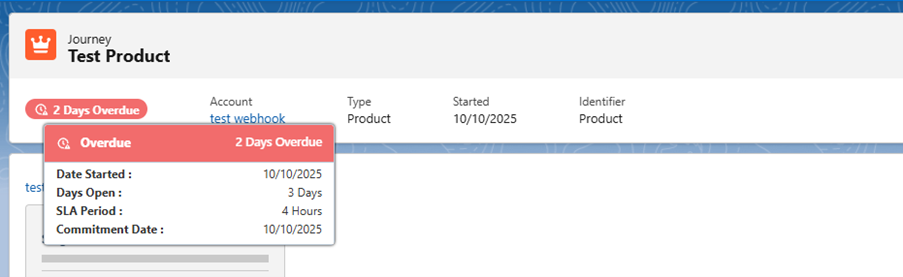
Wherever an SLA is configured, an SLA icon will appear beside the item (journey, stage, or task). Hovering over this icon displays a card containing SLA details.
The card displays the following information:
- Date Started – when the item began.
- Days Open – how many days it has been active.
- SLA Period – the committed SLA duration.
- Commitment Date – the due date based on SLA.
Note: If no SLA is configured, only Date Started and Days Open will be displayed.
Journey SLAs can be viewed in two locations within Salesforce:
-
In the Journeys list
-
When opening a journey, an SLA card appears just below the journey title, providing the same SLA information.
Virtual Documents
Virtual documents represent a file that can be linked to entities, journeys, and document requirements within Salesforce. Unlike standard documents, virtual documents are not stored in Salesforce but instead point to a file hosted externally via a URL. This feature allows users to manage external files without physically storing them in Salesforce. These can be created and viewed in the following areas of Salesforce:
- Documents v2
- Documents v1
- Related Parties
Creating Virtual Documents
User will click on the “Create Virtual Document” icon.
The Virtual Document modal will open, prompting the user to enter the following mandatory fields:
- Name: Name of the document/file.
- Document Type: Classification of the document. For example: Account Opening Form.
- Document URL: The URL where the file is stored. This must begin with https://
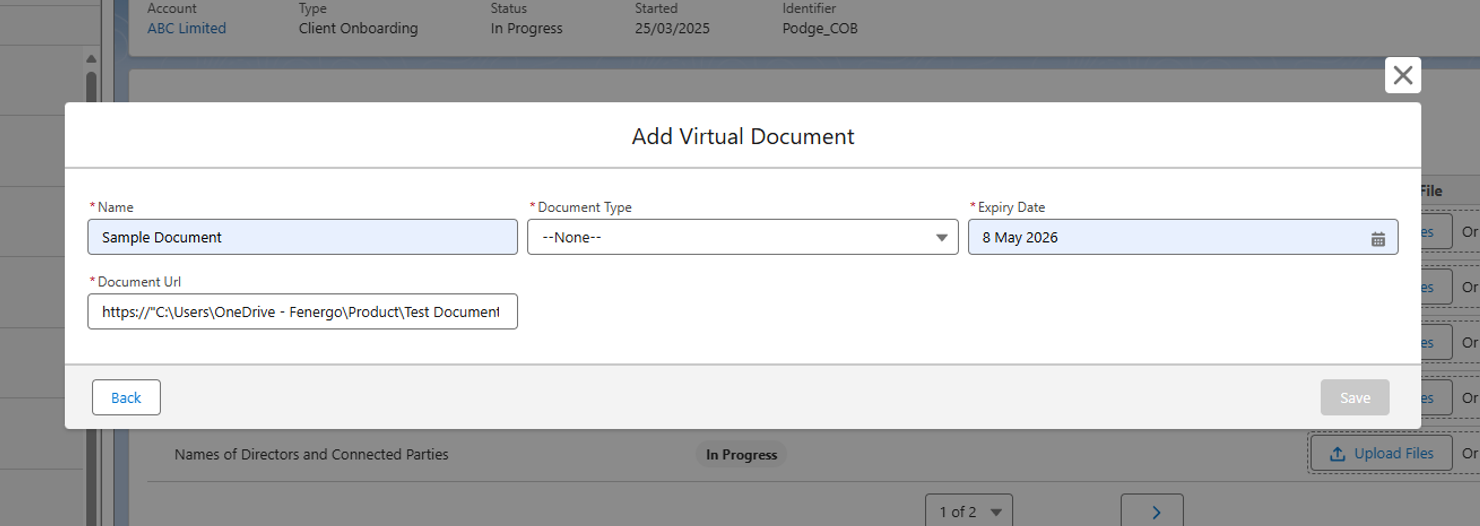
Once all fields are filled, the user clicks the Save button to close the modal and save the virtual document.
To interact with virtual documents, users need specific permissions.
- ‘Document Management Create Virtual’ Permission: This permission allows users to see the “Create Virtual Document” icon and create virtual documents.
- To give a user this permission, go to the Security Configuration section of FenX.
Viewing Virtual Documents
Once created, virtual documents will appear in the relevant grid/ area within Salesforce. Each virtual document will have a unique chip, which includes an icon distinguishing it from a standard document. Clicking on this opens the linked URL in a new browser tab.
Data Field Types and Properties
The following Fenergo SaaS field types are available in Salesforce:
- Text Field
- Date
- Number
- Select Dropdown
- Multiple Select Dropdown
- Text Area
- Linked Select Dropdown
- Linked Multiple Select Dropdown
Mandatory Fields
If a field in Fenergo SaaS is configured to be mandatory it will be flagged in Salesforce within the task view. In addition, a user will not be able to complete a task without providing all mandatory values.
Salesforce now supports dynamic validations as well as static validations for data requirements in Global Policy, allowing Salesforce admins to apply conditional validations (e.g., mandatory, read-only etc.) to various data field types.
This is supported on the Data task and the Related Party task.
Past and Future Dates
If a date field in Fenergo SaaS is configured to disallow a past or future dates an error message will be presented to notify the user of the restriction at the field level in Salesforce.
Regex Validation
If a text field in Fenergo SaaS is configured to follow Regex validation, then an error message will be presented to notify the user of the validation.
Logic Engine Integration
The Salesforce app will display fields as determined by the logic engine in Fenergo SaaS. Therefore, if there is a scoping rule on a field the field will only be displayed dependent on the rule.
Read-only Fields
If a field is configured as read-only in Fenergo SaaS it will be presented as read-only in Salesforce.
Note: There is no configuration work required in Salesforce for any of the above validations. They are configured in Fenergo SaaS only.
Read-only Text Area Fields
This opt-in feature enables read-only Text Area fields in Data Tasks to automatically expand to show their full content.
The Auto Expand Read Only Text Areas toggle allows Salesforce administrators to control whether these text areas auto-expand or not.
Please refer to the Configuration User Guide for configuration information.
Data Groups
Data groups configured captured on Fenergo SaaS task will be displayed to the user within the applicable task window in Salesforce. Via Salesforce the user has the ability to Add, Edit or Delete an entity. The screenshot below provides an example of an address, contact and tax identifier data groups as displayed on a task via the app.
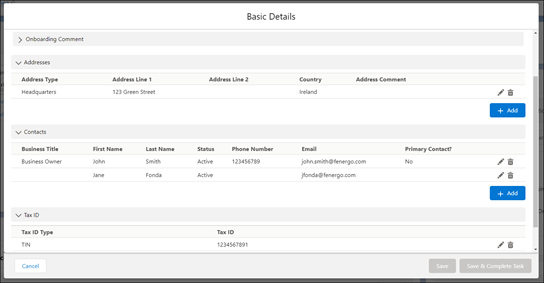
If the user clicks on Add or Edit it will open an additional window from which they can add a record or edit an existing entry.
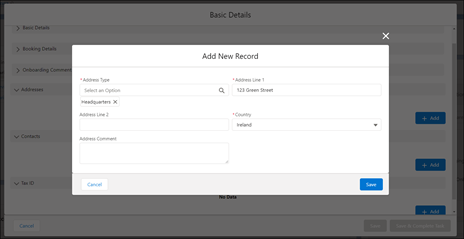
On selecting delete the entry will be removed from the group. The user must Save the task in order to apply any change made to a data group record.
Data Group Mandatory Requirements
If a data group is configured in Fenergo SaaS as mandatory this will be presented against the grid in Salesforce.

The user will be able to save the task without providing the mandatory grid records.
If the mandatory fata group requirements are not captured the validation message, as configured in Fenergo SaaS, will be returned to the user to inform them of the required records. The task cannot be completed if the mandatory requirements are not captured.
Data Group Default Values
Default Values are supported in our Fenergo Salesforce app. Default Values are pre-set values that automatically populate a field when the field is triggered in a Journey. When a Default Value is configured for a Data Group field in the Fenergo SaaS platform, this value will automatically appear in the corresponding field in Salesforce.
Data Group Conditional Values
Conditional Values are also supported in our Fenergo Salesforce app. Conditional Values are values that populate a field based on specific conditions being met. When a Conditional Value and its condition(s) are set for a Data Group field in Fenergo SaaS, and a user interacts with that field within a Salesforce journey, the Conditional Value will display for that field if the condition(s) is met.
Navigation - Breadcrumbs
To allow a user to navigate between Accounts, Journeys and Tasks, breadcrumb navigation is available.
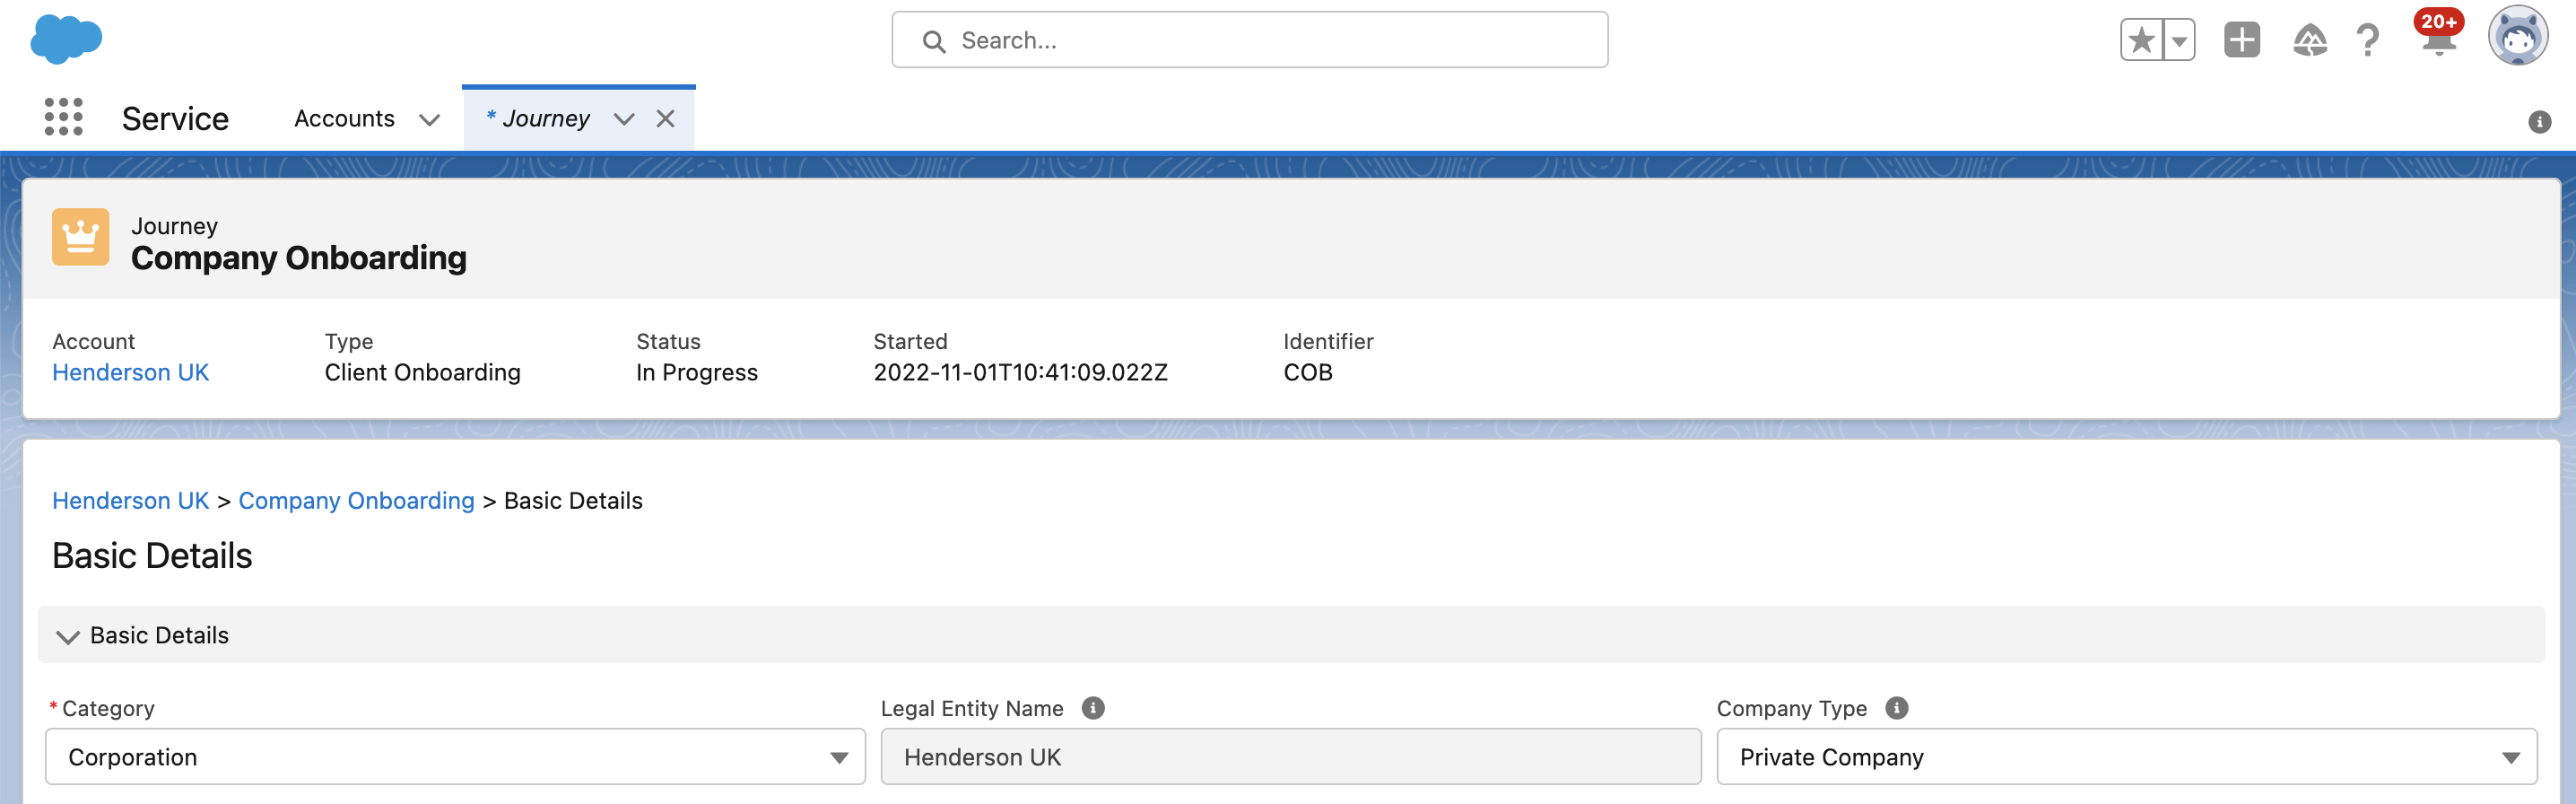
When a user is on a task, the breadcrumb will display Account Name > Journey Name > Task Name. Clicking on the Account Name will navigate the user to the Account Homepage in the Fenergo SaaS app. Clicking on the Journey Name will navigate the user to the journey home page.
When a user is on the journey view, the breadcrumb will display Account Name > Journey Name. Clicking on the Account Name will navigate the user to the Account Homepage in the Fenergo SaaS app.
Breadcrumbs are not visible on the Account homepage in the Fenergo SaaS app.
Task Reassignment
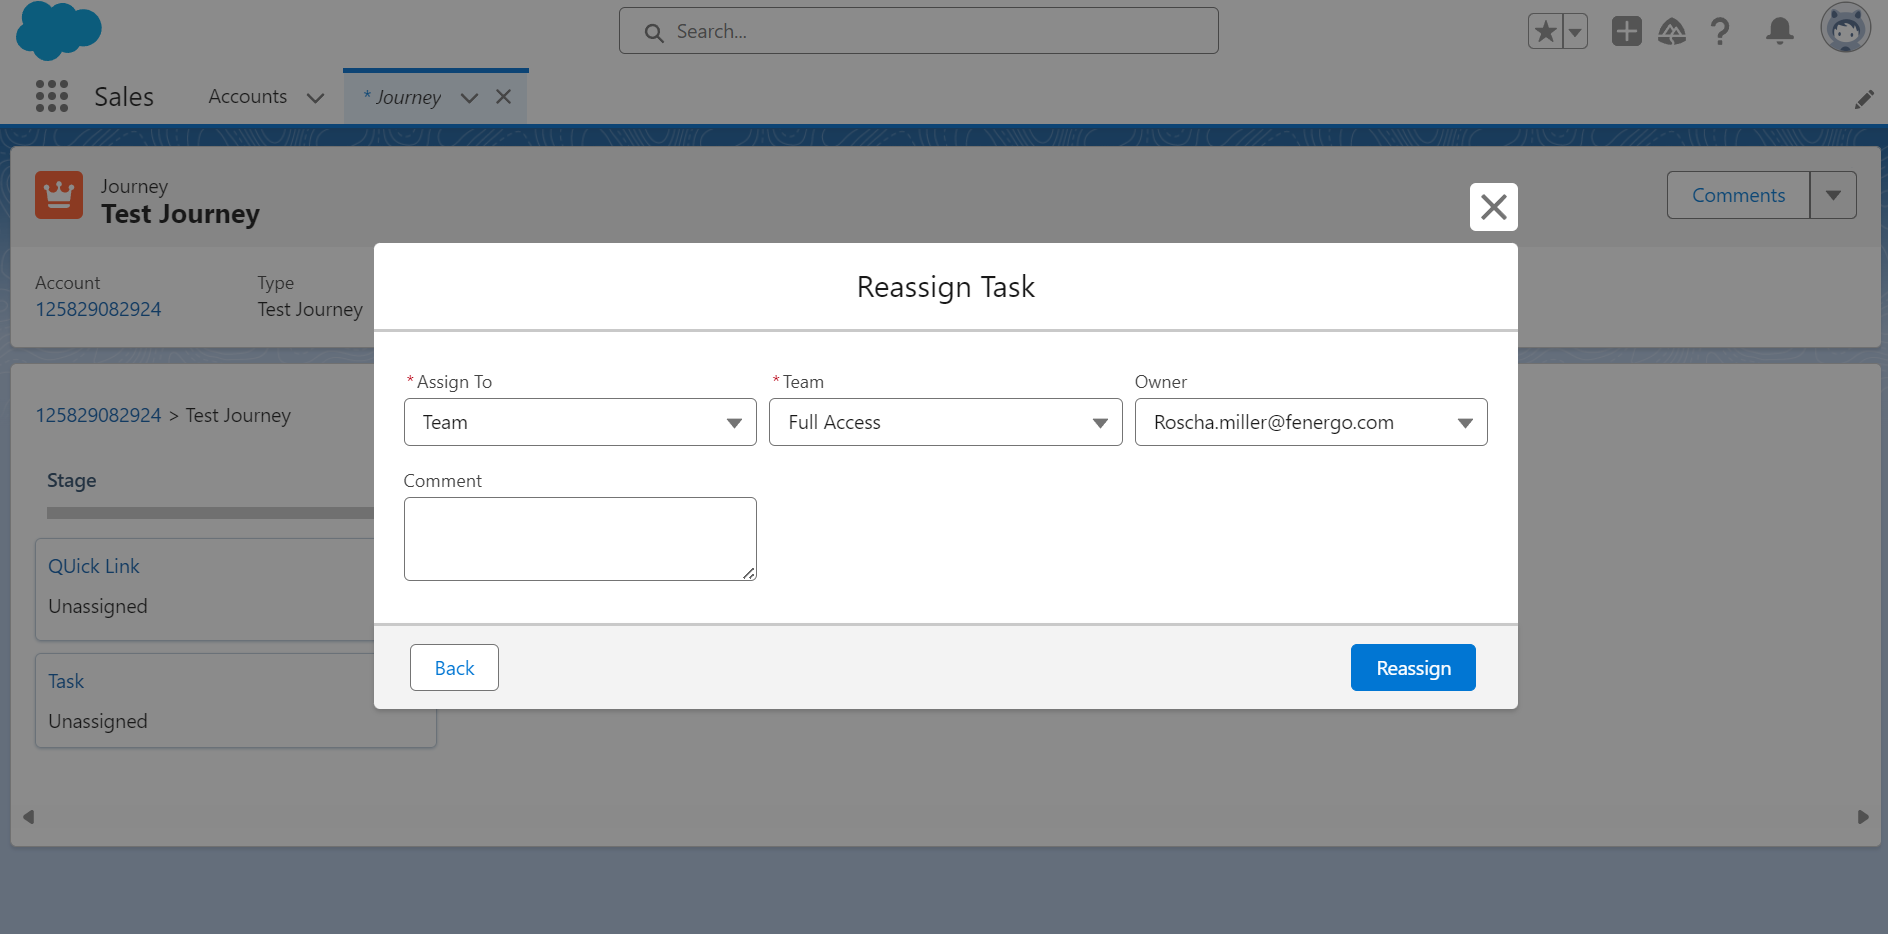
Users with the task reassignment permission have the capability to change the assigned Team and/or owner of a Task and can be clicking on a context menu on a task in a journey which launches the Reassign Task modal.
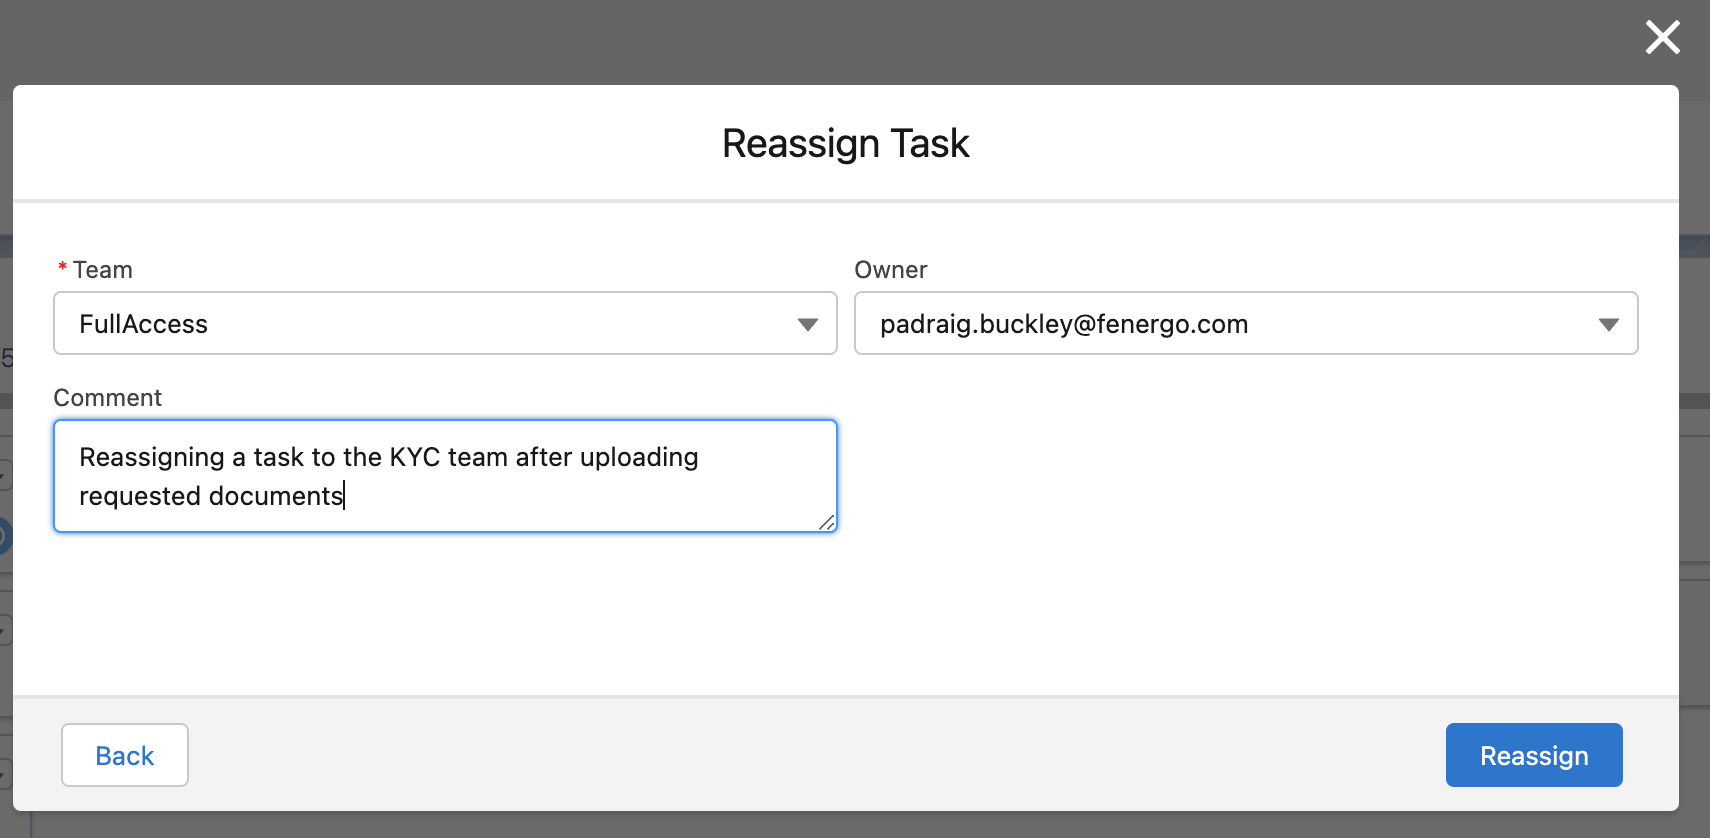
Reassign Team:
A User may reassign their own Tasks to any Team (i.e., they must be on the team that it is currently assigned to). A User can also assign tasks to any Team, when the Task does do not have an assigned Team (i.e., is an unassigned Task).
Assign Task Owner:
The owner that is assigned is the only user that can Complete the task. Note: The list of owners is drawn from the currently assigned Team (i.e., you can only assign an owner that is in the assigned Team). Only those Users (including the User assigning the Owner) that have the assigned Team in their User set-up will appear in the "Owner" lookup. Updating the Team will blank out the Owner.
The user can capture an optional comment when reassigning a task which is displayed in the notifications area in Fenergo SaaS if enabled and/or chatter feed if enabled.
Task Reopening
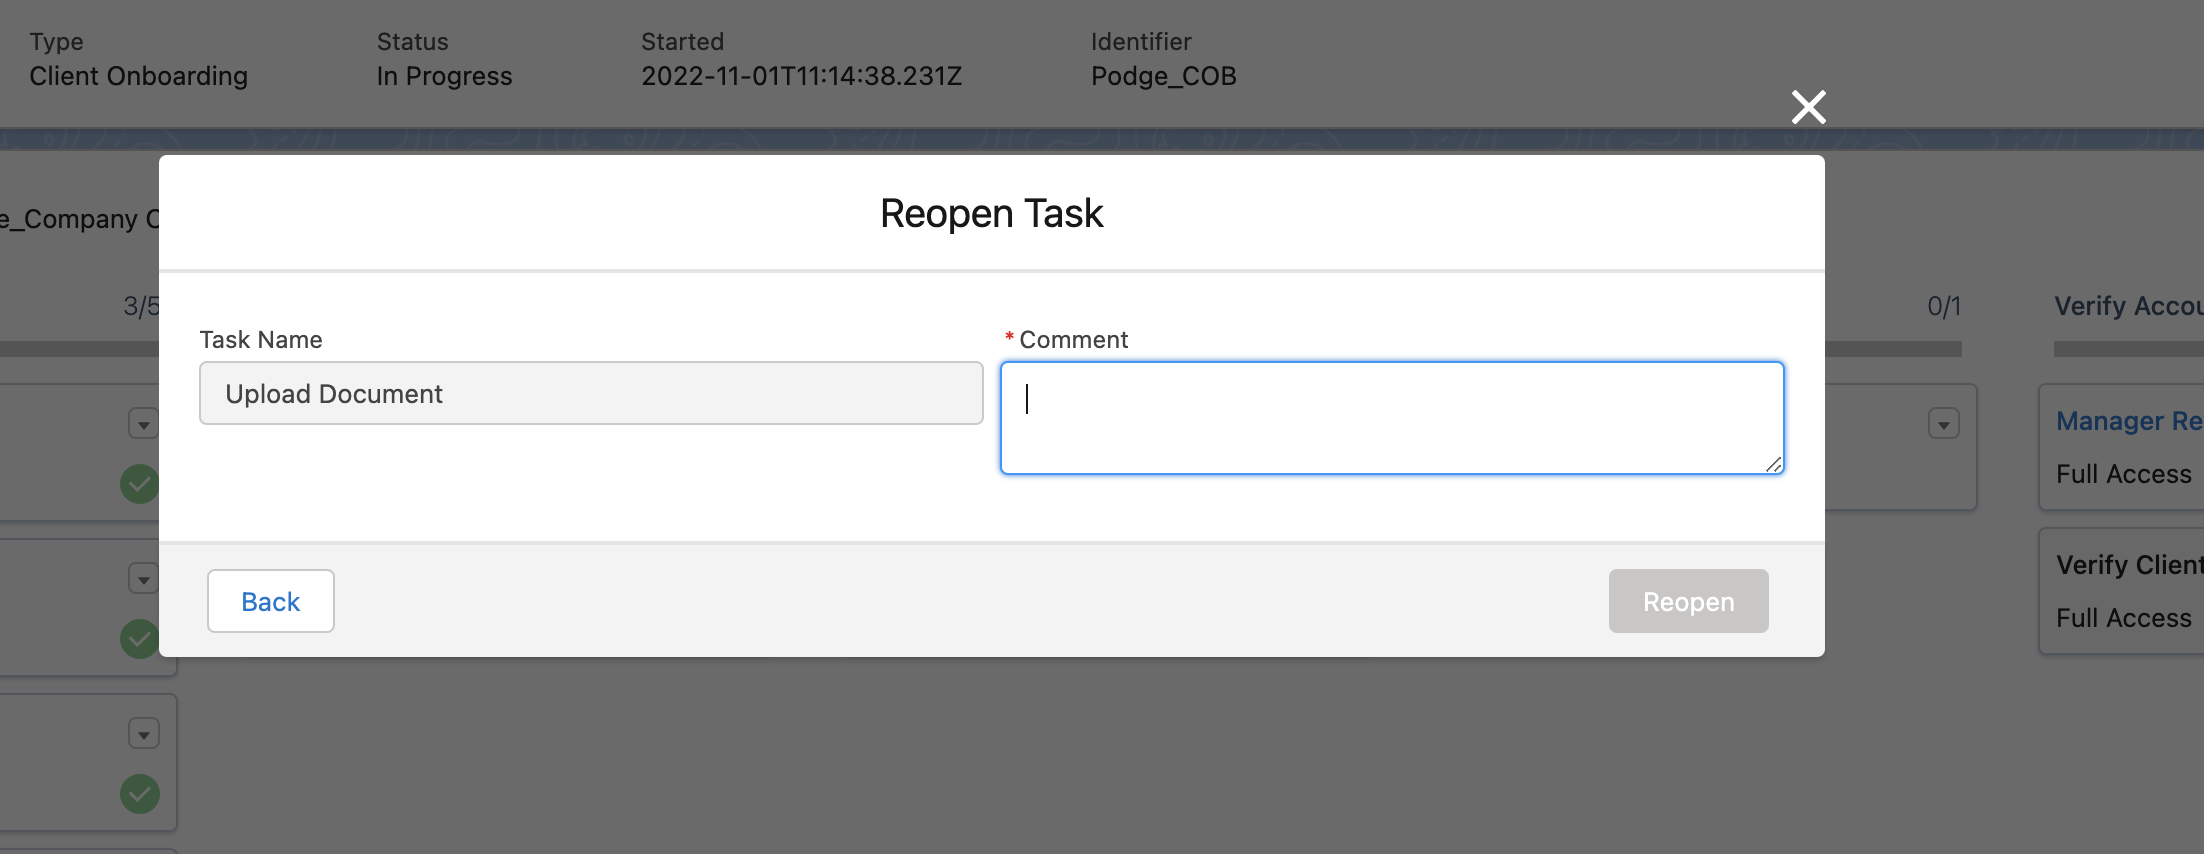
Users can use the context menu on the journey view completed tasks to reopen them and refer the workflow to earlier in the Journey.
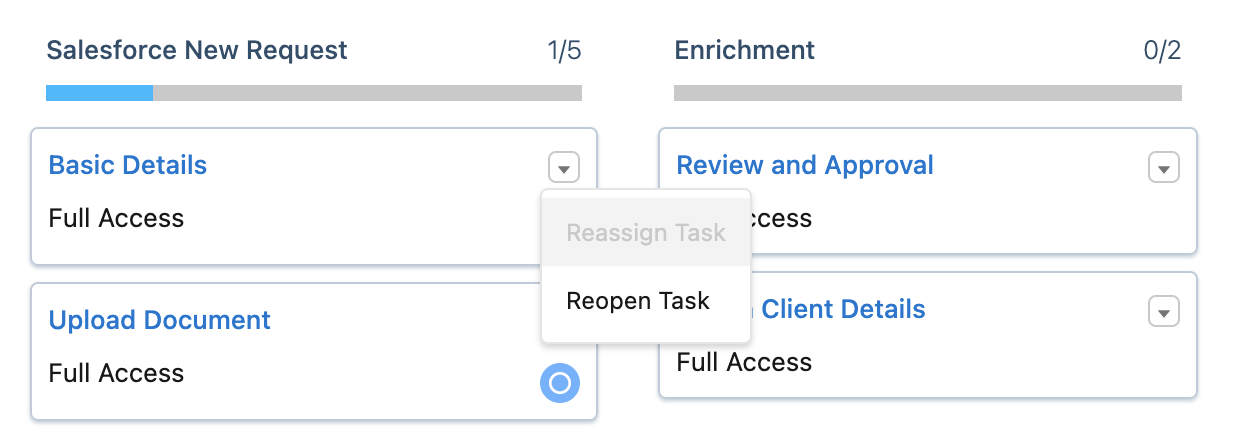
This launches the Reopen Task Modal, where the user can capture a comment that can be viewed in the notification area in Fenergo SaaS or can be sent via chatter to the relevant user (if enabled).
When Parallelism is not enabled, any conditional tasks will be discarded, and their conditions re-assessed when the Journey progresses back to that point. In standard sequential format, all Tasks in between the current in-progress Task and the selected Task to be reopened will also be reopened. If Parallelism is enabled, than only the selected Task will be re-opened. Please see the Parallelism section of the Journey User Guide for more information.
For a user to have the ability to reopen a task from Salesforce, the Journey Reopen Task permission is required. If this permission is not assigned, the Reopen Task option will be disabled in the context menu. Users in the Fenergo Salesforce app can only reopen supported task types (Data, Document, Review, Manage Products and Manual).
Launch Journey
From the Journey component it is possible to launch a journey for an entity by selecting the Launch Journey button.

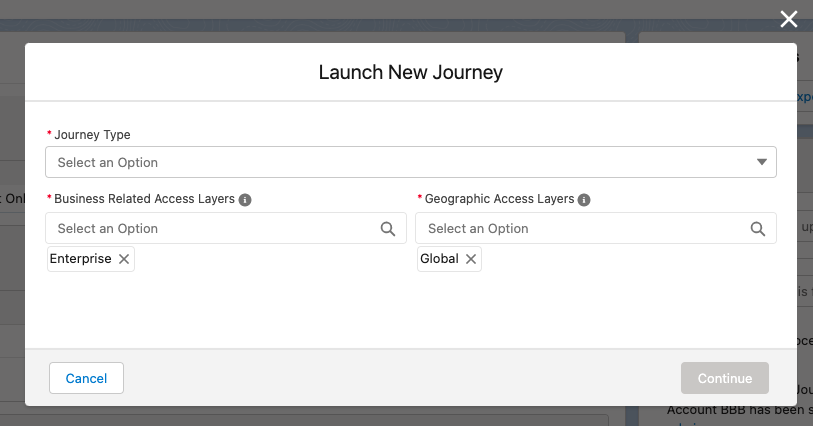
This will open the Launch New Journey popup, as in the screenshot below, from which a user can select any journey type available as defined in Fenergo SaaS.
To launch a journey the Business Related and Geographic Access layers must be provided and will set the access layers for the specific journey launched. If Enterprise as a Business Related Access Layer and Global as a Geographic Access Layers are set it will mean that the entity is available to all users. If Enterprise or Geographic are selected, then no other values from the respective field may be selected.
If a journey does not exist for an entity type or if the user does not have the applicable Fenergo SaaS permission (Journey Create) an error will be returned.
Users can now refresh the journey list in the Salesforce app, by clicking on the refresh button on the journey component, as seen below.

Journey Comments
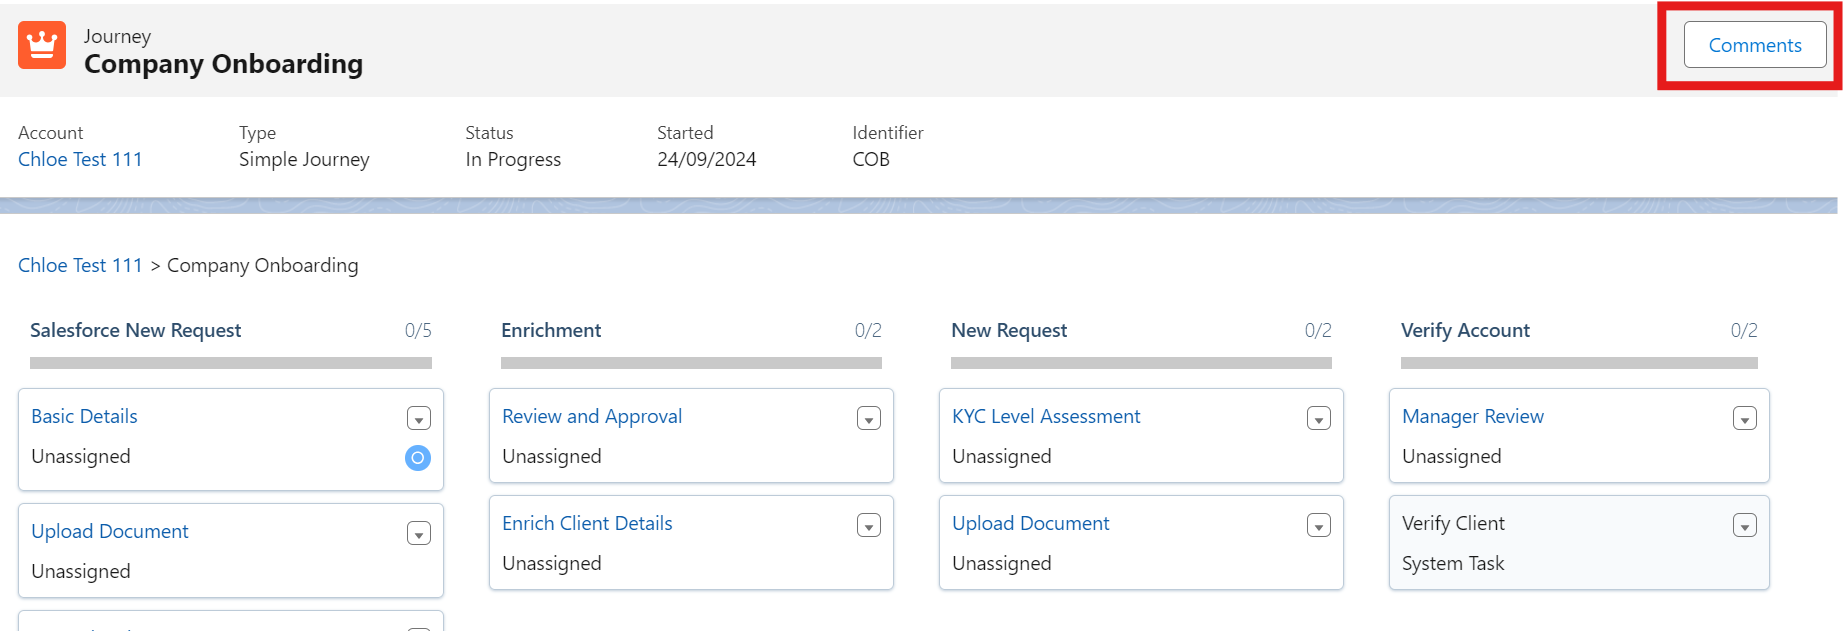
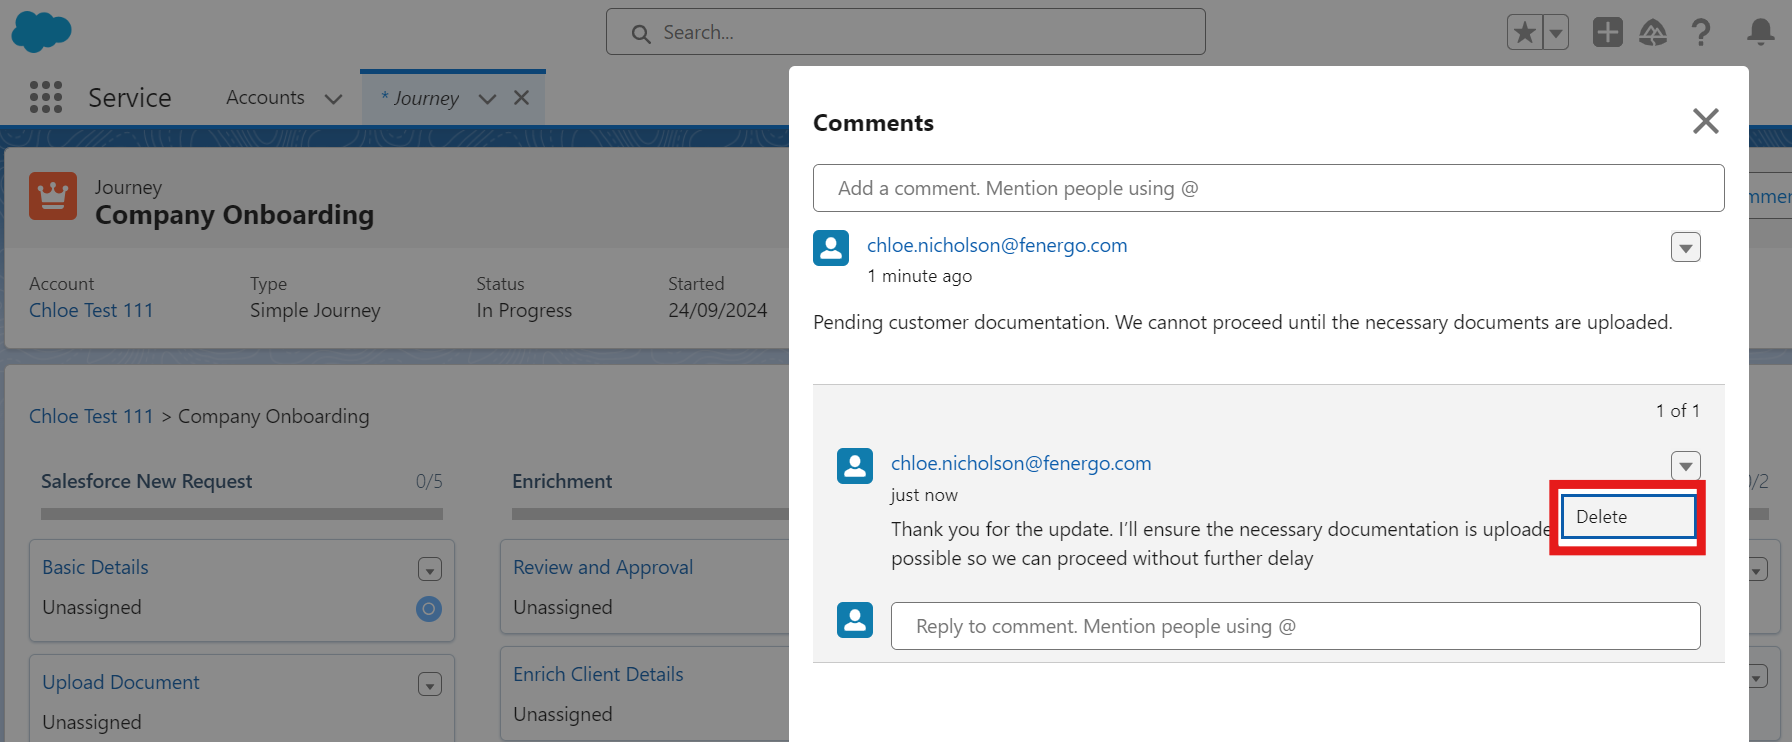
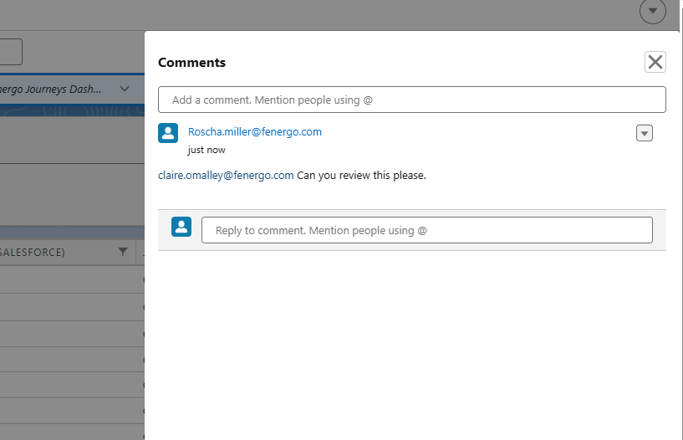
The Comments feature in Salesforce allows users to leave notes on Journeys. Comments are accessible via a shelf in the top right-hand corner of the screen by clicking the Comments Button.
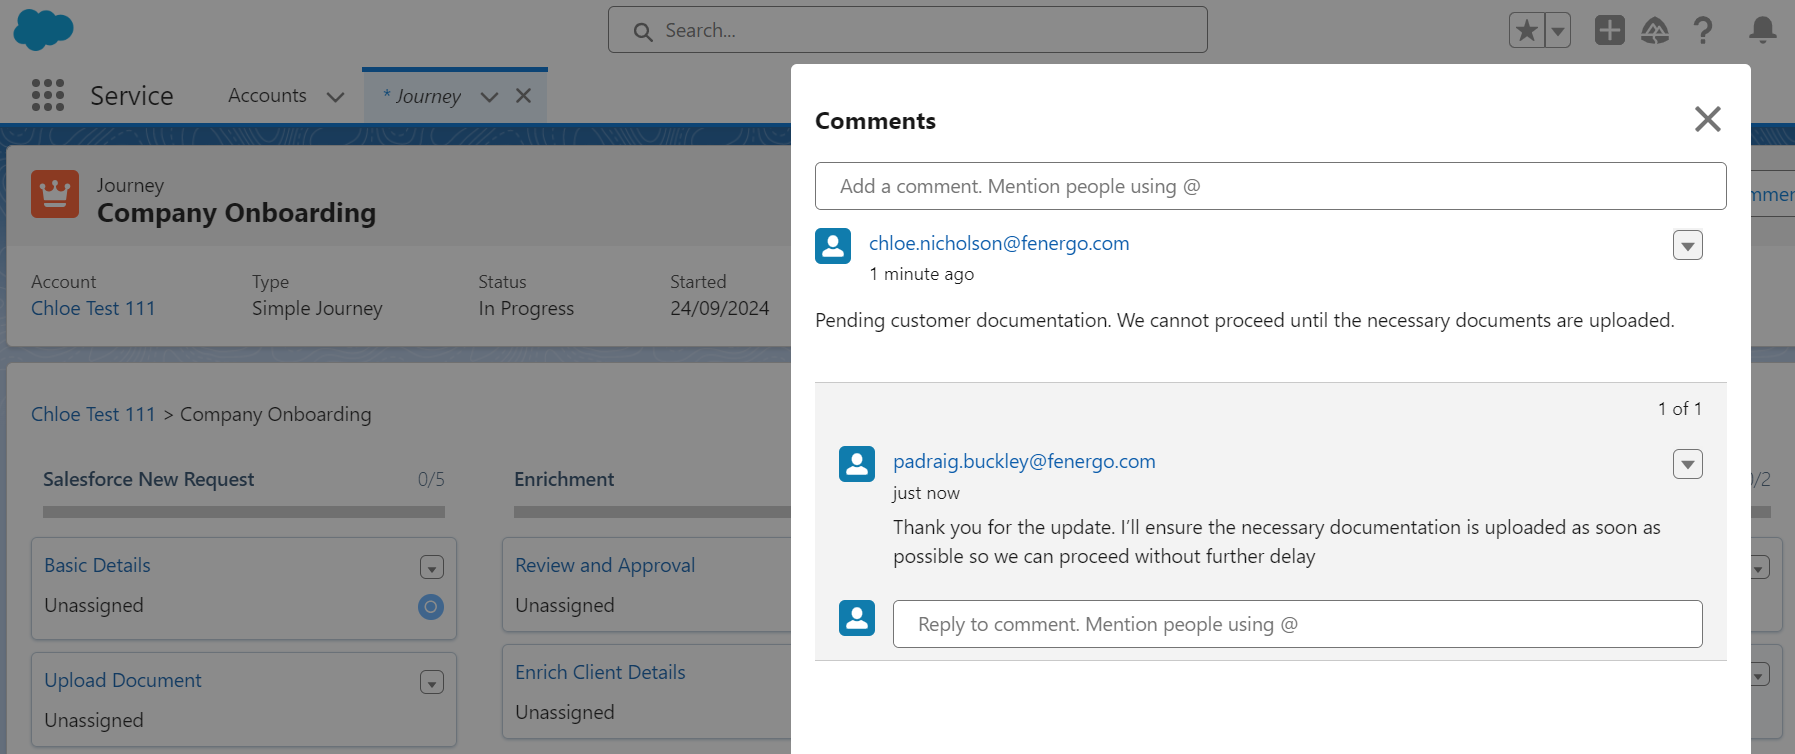
Comment Structure:
- Viewing Comments: Comments are organised in a structured manner for easy access and readability.
- Creating Comments: Users can create a primary comment, up to 1,100 characters long. This is useful for sharing information not included in the KYC/AML file, helping users coordinate their work more effectively. For example, users might explain why a task was reopened or detail specific information that is still pending.

- Replies: Replies to primary comments are limited to 350 characters. Users can only reply to primary comments, with no nested replies allowed, ensuring that comment threads remain clear and manageable.
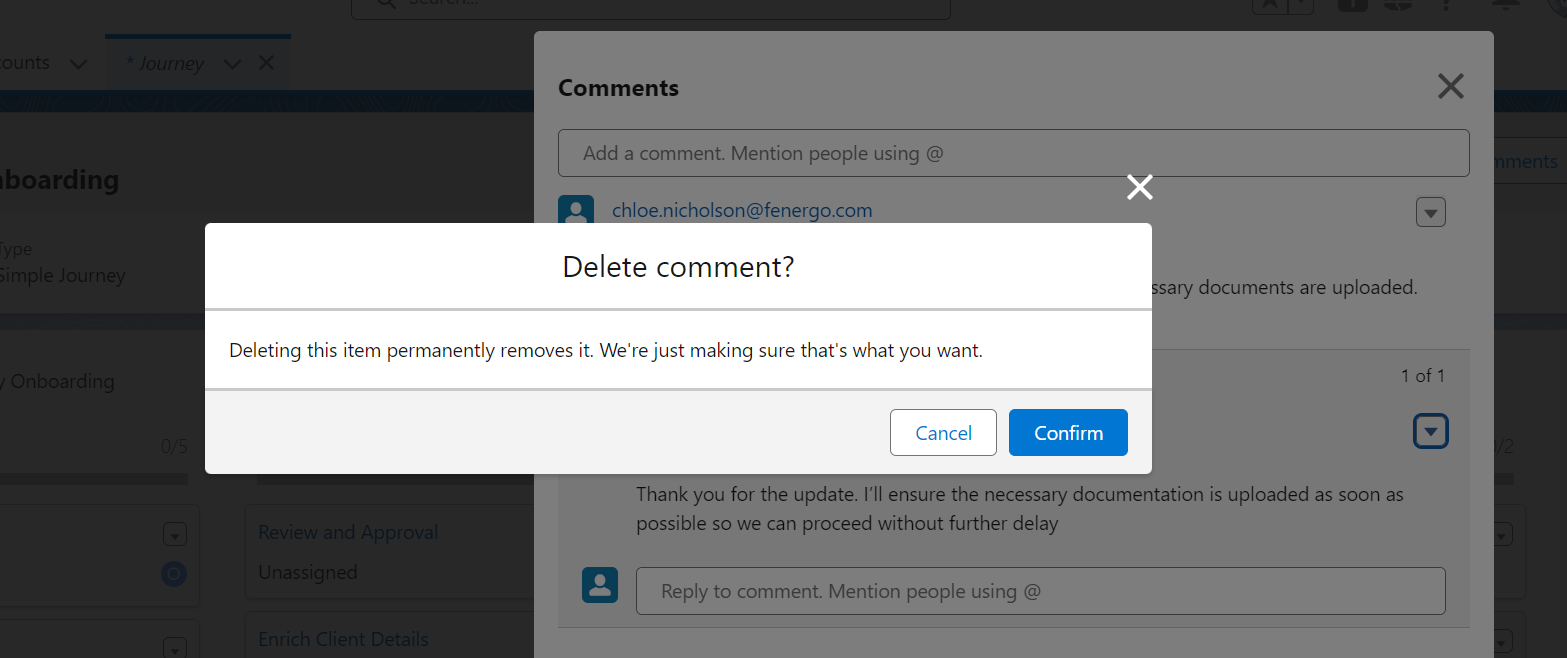
- Deleting Comments: Users can delete any comment or reply, whether posted by themselves or others, providing flexibility in managing comment threads.
@ Mentions:
- Mentioning Users: Users can mention Fenergo SaaS users by using the ‘@’ command and selecting from those with access to the relevant Journey. This helps draw attention to specific comments and ensures relevant team members are notified.
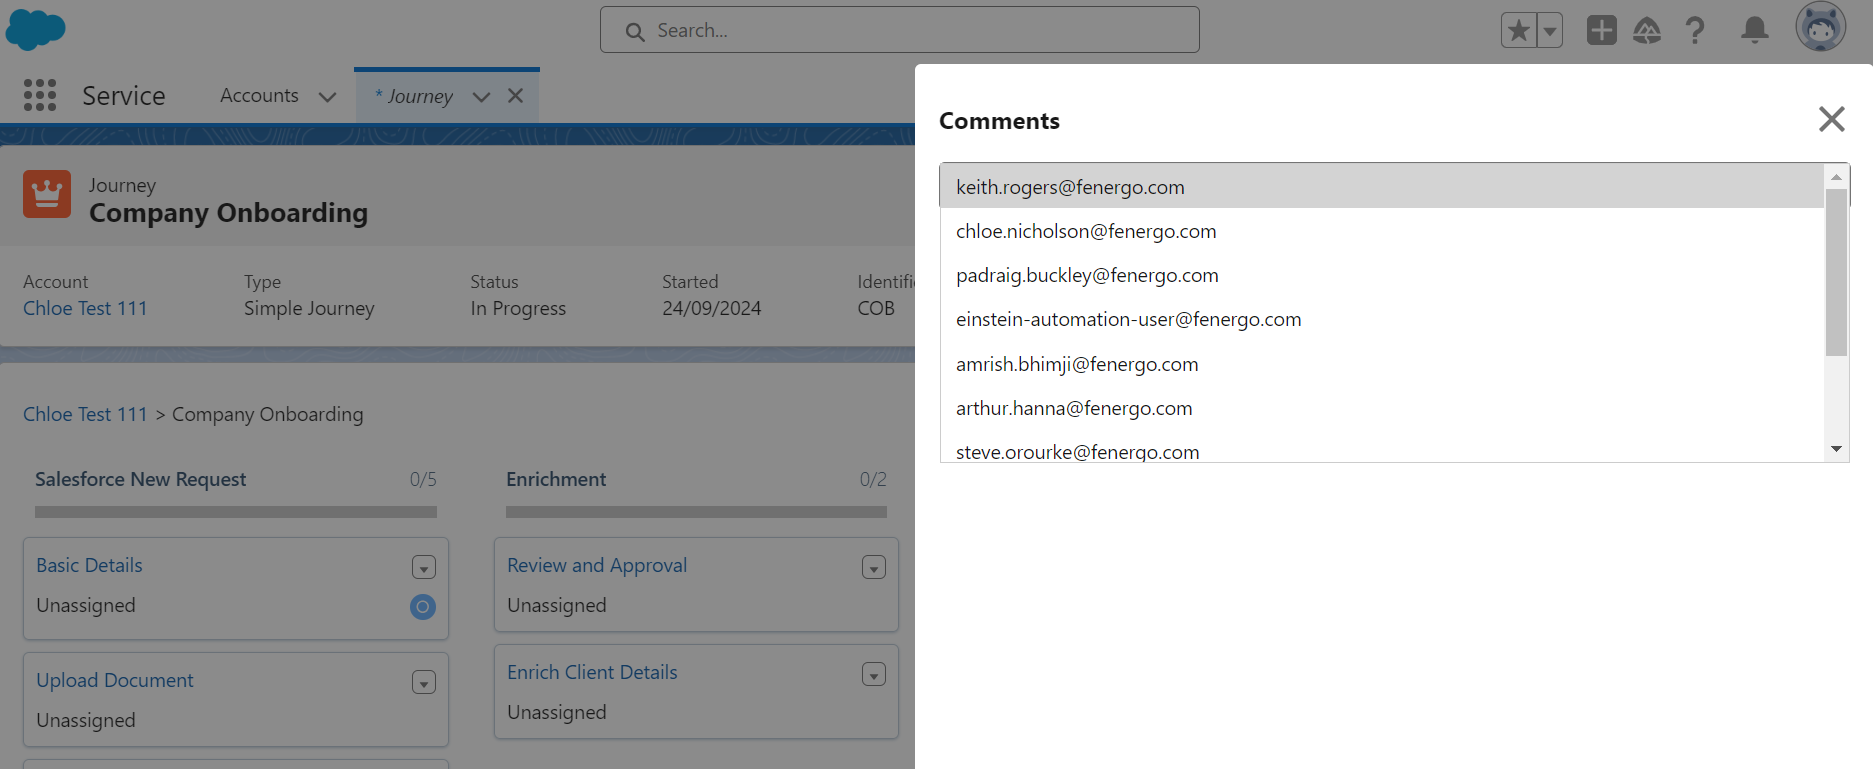
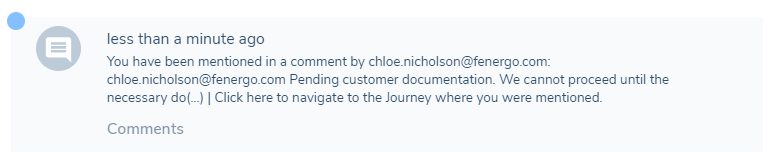
- Notifications: Mentioned users receive notifications in the Fenergo SaaS application. To receive these notifications, users must enable Comment Mention Notification. These notifications include the commenter’s name, the first 100 characters of the comment, and instructions on how to navigate to the relevant Journey.
Permissions:
The Comments feature includes several permissions:
- Access to Comments: Users have the ability to launch the comments shelf, allowing them to view and interact with comments.
- Create a Comment Thread: Users can create new comment threads, initiating discussions or providing updates.
- Reply to a Comment Thread: Users can reply to existing comment threads, contributing to ongoing discussions.
- Delete Any Comment: Users have the ability to delete any comment or reply, regardless of who posted it.
- Delete Your Own Comments: Users can delete comments or replies that they created, giving them control over their own contributions.
Journey Owner
Users can assign a Journey Owner, who will act as the sole user responsible for the successful completion of a Journey.
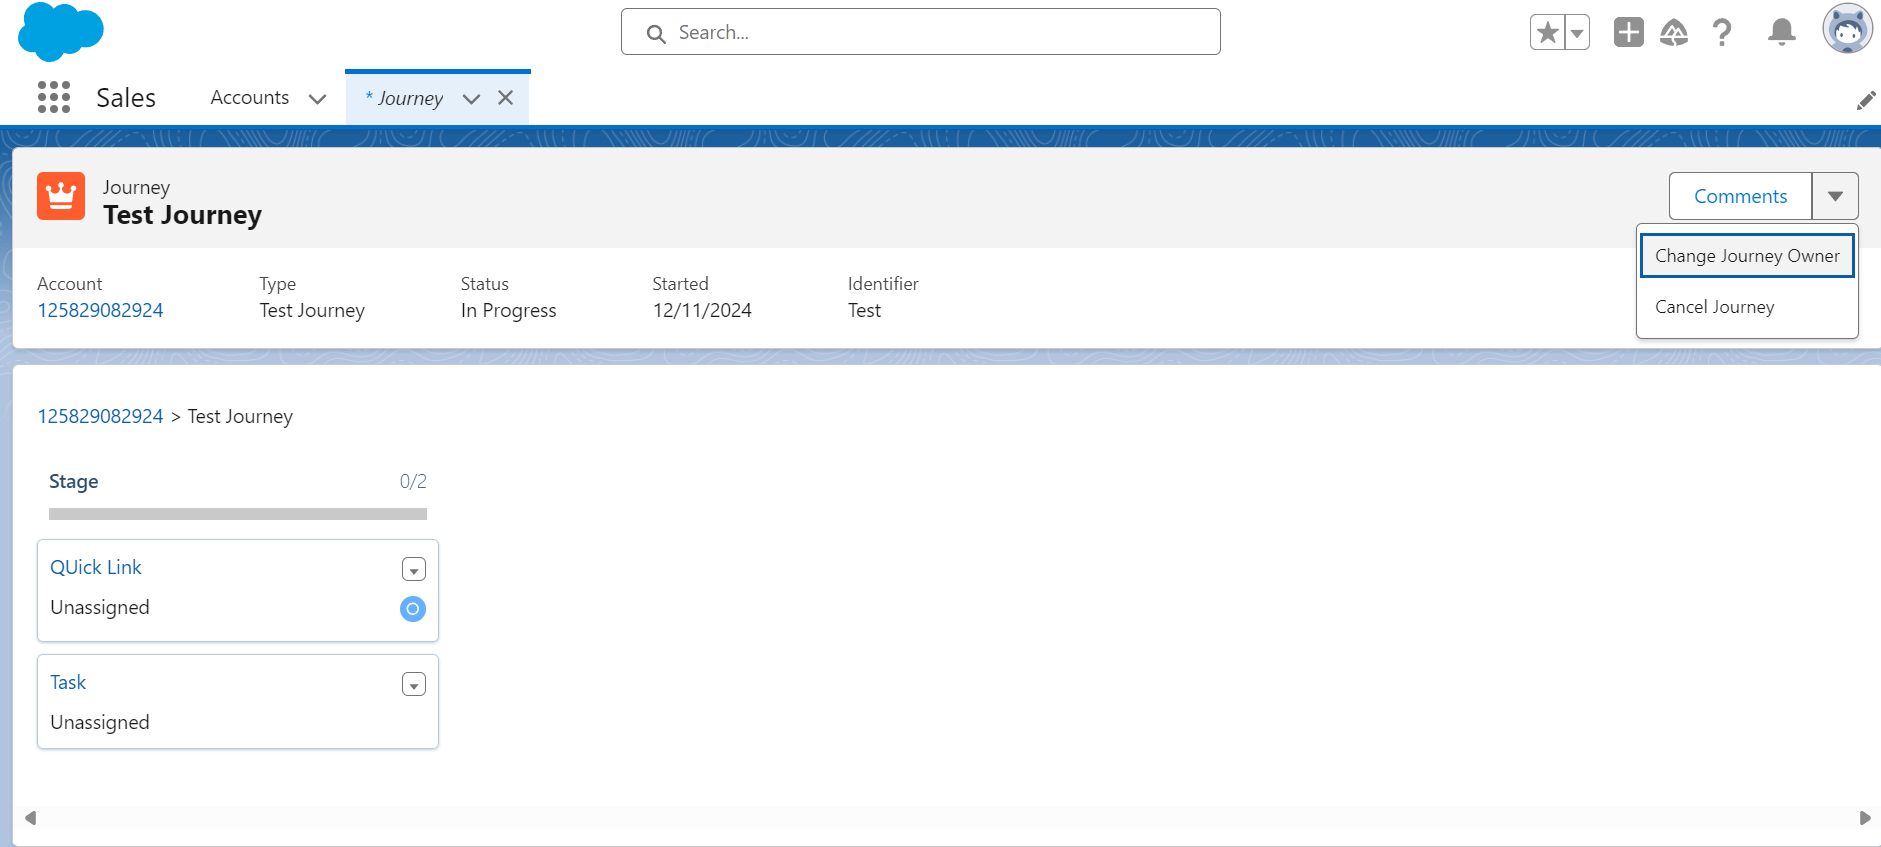
Assigning a Journey Owner:
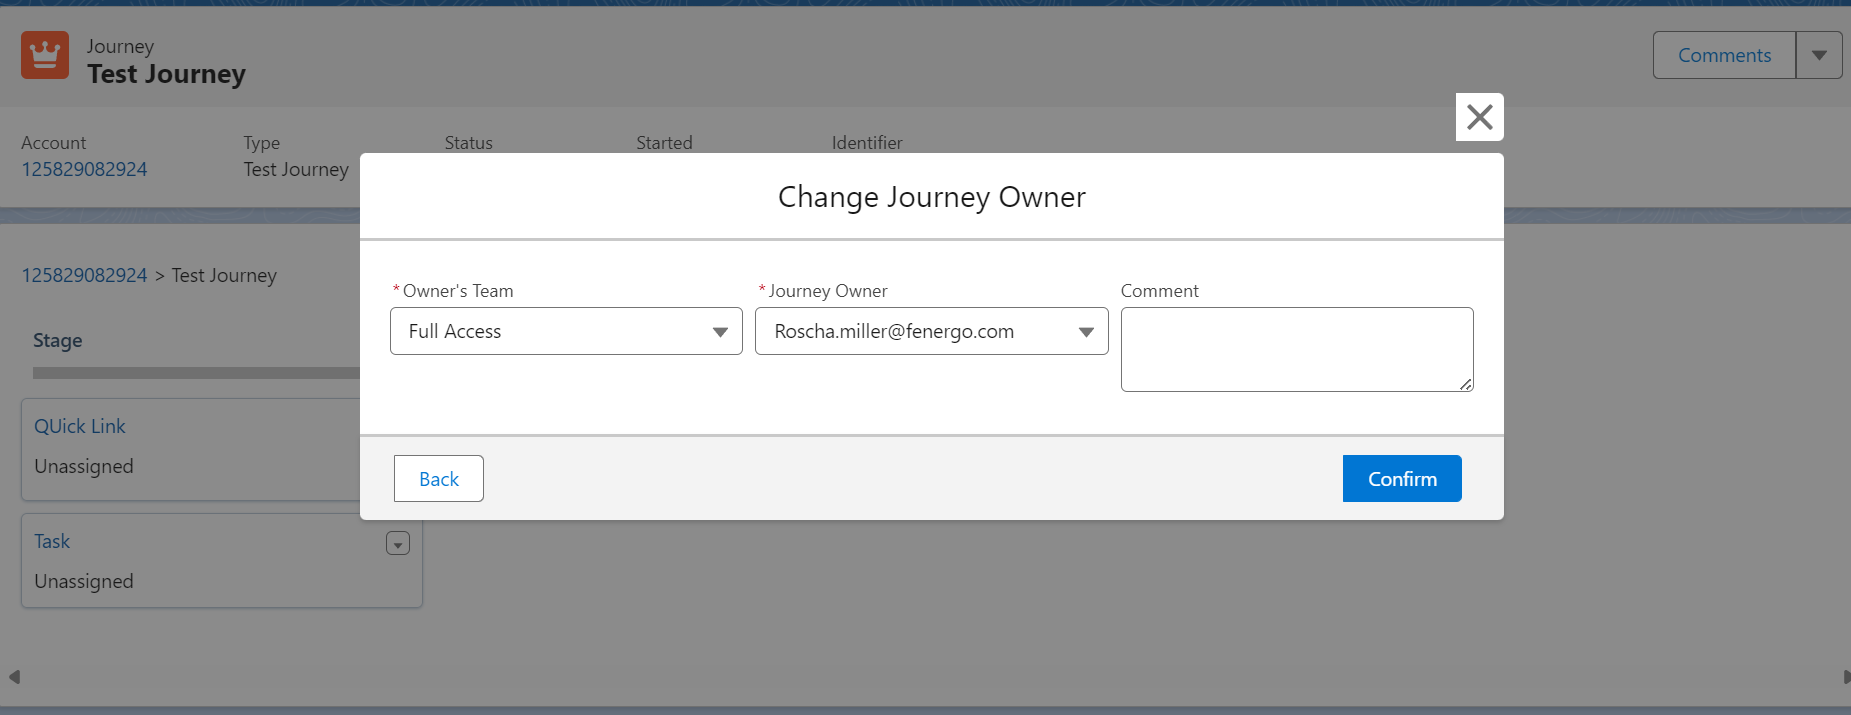
- Within a Journey, users can use the “Change Journey Owner” option, to assign a Journey Owner to a Journey. This option appears upon clicking the chevron to the left of the ‘Comments’ button on the Journey interface. (Comments only available if user has such permissions).
- Once selected, a modal appears, where users can assign the “Owner’s Team” by choosing from a dropdown list containing all the Teams in their tenant. The options available in the “Journey Owner” dropdown will be dynamically filtered based on the selection of the “Owner’s Team”, displaying all users within the selected Team. Both of these fields are mandatory. Users may also leave an optional comment within this modal.
Task Reassignment to the Journey Owner:
- Once the user saves their changes in the modal, any tasks previously assigned to the old Journey Owner in the Journey Builder in Fen-X, are automatically reassigned to the new designated Journey Owner in the Journey Hub.
- To assign the Journey Owner to individual tasks (unassigned or assigned to a Team), users will be able to use the “Assign to” single-select dropdown in the Reassign Task modal. The options within this dropdown will be Team and Journey Owner. The Journey Owner option will only be available if a Journey Owner has been set for the Journey. If a task has been assigned to the "Journey Owner", the "Team" and "Owner" fields should be displayed in the read-only format.
Permission Types:
Reassign Journey Owner and Team:
- Grants users full access to modify both the Journey Owner and Owner's Team fields.
- Users can access the Change Journey Owner option and add comments.
Reassign Journey Owner Only:
- Allows users to modify only the Journey Owner field, with Owner's Team in read-only.
- Users can access the Change Journey Owner option and add comments.
No Reassign Permissions:
- Users without these permissions will see a View Journey Owner option, displaying a read-only modal with Owner's Team, Journey Owner, and comments locked for editing.
Journey Cancellation
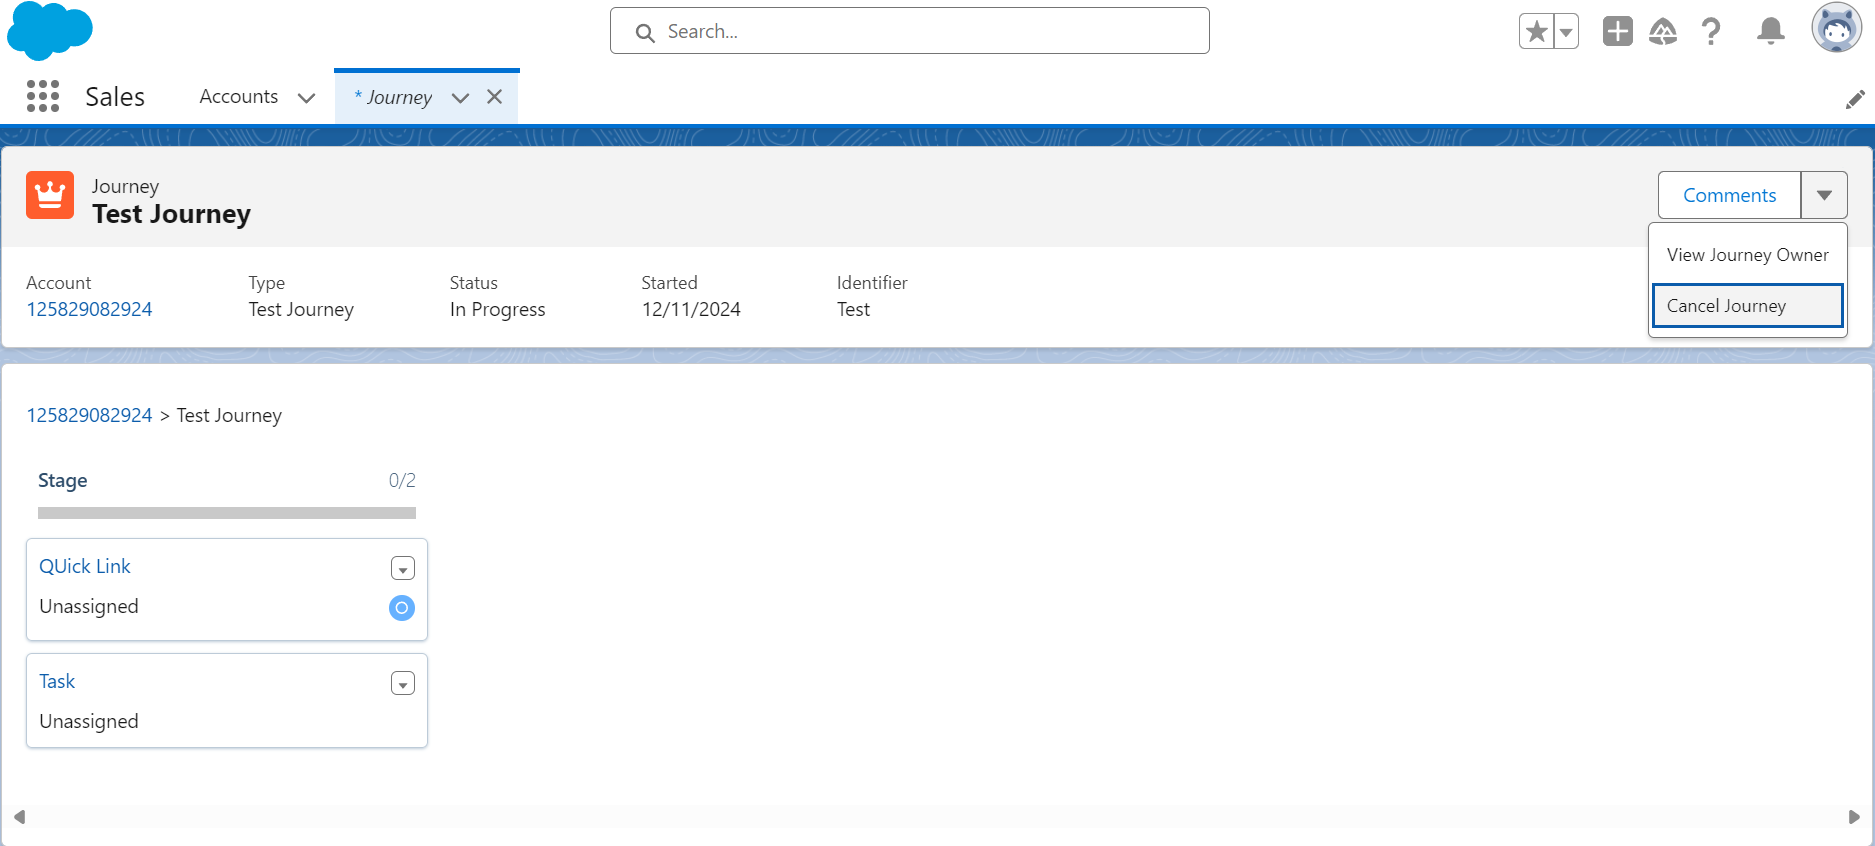
Salesforce users can manually cancel a journey, assuming they have the necessary permissions to do so. When the user clicks on the Context Menu presented in the Journey interface (next to the 'Comments' button), they will see the "Cancel Journey" option. Selecting this option will present the below modal:
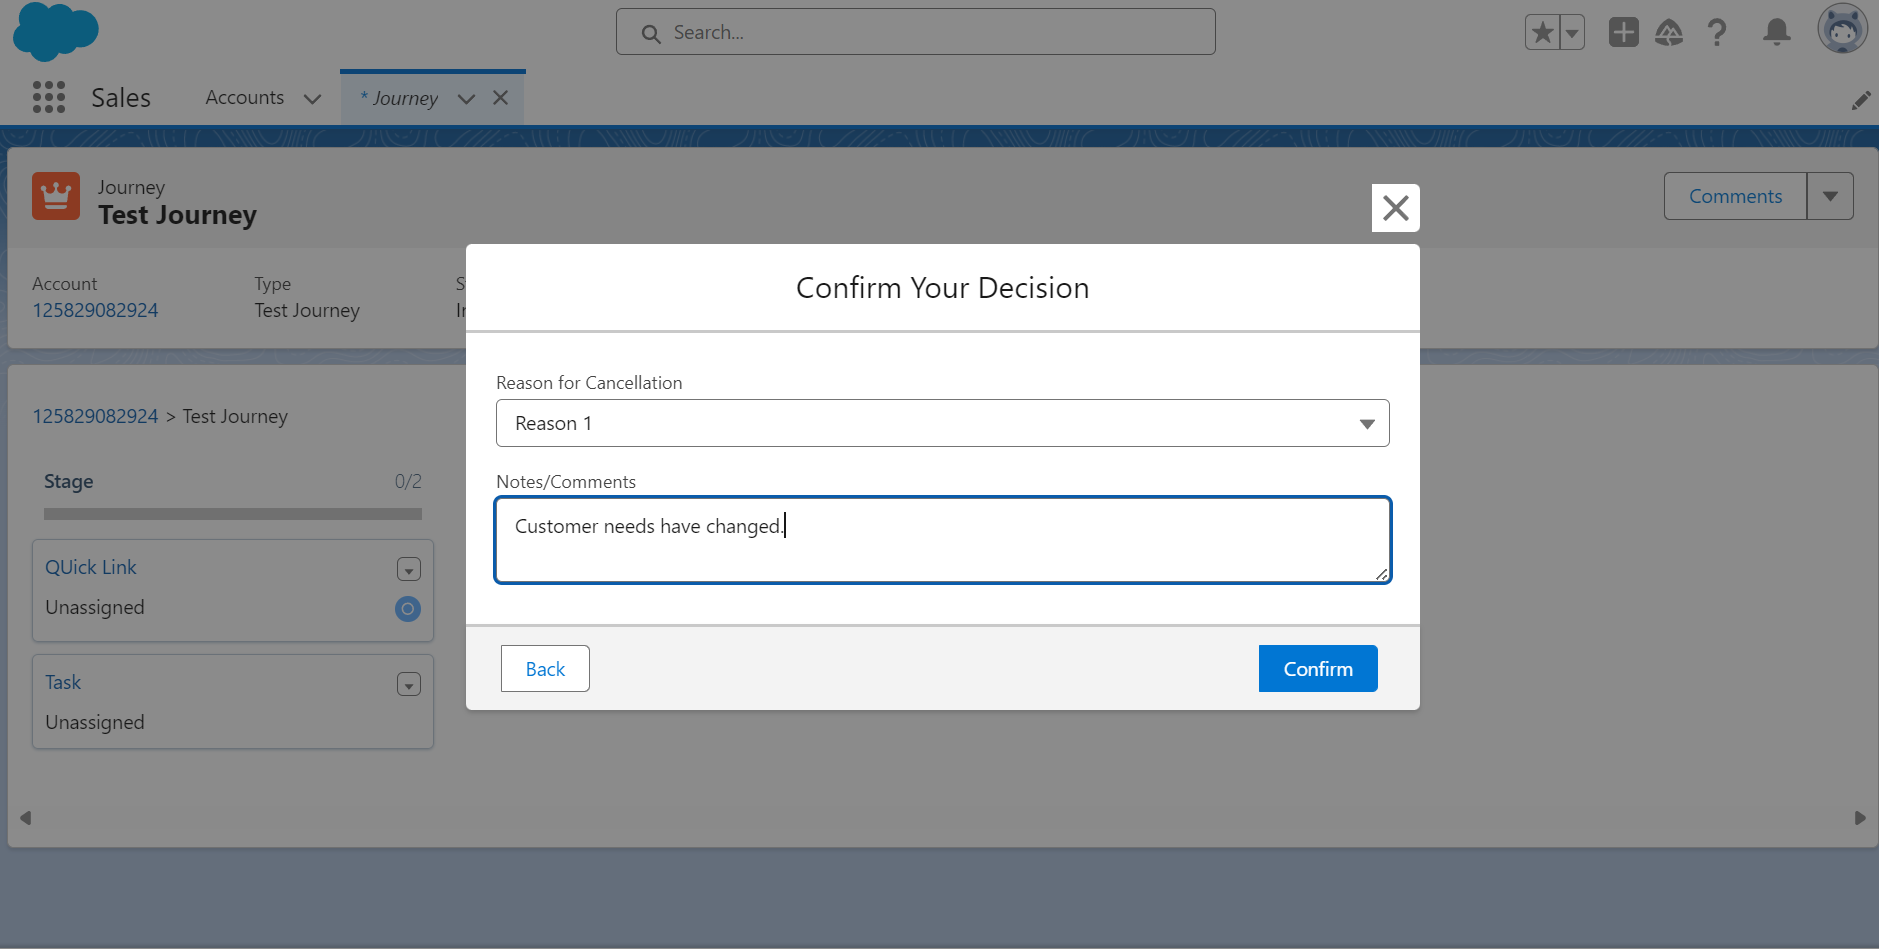
Within this modal, the user can populate a reason for cancellation and capture any additional Notes/Comments on why this Journey was manually cancelled.
When a Journey is cancelled, all in-progress Tasks within the cancelled Journey will display a “Cancelled” chip. There is an option in the Context Menu visible for all Users, titled “Cancellation Details”. This provides a read-only version of the “Reason for Cancellation” modal. Further, the “Reason for Cancellation” dropdown menu is populated with reasons from the “Cancellation Reason” Reference Data List in Fen-X.
In order to view the "Cancel Journey" option within a Journey, users will require the necessary “Journey Cancel” permission. Users without this permission are unable to see or interact with the “Cancel Journey” option.
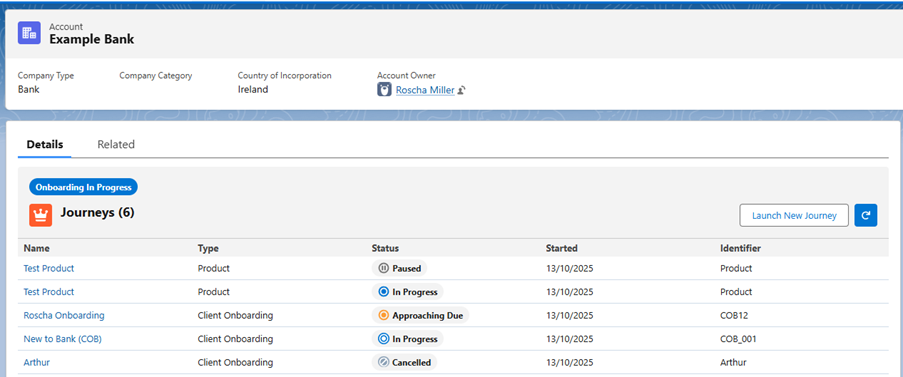
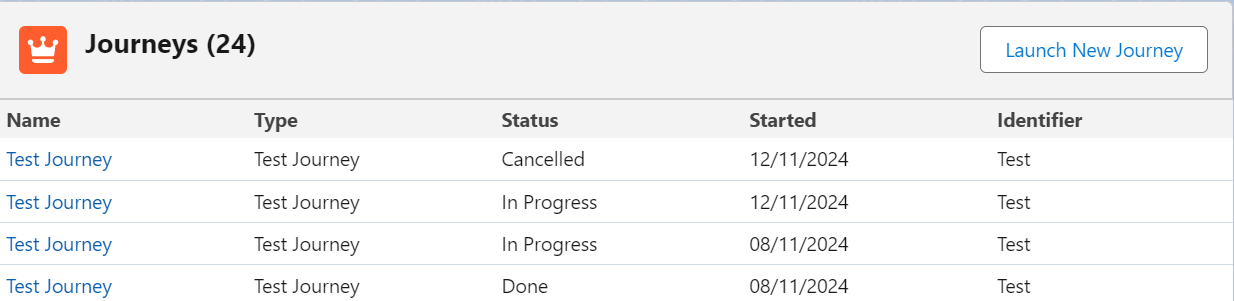
Once a Journey has been cancelled in Salesforce, the Journey’s status will display as “Cancelled” within the “Journeys” section of the account’s profile page. See below:
Fenergo Journey’s Dashboard
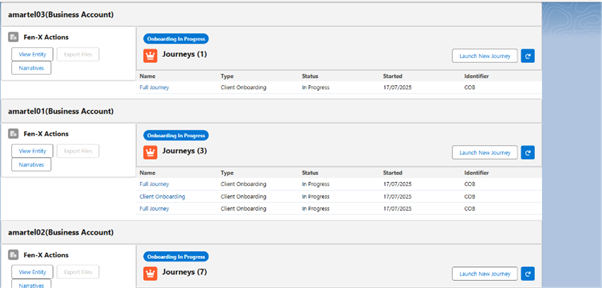
The Fenergo Journeys Dashboard provides Salesforce users with a centralised, real-time view of all Customer Lifecycle Management (CLM) journeys that are mapped to Salesforce accounts. Rather than navigating across multiple pages within Salesforce to track journey progress and ownership, users can view, filter, and take action on journeys from a single location. The dashboard has two tabs:
- My Journeys (default view) — displays in-progress journeys where the logged-in user is the Journey Owner, giving a user a focused view of their own workload. This view is configurable.
- In Progress Journeys — displays all in-progress CLM journeys that the user has permission to view, regardless of ownership.
::Note: The Journeys Dashboard only surfaces journeys for entities that are mapped to Salesforce accounts. Journeys for unmapped entities will not appear. ::
Accessing the Journeys Dashboard
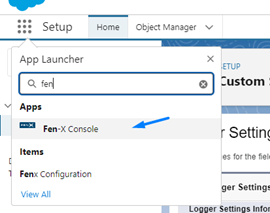
The Journeys Dashboard is accessible from the Salesforce App Launcher.
- Log in to Salesforce.
- Open the App Launcher from the navigation bar.
- Search for or select Fenergo Journeys Dashboard.
The dashboard opens on the My Journeys tab by default, if My Journeys View is toggled on. To navigate into the In Progress Journeys view to see all in progress journeys, just select the In Progress Journeys tab.
Configuring the Journeys Dashboard
The In Progress Journeys tab is hardcoded in Fenergo Journeys Dashboard. To enable My Journeys tab:
- Log in to Salesforce.
- Open the App Launcher from the navigation bar.
- Search for or select Fenergo Configuration.
- Under the App Settings tab, toggle on or off My Journeys View .
- This toggle dictates the view for the whole environment, not just the specific users view.

Dashboard Tabs

My Journeys
The My Journeys tab is the default view when opening the Journeys Dashboard, when it is toggled on. It shows only in-progress journeys where the currently logged-in Salesforce user is assigned as the Journey Owner. This gives users an immediate, focused view of their own active workload without needing to filter the full journey list.
In Progress Journeys
The In Progress Journeys tab displays all active CLM journeys mapped to Salesforce accounts that the user has permission to view, regardless of journey ownership. Each journey is shown as a single row in the journeys grid. Cancelled and completed journeys do not appear in this view. This view shows an extra column of Journey Owner.
The Journeys Grid
The journeys grid is the primary panel on the dashboard. It displays one row per active journey and includes a set of fixed columns.
Dashboard Columns
The following columns appear in the grid by default. The columns (Journey Name, Account, State, Journey Owner, Account Owner) are fixed and cannot be removed or reordered
| Column | Description |
|---|---|
| Journey Name | The name of the CLM journey. Displayed as a hyperlink — click to open the journey directly. |
| Account | The name of the Salesforce Account (entity) associated with the journey. Displayed as a hyperlink — click to open the account record. |
| State | The current state of the journey, displayed as a chip (e.g. In Progress, Blocked – Awaiting Client Input). Click the chip to update the journey state. State options are configurable in Fenergo reference data. |
| Journey Owner | The Fenergo user currently responsible for the journey. |
| Account Owner | The Salesforce user who owns the linked account. |
| Journey Type | The type of journey (Client Onboarding or KYC Review). |
Searching and Filtering
Salesforce users can search by keyword in the search bar.
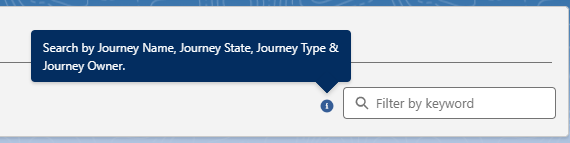
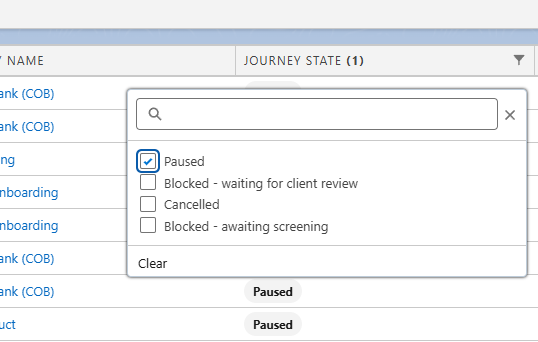
Please note that the search bar is only available when no rows are selected. To filter, users can select the filter icon in the relevant rows and either select or search for their desired filter.

Journey Comments from the Dashboard
Journey comment functionality is supported directly from the grid. Now instead of users having to enter a journey to leave a comment, they can just select the comment icon on the journey row.
Journey Actions
The Journeys Dashboard allows user to action Journeys from this centralised location. Each journey row has a checkbox on the left-hand side. Selecting a checkbox highlights the row and marks it as selected. When at least one journey is selected, an Actions button appears in the top right of the grid, replacing the search bar.

This allows the user to make bulk or individual journey actions. The dashboard updates automatically to reflect the change. Deselecting all journeys returns the search bar to view.
The available actions are:
- Change Journey Owner: Selecting Change Journey Owner from the Actions dropdown opens a modal where you can select the new journey owner. The list of available owners is drawn from the team member configuration in Fenergo. Once confirmed, the change is reflected in both the journey and the dashboard.
- Change Account Owner: Selecting Change Account Owner opens a modal where you can select the new account owner from a pre-defined list of Salesforce users. Once confirmed, the change is reflected in both the Salesforce account and the dashboard.
- Change Journey State: Selecting Change Journey State opens a modal where you can choose an updated state from the available options. Journey state options are configurable by your organisation in Fenergo reference data (for example, In Progress, Blocked, Blocked – Awaiting Client Input). Once selected, the state chip on the journey row updates to reflect the new state.
::Note:
A user requires all relevant permissions for Changing Journey Owner, Journey State (Fenergo permissions) and Account Owner (Salesforce permission) in order to make any of these actions in the grid.
::
Client Offboarding
Client Offboarding journeys are used to partially or fully “offboard” policies and clients in reflection of changes to their business relationship. For example, exiting a region or ending the relationship. Salesforce now supports both full and partial client offboarding journeys. For more detailed information on Fenergo's Client Offboarding, please visit: Client Offboarding
Please continue reading to learn more about launching these journeys within Salesforce.
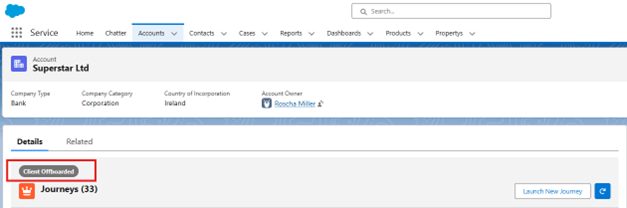
Full Offboarding
To initiate full offboarding, the entity must have been fully onboarded. The “Client” chip confirms that the entity has client status and has been fully onboarded.

- Navigate to the Launch New Journey button.
- The Launch New Journey modal will display.
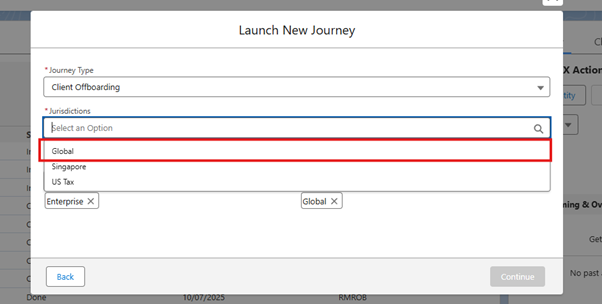
- Journey Type: Client Offboarding.
- Once selected, the Jurisdictions dropdown will appear.
- To fully offboard a client, select Global (Full Offboarding) from the dropdown menu.
- Once the Complete Client Offboarding task has completed, a chip labeled Client Offboarded will display on the entity profile page, Client Offboarded.
Users will not be able to select any additional jurisdictions when Global is selected, as it fully offboards all jurisdictions.
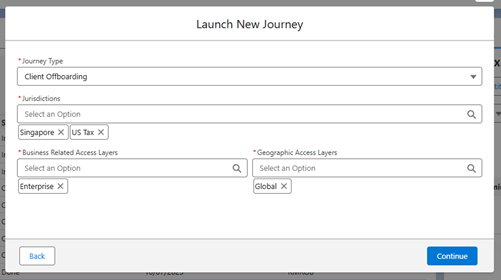
Partial Offboarding
The Partial Offboarding capability allows a user to offboard specific jurisdictions. For example, a client exiting the Irish region can offboard only Ireland while keeping other regions in scope.
- Navigate to the Launch New Journey button.
- The Launch New Journey modal will display.
- Journey Type: Client Offboarding.
- Once selected, the Jurisdictions dropdown will appear.
- To partially offboard, select one or more non-global jurisdictions from the dropdown menu.
The entity will retain its Client Chip, indicating the client is still active in at least one jurisdiction, unlike full offboarding.
Reonboarding
Clients with offboarded jurisdictions (full or partial) are eligible to launch ReOnboarding Journeys to transition selected policies from Offboarded to In Scope status. As long as there is at least one offboarded jurisdiction, a ReOnboarding journey can be launched.
- Navigate to the Launch New Journey button.
- The Launch New Journey modal will display.
- Journey Type: Client ReOnboarding.
- Once selected, the Jurisdictions dropdown will appear.
- Select Global (for full) or any specific jurisdictions (for partial) to reonboard.
Chips Support
Most of the chips supported in Salesforce mirror the chips found on the Fenergo Platform.
For more information on chips and their meaning, please visit Fenergo's Entity Profile Documentation
File Export
From the Fen-X Actions a Salesforce user can export files (max size 5MB) captured on the account in Salesforce to the entity in Fenergo SaaS.
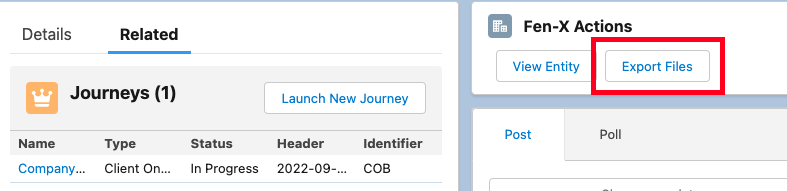
The Export Files button will be disabled if no files are captured on the account. On adding the first file to the account the user will need to refresh the page for the Export Files button to be enabled.
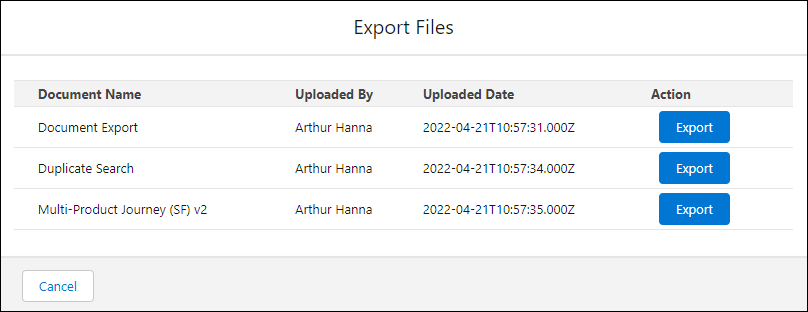
On selecting Export Files, the Export Files popup will be displayed. This will list all documents captured on the account in Salesforce and on selecting Export against a record the file will be exported to Fenergo SaaS. To export the document type must be provided. The list of values in the document type dropdown are defined in Fenergo SaaS. The Export Files document dropdown list can be alphabetized.
Once exported a success confirmation message will be displayed and the Export button will be disabled for that record.
On closing Export Files if the user then reopens the popup there is no indicator to show which files have been previously exported and the user will be able to export the file again.
Localisation
Localisation enables the Fenergo Salesforce app to be translated into different languages, so that users in non-English speaking countries can access their tenants in their preferred languages. This could even be leveraged to convert the existing English system language in the app to client specific terms if required. The Localisation domain in Fenergo SaaS contains all available language packs for the tenants, as well as the configuration tool that is used to create and maintain the language packs.
Salesforces uses the API's available to retrieve the translations from Fenergo SaaS to translate the app. Any specific text strings unique to the Fenergo Salesforce app can be added to the translation file in Fenergo SaaS, translated and will be available for use in the Salesforce app.
The language that the Fenergo Salesforce app is displayed in is based on the user setting in the My Profile area in Fenergo SaaS and/or the tenant default language. For further info on the localisation feature, refer to the Localisation User Guide.
Business Narratives
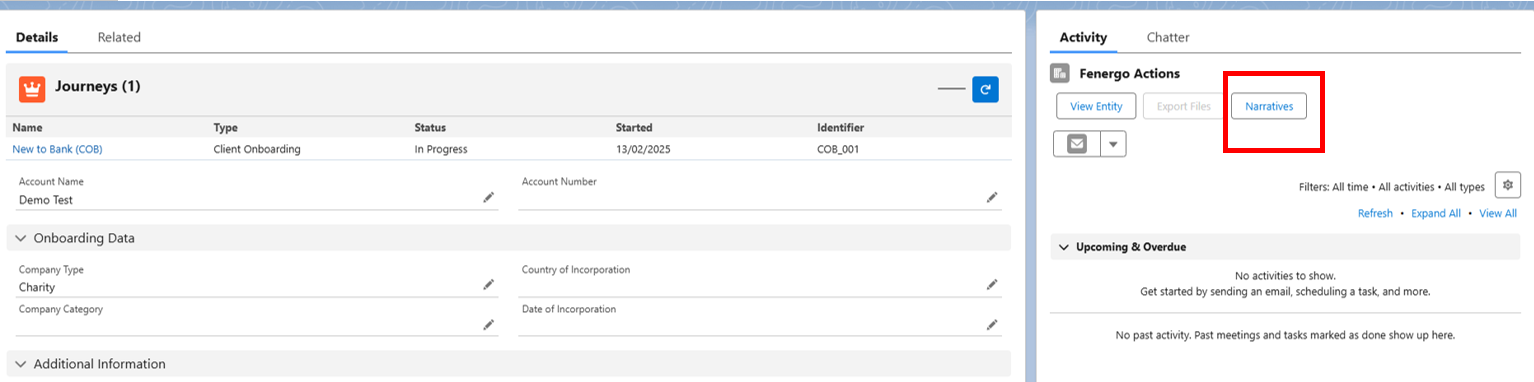
This enhancement allows users to add and maintain detailed notes on client records from the Entity Profile Page in Salesforce, without creating a journey. Narratives have role-based permissions, ensuring that only authorised users can view, create, edit or delete them. This feature allows for two-way real-time communication between Salesforce and Fen X.
Users can access Narratives by clicking on the Narratives button on the Entity Profile Page.
After clicking on the Add button in the top right-hand corner, a pop-up page is displayed where the user can create and format the narrative with text, tables, and links.
Images are not supported:
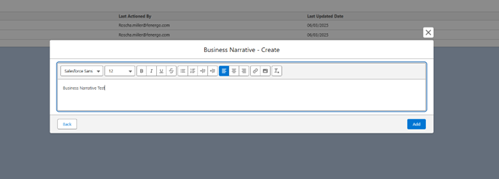
Users can view, edit and delete the business narratives from the Business Narratives grid. They can also see who the narrative was last actioned by and the date it was last updated.
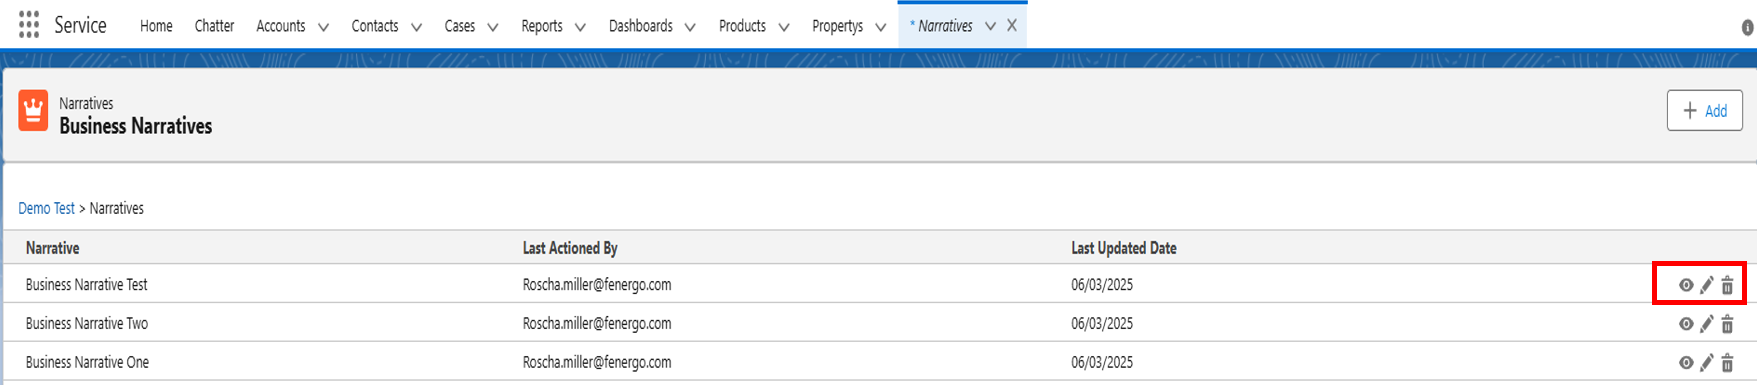
Required Permissions for Business Narratives
- Business Narratives Access - Users with thse permissions can access Business Narratives.
- View Access - Users can view the narrative in a pop-up page by clicking on the eye icon.
- Create Access - Users can use the ‘Add’ button to create new Business Narratives if they have ‘Create’ permissions.
- Edit Access - Users with ‘Edit’ permissions can modify existing narratives using the pencil icon.
- Delete - Users with ‘Delete’ permissions can remove narratives by clicking on the bin/trash icon.
Multiple Journey Lists for Multiple Accounts
Given there is a list of multiple accounts, in order to display a journey list for each account, the requirement is to pass the list of account IDs to the component j-related-list. The public property is called accountIds.
Example of the expected value:
["accountRecordId1","accountRecordId2","accountRecordId3"]
Multiple Salesforce Orgs - Single Fenergo Tenant
To configure multiple Salesforce orgs to a single fenergo tenant, please install the app on both orgs and follow the steps outlined in the installation guide. Please note that multiple Fenergo Tenants to a single Salesforce org is not currently supported.
Important points to be aware of
Webhook limits:
- A webhook is required to be setup for each Salesforce org. There is a limit of 10 webhooks currently supported in Fenergo
New Request:
- Each Salesforce org can link an account to a single Fenergo entity
- Restricting this linkage is not possible through our Salesforce app. Project teams need to investigate implementing access layers and security permissions.
Launch New Journey:
- If an entity is linked to both Salesforce orgs, new journeys can be initiated in both.
- Users can view data in a journey unless access layers are enforced.
Custom Metadata Configuration:
- Configuration needs to be applied to each Salesforce tenant.
Data Sync Fen X -> SF:
- Updates will be sent to each Salesforce org.
- If a linked account is identified, the Salesforce account will be updated.
- If no linked account is identified, no update will occur.
Post Chatter Message:
- Updates will be sent to each Salesforce org.
- If a linked account is identified, a Chatter message will be posted.
- If no linked account is identified, no Chatter message will be posted.
Salesforce App Permissions
- FenX Admin: This controls access to FenX configuration area
- FenX Standard: This is the basic permission that all users need to use the Salesforce for Fenergo app.
- FenX Webhook: The site guest user requires this permission for webhooks to work
The following permissions are not required and can be ignored by clients:
- FenX Logger Admin
- FenX Logger End User
- FenX Logger Log Creator
- FenX Log Viewer
Troubleshooting using apex logs
- Go to Setup > Custom Settings
- Manage the Logger Settings
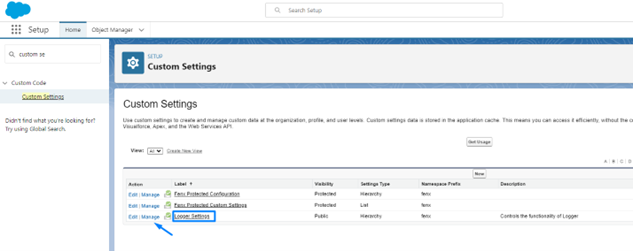
- Edit

- Define the log level
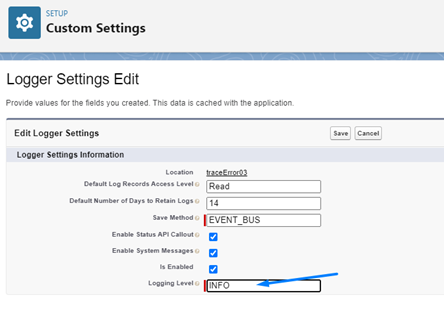
INFO should be the default value, not recommended to change this in PROD, but in lower environments its very useful to set the level to DEBUG to troubleshoot.
After reproducing the issue you would like to debug go to check the new logs
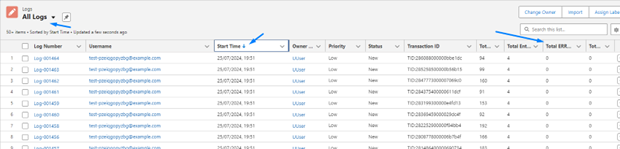
Display all logs, order by date so its easy to check the latest logs, look for the entry where the total errors is more than 0. The logs that appear before this one are very helpful to troubleshoot the error, they describe what app did just before the error so this information is very valuable. Clicking on the log number it will take you to the log entries.
Example:
| Time | Logs | Relevant? |
|---|---|---|
| 14:25 | Log-009 (2 log entries, 1 error message displayed) | YES |
| 14:25 | Log-008 (14 log entries) | YES |
| 14:24 | Log-007 (24 log entries) | YES |
| 14:05 | Log-006 (5 log entries) | NO, log entries not relevant for troubleshooting the issue as they were created 20 minutes before the error |
Total: 2+14+24 log entries relevant to analyze.
Webhook Events
- Entity Data Draft Verified - This allows for data to be sourced fromFenergo back to Salesforce on completion of the verify Entity task
- Journey Instance Started - This sends a chatter notification to indicate a journey has started
- Journey Instance Completed - This sends a chatter notification to indicate a journey has completed
- Journey Task Started - This sends a chatter notification to indicate a task has started
- Journey Task Completed - This sends a chatter notification to indicate a task has completed
- Journey Task Reassigned - This sends a chatter notification to indicate a task is reassigned
- Journey Instance Cancelled - This sends a chatter notification to indicate a journey has been cancelled
- Comments Comment Posted - This sends a chatter notification when a comment is posted in Fenergo with #salesforce included in the comment
Increase Document File Size
- Update the customer metadata file Increase file upload limit to increase the file size from false to true
- To enable this, the configurator needs to set one configuration in their Salesforce Org
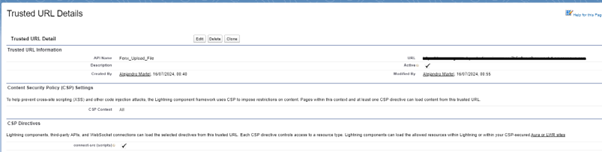
- Add a Trusted URL pointing to the antivirus scan URL.
- Find the URL in the remote site settings under ProductionVirusScan.
- Copy this URL and paste it as a new Trusted URL.
- Before saving, check the box labelled connect-src.
The file size upload limit is extended to 200mb.